Inglis I4TXCGFXQ00 Owner's manual

Category
Fridges
Type
Owner's manual
REFRIGERATORUSE &CAREGUIDE
/ /
GUIDED'UTILISATIONETffENTRETIENDUREFRIGERATEUR
TableofContents/Tabledesmatibres
ASSISTANCE OR SERVICE ............................. 1
REFRIGERATOR SAFETY ............................... 1
INSTALLATION INSTRUCTIONS .................... 2
REFRIGERATOR USE ...................................... 9
REFRIGERATOR CARE ................................. 10
TROUBLESHOOTING .................................... 11
WAR RANTY .................................................... 13
ASSISTANCE OU SERVICE ........................... 14
SECURITE DU REFRIGERATEUR ................ 14
INSTR UCTIONS D'INSTALLATION .............. 15
UTILISATION DU RleFRIGleRATEUR ............ 23
ENTRETIEN DU RleFRIGleRATEUR .............. 25
DlePAN NAG E .................................................. 26
GARANTIE ....................................................... 26
Assistance or Service
If you need assistance or service, first see the "Troubleshooting"
section. Additional help is available by calling f-800-807-6777,
or write:
Whirlpool Canada LP
Customer Interaction Centre
1901 Minnesota Court
Mississauga, Ontario L5N 3A7
Information may also be obtained by visiting our website at
www.inglis.ca.
Please include a daytime phone number in your correspondence.
Keep this book and your sales slip together for future
reference. You must provide proof of purchase or installation
date for in-warranty service.
Write down the following information about your appliance to help
you obtain assistance or service if you ever need it. You will need
to know your complete model number and serial number. You can
find this information on the model and serial number label, located
on the inside wall of the refrigerator compartment.
Dealer name
Serial number
Address
Phone number
Model number
Purchase date
REFRIGERATORSAFETY
Your safety and the safety of others are very important.
We have provided many important safety messages in this manual and on your appliance. Always read and obey all safety
messages.
This is the safety alert symbol.
This symbol alerts you to potential hazards that can kill or hurt you and others.
All safety messages will follow the safety alert symbol and either the word "DANGER" or "WARNING."
These words mean:
You can be killed or seriously injured if you don't immediately
follow instructions.
You can be killed or seriously injured if you don't follow
instructions.
All safety messages will tell you what the potential hazard is, tell you how to reduce the chance of injury, and tell you what can
happen if the instructions are not followed.
2316213
iMPORTANT SAFETY iNSTRUCTiONS
WARNING: To reduce the risk of fire, electric shock, or injury to persons when using the refrigerator, follow basic precautions,
including the following:
Plug into a grounded 3 prong outlet.
Do not remove ground prong.
Do not use an adapter.
Do not use an extension cord.
Disconnect power before servicing.
Replace all parts and panels before operating.
Remove doors from your old refrigerator.
Use nonflammable cleaner.
Keep flammable materials and vapors, such as gasoline,
away from refrigerator.
Use two or more people to move and install refrigerator.
Disconnect power before installing ice maker (on ice maker
kit ready models only).
SAVE THESE INSTRUCTIONS
Proper Disposal of Your Old Refrigerator
Suffocation Hazard
Remove doors from your old refrigerator.
Failure to do so can result in death or brain damage.
IMPORTANT: Child entrapment and suffocation are not problems
of the past. Junked or abandoned refrigerators are still dangerous
- even if they will sit for "just a few days." Ifyou are getting rid of
your old refrigerator, please follow these instructions to help avoid
accidents.
Before You Throw Away Your Old Refrigerator or Freezer:.
Take off the doors.
Leave the shelves in place so that children may not easily
climb inside.
J
INSTALLATIONINSTRUCTIONS
Excessive Weight Hazard
Use two or more people to move and install
refrigerator.
Failure to do so can result in back or other injury.
Remove the Packaging
Do not use sharp instruments, rubbing alcohol, flammable fluids,
or abrasive cleaners to remove tape or glue. These products can
damage the surface of your refrigerator. For more information, see
"Refrigerator Safety."
IMPORTANT: Do not remove the white foam air return insert from
behind the control panel on the ceiling of the refrigerator. If the
insert is removed, ice may migrate down from the freezer and
cause icicles to form.
When Moving Your Refrigerator:
Your refrigerator is heavy. When moving the refrigerator
for cleaning or service, be sure to protect the floor.
Always pull the refrigerator straight out when moving it.
Do not wiggle or "walk" the refrigerator when trying to move
it, as floor damage could occur.
Clean Before Using
After you remove all of the package materials, clean the inside of
your refrigerator before using it. See the cleaning instructions in
"Refrigerator Care."
Important information to know about glass shelves
and covers:
Do not clean glass shelves or covers with warm water when
they are cold. Shelves and covers may break if exposed to
sudden temperature changes or impact, such as bumping.
For your protection, tempered glass is designed to shatter
into many small, pebble-size pieces. This is normal. Glass
shelves and covers are heavy. Use special care when
removing them to avoid impact from dropping.
Explosion Hazard
Keep flammable materials and vapors, such as
gasoline, away from refrigerator.
Failure to do so can result in death, explosion, or fire.
To ensure proper ventilation for your refrigerator, allow for a 1/211
(12.70 mm) space on each side. Allow 3" (7.5 cm) of space
between overhead cabinets and refrigerator top. Allow at least 1"
(25.40 mm) between back of cabinet and the wall. Ifyour
refrigerator has an ice maker, make sure you leave some extra
space at the back for the water line connections.
If you are installing your refrigerator next to a fixed wall, leave
2" (5.08 cm) minimum on the hinge side (depending on your
model) to allow for the door to swing open.
Level the refrigerator. See "Adjust the Doors."
NOTE: It is recommended that you do not install the refrigerator
near an oven, radiator, or other heat source. Do not install in a
location where the temperature will fall below 55°F (13°C).
3" (7.5crn) / °_
U
II I
_11I
/
/
2"(5.08cm)
Electrical Shock Hazard
Plug into a grounded 3 prong outlet.
Do not remove ground prong.
Do not use an adapter.
Do not use an extension cord.
Failure to follow these instructions can result in death,
fire, or electrical shock.
Before you move your refrigerator into its final location, it is
important to make sure you have the proper electrical connection.
Recommended Grounding Method
A 115 Volt, 60 Hz., AC only 15- or 20-amp fused, grounded
electrical supply is required. It is recommended that a separate
circuit serving only your refrigerator be provided. Use an outlet
that cannot be turned off by a switch. Do not use an
extension cord.
NOTE: Before performing any type of installation, cleaning, or
removing a light bulb, turn the control (Thermostat, Refrigerator or
Freezer Control depending on the model) to OFF and then
disconnect the refrigerator from the electrical source. When you
are finished, reconnect the refrigerator to the electrical source and
reset the control (Thermostat, Refrigerator or Freezer Control
depending on the model) to the desired setting.
Read all directions before you begin.
IMPORTANT:
If you turn the refrigerator on before the water line is
connected, turn the ice maker OFR
All installations must meet local plumbing code requirements.
Use copper tubing and check for leaks. Install copper tubing
only in areas where the household temperatures will remain
above freezing.
TOOLS NEEDED: Flat-blade screwdriver, 7/1611and 1/211open-end
wrenches or 2 adjustable wrenches, 1/4"nut driver and drill bit,
hand drill or electric drill (properly grounded). Gather the required
tools and parts before starting installation. Read and follow the
instructions provided with any tools listed.
NOTE: Your refrigerator dealer has a kit available with a 1/4"
(6.35 mm) saddle-type shutoff valve, a union, and copper tubing.
Before purchasing, make sure a saddle-type valve complies with
your local plumbing codes. Do not use a piercing-type or 3/_6"
(4.76 mm) saddle valve which reduces water flow and clogs more
easily.
Water Pressure
A cold water supply with water pressure of between 30 and
120 psi (207-827 kPa) is required to operate the ice maker. If you
have questions about your water pressure, call a licensed,
qualified plumber.
Reverse Osmosis Water Supply
If a reverse osmosis water filtration system is connected to your
cold water supply, the water pressure to the reverse osmosis
system needs to be a minimum of 40 to 60 psi (276 - 414 kPa).
If the ice maker is still not operating properly:
Check to see whether the sediment filter in the reverse
osmosis system is blocked. Replace the filter if necessary.
Allow the storage tank on the reverse osmosis system to refill
after heavy usage.
If you have questions about your water pressure, call a licensed,
qualified plumber.
8. Place the free end of the tubing in a container or sink, and turn
ON the main water supply. Flush the tubing until water is clear.
Turn OFF the shutoff valve on the water pipe. Coil the copper
tubing.
Connect to Refrigerator
NOTE: On kit models, assemble water valve to refrigerator per kit
instructions.
Style 1
1. Unplug refrigerator or disconnect power.
2. Attach the copper tube to the valve inlet using a compression
nut and sleeve as shown. Tighten the compression nut. Do not
overtighten.
3. Use the tube clamp on the back of the refrigerator to secure
the tubing to the refrigerator as shown. This will help avoid
damage to the tubing when the refrigerator is pushed back
against the wall.
4. Turn shutoff valve ON.
5. Check for leaks. Tighten any connections (including
connections at the valve) or nuts that leak.
Read all directions before you begin.
IMPORTANT: Ifyou turn the refrigerator on before the water line is
connected, turn the ice maker OFR
Connect to Water Line
1. Unplug refrigerator or disconnect power.
2. Turn OFF main water supply. Turn ON nearest faucet long
enough to clear line of water.
3. Locate a 1/2"to 11/4'' (1.27 cm to 3.18 cm) vertical cold water
pipe near the refrigerator.
IMPORTANT:
4.
5=
Make sure it is a cold water pipe.
Horizontal pipe will work, but drill on the top side of the
pipe, not the bottom. This will help keep water away from
the drill and normal sediment from collecting in the valve.
Determine the length of copper tubing you will need. Measure
from the connection on lower left rear of refrigerator to the
water pipe. Add 7 ft (2.1 m) to allow for cleaning. Use 1/4"
(6.35 mm) O.D. (outside diameter) copper tubing. Be sure both
ends of copper tubing are cut square.
Using a grounded drill, drill a 1/4"hole in the cold water pipe
you have selected.
G B
F E D v
A. Cold waterpipe E.Compression sleeve
B. Pipe clamp F. Shutoff valve
C. Copper tubing G.Packingnut
D. Compressionnut
6. Fasten the shutoff valve to the cold water pipe with the pipe
clamp. Be sure the outlet end is solidly in the 1/4"drilled hole in
the water pipe and that the washer is under the pipe clamp.
Tighten the packing nut. Tighten the pipe clamp screws slowly
and evenly so washer makes a watertight seal. Do not
overtighten or you may crush the copper tubing.
7. Slip the compression sleeve and compression nut on the
copper tubing as shown. Insert the end of the tubing into the
outlet end squarely as far as it will go. Screw compression nut
onto outlet end with adjustable wrench. Do not overtighten.
A
B
6=
A. Tube clamp
B. Copper tubing
C. Compression nut
D. Valve inlet
The ice maker is equipped with a built-in water strainer. Ifyour
water conditions require a second water strainer, install it in
the 1/4"(6.35 mm) water line at either tube connection. Obtain
a water strainer from your nearest appliance dealer.
Style 2
1. Unplug refrigerator or disconnect power.
2. Disconnect the tube clamp on the back of the product and
insert the copper tubing through the clamp as shown.
3. Attach the copper tube to the valve inlet using a compression
nut and sleeve as shown.
4. Tighten the compression nut. Do not overtighten. Reattach the
tube clamp and tube to the back of the cabinet.
B
A. Tubeclamp C. Compressionnut
B. Copper tubing
5. Turn shutoff valve ON. Check for leaks. Tighten any
connections (including connections at the valve) or nuts that
leak.
6. The ice maker is equipped with a built-in water strainer. Ifyour
water conditions require a second water strainer, install it in
the 1/4"(6.35 mm) water line at either tube connection. Obtain
a water strainer from your nearest appliance dealer.
Completethe Installation
Electrical Shock Hazard
Plug into a grounded 3 prong outlet.
Do not remove ground prong.
Do not use an adapter.
Do not use an extension cord,
Failure to follow these instructions can result in death,
fire, or electrical shock.
Plug into a grounded 3 prong outlet.
NOTE: Allow 24 hours to produce the first batch of ice. Discard
the first three batches of ice produced. Allow 3 days to completely
fill ice container.
TOOLS NEEDED: %6"hex-head socket wrench, #2 Phillips
screwdriver, flat-blade screwdriver, %6" open-end wrench, flat
2" putty knife.
IMPORTANT:
Before you begin, turn the refrigerator control OFE Unplug
refrigerator or disconnect power.
Remove food and adjustable door or utility bins from doors.
If you are only removing and replacing the doors, see the
"Remove Doors and Hinges" and "Replace Doors and
Hinges" sections.
Depending on your model, you may have standard (Style 1) or
contoured (Style 2) doors. If you are also going to reverse the
door swing, follow the instructions for the appropriate door
style.
Remove Doors and Hinges
"5/16"Hex-Head Hinge Screw
1. Unplug refrigerator or disconnect power.
2. Close the refrigerator door and keep both doors closed until
you are ready to lift them free from the cabinet.
NOTE: Provide additional support for the doors while the
hinges are being moved. Do not depend on the door magnets
to hold the doors in place while you are working.
3. Remove the parts for the top hinge as shown in Top Hinge
graphic. Lift the freezer door free from the cabinet.
4. Remove the parts for the center hinge as shown in the Center
Hinge graphic. Lift the refrigerator door free from the cabinet.
5. Remove the parts for the bottom hinge as shown in the
Bottom Hinge graphic.
Reverse Doors (optional)
IMPORTANT: If you want to reverse your doors so that they open
in the opposite direction, follow these steps. Ifyou are not
reversing the doors, see "Replace Doors and Hinges."
Style I - Standard
Graphics follow these instructions.
DoorStop Screw
DoorHandle Sealing Screw
Flat-Head Handle Screw
DoorHinge Hole Plug
Cabinet Hinge Hole Plug
Door Handle Screw Cover
Door Handle Seal Screw Front Round-Head Handle Screw
Cabinet
1. Remove %6" hex-head hinge screws from handle side and
move them to opposite side. See Graphic 1-1.
2. Remove cabinet hinge hole plugs from cabinet top and
move them to opposite side hinge holes as shown.
See Graphic 1-2.
Freezer door
f. Remove freezer handle assembly as shown. Keep all parts
together. See Graphic 2.
2. Remove door hinge hole plug. Move to opposite side as
shown. See Graphic 3.
3. Remove door handle sealing screws. Move to opposite side of
freezer door as shown. See Graphic 4.
4. Remove door stop. Move to opposite side of freezer door as
shown. See Graphic 5.
5. Position freezer handle on opposite side of freezer door.
Assemble handle on door as shown. See Graphic 2.
6. Tighten all screws. Set aside door until hinges and refrigerator
compartment door are in place.
Refrigerator door
f. Remove the screw cover. See Graphic 6.
2. Remove refrigerator handle assembly as shown. Keep all
parts together. See Graphic 6.
3. Remove door hinge hole plug from refrigerator door. Move to
opposite side hinge hole as shown. See Graphic 3.
4. Remove door handle sealing screws. Move to opposite side of
refrigerator door as shown. See Graphic 4.
5. Remove door handle seal screw front. Move to opposite side
of refrigerator door as shown. See Graphic 7.
6. Remove door stop. Move to opposite side of refrigerator door
as shown. See Graphic 5.
7. Position refrigerator handle on opposite side of the refrigerator
door as shown. See Graphic 6. Drive top two screws in handle
first. Align lower portion of handle and drive bottom screw.
8. Replace screw cover. See Graphic 6.
9. Tighten all screws. Set aside refrigerator door until bottom
hinge is installed on refrigerator.
Style 2 - Contoured
Graphics follow these instructions.
Round-Head Door Handle
Handle Screw Screw Hole Plug
Door Hinge
Hole Plug
Cabinet
1. Remove %6" hex-head hinge screws from handle side and
move them to opposite side. See Graphic 1-1.
2. Remove cabinet hinge hole plugs from the cabinet top and
move them to opposite side hinge holes as shown. See
Graphic 1-2.
Doors
1. Remove door hinge hole plug from top of freezer door. Move
to opposite side as shown. See Graphic 2.
2. Remove door stop from both the freezer and refrigerator
doors and move to the other side. See Graphic 3.
Replace Doors and Hinges
NOTE: Graphic may be reversed if door swing is reversed.
f. Replace the parts for the bottom hinge as shown. Tighten
screws. Replace the refrigerator door.
NOTE: Provide additional support for the doors while the
hinges are being moved. Do not depend on the door magnets
to hold the doors in place while you are working.
2. Assemble the parts for the center hinge as shown and tighten
all screws. See Center Hinge graphic. Replace the freezer
door.
3. Assemble the parts for the top hinge as shown. See Top Hinge
graphic. Do not tighten screws completely.
4. Line up the doors so that the bottom of the freezer door aligns
evenly with the top of the refrigerator door. Tighten all screws.
Final Steps
1. Check all holes to make sure that hole plugs and screws are in
place. Reinstall top hinge cover. See Top Hinge graphic.
Electrical Shock Hazard
Plug into a grounded 3 prong outlet.
Do not remove ground prong.
Do not use an adapter.
Do not use an extension cord,
Failure to follow these instructions can result in death,
fire, or electrical shock.
2. Plug in refrigerator or reconnect power.
3. Reset the controls. See "Using the Controls."
4. Return all removable door parts to doors and food to
refrigerator.
Style I - Standard
Center Hinge
B
C
D
E
F
A. Door Stop
B. Door Stop Screw
C. Spacer
D. Center Hinge
E. 5/_6"Hex-Head Hinge Screws
K Spacer
Bottom Hinge
A. Door Stop
B. Spacer
C. Door Stop Screw
D. Bottom Hinge
E. 5h6"Hex-Head Hinge Screws
A, Cabinet Hinge Hole Plugs
A. Door Hinge Hole Plug
A, Flat-Head Handle Screws
B. Freezer Handle
A. Door Handle Seating Screws
A. 5/_,, Hex-Head Hinge
Screws and Washers
*%.
A. Door Handle
Seal Screw Front
Style 2 - Contoured
Top Hinge
A. Top Hinge Cover
B. 5/_8"Hex-Head Hinge Screws
C. Top Hinge
D. Spacer
Center Hinge
A
B
C
E
F
A. Door Stop
B. Door Stop Screw
C. Spacer
D. Center Hinge
E. 5_6"Hex-Head Hinge Screws
K Spacer
Bottom Hinge
C
D
A. Door Stop
B. Spacer
C. Door Stop Screw
D. Bottom Hinge
E. b/_,,Hex-Head Hinge Screws
A. 5h_" Hex-Head Hinge
Screws and Washers
i
!
!
i
[]
A. Cabinet Hinge Hole Plugs
A. Door Hinge Hole Plug
Removal of Door Stops
©
A. Door Stop
B. Door Stop Screw
Reinstallation of Door Stops
©
A. Door Step
B. Door Stop Screw
Your refrigerator has two front adjustable rollers - one on the right
and one on the left. Ifyour refrigerator seems unsteady or you
want the doors to close easier, adjust the refrigerator's tilt using
the instructions below.
Depending on your model, your refrigerator may have leveling
legs (Style 1) or leveling screws (Style 2).They are part of the front
roller assemblies which are found at the base of the refrigerator on
either side.
1. Turn the leveling legs or leveling screws to the right to raise
that side of the refrigerator or to the left to lower that side. It
may take several turns to adjust the tilt of the refrigerator.
NOTE: Having someone push against the top of the
refrigerator takes some weight off the leveling screws and
rollers. This makes it easier to adjust the screws.
2. Open both doors again and be sure that they close as easily
as you like. If not, tilt the refrigerator slightly more to the rear
by turning both leveling screws to the right. It may take several
more turns, and you should turn both leveling screws the
same amount.
Style I
Style 2
3. Using a level, be sure that the refrigerator is still level side to
side, Readjust if necessary.
REFRIGERATORUSE
For your convenience, your refrigerator controls are preset at the
factory. When you first install your refrigerator, make sure that the
controls are still preset to the mid-settings as shown.
NOTE: To turn your refrigerator off, turn the refrigerator control to
the word OFF or until the word OFF appears. Your product will not
cool when the refrigerator control is set to OFR
Mid-setting "3"
OFF
COLI£S @
£ I
3
IMPORTANT:
Give your refrigerator time to cool down completely before
adding food, It is best to wait 24 hours before you put food
into the refrigerator.
If you add food before the refrigerator has cooled completely,
your food may spoil. Adjusting the Refrigerator and Freezer
Controls to a higher (colder) than recommended setting will
not cool the compartments any faster.
Adjusting Controls
The mid-settings indicated in the previous section should be
correct for normal household usage. The controls are set correctly
when milk or juice is as cold as you like and when ice cream is
firm.
If the temperature is too warm or too cold in the refrigerator or
freezer, first check the air vents to be sure they are not blocked.
If you need to adjust temperatures, use the settings listed in the
chart below as a guide. On models with two controls, adjust the
refrigerator temperature first. Wait at least 24 hours between
adjustments and then recheck the temperatures.
CONDITION/REASON: ADJUSTMENT:
REFRIGERATOR too warm REFRIGERATOR or
TEMPERATURE Control one
setting higher
FREEZER too warm/too FREEZER or TEMPERATURE
little ice Control one setting higher
MAX ice production switch
REFRIGERATOR too cold REFRIGERATOR or
TEMPERATURE Control one
setting lower
FREEZER too cold FREEZER or TEMPERATURE
Control one setting lower
You can control the amount of humidity in the moisture-sealed
crisper. Adjust the control to any setting between LOW and HIGH.
LOW (open) for best storage of fruits and vegetables with skins.
HIGH (closed) for best storage of fresh, leafy vegetables.
Turning the Ice Maker On/Off
Toturn the ice maker ON, simply lower the wire shutoff arm.
To manually turn the ice maker OFF, lift the wire shutoff arm to the
OFF (arm up) position and listen for the click.
NOTE: Your ice maker has an automatic shutoff. As ice is made,
the ice cubes will fill the ice storage bin and the ice cubes will
raise the wire shutoff arm to the OFF (arm up) position. Do not
force the wire shutoff arm up or down.
Ice Production Rate
Allow 24 hours to produce the first batch of ice. Discard the
first three batches of ice produced.
The ice maker should produce approximately 8 to 12 batches
of ice in a 24-hour period.
To increase ice production, lower the freezer and refrigerator
temperature. See <<Usingthe Controls." Wait 24 hours
between adjustments.
For maximum ice production (on some models), push the
switch to ICE PLUS. The ice maker should produce 16 to
20 batches of ice in a 24-hour period in the Ice Plus mode.
Remember
The quality of your ice will be only as good as the quality of the
water supplied to your ice maker. Avoid connecting the ice
maker to a softened water supply. Water softener chemicals
(such as salt) can damage parts of the ice maker and lead to
poor quality ice. If asoftened water supply cannot be avoided,
make sure the water softener is operating properly and is well
maintained.
Do not use anything sharp to break up the ice in the bin. This
can cause damage to the ice container and the dispenser
mechanism.
Do not store anything on top of or in the ice maker or ice bin.
REFRIGERATORCARE
Explosion Hazard
Use nonflammable cleaner.
Failure to do so can result in death, explosion, or fire.
Both the refrigerator and freezer sections defrost automatically.
However, clean both sections about once a month to keep odors
from building up. Wipe up spills immediately.
IMPORTANT: Because air circulates between both sections, any
odors formed in one section will transfer to the other. You must
thoroughly clean both sections to eliminate odors. To avoid odor
transfer and drying out of food, wrap or cover foods tightly.
To Clean Your Refrigerator:
NOTE: Do not use abrasive or harsh cleaners such as window
sprays, scouring cleansers, flammable fluids, cleaning waxes,
concentrated detergents, bleaches or cleansers containing
petroleum products on plastic parts, interior and door liners or
gaskets. Do not use paper towels, scouring pads, or other harsh
cleaning tools.
1. Unplug refrigerator or disconnect power.
2. Hand wash, rinse, and dry removable parts and interior
surfaces thoroughly. Use a clean sponge or soft cloth and a
mild detergent in warm water.
3. Wash painted metal exteriors with a clean sponge or soft cloth
and a mild detergent in warm water. Dry thoroughly with a soft
cloth.
4. Plug in refrigerator or reconnect power.
10
NOTE: Not all appliance bulbs will fit your refrigerator. Be sure to
replace the bulb with one of the same size, shape, and wattage.
Refrigerator Light
1. Unplug refrigerator or disconnect power.
2. Reach behind the control panel and unscrew the bulb.
3. Replace the bulb with a 40-watt appliance bulb.
4. Plug in refrigerator or reconnect power.
Freezer Light
1. Unplug refrigerator or disconnect power.
2. Remove the freezer shelf.
3. Remove the freezer light shield by pushing down.
4. Remove the light bulb and replace with one of the same size,
shape and wattage.
5. Replace the light shield.
6. Plug in refrigerator or reconnect power.
TROUBLESHOOTING
Trythe solutions suggested here first in order to avoid the cost of an unnecessary service call.
The refrigerator will not operate
Electrical Shock Hazard
Plug into a grounded 3 prong outlet.
Do not remove ground prong.
Do not use an adapter.
Do not use an extension cord.
Failure to follow these instructions can result in death,
fire, or electrical shock.
Power cord unplugged? Plug into a grounded 3 prong outlet.
Is outlet working? Plug in a lamp to see if the outlet is
working.
Household fuse blown or circuit breaker tripped? Replace
the fuse or reset the circuit breaker. If the problem continues,
call an electrician.
Are controls on? Make sure the refrigerator controls are on.
See "Using the Controls."
New installation? Allow 24 hours following installation for the
refrigerator to cool completely.
NOTE: Adjusting the temperature controls to coldest setting
will not cool either compartment more quickly.
The motor seems to run too much
Your new refrigerator may run longer than your old one due to its
high-efficiency compressor and fans. The unit may run even
longer if the room is warm, a large food load is added, doors are
opened often, or if the doors have been left open.
The refrigerator seems noisy
Refrigerator noise has been reduced over the years. Due to this
reduction, you may hear intermittent noises from your new
refrigerator that you did not notice from your old model. Below are
listed some normal sounds with explanations.
Buzzing - heard when the water valve opens to fill the ice
maker.
Pulsating - fans/compressor adjusting to optimize
performance.
Hissing/Rattling - flow of refrigerant, movement of water
lines, or from items placed on top of the refrigerator.
Sizzling/Gurgling - water dripping on the heater during
defrost cycle.
Popping - contraction/expansion of inside walls, especially
during initial cool-down.
Water running - may be heard when water melts during the
defrost cycle and runs into the drain pan.
Creaking/Cracking - occurs as ice is being ejected from the
ice maker mold.
11
The doors will not close completely
Door blocked open? Move food packages away from door.
Bin or shelf in the way? Push bin or shelf back in the correct
position.
Crisper cover in the way? Make sure the crisper cover is
pushed in fully, so that the back rests on the supports.
The doors are difficult to open
Explosion Hazard
Use nonflammable cleaner.
Failure to do so can result in death, explosion, or fire.
Gaskets dirty or sticky? Clean gaskets and contact surfaces
with mild soap and warm water. Rinse and dry with soft cloth,
The lights do not work
Is a light bulb loose in the socket or burned out? See
"Changing the Light Bulbs."
Temperature istoo warm
New installation? Allow 24 hours following installation for the
refrigerator to cool completely.
Door(s} opened often or left open? Allows warm air to enter
refrigerator. Minimize door openings and keep doors fully
closed.
Large load of food added? Allow several hours for
refrigerator to return to normal temperature.
Controls set correctly for the surrounding conditions?
Adjust the controls a setting colder. Check temperature in
24 hours. See "Using the Controls."
There is interior moisture buildup
NOTE: Some moisture buildup is normal.
Humid room? Contributes to moisture buildup.
Door(s} opened often or left open? Allows humid air to enter
refrigerator. Minimize door openings and keep doors fully
closed.
The ice maker is not producing ice or not enough ice
Refrigerator connected to a water supply and the supply
shutoff valve turned on? Connect refrigerator to water
supply and turn water shutoff valve fully open.
Kink in the water source line? A kink in the line can reduce
water flow. Straighten the water source line.
Ice maker turned on? Make sure wire shutoff arm or switch
(depending on model) is in the ON position.
New installation? Wait 24 hours after ice maker installation
for ice production to begin. Wait 72 hours for full ice
production.
Large amount of ice recently removed? Allow 24 hours for
ice maker to produce more ice.
Ice cube jammed in the ice maker ejector arm?
Remove ice from the ejector arm with a plastic utensil.
Reverse osmosis water filtration system connected to
your cold water supply? This can decrease water pressure.
See "Water Supply Requirements."
The ice cubes are hollow or small
NOTE: This is an indication of low water pressure,
Water shutoff valve not fully open? Turn the water shutoff
valve fully open.
Kink in the water source line? A kink in the line can reduce
water flow, Straighten the water source line,
Reverse osmosis water filtration system connected to
your cold water supply? This can decrease water pressure,
See "Water Supply Requirements."
Questions remain regarding water pressure? Call a
licensed, qualified plumber.
Off-taste, odor or gray color in the ice
New plumbing connections? New plumbing connections
can cause discolored or off-flavored ice.
Ice stored too long? Discard ice. Wash ice bin. Allow
24 hours for ice maker to make new ice.
Odor transfer from food? Use airtight, moisture proof
packaging to store food.
Are there minerals (such as sulfur) in the wate_ A water
filter may need to be installed to remove the minerals.
12
INGLIS®MAJORAPPLIANCEWARRANIT
ONE YEAR LIMITED WARRANTY
For one year from the date of purchase, when this major appliance is operated and maintained according to instructions attached to or
furnished with the product, Whirlpool Canada LP (hereafter "Whirlpool") will pay for factory specification replacement parts and repair
labor to correct defects in materials or workmanship. Service must be provided by a Whirlpool designated service company.
ITEMS WHIRLPOOL WILL NOT PAY FOR
1. Service calls to correct the installation of your major appliance, to instruct you how to use your major appliance, to replace or repair
house fuses or to correct house wiring or plumbing.
2. Service calls to repair or replace appliance light bulbs, air filters or water filters. Those consumable parts are excluded from warranty
coverage.
3. Repairs when your major appliance is used for other than normal, single-family household use.
4. Damage resulting from accident, alteration, misuse, abuse, fire, flood, acts of God, improper installation, installation not in
accordance with electrical or plumbing codes, or use of products not approved by Whirlpool.
5. Any food loss due to refrigerator or freezer product failures.
6. Replacement parts or repair labor costs for units operated outside Canada.
7. Pickup and delivery. This major appliance is designed to be repaired in the home.
8. Repairs to parts or systems resulting from unauthorized modifications made to the appliance.
9. Expenses for travel and transportation for product service in remote locations.
10. The removal and reinstallation of your appliance if it is installed in an inaccessible location or is not installed in accordance with
published installation instructions.
DISCLAIMER OF IMPLIED WARRANTIES; LIMITATION OF REMEDIES
CUSTOMER'S SOLE AND EXCLUSIVE REMEDY UNDER THIS LIMITED WARRANTY SHALL BE PRODUCT REPAIR AS PROVIDED
HEREIN. IMPLIED WARRANTIES, INCLUDING WARRANTIES OF MERCHANTABILITY OR FITNESS FOR A PARTICULAR PURPOSE,
ARE LIMITED TO ONE YEAR OR THE SHORTEST PERIOD ALLOWED BY LAW. WHIRLPOOL SHALL NOT BE LIABLE FOR
INCIDENTAL OR CONSEQUENTIAL DAMAGES. SOME PROVINCES DO NOT ALLOW THE EXCLUSION OR LIMITATION OF
INCIDENTAL OR CONSEQUENTIAL DAMAGES, OR LIMITATIONS ON THE DURATION OF IMPLIED WARRANTIES OF
MERCHANTABILITY OR FITNESS, SO THESE EXCLUSIONS OR LIMITATIONS MAY NOT APPLY TO YOU. THIS WARRANTY GIVES
YOU SPECIFIC LEGAL RIGHTS AND YOU MAY ALSO HAVE OTHER RIGHTS, WHICH VARY FROM PROVINCE TO PROVINCE.
Outside Canada, this warranty does not apply. Contact your authorized Whirlpool dealer to determine if another warranty applies.
If you need service, first see the "Troubleshooting" section of the Use & Care Guide. After checking "Troubleshooting," additional help
can be found by checking the "Assistance or Service" section or by calling Whirlpool at 1-800-807-6777. 8/05
13
p p
GUIDED'UTILISATIONETD NTRETIENDUREFRIGERATEUR
Assistance ou service
Si vous avez besoin d'assistance ou de service, consulter d'abord
la section "Depannage". On peut obtenir de I'aide supplementaire
en appelant 1-800-807-6777, ou en ecrivant a :
Whirlpool Canada LP
Centre d'interaction avec la clientele
1901 Minnesota Court
Mississauga, Ontario L5N 3A7
Des informations peuvent egalement _tre obtenues en visitant
notre site sur www.inglis.ca.
Dans votre correspondance, veuillez indiquer un numero de
telephone ou I'on peut vous joindre dans la journee.
Conservez ce manuel et votre regu de vente ensemble pour
r_f_rence ult_rieure. Pour le service sous garantie, vous
devez presenter un document prouvant la date d'achat ou
d'installation.
Inscrivez les renseignements suivants au sujet de votre appareil
menager pour vous aider a obtenir assistance ou service en cas
de besoin. Vous devrez connaftre le numero de modele et le
numero de serie au complet. Vous trouverez ces renseignements
sur la plaque signaletique situee sur la paroi interne du
compartiment de refrig6ration.
Nora du marchand
Numdro de s_rie
Adresse
Numdro de tdl_phone
Numdro de module
Date d'achat
SECURITEDUREFRIGERATEUR
Votre s_curit_ et celle des autres est tres importante.
Nous donnons de nombreux messages de securite importants dans ce manuel et sur votre appareil menager. Assurez-vous de
toujours lire tousles messages de securite et de vous y conformer.
Voici le symbole d'alerte de securite.
Ce symbole d'alerte de securite vous signale les dangers potentiels de deces et de blessures graves & vous
eta d'autres.
Tousles messages de securite suivront le symbole d'alerte de securite et le mot "DANGER" ou
"AVERTISSEMENT'. Ces roots signifient :
Risque possible de deces ou de blessure grave si vous ne
suivez pas immediatement lee instructions.
Risque possible de deces ou de blessure grave si vous
ne euivez pas lee instructions.
Tous les messages de securite vous diront quel est le danger potentiel et vous disent comment reduire le risque de blessure et
ce qui peut se produire en cas de non-respect des instructions.
14
IMPORTANTES iNSTRUCTiONS DE SI_=CURITI_=
AVERTISSEMENT : Pour reduire les risques d'incendie, de choc electrique ou des blessures Iors de I'utilisation du
refrigerateur, prendre quelques precautions fondamentales, y compris les suivantes :
[] Brancher I'appareil sur une prise A 3 alveoles reliee A la [] Enlever les portes de votre vieux refrigerateur.
terre.
[] Ne pas enlever la broche de liaison A la terre.
[] Ne pas utiliser un adaptateur.
[] Ne pas utiliser un cable de rallonge.
[] Debrancher la source de courant electrique avant
I'entretien.
[] Replacer pieces et panneaux avant de faire la remise en
marche.
[] Utiliser un produit de nettoyage ininflammable.
[] Garder les mat@iaux et les vapeurs inflammables, telle que
I'essence, loin du refrigerateur.
[] Utiliser deux ou plus de personnes pour deplacer et
installer le refrigerateur.
[] Debrancher le refrigerateur avant I'installation de la
machine A glagons (seulement pour modeles pr_ts A
recevoir une machine A glagons).
CONSERVEZ CES INSTRUCTIONS
Mise au rebut de votre vieux r6frig6rateur Avant de jeter votre vieux r6frig6rateur ou cong61ateur :
Enlever les portes.
Laisser les tablettes en place de sorte que les enfants ne
puissent pas y pen6trer facilement.
Risque de suffoquer
Enlever les portes de votre vieu× r6frig6rateur.
Le non=respect de cette instruction peut causer
un d6ces ou des 16sions c6r6brales.
IMPORTANT : L'emprisonnement et I'etouffement des enfants ne
sont pas un probleme du passe. Les refrigerateurs jetes ou
abandonnes sent encore dangereux, m_me s'ils sent laisses
abandonnes pendant "quelques jours seulement". Si vous vous
debarrassez de votre vieux refrigerateur, veuillez suivre les
instructions suivantes pour aider A eviter les accidents.
INSTRUCTIONSD'INSTALLATION
Risque du poids e×cessif
Utiliser deu× ou plus de personnes pour d6placer et
installer le r6frig6rateur.
Le non-respect de cette instruction peut causer
une blessure au dos ou d'autre blessure.
Retirer les materiaux d'emballage
Ne pas utiliser d'instruments coupants, d'alcool A friction, de
liquides inflammables ou de nettoyants abrasifs pour enlever le
ruban adhesif ou la colle. Ces produits peuvent endommager la
surface de votre refrig@ateur. Pour plus de renseignements, voir
la section "Securite du refrigerateur".
IMPORTANT : Ne pas enlever le dispositif de refoulement de I'air
en mousse blanche de derriere le panneau de commande sur le
plafond du refrigerateur. Si le dispositif est enleve, de la glace peut
se former en provenance du congelateur et causer laformation de
glagons.
Deplacement de votre r6frigerateur :
Votre refrig6rateur est Iourd. Lots du deplacement du
refrig6rateur pour le nettoyage ou le service, veiller A proteger
le plancher. Toujours tirer le refrig@ateur tout droit Iors du
deplacement. Ne pas incliner le refrig@ateur d'un c6te ou de
I'autre nile "faire marcher" en essayant de le deplacer car le
plancher pourrait _tre endommage.
15
Nettoyage avant I'utilisation
Apres avoir enleve tous les mat@iaux d'emballage, nettoyer
I'int@ieur du refrig6rateur avant de I'utiliser. Voir les instructions de
nettoyage dans la section "Entretien du refrigerateur".
Importants renseignements a savoir au sujet des tablettes
et des couvercles en verre :
Ne pas nettoyer les tablettes ou couvercles en verre avec de
I'eau tiede quand ils sent froids. Les tablettes et les
couvercles peuvent se briser s'ils sont exposes a des
changements soudains de temperature ou a un impact tel
que coup brusque. Pour votre protection, le verre trempe est
con£u pour eclater en d'innombrables pieces minuscules.
Ceci est normal. Les tablettes et les couvercles en verre sont
Iourds. Un soin special s'impose Iors de leur deplacement
pour eviter I'impact d'une chute.
REMARQUE : IIest recommande de ne pas installer le
refrigerateur pres d'un four, d'un radiateur ou de toute autre
source de chaleur. Ne pas installer le refrigerateur dans un endroit
ou la temp@ature baissera au-dessous de 55°F (13°C).
3" (7,5 cm} --/
II I
JlI
/
/
/
2" 15,08cm)
Risque d'explosion
Garder les materiaux et les vapeurs inflammables, telle
que ressence, loin du refrig_rateur.
Le non-respect de cette instruction peut causer
un deces, une explosion ou un incendie.
Pour obtenir une a@ation appropriee pour votre refrigerateur,
laisser un espace de 1/2"(12,70 mm) de chaque c6te. Laisser un
espace de 3" (7,5 cm) entre le dessus du refrigerateur et le
dessous des armoires. Laisser au moins 1" (25,40 mm) entre
I'arriere du refrigerateur et lemur. Si votre refrigerateur comporte
une machine a glagons, s'assurer qu'un espace additionnel est
prevu a I'arriere pour permettre les connexions des conduits
d'eau.
Si vous installez votre refrigerateur pres d'un mur fixe, laisser
un minimum de 2" (5,08 cm) du c6te des charnieres (selon le
modele) pour permettre a la porte de s'ouvrir sans
obstruction.
12tablir I'aplomb du refrig@ateur. Voir "Ajustement des portes".
Risque de choc electrique
Brancher sur une prise a 3 alveoles reli_,e a la terre.
Ne pas enlever la broche de liaison a la terre.
Ne pas utiliser un adaptateur.
Ne pas utiliser un cable de rallonge.
Le non-respect de ces instructions peut causer
un d_ces, un incendie ou un choc _lectrique.
Avant de placer le refrigerateur a son emplacement final, il est
important de vous assurer d'avoir la connexion electrique
appropriee.
M_thode recommand_e de mise _ la terre
Une source d'alimentation de 115 volts, 60 Hz, type 15 ou
20 amperes CA seulement, protegee par fusible et adequatement
mise a la terre, est necessaire. II est recommande d'utiliser un
circuit distinct pour alimenter uniquement votre refrigerateur.
Utiliser une prise murale qui ne peut pas _tre mise hors circuit a
I'aide d'un commutateur. Ne pas utiliser un cable de rallonge.
REMARQUE : Avant d'executer tout type d'installation, nettoyage
ou remplacement d'une ampoule d'eclairage, tourner la
commands (reglage du thermostat, du refrigerateur ou du
congelateur selon le modele) a OFF (arr_t) et deconnecter ensuite
le refrigerateur de la source d'alimentation electrique. Lorsque
vous avez termine, reconnecter le refrigerateur a la source
d'alimentation electrique et tourner de nouveau la commande
(reglage du thermostat, du refrigerateur ou du congelateur selon
le modele) au reglage desire.
16
Lire attentivement toutes les instructions avant de commencer.
IMPORTANT:
Si on dolt utiliser le refrigerateur avant qu'il soit raccorde & la
canalisation d'eau, placer la commande de la machine
glagons a la position OFF (arr_t).
Toutes les installations doivent _tre conformes aux exigences
des codes Iocaux de plomberie.
Utiliser un tube en cuivre et verifier s'il y a des fuites. Installer
les tubes en cuivre seulement a des endroits ou la
temperature se maintient au-dessus du point de congelation.
OUTILLAGE NI_OESSAIRE : Tournevis a lame plate, cles plates
de 7/_6"et W' ou deux cles a molette reglables, tourne-ecrou et
foret de V4",perceuse manuelle ou electrique (convenablement
reliee a la terre). Rassembler les outils et pieces necessaires avant
de commencer I'installation. Lire et suivre les instructions fournies
avec les outils indiques ici.
REMARQUE :Votre marchand de refrigerateurs presente une
trousse disponible avec un robinet d'arr_t &etrier de V4"
(6,35 mm), un raccord et un tube en cuivre. Avant I'achat,
s'assurer que le robinet d'arr_t a etrier est conforme a vos codes
Iocaux de plomberie. Ne pas employer de robinet d'arr_t & etrier
de 3/_6"(4,76 mm) ou de type a percer, ce qui reduit le debit d'eau
et cause une obstruction plus facilement.
Pression de I'eau
Une alimentation en eau froide avec une pression entre 30 et
120 Ib/po _(207 - 827 kPa) est necessaire pour faire fonctionner la
machine a glagons. Si vous avez des questions au sujet de la
pression de votre eau, faire appel a un plombier qualifie agree.
Alimentation en eau par osmose inverse
Si un systeme de purification de I'eau par osmose inverse est
raccorde a votre alimentation en eau froide, la pression de I'eau
au syst_me dolt _tre d'un minimum de 40 a 60 Ib/po _(276 -
414 kPa).
Si la machine & glagons ne distribue toujours pas d'eau au debit
approprie :
Verifier pour voir si le filtre du systeme d'osmose inverse est
bloque, et le remplacer si necessaire.
Laisser le reservoir du systeme d'osmose inverse se remplir
apres une utilisation intense.
Si vous avez des questions au sujet de la pression de votre eau,
appeler un plombier qualifie agree.
Liretoutes les instructions avant de commencer.
IMPORTANT: Si on met en marche le refrigerateur avant son
raccordement & la canalisation d'eau, placer la commande de la
machine &glagons a la position OFF (arr_t).
Raccordement _ une canalisation d'eau
1. Debrancher le refrigerateur ou deconnecter la source de
courant electrique.
2. FERMER le robinet principal d'arrivee d'eau. OUVRIR le
robinet de puisage le plus proche pendant une p_riode
suffisante pour que la canalisation d'eau se vide.
3= Trouver une canalisation d'eau froide verticale de W' a 1V4"
(1,27 a 3,18 cm) pros du rdrigerateur.
IMPORTANT :
S'assurer qu'il s'agit d'une canalisation d'eau froide.
Un conduit horizontal fonctionnera mais percer par le
dessus de la canalisation et non pas par le dessous. Ainsi,
I'eau ne risquera pas d'arroser la perceuse et ceci
emp_chera egalement les s_diments qu'on trouve
normalement dans I'eau de s'accumuler dans le robinet
d'arr_t.
4. Pour determiner la Iongueur du tube en cuivre, il faut mesurer
la distance entre le point de connexion inferieur gauche
I'arriere du refrigerateur et le tuyau d'arrivee d'eau. Ajouter
une Iongueur de 7 pi (2,1 m) pour permettre le deplacement
du refrigerateur pour le nettoyage. Utiliser un tube en cuivre
de V4"(6,35 mm) de diametre exterieur. Veiller ace que le tube
soit coupe d'equerre aux deux extremites.
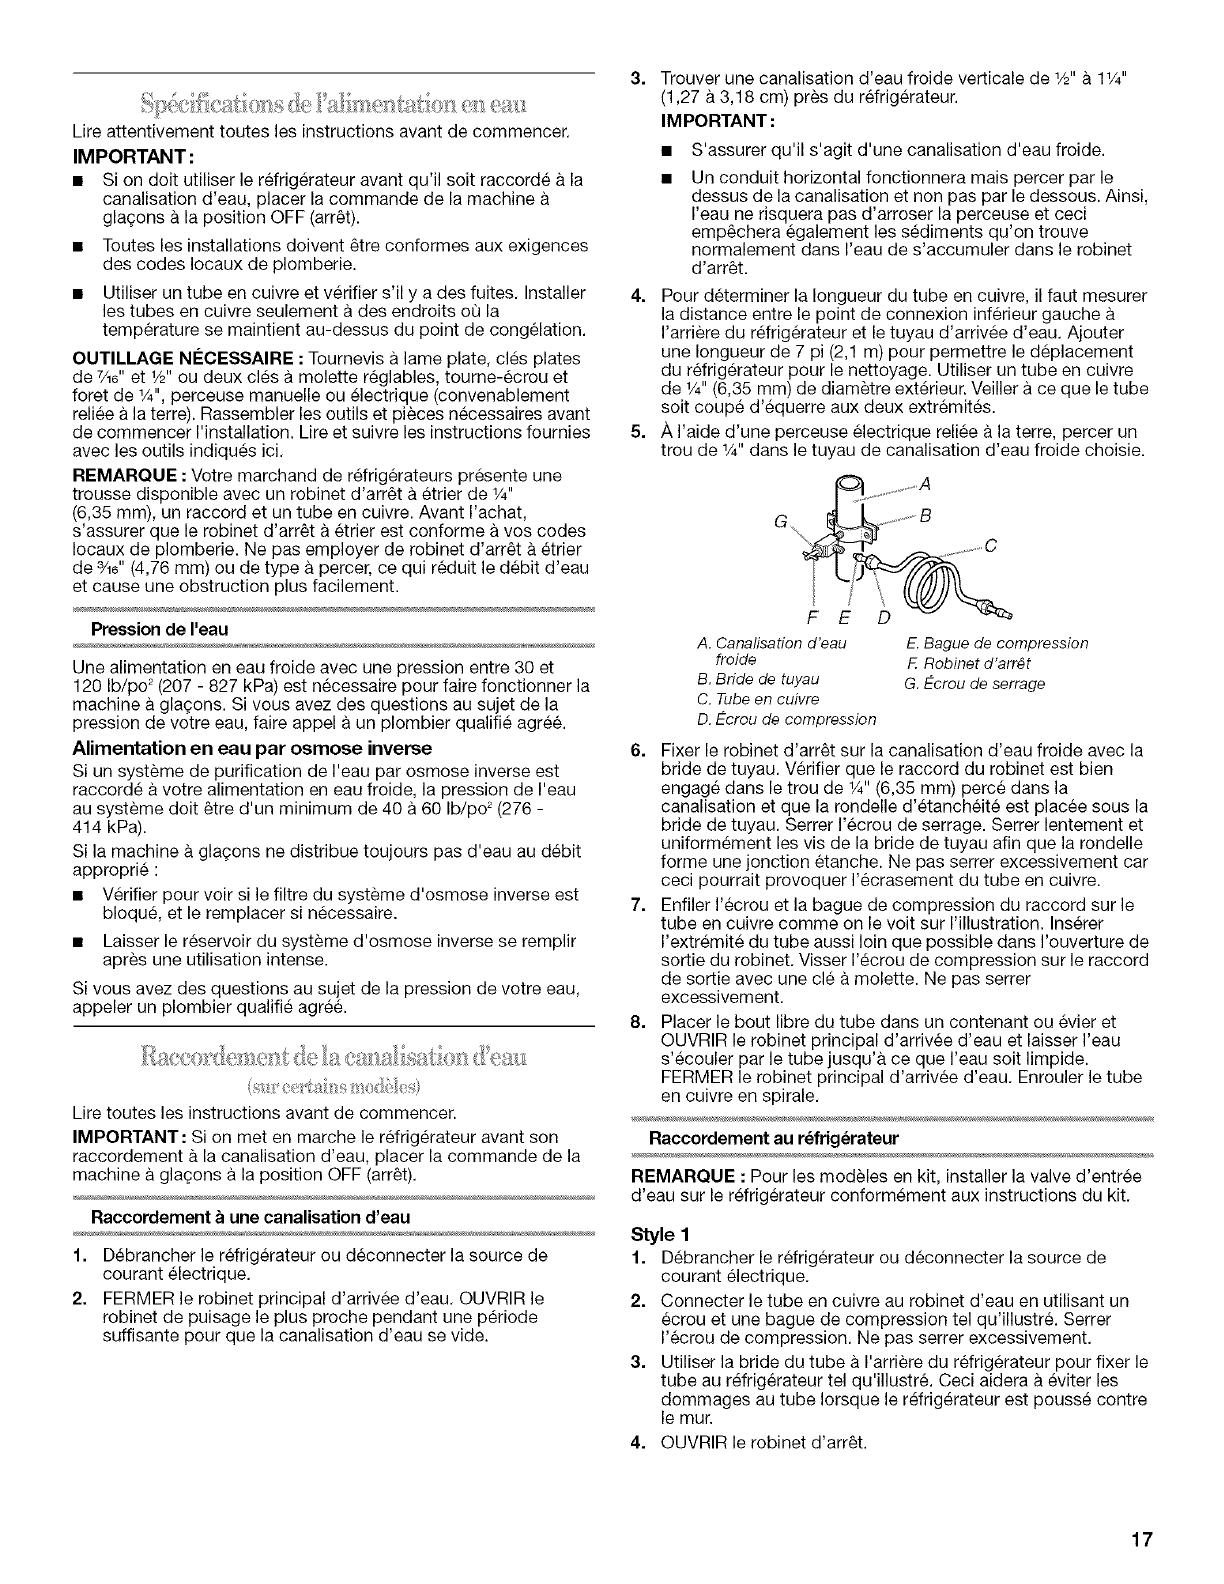
5. /_,I'aide d'une perceuse electrique reliee a la term, percer un
trou de V4"dans le tuyau de canalisation d'eau froide choisie.
A. Canalisation d'eau
froide
B. Bride de tuyau
C. Tube en cuivre
D. Ecrou de compression
E.Bague de compression
Robinet d'arr_t
G. Ecrou de serrage
6. Fixer le robinet d'arr_t sur la canalisation d'eau froide avec la
bride de tuyau. Verifier que le raccord du robinet est bien
engage dans le trou de _/,"(6,35 mm) perce dans la
canalisation et que la rondelle d'etancheite est placee sous la
bride de tuyau. Serrer I'ecrou de serrage. Serrer lentement et
uniformement les vis de la bride de tuyau afin que la rondelle
forme une jonction etanche. Ne pas serrer excessivement car
ceci pourrait provoquer I'ecrasement du tube en cuivre.
7. Enfiler I'ecrou et la bague de compression du raccord sur le
tube en cuivre comme on le volt sur I'illustration. Inserer
I'extremite du tube aussi loin que possible dans I'ouverture de
sortie du robinet. Visser I'ecrou de compression sur le raccord
de sortie avec une cle a molette. Ne pas serrer
excessivement.
8. Placer le bout libre du tube dans un contenant ou evier et
OUVRIR le robinet principal d'arrivee d'eau et laisser I'eau
s'ecouler par le tube jusqu'a ce que I'eau soit limpide.
FERMER le robinet principal d'arrivee d'eau. Enrouler le tube
en cuivre en spirale.
Raccordement au r_frigerateur
REMARQUE : Pour les modeles en kit, installer la valve d'entree
d'eau sur le refrigerateur conformement aux instructions du kit.
Style 1
1. Debrancher le refrigerateur ou deconnecter la source de
courant electrique.
2. Connecter le tube en cuivre au robinet d'eau en utilisant un
ecrou et une bague de compression tel qu'illustre. Serrer
I'ecrou de compression. Ne pas serrer excessivement.
3. Utiliser la bride du tube a I'arriere du refrigerateur pour fixer le
tube au refrigerateur tel qu'illustre. Ceci aidera a eviter les
dommages au tube Iorsque le refrigerateur est pousse contre
lemur.
4. OUVRIR le robinet d'arr_t.
17
5=
Achever I'installation
Inspecter pour rechercher les fuites. Serrer tousles raccords
(y compris les raccordements de la valve d'entree d'eau) ou
les ecrous qui coulent.
A. Bride du tube C. Ecrou de compression
B. Tube en cuivre D. Valve d'entr_e d'eau
6=
La machine & gla(;ons est equipee d'un filtre & eau incorpor&
Si la qualite de I'eau distribuee Iocalement necessite un
deuxieme filtre a eau, il serait utile de I'installer dans le tube de
raccordement de 1/4"(6,35 mm). On peut obtenir un tel filtre &
eau chez le marchand d'appareils electromenagers le plus
proche.
Style 2
1. Debrancher le refrig@ateur ou deconnecter la source de
courant electrique.
2. Deconnecter la bride du tube & I'arriere du produit et introduire
le tube en cuivre dans la bride, tel qu'indiqu&
3. Connecter le tube en cuivre a I'entree d'eau de la valve en
utilisant un ecrou etune bague de compression tel qu'illustr&
4. Serrer I'ecrou de compression. Ne pas serrer excessivement.
Reattacher la bride du tube et le tube a I'arriere de la caisse.
5=
6.
0
.J
= :il
._,0
A
1
B
A. Bride du tube C. Ecrou de compression
B. Tube en cuivre
OUVRIR le robinet d'arr_t. Inspecter pour rechercher les
fuites. Serrer tousles raccords (y compris les raccordements
de la valve d'entree d'eau) ou les ecrous qui coulent.
La machine a gla(_ons est equipee d'un filtre a eau incorpor&
Si la qualite de I'eau distribuee Iocalement necessite un
deuxieme filtre a eau, il serait utile de I'installer dans le tube de
raccordement de 1/4"(6,35 mm). On peut obtenir un tel filtre
eau chez le marchand d'appareils electromenagers le plus
proche.
Risque de choc electrique
Brancher sur une prise a 3 alveoles reli_,e a la terre.
Ne pas enlever la broche de liaison a la terre.
Ne pas utiliser un adaptateur.
Ne pas utiliser un c_ble de rallonge.
Le non=respect de ces instructions peut causer
un d_ces, un incendie ou un choc _lectrique.
Brancher sur une prise & 3 alveoles reliee & la terre.
REMARQUE :Attendre 24 heures pour produire la premiere
quantite de glagons. Jeter les trois premieres quantites de
glagons produites. Attendre 3 jours pour que le bac & gla(;ons se
remplisse entierement.
OUTILLAGE NI_CESSAIRE : Cle a douille avec douille
hexagonale de %6", tournevis Phillips n° 2, tournevis a lame plate,
cle plate de %d', couteau a mastic plat de 2".
IMPORTANT :
Avant de commencer, tourner la commande du refrigerateur
OFF (arr_t). Debrancher le refrigerateur ou deconnecter la
source de courant electrique.
Retirer les aliments et tout balconnet ou casier utilitaire de la
porte du refrig@ateur.
Si vous desirez seulement enlever et reinstaller les portes, voir
"Demontage - Portes et charnieres" et "Reinstallation - Portes
et charnieres".
Selon votre modele, vous pouvez avoir des portes standard
(Style 1) ou contoured (Style 2). Si on prevoit egalement
d'inverser le sens d'ouverture des portes, suivre les
instructions pour le style de porte appropri&
18
D_montage - Portes et charni_res
Vis de charniere a t_te hexagonale de _6"
1. Debrancher le refrigerateur ou deconnecter la source de
courant electrique.
2. Fermer la porte du refrigerateur; maintenir les deux portes
fermees jusqu'au moment 0(4on est pr_t &les separer de la
caisse de I'appareil.
REMARQUE : Prevoir un support additionnel des portes
pendant le demontage des charnieres. La force d'attraction
des aimants des portes ne suffit pas ales maintenir en place.
3. Enlever les pieces de la charniere superieure - voir I'illustration
de la charniere superieure. Soulever la porte du compartiment
de congelation pour la separer de la caisse.
4. Enlever les pieces de la charniere centrale - voir I'illustration
de la charniere centrale. Soulever la porte du refrig6rateur
pour la separer de la caisse.
5. Enlever les pieces de la charniere inferieure - voir I'illustration
de la charniere inferieure.
Inversion des portes (facultatif)
IMPORTANT : Si on souhaite inverser la position des portes pour
pouvoir les ouvrir dans la direction opposee, proceder comme
suit. S'il n'est pas necessaire de changer I'orientation des portes,
voir "R_installation - Portes et charnieres" plus loin dans cette
section.
Style 1 - Standard
Les illustrations suivent ces instructions.
Vis de butte de la porte
Vis de scellement
de lapoignee de laporte
Vis de la poignee _ t_te plate
Vis frontale de scellement
de lapoignee de laporte
Caisse
1.
2=
Bouchon d'obturation
de charni#re de porte
Bouchon d'obturation
de charni#re de caisse
Couvre-vls
de la poign#e de la porte
Vis de poignee
t#te ronde
Enlever les vis a t_te hexagonale de sA6"de la charniere (c6te
poignee); transferer ces pieces du c6te oppos& Voir
I'illustration 1-1.
Enlever les bouchons obturateurs des trous au sommet de la
caisse; transferer ceux-ci dans les trous de charniere du c6te
oppos& Voir I'illustration 1-2.
Porte du compartiment de cong_lation
1. Enlever la poignee de la porte du compartiment de
congelation. Voir I'illustration. Conserver toutes les pieces
ensemble, Voir I'illustration 2.
2. Enlever le bouchon obturateur de charniere de porte.
Transferer le bouchon du c6te oppos& Voir I'illustration 3,
3. Enlever les vis de scellement de la poignee de la porte.
Transferer ces vis du c6te oppose de la porte du
compartiment de congelation. Voir I'illustration 4.
4. Enlever la butee de porte. Transferer la butee du c6te oppose
de la porte du compartiment de congelation, Voir
I'illustration 5.
5. Positionner la poignee du compartiment de congelation du
c6te oppose de la porte. Fixer la poignee sur la porte, Voir
I'illustration 2.
6. Serrer toutes les vis, Conserver la porte & part jusqu'a la mise
en place des charnieres de la porte du compartiment de
refrigeration.
Porte du compartiment de r_frig_ration
1. Enlever le couvre-vis. Voir I'illustration 6,
2. Enlever la poignee de la porte du compartiment de
refrigeration. Voir I'illustration, Conserver toutes les pieces
ensemble. Voir I'illustration 6.
3. Enlever le bouchon obturateur de charniere sur la porte du
refrigerateur. Transferer le bouchon obturateur au trou du c6te
oppos& Voir I'illustration 3.
4. Enlever les vis de scellement de la poignee de la porte,
Transferer ces vis du c6te oppose de la porte du refrigerateur.
Voir I'illustration 4.
5. Enlever la vis frontale de scellement de la poignee de porte.
Transferer du c6te oppose de la porte du refrigerateur. Voir
I'illustration 7.
6. Enlever la butee de porte. Transferer la piece du c6te oppose
de la porte du refrigerateur. Voir I'illustration 5.
7. Positionner la poignee de porte du refrigerateur sur le c6te
oppose de la porte. Voir I'illustration 6, Placer d'abord les
deux vis sup_rieures de la poignee. Aligner la partie inferieure
de la poignee, puis visser la vis inferieure.
8. Reinstaller le couvre-vis. Voir I'illustration 6.
9. Serrer toutes les vis. Conserver la porte du refrigerateur & part
jusqu'a ce que la charniere inferieure soit installee sur le
refrigerateur.
19
Style2 - Contoured
Lesillustrations suivent ces instructions.
Vis depoignee Bouchon obturateur
t#te ronde de la vis de poignee
de porte
Bouchon obturateur
de charni#re de
porte
Caisse
1. Enlever les vis de charniere a t_te hexagonale de %6" (c6te
poignee) et les transferer au c6te oppose. Voir
I'illustration 1-1.
2. Enlever les bouchons obturateurs des charnieres au sommet
de la caisse et les placer darts les trous de charniere du c6te
oppose. Voir I'illustration 1-2.
Portes
1. Enlever le bouchon obturateur de charniere de porte au
sommet de la porte du congelateur. Le deplacer au c6te
oppose tel qu'illustre. Voir I'illustration 2.
2. Enlever la butee de la porte du compartiment de congelation
et celle de la porte du compartiment de refrigeration et les
transferer au c6te oppose. Voir I'illustration 3.
R_installation - Portes et charnieres
REMARQUE :Si on inverse le sens d'ouverture des portes,
considerer I'image symetrique.
1. Reinstaller les pieces de la charniere inferieure. Voir
I'illustration. Serrer les vis. Reinstaller la porte du
compartiment de refrigeration.
REMARQUE : Prevoir un support additionnel des portes
pendant la reinstallation des charnieres. La force d'attraction
des aimants des portes ne suffit pas ales maintenir en place.
2. Assembler les pieces de la charniere centrale. Voir
I'illustration. Serrer toutes les vis. Voir I'illustration de la
charniere centrale. Reinstaller la porte du compartiment de
congelation.
3. Assembler les pieces de la charniere superieure. Voir
I'illustration - charniere superieure. Ne pas completement
serrer les vis.
4. Aligner correctement les portes au niveau de la separation
entre le bas de la porte du compartiment de cong_lation et le
sommet de la porte du refrigerateur. Serrer toutes les vis.
Etapes finales
1. Inspecter tous les trous. Verifier que tousles bouchons
obturateurs et vis sont en place. Reinstaller le couvercle de la
charniere superieure. Voir I'illustration - charniere superieure.
Risque de choc electrique
Brancher sur une prise a 3 alveolea reli_,e a la terre.
Ne pas enlever la broche de liaison a la terre.
Ne pas utiliser un adaptateur.
Ne pas utiliser un cable de rallonge.
Le non-respect de ces instructions peut causer
un d_ces, un incendie ou un choc _lectrique.
2. Brancher le refrigerateur ou reconnecter la source de courant
electrique.
3. Effectuer les reglages necessaires. Voir "Utilisation des
commandes".
4. Reinstaller les balconnets et autres pieces amovibles; repartir
les aliments sur les balconnets.
2O
  • Page 1 1
  • Page 2 2
  • Page 3 3
  • Page 4 4
  • Page 5 5
  • Page 6 6
  • Page 7 7
  • Page 8 8
  • Page 9 9
  • Page 10 10
  • Page 11 11
  • Page 12 12
  • Page 13 13
  • Page 14 14
  • Page 15 15
  • Page 16 16
  • Page 17 17
  • Page 18 18
  • Page 19 19
  • Page 20 20
  • Page 21 21
  • Page 22 22
  • Page 23 23
  • Page 24 24
  • Page 25 25
  • Page 26 26
  • Page 27 27
  • Page 28 28

Inglis I4TXCGFXQ00 Owner's manual

Category
Fridges
Type
Owner's manual

Ask a question and I''ll find the answer in the document

Finding information in a document is now easier with AI

in other languages