
www.philips.com/saeco
Type HD8854 / HD8856 - Cod.15001999 Rev.01 del 15-05-10
The manufacturer reserves the right to change the features of the product without prior notice.
EN

Type HD8854 / HD8856
OPERATING INSTRUCTIONS
READ THESE OPERATING INSTRUCTIONS CAREFULLY BEFORE USING THE MACHINE.
Register your product and get support at
www.philips.com/welcome
EN
English

IMPORTANT SAFEGUARDS
When using electrical appliances, basic safety precautions should always be
followed, including the following:
1. Read all instructions.
2. Do not touch hot surfaces. Use handles or knobs.
3. To protect against fire, electric shock and injury to persons do not immerse
cord, plugs, or appliance in water or other liquid.
4. Close supervision is necessary when the appliance is used by or near
children.
5. Unplug from outlet when not in use and before cleaning. Allow to cool
before putting on or taking off parts, and before cleaning the appliance.
6. Do not operate any appliance with a damaged cord or plug or after the
appliance malfunctions, or has been damaged in any manner. Return
appliance to the nearest authorized service facility for examination, repair
or adjustment.
7. The use of accessory attachments not recommended by the appliance
manufacturer may result in fire, electric shock or injury to persons.
8. Do not use outdoors.
9. Do not let cord hang over edge of table or counter, or touch hot surfaces.
10. Do not place on or near a hot gas or electric burner, or in a heated oven.
11. Always attach plug to appliance first, then plug cord into wall outlet. To
disconnect, turn any control to “off”, then remove plug from wall outlet.
12. Do not use appliance for other than intended use.
13. Save these instructions.
SAVE THESE INSTRUCTIONS

CAUTION
This appliance is for household use only. Any servicing, other than cleaning and
user maintenance, should be performed by an authorized service center. Do not
immerse machine in water. To reduce the risk of fire or electric shock, do not
disassemble the machine. There are no parts inside the machine serviceable by
the user. Repair should be done by authorized service personnel only.
1. Check voltage to be sure that the voltage indicated on the nameplate
corresponds with your voltage.
2. Never use warm or hot water to fill the water tank. Use cold water only.
3. Keep your hands and the cord away from hot parts of the appliance during
operation.
4. Never clean with scrubbing powders or harsh cleaners. Simply use a soft
cloth dampened with water.
5. For optimal taste of your coffee, use purified or bottled water. Periodic
descaling is still recommended every 2-3 months.
6. Do not use caramelized or flavored coffee beans.
INSTRUCTIONS FOR THE POwER
SUPPly CORD
A. A short power-supply cord (or detachable power-supply cord) is to be
provided to reduce risks resulting from becoming entangled in or tripping
over a longer cord.
B. Longer detachable power-supply cords or extension cords are available
and may used if care is exercised in their use.
C. If a long detachable power-supply cord or extension cord is used,
1. The marked electrical rating of the detachable power-supply cord or
extension cord should be at least as great as the electrical rating of the
appliance
2. If the appliance is of the grounded type, the extension cord should be a
grounding-type 3-wire cord, and
3. The longer cord should be arranged so that it will not drape over the
counter top or table top where it can be pulled on by children or tripped
over.

VI
A
1 2
3
4
5 6
C
D
A
B B
8
E
7
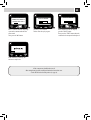
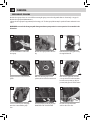
For correct use of the carafe, refer to the instructions on page 12.
The maintenance instructions for the carafe circuits are described on page 34.
The disassembly and cleaning instructions for the components are described on page 39.
THOROUGHLY CLEAN THE CARAFE AT FIRST USE AND AFTER A LONG PERIOD OF INACTIVITY.
A THOROUGH SANITATION AND CLEANING OF THE CARAFE ENSURES CORRECT OPERATION AND PREVENTS THE
PROLIFERATION OF BACTERIAL LOADS WHICH MAY BE HARMFUL FOR HUMAN HEALTH.
CARAFE ASSEMBLY PROCEDURE

1
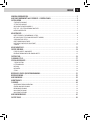
INDEX
GENERAL INFORMATION . . . . . . . . . . . . . . . . . . . . . . . . . . . . . . . . . . . . . . . . . . . . . . . . . . . . . . . . . . . . . . . 2
MACHINE COMPONENTS & ACCESSORIES CONTROL PANEL . . . . . . . . . . . . . . . . . . . . . . . . . . . . . . . . . 3
INSTALLATION . . . . . . . . . . . . . . . . . . . . . . . . . . . . . . . . . . . . . . . . . . . . . . . . . . . . . . . . . . . . . . . . . . . . . . . . 4
STARTING THE MACHINE . . . . . . . . . . . . . . . . . . . . . . . . . . . . . . . . . . . . . . . . . . . . . . . . . . . . . . . . . . . . . . . . . . . . . . . . . . . . . . . . . . . . . .4
SETTING THE LANGUAGE . . . . . . . . . . . . . . . . . . . . . . . . . . . . . . . . . . . . . . . . . . . . . . . . . . . . . . . . . . . . . . . . . . . . . . . . . . . . . . . . . . . . . .5
MEASURING THE WATER HARDNESS . . . . . . . . . . . . . . . . . . . . . . . . . . . . . . . . . . . . . . . . . . . . . . . . . . . . . . . . . . . . . . . . . . . . . . . . . . . .5
FIRST USE - USE AFTER A PERIOD OF INACTIVITY . . . . . . . . . . . . . . . . . . . . . . . . . . . . . . . . . . . . . . . . . . . . . . . . . . . . . . . . . . . . . . . . .6
INTENZA WATER FILTER . . . . . . . . . . . . . . . . . . . . . . . . . . . . . . . . . . . . . . . . . . . . . . . . . . . . . . . . . . . . . . . . . . . . . . . . . . . . . . . . . . . . . . .7
ADJUSTMENTS . . . . . . . . . . . . . . . . . . . . . . . . . . . . . . . . . . . . . . . . . . . . . . . . . . . . . . . . . . . . . . . . . . . . . . . . 8
COFFEE STRENGTH (SAECO BREWING SYSTEM) . . . . . . . . . . . . . . . . . . . . . . . . . . . . . . . . . . . . . . . . . . . . . . . . . . . . . . . . . . . . . . . . . .8
OPTI-DOSE (ADJUSTS THE AMOUNT OF COFFEE TO GRIND) . . . . . . . . . . . . . . . . . . . . . . . . . . . . . . . . . . . . . . . . . . . . . . . . . . . . . . . .8
SAECO ADAPTING SYSTEM . . . . . . . . . . . . . . . . . . . . . . . . . . . . . . . . . . . . . . . . . . . . . . . . . . . . . . . . . . . . . . . . . . . . . . . . . . . . . . . . . . . .9
COFFEE GRINDER ADJUSTMENT . . . . . . . . . . . . . . . . . . . . . . . . . . . . . . . . . . . . . . . . . . . . . . . . . . . . . . . . . . . . . . . . . . . . . . . . . . . . . . . .9
DISPENSING SPOUT HEIGHT ADJUSTMENT . . . . . . . . . . . . . . . . . . . . . . . . . . . . . . . . . . . . . . . . . . . . . . . . . . . . . . . . . . . . . . . . . . . . .10
STAND-BY . . . . . . . . . . . . . . . . . . . . . . . . . . . . . . . . . . . . . . . . . . . . . . . . . . . . . . . . . . . . . . . . . . . . . . . . . . . . . . . . . . . . . . . . . . . . . . . . .11
MILK CARAFE USE . . . . . . . . . . . . . . . . . . . . . . . . . . . . . . . . . . . . . . . . . . . . . . . . . . . . . . . . . . . . . . . . . . . . 12
COFFEE BREWING . . . . . . . . . . . . . . . . . . . . . . . . . . . . . . . . . . . . . . . . . . . . . . . . . . . . . . . . . . . . . . . . . . . . 14
ESPRESSO / COFFEE / LONG COFFEE . . . . . . . . . . . . . . . . . . . . . . . . . . . . . . . . . . . . . . . . . . . . . . . . . . . . . . . . . . . . . . . . . . . . . . . . . . .14
BEVERAGE BREWING WITH PRE-GROUND COFFEE . . . . . . . . . . . . . . . . . . . . . . . . . . . . . . . . . . . . . . . . . . . . . . . . . . . . . . . . . . . . . . .15
CAPPUCCINO . . . . . . . . . . . . . . . . . . . . . . . . . . . . . . . . . . . . . . . . . . . . . . . . . . . . . . . . . . . . . . . . . . . . . . . . 16
CLEANING CYCLE . . . . . . . . . . . . . . . . . . . . . . . . . . . . . . . . . . . . . . . . . . . . . . . . . . . . . . . . . . . . . . . . . . . . . 17
SPECIAL BEVERAGES . . . . . . . . . . . . . . . . . . . . . . . . . . . . . . . . . . . . . . . . . . . . . . . . . . . . . . . . . . . . . . . . . . 18
"SPECIAL" BUTTON . . . . . . . . . . . . . . . . . . . . . . . . . . . . . . . . . . . . . . . . . . . . . . . . . . . . . . . . . . . . . . . . . . . . . . . . . . . . . . . . . . . . . . . . . .18
LATTE MACCHIATO . . . . . . . . . . . . . . . . . . . . . . . . . . . . . . . . . . . . . . . . . . . . . . . . . . . . . . . . . . . . . . . . . . . . . . . . . . . . . . . . . . . . . . . . . .19
HOT MILK . . . . . . . . . . . . . . . . . . . . . . . . . . . . . . . . . . . . . . . . . . . . . . . . . . . . . . . . . . . . . . . . . . . . . . . . . . . . . . . . . . . . . . . . . . . . . . . . . .19
HOT WATER . . . . . . . . . . . . . . . . . . . . . . . . . . . . . . . . . . . . . . . . . . . . . . . . . . . . . . . . . . . . . . . . . . . . . . . . . . . . . . . . . . . . . . . . . . . . . . . .20
STEAM . . . . . . . . . . . . . . . . . . . . . . . . . . . . . . . . . . . . . . . . . . . . . . . . . . . . . . . . . . . . . . . . . . . . . . . . . . . . . . . . . . . . . . . . . . . . . . . . . . . .20
BEVERAGE LENGTH QUICK PROGRAMMING . . . . . . . . . . . . . . . . . . . . . . . . . . . . . . . . . . . . . . . . . . . . . . 21
BEVERAGE MENU . . . . . . . . . . . . . . . . . . . . . . . . . . . . . . . . . . . . . . . . . . . . . . . . . . . . . . . . . . . . . . . . . . . . . 22
MACHINE MENU . . . . . . . . . . . . . . . . . . . . . . . . . . . . . . . . . . . . . . . . . . . . . . . . . . . . . . . . . . . . . . . . . . . . . . 25
MAINTENANCE . . . . . . . . . . . . . . . . . . . . . . . . . . . . . . . . . . . . . . . . . . . . . . . . . . . . . . . . . . . . . . . . . . . . . . . 30
CLEANING . . . . . . . . . . . . . . . . . . . . . . . . . . . . . . . . . . . . . . . . . . . . . . . . . . . . . . . . . . . . . . . . . . . . . . . . . . . 36
MAINTENANCE DURING OPERATION . . . . . . . . . . . . . . . . . . . . . . . . . . . . . . . . . . . . . . . . . . . . . . . . . . . . . . . . . . . . . . . . . . . . . . . . . . .36
GENERAL MACHINE CLEANING. . . . . . . . . . . . . . . . . . . . . . . . . . . . . . . . . . . . . . . . . . . . . . . . . . . . . . . . . . . . . . . . . . . . . . . . . . . . . . . .37
BREW GROUP CLEANING . . . . . . . . . . . . . . . . . . . . . . . . . . . . . . . . . . . . . . . . . . . . . . . . . . . . . . . . . . . . . . . . . . . . . . . . . . . . . . . . . . . . .38
MILK CARAFE CLEANING . . . . . . . . . . . . . . . . . . . . . . . . . . . . . . . . . . . . . . . . . . . . . . . . . . . . . . . . . . . . . . . . . . . . . . . . . . . . . . . . . . . . .39
MILK CARAFE ASSEMBLY . . . . . . . . . . . . . . . . . . . . . . . . . . . . . . . . . . . . . . . . . . . . . . . . . . . . . . . . . . . . . . . . . . . . . . . . . . . . . . . . . . . .40
MACHINE WARNINGS . . . . . . . . . . . . . . . . . . . . . . . . . . . . . . . . . . . . . . . . . . . . . . . . . . . . . . . . . . . . . . . . . 41
SAFETY RULES . . . . . . . . . . . . . . . . . . . . . . . . . . . . . . . . . . . . . . . . . . . . . . . . . . . . . . . . . . . . . . . . . . . . . . . 43

2
GENERAL INFORMATION TECHNICAL DATA
GENERAL INFORMATION
This coee machine is suitable for preparing espresso
coee using coee beans and is equipped with a device to
dispense steam and hot water.
The machine is designed for domestic use and not suitable
for heavy or professional use.
Warning: No liability is held for damage caused by:
• Incorrectusenotinaccordancewiththeintendedpurposes.
• Repairsnotcarriedoutbyauthorizedservicecenters.
• Tamperingwiththepowercord.
• Tamperingwithanypartsofthemachine.
• Useofnon-originalsparepartsandaccessories.
• Failuretodescalethemachineormachineuseattemperatures
below32°F(0°C).
IN THESE CASES, THE WARRANTY SHALL BE DEEMED NULL
AND VOID.
THE WARNING TRIANGLE INDICATES ALL
IMPORTANT INSTRUCTIONS FOR THE USER'S
SAFETY. PLEASE FOLLOW THESE INSTRUCTIONS
CAREFULLY TO PREVENT SERIOUS INJURIES.
HOW TO USE THESE INSTRUCTIONS
Keep these operating instructions in a safe place and make them
availabletoanyoneelsewhowouldusethecoeemachine.For
further information or in case of problems, please refer to the an
authorizedservicecenter.ForSaecocustomerservice,call(800)
933-7876intheU.S.or(514)385-5551inCanada.
SAVE THESE INSTRUCTIONS
INSTRUCTIONS FOR THE POWER SUPPLY CORD
• Ashortpower-supplycordisprovidedtoreducerisksresulting
frombecomingentangledinortrippingoveralongercord.
• Extensioncordsmaybeusedifcareisexercisedintheiruse.
Ifanextensioncordisused,makesure:
a. Themarkerelectricalratingoftheextensioncord
should be at least as great as the electrical rating of the
appliance.
b. Theextensioncordshouldbearrangedsothatitwillnot
drapeoverthecountertoportabletopwhereitcanbe
pulledonbychildrenortrippedover.
c. Iftheapplianceisofthegroundedtype,theextension
cordshouldbeagrounding-type3-wirecord.
• Donotusemulti-sockets
TECHNICAL DATA
Nominal voltage See label on the appliance
Power rating See label on the appliance
Power supply See label on the appliance
Shell material Thermoplastic material/Metal
Size (w x h x d) 245x360x420mm
Weight 13.4Kg(Class)-14.2Kg(Class)
Cord length 1200 mm
Control panel Front
Water tank 1.5liters-(removable)
Coee bean hopper capacity 300 grams
Pump pressure 15 bar
Boiler Stainless steel
Coee grinder Ceramic
Quantity of ground coee 7-10,5g
Dregdrawer capacity about 11
Safety devices Boilerpressuresafetyvalve–Doublesafetythermostat.

3
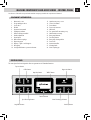
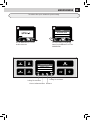
MACHINE COMPONENTS AND ACCESSORIES CONTROL PANEL
Thereferencesofthistablearereportedintheattachedcartonpaper,inwhichthecomponentsareillustrated.
COMPONENTI APPARECCHIO
1 Watertank+cover
2 Pre-groundbypassdoser
3 Servicedoor
4 SBS dial
5 Hotwater/steamwand
6 Full drip tray indicator
7 Coeebeanhopperwithlid
8 Grinder adjustment
9 Control panel
10 Milk container couplings
11 Dispensing spout
12 Drip tray + grill + sealed support
13 Brewgroup
14 Usedgroundsdrawer+protectionelement
15 Liquidrecoverytray+cover
16 Servicedoorbutton
17 Powerbutton
18 Powercordconnector
19 Milk carafe
20 Pre-groundcoeemeasuringscoop
21 Water hardness test strip
22 Brewgrouplubricant
23 Descaling solution
24 Brewgroupcleaningtablets
25 Powercord
26 Intenzawaterlter
27 Cleaning brush
28 Carafe coupling cap
Cappuccino button
Carafe cleaning cycle button
Stand-bybutton
Opti-dosebutton
"MENU" button
Function buttons
Espresso button
Coeebutton
LongCoeebutton
Specialbeveragebutton
CONTROL PANEL
Thecontrolpanelhasbeendesignedtoallowanergonomicuseofallmachinefunctions.

4
1
4
7 8
5 6
32
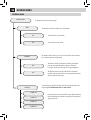
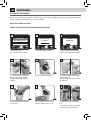
STARTING THE MACHINE
Beforeturningonthemachine,makesurethatthepowerbuttonissetto"0".
Lifttherightouterlidandremovethe
inner lid.
Removethewatertankusingthehandle.
Pressthepowerbuttontothe"I"
position to turn the machine on.
Thedisplayshowsaredashingled.
Pressthestand-bybuttontostartthe
machine.
Fillthetankwithfreshdrinkingwater.Do
notexceedthe"max"levelindicatedon
thewatertank.Placethewatertankback
into the machine.
Insert the plug into the socket located
on the back of the machine and insert
theotherendintoapoweroutletwith
suitable current.
Slowlypourcoeebeansintothe
hopper.
Replace the inner lid and close the outer
lid.
Lifttheleftouterlidandremovethe
inner lid.
When the correct temperature is
reached, the machine performs a
priming and rinsing cycle of the
internal circuits. A small amount of
waterisdispensed.Waitforthiscycle
to be completed.
The screen for product dispensing
appears on the display; see page 3.
INSTALLATION
Atrststart-uponly,thescreen(1)willbedisplayedasshownonpage5.Then,thelanguagecanbesetfromtherelevantmenuonly
(seepage25).

5
5
1 2
1 2 3 4
A
B
C
6
Selezionarelalinguadesiderata
premendoitasti( )o( ).
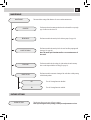
SETTING THE LANGUAGE
Thissettingallowsyoutochoosetheoperatinglanguageofthemachine.Italsoallowsyoutoadjusttheparametersofthebeveragesto
thetypicalparametersofthecountrywherethemachineisused.Thisiswhysomelanguagesaredierentiatedalsobycountry.
Ifnolanguageisselected,youwillberequestedtoselectitthenexttimethemachineisstarted.
MEASURING THE WATER HARDNESS
The test strip can only be used for one measurement.
Immersethewaterhardnessteststrip
providedwiththemachineinwaterfor
1 second.
Checkthewaterhardnessvalueandset:
- Themachinewaterhardnesslevel(page28).
- TheIntenzaAromaSystem(page7).
IntenzaAromaSystem
Machinewaterhardnesssetting
LINGUA
ITALIANO
ENGLISH
DEUTSCH
1
LINGUA
ITALIANO
ENGLISH
DEUTSCH
2
RINSING
STOP
4
HEATING UP…
3
Select the desired language by pressing
thearrowbuttons( )or( ).
Pressthesavebutton. Themachineactivatesthewarmingup
phase. Wait until it is completed.
Whenwarm-upphaseiscomplete,the
machine performs a rinsing cycle of the
internal circuits. It is possible to interrupt
the cycle by pressing the "STOP" button.
Themachineisnowreadyforuse.Asmallquantityofwaterisdispensed.
Wait for this cycle to be completed
automatically.

6
9
1 32
8
5
7
FIRST USE USE AFTER A PERIOD OF INACTIVITY
Toimprovetheproductquality,carryoutthisprocedureatrstuseofthemachineandafterlongperiodsofinactivity.
A few simple operations are needed to ensure the quality of your favourite beverages over time.
INSTALLATION
HOT MILK
HOT WATER
STEAM
SPECIAL BEVERAGES
6
Placeacontaineroflargesizeunderthe
coeedispensingspout.
Press the button once or more until the
icon is displayed.
Select the product by pressing the
buttonshown.
OK ESC
INSERT
GROUND COFFEE
AND PRESS OK
4
Press the "OK" button to start dispensing
waterthroughthedispensingspout.DO
NOTinsertcoeeatthisstage.
Fillthewatertankwithfreshdrinking
wateraspreviouslydescribed.Your
machineisnowreadytobrewexcellent
beverages!
At the end of the dispensing phase,
removethecontainerandplaceitunder
thehotwaterwand.
Press the "SPECIAL" button.
Dispensing can be interrupted by
pressing the "STOP" button.
Attheend,removethecontainerand
empty it.
Repeat the process from step 5 to step 7
untilthewatertankisempty.
Select "HOT WATER" by pressing button
(
)or( ).Pressthe"OK"'buttonand
waitfortheprogrammedquantitytobe
dispensed.
HOT WATER
STOP
7
5

7
1
4 5
32
INTENZA WATER FILTER
Toimprovethequalityofthewateryouuseandextendthelifeofyourmachineatthesametime,itisrecommendedthatyouinstallthe
waterlter.Afterinstallation,gotothewaterlterinitializationprogramme(seethe"MACHINEMENU",page25).Inthisway,themachine
informstheuserwhenthewaterltermustbereplaced.
Remove the water lter from its packaging, immerse it vertically (with the opening positioned upwards) in cold water and
gently press its sides to let the air bubbles out.
Removethesmallwhitelterfromthe
tank and store it in a dry place sheltered
from dust.
Fillthetankwithfreshdrinkingwater
andre-insertitintothemachine.
Placeacontainerbeneaththehotwater/
steamwand.
Insertthelterintheemptytank.The
referencemarkandthegroovemust
match.Pushrmlyuntilitiscompletely
inserted.
SetuptheIntenzaAromaSystem:
A=Softwater
B=Mediumwater(standard)
C=Hardwater
Press the "OK" button. Pressthe"OK"buttontoconrmthe
introductionofthenewwaterlter.
Pressthe"OK"buttontoconrm.Wait
untilthecycleiscompletedandremove
the container.
Accessthe"MACHINEMENU"(see
page25).Select"WATERMENU"and
"ACTIVATE FILTER", then press "OK".
NOTE: At the end of the procedure the display automatically returns to the product dispensing page.
If the Intenza water lter is not available, insert the small white lter previously removed (see point 1) into the tank.
ENABLE FILTER
ACTIVATE FILTER
WATER MENU
6
OK ESC
ACTIVATE FILTER?
7
OK
INSERT FILTER.
FILL THE TANK
8
OK
PLACE A CONTAINER
UNDER THE
WATER SPOUT
9

8
21
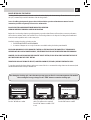
ADJUSTMENTS
COFFEE STRENGTH SBS
TheSBSdialhasbeencarefullydesignedtogiveyourcoeethefullnessandintensityyoudesire.Simplyturnthedialandsetthecoee
frommildintensitytostrongintensity,accordingtoyourowntaste.
SBS SAECO BREWING SYSTEM
TheSaecoBrewingSystem(SBS)adjuststhefullnessofthebrewedcoee.Thecoeemayevenbeadjustedwhilebrewing.
Thisadjustmenthasanimmediateeectontheselectedtypeofbrewing.
MEDIUM
COFFEE
STRONG
COFFEE
MILD
COFFEE
OPTIDOSE ADJUSTS THE AMOUNT OF COFFEE TO GRIND
Themachineallowsyoutoadjusttherightquantityofgroundcoeeforeachproduct.Thestandardadjustmentforeachproductcanbeset
inthe"BEVERAGEMENU"(seepage22).
Youmaytemporarilychangetheamountofcoeegroundaswell.Thischangeappliesonlytothebrewingofthenextcoee.
Press the " "buttononthecontrolpaneltotemporarilychangethequantityofgroundcoee,orselectthepre-groundfunction.
= mild dose
= medium dose
= strong dose
=Thebeverageisbrewedbyusingthepre-groundcoee

9
A B C
Thissettingprovidesaverycoarse
grinding.
Press and turn. Thissettingprovidesaverynegrinding.
SAECO ADAPTING SYSTEM
Coeeisanaturalproductanditscharacteristicsmaychangeaccordingtoitsorigin,blendandroast.TheSaecocoeemachineisequipped
withaself-adjustingsystemthatallowstheuseofalltypesofcoeebeansavailableonthemarket(notincludingavoredorcarmelized).
• Themachineautomaticallyadjustsitselfinordertooptimizetheextractionofthecoee,ensuringperfectcompressionofthebeansto
obtainacreamyespressocoeethatisabletoreleaseallthearomas,regardlessofthetypeofcoeeused.
• Theoptimizationprocessisalearningprocessthatrequiresthebrewingofacertainnumberofcoeestoallowthemachinetoadjustthe
compactnessofthegroundcoee.
• Attentionshouldbegiventospecialblends,whichrequiregrinderadjustmentsinordertooptimizetheextractionofthecoee.
COFFEE GRINDER ADJUSTMENT
Themachineallowsslightadjustmentstothecoeegrindertoadaptittothekindofcoeeused.
Important Note: Adjustments to the co ee grinder can be made only when the grinder is being used. This phase takes
place during the rst part of a co ee brewing.
Theadjustmentcanbecarriedoutbyusingthedialinsidethebeanhopperwithoutcomingintocontactwithanymovingparts.
Pressandrotatethedial(onestepatatime)accordingtotheindicationsprovidedonthecover.
Pressandturnthedialonenotchatatimeandbrew2-3cupsofcoee;thisistheonlywaytonoticedierencesinthegrind.

10
1 2 3
4
DISPENSING SPOUT HEIGHT ADJUSTMENT
Beforebrewingaproduct,andaccordingtothekindofcup,adjusttheheightofthedispensingspout.
Toadjust,manuallymovethedispensingspoutasshowninthepicture.
Note: In some cases the dispensing spout can be removed to allow the use of very
large containers.
ADJUSTMENTS

11
A
STANDBY MODE
Themachineisdesignedforenergysaving.After60minutesofinactivity,themachinegoesintostand-bymode,theboilerisnolonger
heatedandallthedevicesturno.
Powerconsumptionisreducedtoaminimum.Pressanybuttontoturnthemachineonagain.
Themachinestatuscanbemanuallychangedtostand-bymodebyholdingthestand-bybuttonpressedfor3seconds.
Note:
1 The stand-by mode cannot be activated if the service door is left open.
2 The stand-by activation time can be changed in the "MACHINE MENU" on
page 26.
3 When the stand-by mode is activated, the machine performs a rinse
cycle of the internal circuits, if necessary. The cycle can be interrupted by
pressing the "STOP" button.
Themachinecanbeturnedonagainbyexecutingoneofthefollowingactions:
1 By pressing any of the control panel buttons.
2 Byopeningtheservicedoor(whenclosingthedoorthemachinegoesbackto
stand-bymode).
Theredlightasheswhenthemachine
isinstand-bymode.

12
I
II
1 2 3
4 5 6
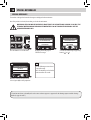
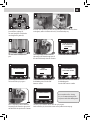
Themachineisequippedwithacarafeallowingforoptimalmilkfrothingforthebrewingof
tastycappuccinos,lattemacchiatosandanymilk-basedbeverage.
Note: Before using the carafe, make sure it is thoroughly clean and sanitary. If
milk is left in the carafe, make sure it is still suitable for food consumption before
using it.
Thecontainerallowsforaneasyandpracticalsteamingandfrothingofmilk.Thecontainer
canbeeasilyremovedfromthemachineaftereachusesothatitcanbeplacedbackinthe
refrigerator.
Thebrewingcircuitisautomaticallywashedbyanautomaticcleaningcycleaftereachuse.
Thisautomaticcleaningcycleworksonlyifactive(seepage29)andcanbealsomanually
startedbypressingthe"CLEAN"buttonnext(seepage17).
Thecarafemustberemovedatleastonceaweektoallowforpropercleaningofall
componentsandkeepallpartsfreshforoptimumbrewing.(Forpropercleaning,refertothe
"MilkCarafeCleaning"sectionseepage39).
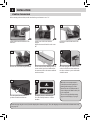
Removetheprotectioncoverfromthe
milk container connection and keep it in
a clean place. It is suggested to insert it
inthewatercoverseat.
Rotatethehandleclockwiseto
disengage the lock.
Pressthedisengagebuttonstoallowthe
lidremoval.
Fillthecarafewithcoldmilk.Fillmilkto
abovethe"MIN"line,butdonotexceed
the"MAX"levelindicatedonthecarafe.
MILK CARAFE USE
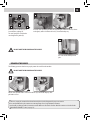
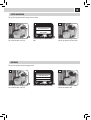
Place the lid back and ensure that it is
closedcorrectly.Movethehandleback
toitscentralpositiontoallowforperfect
closure.
Insertthecarafeinclinedtowardsthe
front.
The carafe base should be positioned on
thehole(E)locatedonthedriptray.
A = Carafe holes
B = Carafe pins
C = Machine couplings
D = Guides for carafe pins
A
B
B
C
D

13
2
1
8
9
7
C
D
A
B B
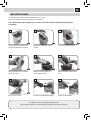
Afteruse,removethecontainerfromthemachineandplaceitintherefrigeratorforproperconservation.
WerecommendNOTtokeepthecontaineratroomtemperaturefortoolong.Maximum10minutes.
Storethemilkaccordingtoproducer'sinstructionsanddoNOTuseitafterbest-beforedate.Washthecontainerasdescribedinthe
"MILKCARAFECLEANING"section(seepage39).
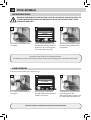
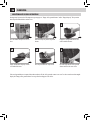
REMOVING THE CARAFE
Thefollowingoperationsshowhowtoproperlyremovethecarafefromthemachine.
DO NOT FORCE THE INCLINATION OF THE CARAFE.
Atthisstagethecarafeholes(A)are
lowerthanthecouplings(C).
Thecarafepins(B)arelocatedatthe
sameheightoftheguides(D).
Insertthecarafebyturningittowardsthebasethrougharoundmovement(asshown
inthegure),untilitishookedtothehole(E)locatedinthedriptray.
Pullthecarafeupwardsuntilitsreleasefromthehole(E)locatedinthedriptray.Then
pull until it releases.
DO NOT FORCE THE INCLINATION OF THE CARAFE.
Thecarafewillbenaturallybackin
place.
E

14
1 2 3
ESPRESSO / COFFEE / LONG COFFEE
Thisprocedureshowshowtobrewanespresso.Tobrewanothertypeofcoee,presstheappropriatebutton.Usepropercoeecupsto
preventcoeefromspilling.
Tobrew2cups,pressthebuttontwice;themachinebrewshalfoftheenteredquantityandbrieyinterruptsdispensinginordertogrind
thesecondcoeedose.Coeebrewingisthenrestartedandcompleted.
Position1or2cupstobrewoneortwo
espressocoees.
Position1or2cup(s)tobrewanespresso
oralongcoee.
Choosethebeveragebypressingthe
correspondingbutton:oncefor1cupand
twicefor2cups.
ESPRESSO
STOP
5
The machine starts grinding the selected
coeequantity.
Themachinebeginsbrewingthe
selectedbeverage.
Coeebrewingcanbestoppedatanytimeby
pressing "STOP".
Themachinenishesbrewingautomaticallyonthebasisofthequantitydeterminedbythefactorysettings.
Tocustomizethisquantity,seepage22.
ESPRESSO
STOP
6
ESPRESSO
4
COFFEE BREWING

15
1 3
5
2
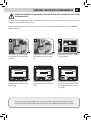
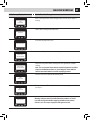
BEVERAGE BREWING WITH PREGROUND COFFEE
Themachineallowsyoutousepre-groundanddecaeinatedcoee.
Pre-groundcoeemustbepouredintothebypassdoserpositionedonthetopofthemachine.Onlyusegroundcoeeforespresso
machinesandnevercoeebeansorinstantcoee(seethe"beverageprogramming"sectiononpage22).
Thisexampleshowshowtobrewanespressobyusingpre-groundcoee.
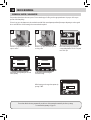
Place 1 cup under the dispensing spout. Presstheopti-doseonceormoreuntil
the icon appears on the display screen.
Select the product desired by pressing
the corresponding button.
OK ESC
INSERT
GROUND COFFEE
AND PRESS OK
4
OK ESC
INSERT
GROUND COFFEE
AND PRESS OK
6
A message reminds the user to pour
groundcoeeintothebypassdoser.
Lift the door and open it.
Pourgroundcoeeintheappropriate
compartment using the measuring scoop
provided.
Press"OK"tostartbrewing.
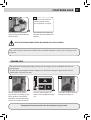
Note:
• Ifbrewingdoesnotstartwithin30secondsfromtheappearanceofthemessageinstep4,themachinewillreturntothemain
menuanddischargeanyinsertedcoeeintotheusedgroundsdrawer.
• Ifnopre-groundcoeeispouredintothebypassdoser,onlywaterwillbedispensed;
• Ifthedoseisexcessiveorif2ormorescoopsofcoeeareadded,themachinewillnotbrewtheproductandthecoeeinthe
bypassdoserwillbedischargedintotheusedgroundsdrawer.
WARNING: ONLY PUT PREGROUND COFFEE INTO THE BYPASS DOSER WHEN YOU WISH TO BREW THIS TYPE
OF PRODUCT.
ONLY INSERT ONE SCOOP OF GROUND COFFEE AT A TIME. TWO COFFEES CANNOT BE BREWED AT THE SAME
TIME WHEN USING THIS FUNCTION.
Page is loading ...
Page is loading ...
Page is loading ...
Page is loading ...
Page is loading ...
Page is loading ...
Page is loading ...
Page is loading ...
Page is loading ...
Page is loading ...
Page is loading ...
Page is loading ...
Page is loading ...
Page is loading ...
Page is loading ...
Page is loading ...
Page is loading ...
Page is loading ...
Page is loading ...
Page is loading ...
Page is loading ...
Page is loading ...
Page is loading ...
Page is loading ...
Page is loading ...
Page is loading ...
Page is loading ...
Page is loading ...
Page is loading ...
Page is loading ...
Page is loading ...
Page is loading ...
-
 1
1
-
 2
2
-
 3
3
-
 4
4
-
 5
5
-
 6
6
-
 7
7
-
 8
8
-
 9
9
-
 10
10
-
 11
11
-
 12
12
-
 13
13
-
 14
14
-
 15
15
-
 16
16
-
 17
17
-
 18
18
-
 19
19
-
 20
20
-
 21
21
-
 22
22
-
 23
23
-
 24
24
-
 25
25
-
 26
26
-
 27
27
-
 28
28
-
 29
29
-
 30
30
-
 31
31
-
 32
32
-
 33
33
-
 34
34
-
 35
35
-
 36
36
-
 37
37
-
 38
38
-
 39
39
-
 40
40
-
 41
41
-
 42
42
-
 43
43
-
 44
44
-
 45
45
-
 46
46
-
 47
47
-
 48
48
-
 49
49
-
 50
50
-
 51
51
-
 52
52


Philips HD8854 Operating instructions
- Category
- Coffee makers
- Type
- Operating instructions
Ask a question and I''ll find the answer in the document
Finding information in a document is now easier with AI
Related papers
-
Philips Energica Focus Operating instructions
-
Philips RI9944 User manual
-
-
Philips HD8857/09 User manual
-
-
-
-
Philips Exprelia User manual
-
Philips HD8753 Operating instructions
-
Philips HD8953/09 User manual
Other documents
-
Saeco HD8942/11 User manual
-
-
Saeco HD8943 User manual
-
-
-
Gaggia 1003380 User manual
-
Saeco Cappuccino Operating instructions
-
Saeco HD8753/80 User manual
-
Saeco HD8838 Syntia User manual
-
Saeco HD8753 Intelia Evo User manual