Troy-Bilt 030240 Owner's manual
- Category
- Power generators
- Type
- Owner's manual
This manual is also suitable for

O
Portabme Generator/Generador Port,tim
Modem / Modemo 030240
,®
Before using this product, read this manuaHand follow aH
Safety RuHes and Operating Instructions.
Antes de utiHizar eH producto, Heaeste manuaH y siga todas Has
Reghs de Seguridad e Instrucdones de Uso.
Questions? Preguntas?
- 1=888=611=6708 P1-F84 CT
Troy-BiltO is a registered trademark ofTroy-Bilt, LLC and is used under license to Briggs & Stratton Power Products.
Troy-Bilt® es una marca registrada registrada de Tro>,-Bilt,LLC y se usa abaio licencia a Briggs & Stratton Power Products.
BRIGGS & STRATTON POWER PRODUCTS GROUP, LLC
JEFFERSON,WISCONSIN, U.$.A.
Printed in USA
4
Manual No. 197484GS Revision O(05/06/2005)

Safety Rules
SAVE THESE mNSTRUCTmONS
TABLE OF CONTENTS
Section Ho Safety RuNes .......................... 2-4
Section 2 ° Features and ControHs ................... 5
Section 3 oAssembHy ............................ 6-8
Section 4 o Operation .......................... 9- H2
Section 5 o Maintenance .......................... H3
Section 6 o Storage .............................. H4
Section 7 oTroubleshooting ........................ H5
Notes ......................................... H6
Warranty ...................................... H7
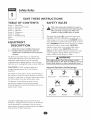
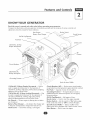
EQUmPNENT
DESCRmPTmON
- ead this manuam carefummy and become
fam,iarwith,oorge°erator.,°owits
appmications, its mimitadons and any hazards
invomved.
The generator described herein is an engine:driven,
revoHving fiend,aHternating current (AC) device. Each is
designed to supply electrical power for operating
compatibHe eHectricaH Highting, appHiance, tool and motor
Hoads. Each unit's revoHving fiend rotates at about 3,600 rpm.
SAFETY RULES
This is the safety amert symbol [t is used to
amert you to potendam personam iniury hazards.
Obey all safety messages that follow this
symbol to avoid possible iniury or death.
The safety aHert symboH (_) is used with a signaH word
(DANGER, CAUTION)A!ARNING), a pictorial and/or a
safety message to aHert you to hazards. DANGER indicates
a hazard which, if not avoided, will resuHt in death or serious
iniury. WARNING indicates a hazard which, if not avoided,
could resuHt in death or serious iniury. CAUTION
indicates a hazard which, if not avoided, might resuHt in
minor or moderate iniury. CAUTION, when used
without the aHert symbol indicates a situation that couHd
resuHt in equipment damage. FoHHowsafety messages to
avoid or reduce the risk of iniury or death.
[
CAUT|ON! DO NOT exceed the generator's
wattage/amperage capacity. See "Don't OverHoad
Generator".
Every effort has been made to ensure that information in
this manual is accurate and current. However, we reserve
the right to change, aHter or otherwise improve the product
and this document at any time without prior notice.
The Emission ControH System for these unit's are
warranted for standards set by the Environmenta[
Protection Agency. For warranty information refer to the
engine owner's manua[.
Hazard Symbols and Meanings
EHectrocution EHectricaHShock
ExpHosion
EHectricaHShock
Toxic Fumes Kickback
Fire
Hot Surface
Copyright © 2005 Brigs & Stratton Power Products
Group, LLC. AHHrights reserved. No part of this materiaH
may be reproduced or transmitted in any form by any
means without the express written permission of Brigs &
Stratton Power Products Group, LLC.

Section 1: Safety Rules
WARNING
Operate generator ONLY outdoors.
Keep exhaust gas from entering a confined area through
windows, doors, ventilation intakes or other openings,
DO NOT operate generator inside any building or enclosure,
including the generator compartment of a recreadona[ vehicle (RV).
WARNING
When using generator for backup power; notify utility
company,, Use approved transfer equipment to isolate
generator from electric utility
Use a ground fauk circuit interrupter (GFCI) in any damp or
highly conductive area, such as metal decking or steel work.
DO NOT touch bare wires or receptacles.
DO NOT use generator with electrical cords which are worn,
frayed, bare or otherwise damaged.
DO NOT operate generator in the rain.
DO NOT handle generator or electrical cords while standing
in water, while barefoot, or while hands or feet are wet.
DO NOT allow unqualified persons or children to operate or
service generator
WARNING
• When starting engine, pull cord slowly until resistance is felt
and then pull rapidly to avoid kickback.
. NEVER start or stop engine with electrical devices phJgged in
and turned on.
WHEN ADDmNG OR DRAmNHNG FUEL
Turn generator" OFF and let it cool at least 2 minutes before
removing fue! cap. Loosen cap slowly to relieve pressure in
tank.
Fill or drain fuel tank outdoors.
DO NOT overfill tank.Allow space for fiJel expansion.
Keep fuel away from sparks, open flames, pilot lights, heat, and
other ignition sources_
DO NOT light a cigarette or smoke.
VHEN STARTING EQUIPMENT
• Ensure spark plug, muffler, fiJel cap and air cleaner are in place.
DO NOT crank engine with spark plug removed.
If fuel spills, wait until it evaporates before starting engine.
WHEN OPERATING EQUIPMENT
Do not tip engine or equipment at angle which causes fuel to
spill
This generator is not for use in mobile equipment or marine
applications.
VHEN TRANSPORTING OR REPAiRiNG
EQUIPMENT
iN TANK
Store away from furnaces, stoves, water heaters, clothes
dryers or other appliances that have pilot light or other
ignition source because they can ignite fuel vapors.
This generator does not meet U. S. Coast Guard Regulation
33CFR-183 and should not be used on marine applications.
FaihJre to use the appropriate U. S. Coast Guard approved
generator could resuk in bodily injury and/or property
damage.

Section 1: Safety RuJes
WARNING
WHEN ADJUSTmNG OR MAKmNG REPAmRS TOYOUR
GENERATOR
Disconnect the spark plug wire from the spark plug and place
the wire where it cannot contact spurt< plug
WHENTESTmNG FOR ENGmNE SPARK
Use approved spark plug tester:
DO NOT check for spark with spark plug removed,
WARNING
DO NOT touch hot surfaces.
Allow equipment to cod before touching.
The generator must be at least 5 feet from structures having
combustible walls and/or other combustible materials.
Keep at least 3 feet of clearance on all sides of generator for
adequate cooling, maintenance and servicing.
In the State of California a spark arrester is required by law
(Section 4442 of the California Public Resources Code). Other
states may have similar laws. Federal laws apply on federal
lands. [f you equip the muffler with a spark arrester, it must be
maintained in effective working order:
CAUTION
DO NOT tamper with governed speed. Generator supplies
correct rated frequency, and voltage when running at governed
speed.
DO NOT modify generator in any way,
See "Don't Overload Generator".
Start generator and let engine stabilize before connecting
electrical loads.
Connect electrical loads in OFF position, then turn ON for
operation.
Turn electrical loads OFF and disconnect from generator
before stopping generaton
Use generator only for" intended uses.
If you have questions about intended use, ask dealer or call
1-888-61 1-6708.
Operate generator only on level surfaces,
DO NOT expose generator to excessive moisture, dust, dirt,
or" corrosive vapors.
DO NOT insert any objects through cooling slots.
If connected devices overheat, turn them off and disconnect
them from generator:
Shut off generator if:
-electrical output is lost;
-equipment sparks, smokes, or emits flames;
-unit vibrates excessiveJy.

Features and Controls
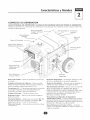
KNOW YOU R G I=NI=RATOR
FueHTank
[ 20 Vok AC, 20 Amp
DupHex Receptacles
Choke Lever
Air
CHeaner
Circuit Breakers
H20/240VokAC_
30 Amp Receptacle
Grounding Fastener
[ 20 Volt AC, 20 Amp, Duplex Receptacle -- Hay be
used to supply electrical power for the operation of
[ 20Vo[tAC, 20 Amp, single phase, 60 Hz electrical lighting,
appliance, too[ and motor loads.
[ 201240 Volt AC, 30 Amp Locldng Receptacle -- Hay
be used to supply electrical power for the operation of
120 and/or 240 Volt AC, 30 Amp, single phase, 60 Hz
electrical lighting, appliance, tool and motor loads.
Air Cleaner -- Protects engine by fikering dust and debris
out of intake air_
Battery Float Charger -- Use battery float charger jack
to keep the starting battery charged and ready for use.
Choke Lever -- Used when starting a cold engine.
Spark Attester Muffler
Circuit Breakers (AC) -- Push:to-reset circuit breakers
are provided to protect generator against electrical overload.
Fuel Tank -- Capacity of seven (7) U.S. gallons.
Grounding Fastener -- If required, please consult a
qualified electrician, electrical inspector, or local agency
Oil Fill Cap/Dipstick--Add engine oil here.
Recoil starter i Used to start the engine manually.
Rocker Switch -- Set this switch to "On" before using
recoil starter. Set switch to "O_' to switch off engine.
SparkArrester Mumer -- Exhaust muffler lowers
engine noise and is equipped with a spark arrester screen.
Start Button -- Push to start the engine.

Assembly
ASSEMBLY
Your generator requires some assembiy and is ready for
use after it has been properiy serviced with the
recommended oH and fuel
If you have any probiems with the assembiy of your
generator, piease cali the generator heipiine at
i-888-6 i 1-6708. If calling for assistance, piease have the
model revision_ and seMai number from the data tag avaHabie.
Remove Generator From Carton
H. Set carton on a rigid fiat surfacewith "This Side Up"
arrows pointing upward.
2. Carefuliy open top flaps of shipping carton.
3. Cut down corners at one end of carton from top to
bottom and Haythat side of carton down fiat.
4. Remove ali packing material carton flirters, etc.
5. Remove generator from shipping carton.
Carton Contents
Check ali contents. If any parts are missing or damaged_ cali
the generator heipiine at 1-800-743-4 i i 5.
Main unit
EngineoiH
Owner's manuai
Engine manual
Battery float charger
VVheeikit
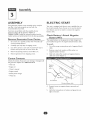
ELECTRmC START
Your unit is equipped with electric start capability but can
be started manually. If you choose not to use the electric
start feature, you do not need to connect the negative
battery cable.
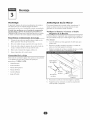
Check Battery / Attach Negative
The sealed battery on the generator is fully charged and
pre-installed except for the negative (black) battery cable.
To install:
I. Cut off tie wrap securing loose end of negative (black)
cable.
2. Remove screw, lock washer and fiat washer on
negative battery termina[.
3. Siide Hock washer, fiat washer and negative battery
cabie over screw (Figure 1).
cable
4_
5.
/
Lock Washer
Positive battery cable
Reattach screw to negative battery termina[ and
tighten.
Verify that connections to battery and generator are
tight and secure.

Section 3: Assembly
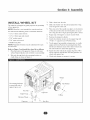
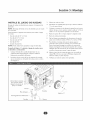
mNSTALLWHEEL KIT" 3. Slideawheelovertheaxle.
The wheeH Haltis designed to greatly improve the portability 4. SHidea fiat washer over the axle and pHacethe e-ring
of your generator, onto the groove in the axHe.
NOTE:_6/heeH Haltis not intended for overothe-road use. 5. Place one end of the needle nose pHierson the bottom
of the axHeand the other end of the pHiers on top of
You will need the following tools to instaHHthis wheel kit:
the e-ring. Seat the e-ring by pressing the pHiers closed,
" H/2" or H3mm socket wrench
6. Repeat step 3 through 5 to secure second wheel
" H/2" or H3mm open end wrench
7. Remove the temporary bHocks.
, 7/H6" socket wrench 8. Attach the vibration mounts to the support Hegwith
, 7/H6" open end wrench H/4-20 x H" capscrews and H/4-20 Hock nuts.
" Needle-nose pliers 9. To aid support leg assembly, rest generator on cradle,
NOTE: AdjustabHe wrenches may be substituted for open engine end down. Remove the existing Hod<nut from
end wrenches, the left unit vibration mount with 13mm wrench. Use
Refer to Figure 2, and install the wheel kit as follows: the same Hod<nut to attach the support Heg.
H. Race the bottom of the generator frame on a fiat, even H0. Attach the other side of the support Hegwith a P18 x
surface.TemporariHy place unit on blocks to ease assembly. 20 mm capscrew and H8 lock nut. Rest generator on
wheeHs and support Heg.
2. SHide axle through both axle mounting brackets on
HH. Check each fastener to ensure it is secure.
cradHe frame, as shown in Figure 2.
Wheel
Use existing hardware
to attach Heft side of
support Hegto unit
Hex Nut _
Support
Vibration Hount
\
Capscrew
Axle
Rat Washer
/
_. /
E-Ring
Capscrew -- - Hex Nut

Section 3: Assembly
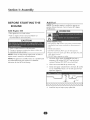
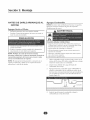
BEFORE STARTmNG THE
ENGmNE
Add Engine Oil
* Place generator on a [eve[surface.
° Refer to engine owner's manual and follow oil
recommendations and instructions.
Refer to engine manual for oil fill information.
Damage to equipment resuking from failure to follow this
instruction will void warrant><
NOTE: Ched< oil often during engine break-in. Refer to
engine owner's manual for recommendations.
NOTE:The generator assembly rotates on a prehbricated
and sealed ball bearing that requires no additional
lubrication for the life of the bearing.
Add Fuel
NOTE: This gasoline engine is certified to operate on
gasoline. Exhaust Emission Control System: EH (Engine
Hodifications).
WHEN ADDING FUEL
Turn generator" OFF and let it cool at least 2 minutes before
removing rue! cap. Loosen cap slow, ly to relieve pressure in
tank.
Fill fuel tank outdoors.
DO NOT overfill tank.Allow space for fuel expansion.
Keep fuel away from sparks, open flames, pilot lights, heat, and
other" ignition sources.
DO NOT light a cigarette or smoke.
Use clean, fresh, regular UNLEADED fuel with a
minimum of 85 octane. DO NOT use fuel which
contains Hethanol. DO NOT mix oil with fuel.
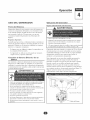
2. Clean area around fuel fill cap, remove cap.
3. Slowly add regular unleaded fuel to fuel tank. Be careful
not to overfill.Allow about 1.5" of tank space for fuel
expansion (Figure 3).
_NNNNNNNNNNNNNNN
_NNNNNNNNNNNNNNf"
INNNNNNNNNNNNNNN
4. Install fuel cap and wipe up any spilled fuel.

Operation
USmNG THE GENERATOR
System Ground
The generator has a system ground that connects the
generator frame components to the ground terminals on
the AC output receptacles.The system ground is connected
to the AC neutral wire (see "Eqopment Description',
earlier in this manual).
Special Requirements
There may be Federal or State Occupational Safety and
HeaHthAdministration (OSHA) reguHations, HocaHcodes, or
ordinances that apply to the intended use of the generator,
Please consuk a qualified electridan, electrical inspector, or
the local agency having jurisdiction,
o In some areas, generators are required to be registered
with local utility companies,
o If the generator is used at a construction site, there may
be additional regulations which must be observed,
Connecting to a Build[rig's Electrical
Connections for standby power to a building's electrical
system must be made by a qualified electrician.The
connection must isolate the generator power from utility
power, and must comply with all applicable laws and
electrical codes.
WANNING
When using generator for backup power1 notify utility
company. Use approved transfer equipment to isolate
generator from electric utility:
Use a ground fauk circuit interrupter (GFCI) in any damp or
highly conductive area, such as metal decking or steel work.
DO NOT touch bare wires or receptacles.
DO NOT use generator with electrical cords which are worn,
frayed, bare or otherwise damaged.
DO NOT operate generator in the rain.
DO NOT handle generator or electrical cords while standing
in water; while barefoot, or while hands or feet are wet.
DO NOT allow unqualified persons or children to operate or
service generatoi:
Operate generator ONLY outdoors.
Keep exhaust gas from entering a confined area through
windows, doors, ventilation intakes or other openings.
DO NOT operate generator inside any building or enclosure,
including the generator compartment of a r_creational vehicle (RV).
The generator must be at least 5 ft. (I 52 cm) from
structures having combustible walls and/or other
combustible materials. Leave at least 3 ft. (92 cm) all around
generator including overhead, for adequate cooling,
maintenance and servicing.
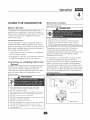
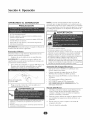
Place generator in a well ventilated area, which will allow
for removal of deadly exhaust gas. DO NOT place
generator where exhaust gas could accumulate and enter
inside or be drawn into a potentially occupied building.
Ensure exhaust gas is kept away from any windows, doors,
ventilation intakes or other openings that can allow exhaust
gas to collect in a confined area (Figure 4). Prevailing winds
and air currents should be taken into consideration when
positioning generator.
Typical Generator Shown
Exhaust Port

Section 4: Operation
OPERATmNG THE
See "Don't Overload Generator",
Start generator and let engine stabilize before connecting
electrical loads.
Connect electrical loads in OFF position, then turn ON for
operation.
Turn electrical loads OFF and disconnect from generator
before stopping generaton
[HPORTANT: Always unplug the battery float charger
before starring the generator.
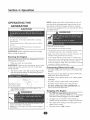
Starting the Engine
Disconnect ai[ electrical loads from the generator. Use the
following start instructions:
i, Hake sure unit is on a level surface.
IMPORTANT: Failure to start and operate unit on a level
surface wiil cause the unit not to start or to shut down
during operation.
2. Turn the fuel valve to the "On" position (Figure 5).The
fuel valve handle should be vertical (pointing toward
the ground) for fuel to flow,
in the On position
3. Start engine according to instructions given in the
engine owner's manual
1 WAR.I.G 1
When starting engine, pull cord slowly until resistance is felt
and then pull rapidIy to avoid kickback.
NEVER start or stop engine with electrical devices plugged in
and turned on.
NOTE: If engine starts after 3 pulis but fails to run, or if
unit shuts down during operation, make sure unit is on a
level surface and check for proper oil level in crankcase.
This unit may be equipped with a low oil protection device.
See engine manual.
WANNING
DO NOT touch hot surfaces.
Allow equipment to cool before touching.
The generator must be at least 5 feet from structures having
combustible walls and/or other combustible materials.
Keep at least 3 feet of clearance on all sides of generator for
adequate cooling, maintenance and servicing.
in the S_ate of California a spark attester is required by law
(Section 4442 of the California Public Resources Code). Other
states may have similar laws. Federal laws apply on federal
lands, if you equip the muffler with a spark arresten it must be
maintained in effective working order:
Cormecting Electrical Loads
° Let engine stabilize and warm up for a few minutes after
starting.
° Plug in and turn on the desired 120 and/or 240VoitAC_
single phase_60 Hz electrical loads.
* DO NOT connect 240Volt loads to the i20Voit duplex
receptacles.
° DO NOT connect 3-phase loads to the generator.
° DO NOT connect 50 Hz loads to the generator.
* DO NOT OVERLOADTHE GENEPJ:kTOR. See
"Don't Overload the Generator".
the Ens:ine
I. Turn OFF and unplug ali electrical loads from
generator panel receptacles, NEVER s_rt or stop engine
with electrical devices plugged in and turned ON,
2, Let engine run at no-load for several minutes to
stabilize internal temperatures of engine and generator.
3, Turn engine off according to instructions given in the
engine owner's manual,
4. Hove fuel valve to "Off" position.

Section 4: Operation
RECEPTACLES
CAUTION
NEVERattempt to power a device requiring more amperage
than generator or receptacle can supply,
DO NOT overload the generator: See"Don't Overload
_ener_tor".
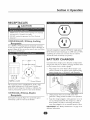
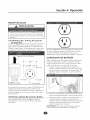
120/240 Volt AC, 30 Amp, Locking
1
Use a NEMA L14-30 plug with this receptacHe. Connect a
4-wire cord set rated for 250VoHtAC [oads at 30 Amps (or
greater) (Figure 6).You can use the same 4-wire cord if you
_lan to run a 120Volt load.
4oVVire Cord Set
/
/ \
Y (Hot)
(Neutral)
// X (Hot)
Ground (Green)
i
NEMA LI4-30
This receptacle powers 120/240VoltAC, 60 Hz, single
phase loads requiring up to KSS0 watts of power
(5.55 kW) at 23.1 Amps for 120Volts or 240Volts.The
outlet is protected by a push-to-reset circuit breaker.
120 Volt AC, 20 Amp, Duple×
Each duplex receptacle (Figure 7) is protected against
overload by a push-to-reset circuit breaker.
Use each receptacle to operate 120VoltAC, single-phase,
60 Hz electrical loads requiring up to 2,400 watts (2.4 kW)
at 20 Amps of current. Use cord sets that are rated for
125 Volt AC loads at 20 Amps (or greater).
BATTERY CNARGER
Use battery float charger jack to keep the starting battery
charged and ready for use. Battery charging should be done
in a dry location, such as inside a garage.
I. Phg charger into unit's"Battery Float Charger" jack
which is located on the starter switch (Figure 8). Plug
battery charger into a 120VoltAC wall receptacle.
2. Unplug charger from unit and wall oudet when
generator is being started and while it is in operation.
3. Keep this charger phgged in when generator is not in
use to prolong battery life.The charger has a built in
float equalizer and will not overcharge the battery,
even when plugged in for an extended period of time.
iMPORTANT: See "Battery Haintenance" on page I 3 for
additional information.

Section 4: Operation
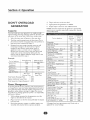
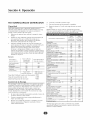
DON'T OVERLOAD
You must make sure your generator can suppHy enough
rated (running) and surge (starting) watts for the items you
wHH power at the same time. Follow these simpHe steps:
[. SeHect the items you will power at the same time.
2. Tota[ the rated (running) watts of these items.This is
the amount of power your generator must produce to
keep your items running. See Figure 9.
3. Estimate how many surge (starting) watts you will
need. Surge wattage is the short burst of power
needed to start eHectric motor-driven tools or
appliances such as a circular saw or refrigerator.
Because not all motors start at the same time, total
surge watts can be estimated by adding only the
item(s) with the highest additional surge watts to the
total rated watts from step :2.
Tool or Appliance
Window Air
Conditioner
Refrigerator
Freezer
Television
Li h_ (75 VVat_s_
Rated (Running)
Watts
1200
8OO
500
500
75
3075 Total
RunningWatts
Total Rated (Running)Watts = 3075
HighestAdditional SurgeVVatts = 1800
Total Generator Output Required = 4875
Additional Surge
1800
1600
500
1800 Highest
Surge Watts
Power Management
To prolong the life of your generator and attached devices,
it is important to take care when adding electrical loads to
your generator.There should be nothing connected to the
generator outlets before starting it's engine.The correct
and safe way to manage generator power is to sequentially
add loads as follows:
I. With nothing connected to the generator, start the
engine as described in this manual.
2. Plug in and turn on the first Ioad, preferably the largest
load you have.
3. Permit the generator output to stabilize (engine runs
smoothly and attached device operates properly.
4. Plug in and turn on the next load.
5. Again, permit the generator to stabilize.
6. Repeat steps 4 and 5 for each additional load.
NEVER add more loads than the generator capacity.Take
special care to consider surge loads in generator capacity,
as described above.
Tool or" Appliance
Rated >_
(Running)
Watts
Additional
Surge
(Starting)
Watts
_VVattages listed are approximate only. Check tool or
appliance for actual wattage.
Essentials
Light Bulb - 75 watt 75
Deep Freezer 500 500
Sump Pump 800 1200
Refrigerator/Freezer - [8 Cu. Ft. 800 [600
Water" Well Pump- I/3 HP I000 2000
Heating/Cooling
Window AC - I0,000 BTU 1200 1800
Window Fan 300 600
Furnace Fan Blower- 1/2 HP 800 1300
Kitchen
Microwave Oven - [000 Watt [000
Coffee Maker [S00
Electric Stove - Single Element [500
Hot Plate 2500
Family Room
100
VCR IO0
Stereo Receiver 450
Color" Television - 27" 500
Personal Computer w/I 7" monitor 800
Other
Security System [80
AM/FM Clock Radio 300
Garage Door Opener - I/2 HP 480 520
Electric Water Heater - 40 Gallon 4000
DiYijob Site
Quartz Halogen Work Light 1000
Airless Sprayer - I/3 HP 600 1200
Reciprocating Saw 960 960
Electric Drill- I/2 HP 1000 1000
Circular Saw - 7 U4" 1500 1500
Miter Saw - 10" [800 [800
Table Planer - 6" [800 [800
Table Saw/Radial Arm Saw - 10" 2000 2000
Air Compressor - I-I/2 HP 2500 2500

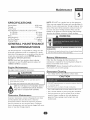
SPECmFmCATmONS
Starting VVatts ......................... 8,550 watts
Wattage ............................. 5,550 watts
Power Factor ................................ H.0
Rated Plaximum Continuous AC Load Current:
At H20VoHts ......................... 46.2 Amps
At 240 Volts ......................... 23. HAmps
Phase .................................. H-phase
Rated Frequency ......................... 60 Hertz
Furl Tank Capadty .................... 7 U.S. gallons
SNpping VVoght .......................... H83 Hbs.
GENERAL MAmNTENANCE
RECOMMENDATmON$
The Owner/Operator is responsibHe for making sure that
aH periodic maintenance tasks are completed on a timdy
basis; that aH discrepandes are corrected; and that the unit
is kept clean and properly stored. NEVER operate a
damaged or defective generator°
NOTE: Should you have questions about replacing
components on your Troy-BiWD generator, please call
1-888-611-6708 for assistance.
Engine Mair ter ance
See engine owner's manual for instructions.
1 cAoTlo.
NOTE: DO NOT use a garden hose to clean generator.
Water can enter engine fuel system and cause problems. In
addition, ifwater enters generator through cooling air slots,
some of the water will be retained in voids and cracks of
the rotor and stator winding insulation._A/ater and dirt
buildup on the generator internal windings will eventually
decrease the insulation resistance of these windings.
WARNING
Disconnect the spark plug wire from the spark plug and place
the wire where it cannot contact spark plug.
Battery Maintenance
Other than float charging, described elsewhere, no
maintenance is required for the starting battery. Keep the
battery and terminals clean and dry.
mNPORTANT_" Battery charging should be performed in a
dry location, such as inside a garage.
1 Generator Cieanin
, Use a damp cloth to wipe exterior surfaces clean.
• Used motor oil has been shown to cause skin cancer in
certain laboratory animals.
• Thoroughly wash exposed areas with soap and water;
KEEP OUT OF REACH OF CHILDREN. DON'T
POLLUTE. CONSERVE RESOURCES. RETURN
USED OILTO COLLECTION CENTERS.
Genera|:or Maintenance
Generator maintenance consists of keeping the unit dean
and dry. Operate and store the unit in a clean dry
environment where it will not be exposed to excessive
dust, dirt, moisture or any corrosive vapors. Cooling air
slots in the generator must not become clogged with snow,
leaves or any other foreign material.
®
®
®
DO NOT expose generator to excessivemoisture, dust, dirt,
or corrosive vapors.
DO NOT insert any objects through cooling slots.
Use a soft bristle brush to loosen caked on dirt or oil.
Use a vacuum cleaner to pick up loose dirt and debris.
Use low pressure air (not to exceed 25 psi) to blow
away dirt. Inspect cooling air slots and opening on
generator.These openings must be kept clean and
unobstructed.

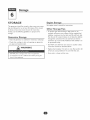
Stocage
STO RAG E
The generatorshouHdbe startedat Heastonce every seven
days and allowed to run at Heast30 minutes. If this cannot
be done and you must store the unit for more than
30 days, use the following guideHines to prepare it for
storage.
Generator Storage
o CHeanthe generator as oudined in "Generator CHeaning".
o Check that cooHing air shots and openings on generator
are open and unobstructed.
DO NOT place a storage cover over a hot generaton
Let equipment cool for a sufficient time before plating the
cover on the equipment.
Engine Storable
See engine owner's manuaH for instructions.
Other Storage Tips
o To prevent gum from forming in fuel system or on
essentiaH carburetor parts, empty aHHthree suppHied fuel
stabiHizer containers into fuel tank and firthwith fresh fuel
Run the unit for several minutes to circuHate the additive
through the carburetor.The unit and fuel can then be
stored for up to 24 months.AdditionaH fuel stabiHizer can
be purchased locally.
o DO NOT store fueHfrom one season to another unHess
it has been treated as described above.
o Replace fuel container if it starts to rust. Rust and/or dirt
in fueH can cause problems if it's used with this unit.
o Store unit in a dean and dry area.

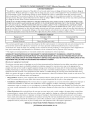
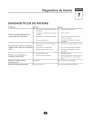
TROUBLESHOOTmNG
Probmem
No AC output is avaimaMe, but
generator is running.
Cause
i. One of the circuitbreakers is
open.
2. Fauitin generator.
3. Poor connection or defective cord
set.
4. Connected device is bad.
Correction
[. Reset circuit breaker.
2. ContactAuthorized service fadiity.
3. Check and repair.
4. Connect another device that is in
good condition.
Generator runs good at no-toad 1. Short circuit in a connected load. 1. Disconnect shorted electrical load.
but "bogs" down" when toads are 2. Generator is overloaded. 2. See "Don't Overload Generator".
connected. 3. Shorted generator circuit. 3. Contact Authorized service fadiity.
I. Failed battery. I. Replace battery.
Generator will not start; or starts
and runs rough. 2. Low oil level. 2. Fiil crankcase to proper level or
place generator on level surface.
Generator shuts down during Out of gasoline. Fiil fuel tank.
operation.
Generator lacks power. Load is too high. See "Don't Overload Generator".

Notes

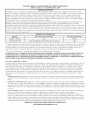
TROYoBILT® OWNERWARRANTY POLICY Effective November [, 2004
LiMiTED WARRANTY
"Troy=Bilt® isa registered trademark ofTroy=Bilt, LLC and is used under license to Briggs& Stratton Power Products. Briggs&
Stratton Power Products will repair or rephce, free of charge_any part_or parts of the equipmen__;_that are defective in material
or workmanship or both.Transportation chargeson parts submitted for repair or replacement under this warranty must be
borne by purchaser,Thiswarranty is effective for the time periods and subject to the conditions provided for in this policy.For
warranty service, find your nearest Authorized service dealer by calling 1=888=611=6708.Warrantyservice may only be performed
by a Briggs& Stratton Power Products Authorized service dealer.
THERE ISNO OTHER EXPRESSWARRANTY.IMPLIEDWARRANTIES_INCLUDING THOSE OF MERCHANTABILITY AND
FITNESSFORA PARTICULAR PURPOSE,ARE LIMITEDTOTHETIME PERIOD SPECIFIED_ORTOTHE EXTENT PERMITTED
BY LA_ANY AND ALL IMPLIEDWARRANTIES ARE EXCLUDED. LIABILITY FOR CONSEQUENTIAL DAMAGES UNDER
ANY AND ALL WARRANTIES ARE EXCLUDED TO THE EXTENT EXCLUSION ISPERMITTED BY LAW Some countries or
states do not allow limitations on how long an implied warranty lasts,and some countries or states do not allow the exclusion or
limitation of incidental or consequential damages,so the above limitation and exclusion may not apply to you.This warranty gives
you specific legal rights and you may also haveother rights that vary from country to country or state to state."
WARP_ANTY PERIOD*
Consumer Use Commercial Use
PressureWasher I Year 90 Days
Portable Generator 2Years (2nd year parts only) I Year
_The warranty period beginson the date of purchase bythe first retail consumer or commercial end user,and continues for the
period of time stated in the table above. "Consumer use" means personal residential household use by a retail consumer,
"Commercial use" meansall other uses_including usefor commercial income producing or rental purposes.Once equipment has
been used commercially,it shallthereafter be considered to be in commercial usefor purposes of this warranty.
"_The engineand starting batteries are warranted solely by the manufacturers of those products.
WARRANTY REGiSTRATiON iS NOT NECESSARYTO OBTAINWARRANTY ON BRIGGS & STRATTON POWER
PRODUCTS EQUIPMENT° SAVEYOUR PROOF OF PURCHASE RECEIPT.IFYOU DO NOT PROVIDE PROOF OFTHE
iNiTiALPURCHASE DATE AT THETINEWARRANTY SERVICE iSREQUESTED, THE MANUFACTURING DATE OF THE
EQUIPNENTWILL BE USEDTO DETERNINETHEWARRANTY PERIOD.
About your equipment warranty:
VVe welcome warranty repair and apologize to you for being inconvenienced.Any Authorized service dealer may perform warranty
repairs. Most warranty repairs are handled routinely, but sometimes requests for warranty service may not be appropriate. For
example, warranty service would not apply if equipment damage occurred because of misuse, hck of routine maintenance, shipping,
handling,warehousingor improper installation.Similarly,the warranty isvoid if the manufacturingdate or the serial number on the
equipment hasbeenremoved or the equipment hasbeenaltered or modified. During the warranty period, theAuthorized service
dealer,at its option, will repair or replaceany part that,upon examination, isfound to be defective under normal useandservice.This
warranty will not cover following repairs and equipment:
Normal Wear: Outdoor power equipment, H<eall mechanicaldevices,needs periodic parts, service and replacement to perform
well.This warranty does not cover repair when normal usehasexhausted the life of a part or the equipment.
Installation and Maintenance: This warranty does not applyto equipment or parts that havebeensubjected to improper or
unauthorized installation or alteration and modification, misuse,negligence,accident,overloading, overspeeding,improper
maintenance,repair or storage so as,in our judgment, to adverselyaffect its performance and reliability.This warranty also does
not cover normal maintenance such as adjustments,fuel system cleaningandobstruction (due to chemical,dirt, carbon or lime,
etc.).
Other E×ciusions: Also excluded from this warranty are wear items such asquick couplers, oil gauges,belts,oorings,filters,
pump packing_etc., pumps which havebeen run without water supplied or damageor malfunctions resulting from accidents,
abuse,modifications, alterations, or improper servicing or freezing or chemical deterioration.Accessory parts such asguns,
hoses,wands and nozzles are excluded from the product warranty.This warranty excludes failures due to acts of God and other
force majeure events beyond the manufacturers control.Also excluded is used,reconditioned, and demonstration equipment;
equipment used for prime power in placeof utility power and equipment used in life support applications.
BRIGGS & STRATTON POWER PRODUCTS GROUP, LLC
JEFFERSON,WISCONSIN, U,S,Ao

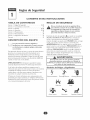
RegIasde Seguddad
CONSERVE ESTAS [NSTRUCCIONES
TABLA DE CONTENIDOS
Secci6n [ - RegJas De Seguridad ...................... [8-20
Secci6n 2 - Caracteristicas y Controles ................... 2 U
Secci6n 3 - Hon_aie ................................ 22-24
Secci6n 4 - Operad6n .............................. 25-28
Secci6n 5 - Hantenimiento ............................. 29
Secci6n 6 -AImacenamiento ............................ 30
Secci6n 7 - Diagnosticos De ,_verias ...................... 3U
Garantia ............................................ 32
DESCRIPClC)N DEL EQUIPO
_]__ _,. Lea este manual de manera cu[dadosa
Y
_ fami[iar[cese con su
..... generadoro Conozca sus usos,
sus [imitaciones y cua[quier pe[igro re[acionado
con em mismo.
Este generador funciona en base a un motor, de campo eJ6ctrico
giratorio 7"de corriente alterna (AC). Fue disefiado con la
finatidad de proveer energia e[6ctrica para luces ei6ctricas,
aparatos, herramientas compatibles y cargas de moron El campo
giratorio de[ generador funciona a una ve[ocidad de 3_6000 rpm
usando un motor con un solo ciiindro.
[PRECAUTION! NO sobrepase la capacidad de vataie y
amperaie de[ generador. Revise "No Sobrecargue Generador'.
Se ha hecho cada esfuerzo posible para asegurarse que la
informaci6n que aparece en este manual es exacta y se encuentra
actuaIizada. Sin embargo, nosotros se reserva el derecho a
cambia_; alterar o de otra manera meiora_; el producto y este
documento en cualquier momento, sin previo aviso.
El Sistema de Control de Emisiones para este generador est_
garan_izado para iuegos est_ndares por la Agencia de Protecci6n
Ambientai. Para mayor informaci6n acerca de la garantia, consulte
con el manual del propietario del motor:
REGLAS DE SEGUR[DAD
Este es el s[mbo[o de a[erta de segur[dad. Sirve
para advertir a[ usuario de un posible r[esgo para
su [ntegridad fisica. S[ga todos los mensajes de
seguridad que figuren despu_s de este sJmbo[o
para ev[tar [esiones o [ncluso [a muerte.
El simbo[o de alerta de seguridad (_k) es usado con una palabra
(PEUGRO, ADVERTENC[A, PRECAUC[©N), un mensa[e pot
escrito o una ilustraci6n, para a[ertar[o acerca de cuaJquier
situaci6n de pe[igro que pueda existm PEL[G[_O indica un riesgo
et cuaL si no se evita, causar6 [a muerte o una herida grave.
ADVERTENCIA indica un riesgo el cual, si no se evita, puede
causar Ia muerte o una herida grave. PRECAUCm6N indica un
riesgo, el cuai, si no se evita, puede causar heridas menores o
moderadas. PRECAUCION, cuando se usa sin el simbolo de
alerta, indica una situaci6n que podrla resukar en el daho del
equipo. Siga !os mensaies de seguridad para evitar o reducir los
riesgos de heridas e inclusive la muerte.
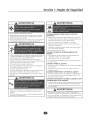
'ERTEN¢ :[A
El escape dem motor de este producto condene
elementos qu_micos reconocidos en el Estado de
CaJffornia pot producir c_ncer, defectos de nacim[ento u
arras dahos de tipo reproductivo°
Simbo[os de Pe[igro y Significados
Electrocutamiento Descarga El6ctrica Descarga El6ctrica
Explosi6n Fuego
Gases T6xicos Retroceso Supe_icie Caliente

$ecd6n 1: Reglas de $eguddad
ADVERTENCIA
Opere el generador SOLAMENTE al aile lible.
Aseg_resede que los gasesde escapeno puedan enu_l pot ventanas,
puer_as,_ornasdeabe de vendlaci6n u otras abe_uras en un espacio
cerrado en el que puedanacurnularse.
NO opere el gene_dor den[! o de un edificio o lugal cer!_do, incluyendo
el comparqrniento del generador en un vehiculo recreativo o RM
ADVERTENCIA
Cuando use un generador como poder de energia auxiliak notifique a
la compafiia de udlidades. Use el equipo de transfelencia aprobado
para aislal el generador de otra utilidad el6etlica.
Use un interrupto! para la fa!la del circuito de tierra (GFC ben
cualquier _rea bastante h0rneda o que sea akarnente conducdva, tales
corno terrazas de metal o t_abaio hecho con acero.
NO toque los alarnbles pelados o recept_culos.
NO use un genelador con cables el6ctricos que est6n malgastados,
rotos, pelados o da_ados de cualquie! fo! rna.
NO opete el genelador bajo la Iluvia.
NO maneie el genelador o cables el6cu icos mientras est6 palado en
agua, descalzo o cuando las rnanos y los pies est6n mojados.
NO perrnita que personas descalificadas o ni_os opelen o silvan a!
generadon
Cuando arlanque elrnoto[; tire lenEarnente del cable hasta sentil una
resistencia y, a continuaci6n, tile r_pidarnente de 61 para evitar su
re_roceso,
NUNGA ananque o pale el motor cuando haya apalatos el6etricos
conectados yen fundonarniento.
CUANDO ANADA COMBUSTIBLE O VACiE EL
DEPOSITO
Apague el gene_ador (posici6n OFF) y d6ielo enfriar al rnenos pot
2 minu_os antes de remover la Eapa de la cornbusdbb.Afloie la _apa
lenEarnente para dejar que la presi6n salga del _anque.
Lbne o vacie el dep6sko de combustible a la internpe_ie.
NO Ilene dernasiado el tanque. Perrnita al rnenos espacio para la
expansi6n del combustible.
P1antenga la combustible aleiada de chispas, llamas abiertas, pilotos,
calory ouas fuentes de ignici6n.
NO encienda un cigarrillo o fume.
:UANDO PONGA EN FUNCIONAHIENTO EL
EQUmPO
Cornpruebe que la buiia, e] silenciadok el tap6n del dep6sito de
cornbustibb y el filuo de aire est_n instalados.
NO a! ranque el motor sin la bujia instalada.
Si se ha derlarnado cornbusdbb, espere a que se evapore antes de
al rancar el rnOt:Ol:
:UANDO OPERE EL EQUIPO
, NO incline el mot:or o el equipo, de _al manera que la cornbustible se
pueda del rarnan
. Este geneladol no es apto pala el uso en equipos rn6viles ni en
aplicaciones real inas.
CUANDOTRANSPORTE 0 REPARE EL EQUmPO
. Transpo_te o repare el equipo con el tanque de combustible vacio, o
con la v_lvula para apagal el combustible, apagada (posici6n OFF).
, Desconecte et cable de la bqia.
CUANDOALMACENE 0 GUARDE EL EQUIPO CON
COMBUSTIBLE EN ELTANQUE
Ah_nacene aleiado de calderas, estufas, calentadores de agua, secadoras
de _opa u otros aparatos ebctrodorn6sticos que posean pilotos u
otras fuentes de ignici6n, porque ellos pueden encende! los vapo_es
de la combustible.
ADVERTENCIA
Este gene_ado_ no curnple la norrna 33CFR_183 del cuerpo de
guardacostas de EE.UU. y no debe utilizarse en aplicaciones rnalinas.
E! uso de un generador no homologado po_ cuerpo de gua_dacostas
de EE.UU. puede p_ovocar lesiones y dados materiales.

$ecddn 1: lnstrucdenes de $eguddad
ADVERTENCIA
CUANDO AJUSTE O HAGA REPARACmONES A SU
GENERADOR
Siempre desconecte el slsmbre de Is buiis y col6queto donde no
pueds entrs! en contseto con la buiia.
CUANDO PRUEBE LA BUJJA DEL MOTOR
Utilice un eomprobsdol de buiiss homologado.
NO eomp!uebs Is chispa sin Is buiia instslsda.
NO toque Iss superficies calientes.
PermiEs que el equipo se enflie antes de tocsrlo.
El genersdor debe estsl situsdo s un rninimo de 152 em (5 pies) de
rods estructurs con muros combustibles 7/o or!as msteriss
combusgibles.
Han_enga un rninimo de 92 em (3 pies) shededor de Is carcass del
genersdol: pars facilitsr Is ventilsci6n y et mantenimiento del
genersdon
En el estado de Califol nia es obligs_olio, seg0n Is leg, el uso de
spagschispss (Seeci6n 4442 del Cddigo de Recursos P0Nicos de
Cslifol nis). Otros es_ados pueden tener leyes similares. Lss leyes
federales se aplican en tie_ rss fede_ales. Si equipa el silendsdor con un
spagschispss, este debet_ ser msn_enido en buenss condiciones de
trsbsio.
PRECAUCION
NO csmbie ninguns velocidsd detel minsda. El genelsdol suministrs
una flecuencia y un vol_sje eslificado euando funeiona a uns veloeidsd
dete_ minada.
NO modifique al genelsdor en ninguns forma.
Ves "No soblecsrgue genersdor".
Encienda su genersdor y deie que el motor se estsbilice antes de
coneetsr Iss esrgss el6ctricas.
Conecte Iss cargas el6ctricas en la posici6n de spagsdo (OFF), luego
eneienda (ON) pars su opersci6n.
Apsgue (OFF) !as csrgss el6cu icss y deseon@ctelss del gene!sdo!
antes de psrsl el genersdo!:
Use el generador solsmenEe con Is finslidad pala el cual rue dise_ado.
Si usted tiene slguna pregunEa seelcs de !as finslidsdes de uso del
genersdok preg0ntele a su concesionario o contscte el comerciante
sutorizado.
Opele el genersdor solsmen_e en superficies nivelsdas.
NO expongs al genersdor suns humedsd excesivs, polvo, sueiedsd o
vspol es corl osivos.
NO inselte cuslquier objeto a trsv6s de Iss rsnurss de enfl ismiento.
Si los apslstos conec_ados se sobrecslientan, sp_guelos y
descon6ctelos del genersdoi:
Apsgue el genelador si:
Se piel de la sslida el6ctrics;
El equipo produce chispss, humo o emite llamas;
La unidsd vibrs de uns maners exeesivs,
Page is loading ...
Page is loading ...
Page is loading ...
Page is loading ...
Page is loading ...
Page is loading ...
Page is loading ...
Page is loading ...
Page is loading ...
Page is loading ...
Page is loading ...
Page is loading ...
-
 1
1
-
 2
2
-
 3
3
-
 4
4
-
 5
5
-
 6
6
-
 7
7
-
 8
8
-
 9
9
-
 10
10
-
 11
11
-
 12
12
-
 13
13
-
 14
14
-
 15
15
-
 16
16
-
 17
17
-
 18
18
-
 19
19
-
 20
20
-
 21
21
-
 22
22
-
 23
23
-
 24
24
-
 25
25
-
 26
26
-
 27
27
-
 28
28
-
 29
29
-
 30
30
-
 31
31
-
 32
32


Troy-Bilt 030240 Owner's manual
- Category
- Power generators
- Type
- Owner's manual
- This manual is also suitable for
Ask a question and I''ll find the answer in the document
Finding information in a document is now easier with AI
in other languages
Related papers
-
Troy-Bilt 01919-1 Owner's manual
-
-
-
-
Troy-Bilt 030237 Owner's manual
-
-
-
-
-
Other documents
-
Simplicity 01923-0 User manual
-
-
-
Troybilt 01924 Owner's manual
-
Briggs & Stratton PORTAbLE GENERATOR Owner's manual
-
-
Briggs & Stratton 40248 Owner's manual
-
-
Generac Portable Products 1656-1 Owner's manual
-
Snapper 30215 Owner's manual