
Steamboy PRO T3
FLOOR STEAMER
/
SCRUBBER
NETTOYEUR À VAPEUR/LAVEUSE DE SOLS
LIMPIADORA A VAPOR/LUSTRADORA DE PISOS
INSTRUCTION MANUAL
GUIDE D’UTILISATION
MANUAL DE INSTRUCCIONES


ENGLISH 04
FRANÇAIS 13
ESPAÑOL 23

4
STEAMBOY PRO T3
FLOOR SWEEPER
/
STEAMER
INSTRUCTION MANUAL
ENGLISH

5
CONGRATULATIONS
We would like to thank you, and congratulate you for
purchasing the Steamboy PRO T3 floor steamer/scrubber from
Reliable Corporation.
This Steamer/scrubber is a new way of cleaning that is
effective and far more hygienic than conventional methods.
The Scrubber is designed to loosen debris from hard surface
floors and clean tile grout lines.
The Steamer achieves a high degree of hygiene and cleaning
power by converting water into steam. It works with a micro
fiber pad, which enhances absorbency. When contact is made
with floor surfaces, dirt and grime can be eliminated in a
matter of seconds.
Since the Steamer uses the active power of steam without the
use of detergents or soap, it is environmentally friendly.
When used correctly the Steamer can kill dust mites and some
types of bacteria, such as salmonella and E-coli.

6
IMPORTANT SAFETY REQUIREMENTS
When using an electric appliance, basic precautions should always be followed,
including the following:
READ ALL INSTRUCTIONS BEFORE USING THIS Steamer/scrubber
WARNING: DANGER OF SCALDING
TO REDUCE THE RISK OF FIRE, ELECTRIC SHOCK, OR INJURY:
• Thisproductisdesignedfordomesticuseonly.
• Donotuseoutdoors.
• DonotleavetheSteamboyPROT3unattendedwhileturnedon.Unplugthe
electricalcordwhennotinuseandbeforeservicing.
• Donotallowtobeusedasatoy.Closeattentionisnecessarywhenused
nearchildren,petsorplants.
• TheSteamboyPROT3isnotintendedforusebyyoungchildrenorinrm
persons
withoutsupervision.
• Youngchildrenshouldbesupervisedtoensurethattheydonotplaywith
theSteamboyPROT3.
• Neverdirectsteamtowardspeople,animalsorplants,orequipment
containingelectricalcomponents.
• DonotimmersetheSteamboyPROT3intowaterorotherliquids.
• Donotusewithdamagedcordorplug.IftheSteamboyPROT3isnotworking
as it should, has been dropped, damaged, left outdoors, or immersed into
water,contactthedistributorbeforecontinuinguse.Ifthepowersupplycordis
damaged,itmustbereplacedbythemanufacturer.
• Donotpullorcarrybycord,usecordasahandle,closeadooronthecord,or
pullcordaroundsharpedgesorcorners.Keepcordawayfromheatedsurfaces.
• Donotuseextensioncordsoroutletswithinadequatecurrentcarryingcapacity.
• Unplugafteruse.Donotunplugbypullingoncord.Tounplug,graspthe
plug,notthecord.
• DonothandleplugoranypartoftheSteamboyPROT3withwethandsor
operatewithoutshoes.
• Donotinsertanyobjectsintoopenings.Donotusewithanyopeningblocked.
• Donotusewithoutmicroberpadinplaceunlessusingjusttheoorbrush.
• Donotuseonstairs.
• StoreyourSteamboyPROT3indoorsinacool,dryarea.
• Keepyourworkareawelllighted.
• NeverputcleaningdetergentsintotheSteamboyPROT3.Thiswillmakethe
operationunsafeanddamagetheunit.
• Useonlyasdescribedinthismanual.Useonlymanufacturer’srecom-
mendedaccessories.

7
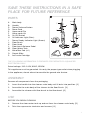
SAVE THESE INSTRUCTIONS IN A SAFE
PLACE FOR FUTURE REFERENCE
PARTS
A. Main body
B. Handle
C. Steam Release Button
D. Power Cord
E. Upper cord Clip
F. Lower cord clip
G. On/Off Button
H. On Indicator Light (Blue)
I. Steam Ready Indicator Light (Green)
J. Floor Brush
K. Floor Head
L. Floor brush Release Pedal
M. Clean Water Tank
N. Microfiber Pad (x2)
O. Carpet Glide
P. Anti-scale Cartridge
THE FOLLOwINg INFORmATION IS PROVIdEd FOR SERVICE by A qUALIFIEd
ELECTRICIAN ONLy:
Rated voltage: 110~120V, 60HZ, 1500W
This appliance must be grounded. Use only the proper type outlet when plugging
in the appliance, do not attemt to override the ground wire feature.
ASSEmbLy
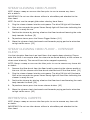
Remove all components from the packaging.
1. Insert the handle into the cleaner main body until it locks into position. [2]
2. Assemble the main body of the cleaner to the floor Brush. [3]
3. Assemble the cleaner with floor brush to the floor head. [4]
USE
BEFORE YOU BEGIN CLEANING
1. Remove the clean water tank up and out from the cleaner main body. [5]
2. Twist the cap counter clockwise and remove. [6]

8
11 12
4
2 3 4 5
6
14 15 16
18
7 8
17
9
10 11 12 13
3. Fillthecleanwatertankwithcoldtapwater.Replacecap.[7]Donotaddany
chemicals,detergentsorperfumestothecleanwatertank.
4. Re-tthecleanwatertanktothecleanerensuringthehardwaterlterisin
place.
5. Attachamicroberpadtothebaseoftheoorhead.[8]
IMPORTANT: Always unplug the cleaner when adding water or changing a
textile pad.
NOTE: Wash the textile pad prior to use to remove any lint.

9
STEAM CLEANING HARD FLOORS
NOTE: Always sweep or vacuum the floor prior to use to remove any loose
dirt or debris.
IMPORTANT: Do not use the cleaner without a microfiber pad attached to the
floor head.
NOTE: Do not use the carpet glide when cleaning hard floors.
1. Plugthesteamcleanerintothemainpower.TheblueONlightwillilluminate.
2. AfterafewsecondsthegreenSteamReadylightwillilluminateindicatingthe
cleanerisreadyforuse.
3. Reclinethecleanerbyplacingafootontheoorheadandloweringthemain
bodytowardstheoor.[9]
4. ToproducesteampresstheSteamTriggerButton.[10]
5. Movethecleanerslowlybackwardsandforwardspayingparticularattention
tohightrafcareas.[11]
STEAM CLEANING HARD FLOOR – INTENSIVE
CLEAN
Usethetriangularoorbrushonhardoorsthatrequiredeepcleaning.Please
note that there is no mop to allow the steam to be aimed directly at the surface to
cleanmoreintensely.Theareawillhavetobemoppedseparately.
NOTE: Always sweep or vacuum the floor prior to use to remove any loose dirt
or debris.
1. Removetheoorbrushfromtheoorheadbypressingthereleasepedalat
therear.Liftthecleanerwithoorbrushattachedoutoftheoorhead.[12]
2. Plugthesteamcleanerintothemainpower.TheblueONlightwillilluminate.
AfterafewsecondsthegreenSteamReadylightwillilluminateindicatingthe
cleanerisreadyforuse.
3. Reclinethecleanerbyplacingafootontheoorbrushandloweringthemain
bodytowardstheoor.[13]
4. Toproducesteampressthesteamreleasebutton.[10]
5. Movethecleanerslowlybackwardsandforwardspayingparticularattention
tohightrafcareas.[14]
REFRESHING CARPETS
NOTE: Always sweep or vacuum the floor prior to use to remove any loose dirt
or debris.
IMPORTANT: Do not use the cleaner without a microfiber pad attached to the
floor head.

10
1. Attachthecarpetglidetotheoorhead.[15]
2. Plugthesteamcleanerintothemainpower.TheblueONlightwillilluminate
3. AfterafewsecondsthegreenSteamReadylightwillilluminateindicatingthe
cleanerisreadyforuse.
4. Reclinethecleanerbyplacingafootontheoorheadandloweringthemain
bodytowardstheoor.[9]
5. Toproducesteampressthesteamreleasebutton.[10]
6. Movethecleanerslowlybackwardsandforwardspayingparticularattention
tohightrafcareas.[11]
MAINTENANCE
IMPORTANT: always ensure the cleaner has fully cooled down before performing
any maintenance tasks.
EMPTY THE WATER TANK
1. Unplugthecleanerfromthemainpowerandensuretheunithascooled.
2. Removethecleanwatertankforthemainbodyofthecleaner.[5]
3. Twistthecapanti-clockwiseandremove.[6]
4. Emptyanyexcesswaterfromthetank.[16]Replacethecapandreturnto
the cleaner
REMOVING AND CLEANING THE MICRO FIBER PAD
1. Unplugthecleanerfromthemainpowerandensuretheunithascooled.
2. Ifnecessaryremovethecarpetglider,thenpeelthetextilepadfromtheoor
base.[17]
3. Washthetextilepadinawashingmachinewithamilddetergentatmax
temperature40°c.
IMPORTANT: Do not use bleach or fabric softener when washing the textile pad.
REPLACING THE ANTI-SCALE CARTRIDGE
Thecleaneristtedwithahardwaterlter.Ifyouliveinanareaofhardwaterthe
lterwilldiscolourovertime.Dependingonthewaterhardnessandfrequencyof
usetheltershouldbechangedevery6months.
1. Unplugthecleanerfromthemainpowerandensuretheunithascooled.
2. Removethecleanwatertankforthemainbodyofthecleaner.[5]
3. Liftthehardwaterlteroutofthecleaner.[18]Replacewithnewlter.
4. Reassemblethecleanwatertanktoyourcleaner.

11
NOTE: The condition of the filter will affect the cleaner performance.
CLEANING FAQS
When is steamjet ready?
Inapproximately30seconds.
Can I use steamjet on all floor surfaces?
Onallhardoorslikemarble,ceramic,stone,linoleum,sealedhardwoodoors
andparquet.
Does steamjet emit steam automatically?
No,toproducesteamyoushouldpressthesteamreleasebuttonunderthe
handle.
Can I use it vertically?
No,steamjetcanbeusedonlyonhorizontaloorsurfaces.
Can I put detergents or other chemicals inside the tank?
No,itwilldamagetheproduct.
What if in the city where I live the water is very hard?
Youcanusedistilledwateroryouwillhavetochangetheanti-scalecartridge
moreoften.
When is it time to change the anti-scale cartridge? How do you notice it?
Itdependsonthewaterhardness.Normally6months.Youwillnoticethatthe
colourofyellowresininsidetheanti-scalecartridgebecomesabitdull.
Is the microfiber pad washable?
Yes,itcanbewashedbyhandorinthewashingmachinewithamilddetergentat
maxtemperature40°c.Donotusebleachorfabricsoftener.

12
PROBLEM
LEDisnoton
Nosteam
Paleresidueleftontheoor
(causedbyleavingtheoor
steamer in the same position
for too long)
Toomuchwaterontheoor
Nosteamcomesout
REMEDY
1. EnsureSteamerpowercordiscorrectlypluggedinto
poweroutlet.
2. Ensurecircuitbreakerisoperational.
3. Tryoperatingthesteamerfromanotherpoweroutlet.
1. Ensurethewatertankhascorrectlevelofwater.
1. Canberemovedwithhouseholdwhitevinegar
oradecalcifyingproduct.
2. Alternativelyreheattheareaforoneminuteandresidue
shouldberemoved.CAUTION: DO NOT OVERHEAT AREA.
1. Holdsteamswitchfornolongerthan5secondsatatime.
Release the switch for a few seconds and then you can
repeat (the heating element needs time to heat up again to
properlyconvertthewaterintosteam.
1. Haveyoupressedthesteamreleasebuttoncorrectly?
2. TheSteamboyPROT3isnotyetreadytooperate.Holdthe
steamreleasebuttondownforapprox.30secondsuntilyou
nolongerhearanypumpingnoisesandthedevicebeginsto
emitsteam.
3. Thewatertankisempty.Fillitup.
TROUBLESHOOTING
CAUTION: Prior to troubleshooting isolate the unit by removing the cord
from the power socket.

13
ReliableCorporation(“Reliable”)warrantstooriginalpurchaserofitsproductsthat
everyproductsoldbyReliable(a“ReliableProduct”)isfreefromdefectsinmaterial
andworkmanshipforaperiodofoneyearfromthedateofpurchase,ifproperlyused
andmaintained.Subjecttotheconditionsandlimitationssetforthbelow,Reliable
willeitherrepairorreplaceanypartofaReliableProductthatprovesdefectiveby
reasonofimproperworkmanshipormaterials.IfthedefectiveReliableProductis
nolongeravailableandcannotberepairedeffectivelyorreplacedwithanidentical
model,ReliableshallreplacethedefectiveReliableProductwithacurrentReliable
Productofequalorgreatervalue.Repairedpartsorreplacementproductswillbe
providedbyReliableonanexchangebasis,andwillbeeitherneworrefurbishedto
befunctionallyequivalenttonew.IfReliableisunabletorepairorreplaceaReliable
Product,itwillrefundthecurrentvalueofthatReliableProductatthetimethewar-
rantyclaimismade.
ThislimitedwarrantydoesnotcoveranydamagetoaReliableProductthatresults
fromimproperinstallation,accident,abuse,misuse,naturaldisaster,insufcientor
excessiveelectricalsupply,abnormalmechanicalorenvironmentalconditions,wear
andtearresultingfromnormaluseoftheproduct,oranyunauthorizeddisassembly,
repair,ormodication.Thislimitedwarrantydoesnotextendtoanyindirect,con-
sequentialorincidentaldamagesthatmaybesufferedbyauserorfromtheuseof
a Reliable Product, including without limitation, any liability for third party claims for
damage, and is limited to the amount paid by the original purchaser Reliable Product
withrespecttowhichthislimitedwarrantyprotectionapplies.Thislimitedwarranty
doesnotapplywithrespecttoproductsthathavebeenalteredorwhicharemissing
serial numbers or for products not purchased directly from Reliable or a dealer autho-
rizedbyustosellReliableProducts.
This limited warranty is the only warranty that applies to any Reliable Product, super-
sedes any and all terms that may be contained in any other document or purchase
orderandmaynotbealteredoramendedexceptexpresslyinwritingbyReliable.
To obtain a repair or replacement under the terms of this warranty, please contact our
customerservicegroupat1-800-268-1649oratsupport@reliablecorporation.com.
Youwillberequiredtosubmitanoriginalreceiptviafaxore-mail.Thereceiptmust
reectthatyouaretheoriginalpurchaser,theproductwasboughtdirectlyfromusor
fromanauthorizedReliabledealerandthatthewarrantyclaimisbeingmadewithin
thewarrantyperiod.Youwillbeissuedareturnauthorizationnumber(RA#)and
askedtoshipthedefectiveproducttogetherwithproofofpurchaseandRA#,prepaid
insured to the following address:
ReliableCorporation,5-100WingoldAvenue,Toronto,ONM6B4K7.Freightcollect
shipmentswillberefused.Theriskoflossordamageintransitwillbebornebythe
customer.OnceReliablereceivesthedefectiveproduct,itwillinitiatetherepairor
replacementprocess.
RELIABLEPRODUCTSWARRANTY

14

15
STEAMBOY PRO T3
BALAI ELECTRIQUE/
VADROUILLE A VAPEUR
MANUEL D’INSTRUCTIONS
FRANÇAIS

16
FÉLICITATIONS
Nous souhaitons vous remercier et vous féliciter pour l’achat
du balai électrique/ vadrouille à vapeur Steamboy PRO T3 de
Reliable Corporation.
Le balai électrique/ vadrouille à vapeur est une nouvelle façon
de nettoyer plus efficace et beaucoup plus hygiénique que les
méthodes conventionnelles.
L’épurateur est conçu pour détacher des débris des planchers
de surface dure et des lignes propres de coulis de tuile.
La vadrouille atteint un haut degré d’hygiène et pouvoir de
nettoyage grâce à la conversion de l’eau en vapeur. Elle
fonctionne avec une lingette en microfibers qui améliore
l’absorption. Lors du contact avec les surfaces de plancher,
la saleté et la crasse peuvent être éliminées en seulement
quelques secondes.
Puisque la vadrouille utilise la puissance active de la vapeur
sans utiliser de détergents ou savon, elle est respectueuse de
l’environnement.
Si elle est correctement utilisée, la vadrouille peut terminer
avec les acariens et certains types de bactéries, telles que la
salmonelle et l’E-coli.

17
IMPORTANTES MESURES DE SÉCURITÉ
Lesprécautionsdebasesuivantesdoiventtoujoursêtrerespectéeslorsquevous
utilisezunappareilélectrique:
LIRE TOUTES LES INSTRUCTIONS AVANT D’UTILISER CE BALAI ELECTRIQUE/
VADROUILLE A VAPEUR
MISE EN GARDE : Danger de brûlure
POUR DIMINUER TOUT RISQUE DE FEU, DÉCHARGE ÉLECTRIQUE OU DE BLESSURE :
• Ceproduitaétéconçuseulementpourunusageménager.
• Nepasutiliseràl’extérieurdelamaison.
• Nepaslaisserlavadrouilleenmarcheetsanssurveillance.Débranchezle
cordond’alimentationlorsquel’appareiln’estpasutiliséouavanttoutentretien.
• Nepasl’utilisercommejouet.Porteruneattentionparticulièrelorsqu’ilya
desenfants,desanimauxoudesplantesàproximité.
• L’appareiln’estpasconçupourêtreutiliséparlesjeunesenfantsoudes
personneshandicapéessanssurveillance.
• Lesjeunesenfantsdevraienttoujoursêtresupervisésandes’assurerqu’ils
nejouentpasavecl’appareil.
• Nedirigerjamaislavapeurverslespersonnes,lesanimauxoulesplantes,
ouversleséquipementsquicontiennentdescomposantsélectriques.
• Neplongezpaslavadrouilledansl’eauoudansd’autresliquides.
• Nel’utilisezpasavecuncordonélectriqueouunepriseendommagés.Sila
vadrouillenefonctionnepascorrectement,sielleesttombée,aétéendom-
magée,laisséeàl’extérieurousielleesttombéedansl’eau,contactezle
distributeuravantdecontinueràl’utiliser.Silecordond’alimentationest
endommagé,ildoitêtreremplacéparlefabricant.
• Nepastireroutransporterparlecordon,l’utiliserpourmanipuler,fermerune
portedessusouletirersurdesextrémitésoudescoinspointus.Garderle
cordonéloignédessurfaceschaudes.
• N’utilisezpasderallongesoudeprisesdecourantayantunecapacitéde
chargeencourantinadéquate.
• Débrancheraprèsl’avoirutilisée.Nepasdébrancherentirantsurlecordon.
Tirersurlapriseetnonlacordepourdébrancher.
• Nepasmanipulerlacheoulenettoyeuràvapeuravecdesmainshumides
ouenneportantpasdesouliers.
• Nepasmettreaucunobjetdanslesouvertures.Nel’utilisezpassil’unedes
ouverturesestbloquée.
• N’employezpassansprotectiondemicroberenplaceàmoinsqu’employant
justelabrossedeplancher.

18
• Nepasutiliserdanslesescaliers.
• Rangervotrevadrouilleàl’intérieurdansunendroitsecetfrais.
• Gardervotresurfacedetravailbienéclairée.
• NejamaismettredesdétergentsnettoyantsdanslaVadrouille.Cecirendrale
fonctionnementnonsécuritaireetendommageral’appareil.
• Utiliserseulementcommedécritdanscemanuel.Utiliserseulementles
accessoiresrecommandésparlefabricant.
CONSERVER CES INSTRUCTIONS
CARACTÉRISTIQUES PRINCIPALES DE STEAMBOY
CARACTÉRISTIQUES/PIÈCES
A. Corpsprincipaldunettoyeur
B. Poignée
C. Boutondelibérationdelavapeur
D. Cordond’alimentation
E. Bridesupérieureducordon
F. Brideinférieureducordon
G. Boutondemiseenmarche
H. Indicateurlumineuxallumé(Bleu)
I. Témoinlumineuxdevapeurprête(Vert)
J. Brossepoursol
K Têtepoursol
L Pédaledelibérationdelabrosse
M Réservoird’eaupropre
N. Tamponenmicrobre(x2)
O. Patinpourtapis
P. Cartoucheantitartre
L’INFORMATION SUIVANTE EST FOURNIE POUR LE SERVICE DONNÉ UNIQUEMENT
PAR UN ÉLECTRICIEN QUALIFIÉ :
Tension:110~120V,60HZ,1500W
Cetappareildoitêtremisàlaterre.Utilisezseulementlaprisedetypeapproprié
aumomentdebrancherl’appareil,nepasattemtpourremplacerlafonctionnalité
deldeterre.

19
ASSEMBLAGE
Lebalaiélectriqueestconçupourbalayerlesrésidussecs,lapoussièreetles
Retireztouslesélémentsdel’emballage.
1.Insérezlapoignéedanslecorpsprincipaldunettoyeuràvapeurjusqu’àce
qu’elleseverrouilleenposition.[2]
2.Assemblezlecorpsprincipaldunettoyeuràvapeuràlabrossepoursol.[3]
3.Assemblezlenettoyeuràvapeuréquipédelabrosseàlatête.[4]
UTILISATION
Avantquevousnecommenciezlenettoyage.
1. Retirezleréservoird’eaupropreenletiranthorsducorpsprincipaldunettoy-
euràvapeur.[5]
2. Tournezlebouchondanslesenscontraireauxaiguillesd’unemontreet
retirez-le.[6]
3. Remplissezleréservoird’eaupropreavecdel’eaufroidedurobinet.Remettez
lebouchon.[7]N’ajoutezaucunproduitchimique,détergentouparfumdans
leréservoird’eaupropre.
4. Remettezenplaceleréservoird’eaupropresurlenettoyeuràvapeurenvous
assurantqueleltrepoureaucalcaireestenplace.
5. Fixezletampontextileàlabasedelatête.[8]
IMPORTANT : Débranchez toujours le nettoyeur à vapeur lorsque vous ajoutez de
l’eau ou changez un tampon textile.
REMARQUE : Lavez le tampon textile avant de l’utiliser pour retirer toute peluche.
NETTOYAGE À LA VAPEUR DES SOLS DURS
REMARQUE : Balayez ou aspirez toujours le sol avant l’utilisation afin d’éliminer
toute saleté ou débris de la surface.
IMPORTANT : N’utilisez pas le nettoyeur à vapeur sans tampon textile fixé
à la tête.
REMARQUE : N’utilisez pas le patin pour tapis lors du nettoyage de sols durs.

20
11 12
4
2 3 4 5
6
14 15 16
18
7 8
17
9
10 11 12 13
Page is loading ...
Page is loading ...
Page is loading ...
Page is loading ...
Page is loading ...
Page is loading ...
Page is loading ...
Page is loading ...
Page is loading ...
Page is loading ...
Page is loading ...
Page is loading ...
Page is loading ...
Page is loading ...
Page is loading ...
Page is loading ...
Page is loading ...
Page is loading ...
Page is loading ...
Page is loading ...
-
 1
1
-
 2
2
-
 3
3
-
 4
4
-
 5
5
-
 6
6
-
 7
7
-
 8
8
-
 9
9
-
 10
10
-
 11
11
-
 12
12
-
 13
13
-
 14
14
-
 15
15
-
 16
16
-
 17
17
-
 18
18
-
 19
19
-
 20
20
-
 21
21
-
 22
22
-
 23
23
-
 24
24
-
 25
25
-
 26
26
-
 27
27
-
 28
28
-
 29
29
-
 30
30
-
 31
31
-
 32
32
-
 33
33
-
 34
34
-
 35
35
-
 36
36
-
 37
37
-
 38
38
-
 39
39
-
 40
40


Ask a question and I''ll find the answer in the document
Finding information in a document is now easier with AI
in other languages
- français: Reliable T3 Manuel utilisateur
- español: Reliable T3 Manual de usuario
Related papers
-
Reliable PRO 300CU User manual
-
-
-
-
-
-
-
-
Reliable 2300IR User manual
-
Other documents
-
Hoover CA2IN1D Owner's manual
-
-
 Cirrus SM212B Owner's manual
-
-
Sienna Flex SSM-4003 User manual
-
-
-
-
-
