Page is loading ...

1
Fogless Light Up Mirror &
Wireless Splash Proof Speaker
R-70S
INSTRUCTION MANUAL
PLEASE READ ALL INSTRUCTIONS CAREFULLY
& RETAIN FOR FUTURE USE

2
Getting Started
Remove the product from the box.
Remove any packaging from the product.
Please retain all packaging until you have checked and counted all the parts and the
contents against the parts list.
Package Contents
Fogless Light Up Mirror & Wireless Splash Proof Speaker
USB charging cable
Instruction manual
Features
1. Fogless Mirror holds up against misty conditions and stray sprays from the shower
2. Bright LED Light for precise shave
3. Built-in hook holds razor to keep it neat and within reach (razor is not included)
4. Built-in microphone allows you to answer phone calls directly from the speaker
with just the push of a button
5. Bluetooth wireless speaker plays your favorite songs
6. Tune in to live radio with its built-in AM/FM tuner
7. Built-in digital clock & display
8. USB rechargeable (USB cable included)
9. Easy to mount (suction cups & screw included)
IMPORTANT SAFETY INFORMATION
1. Read all instructions before using this product.
2. Do not leave this product unattended while connected to the power supply.
3. Do not use if product has been dropped or damaged in any way.
4. Repairs to electrical equipment should only be performed by qualified personnel.
Improper repairs may place user at serious risk.
5. Place product on sound, even surface, free of vibrations and away from sources of
heat.
6. Do not put objects into openings.
7. Keep free of dust, lint, hair etc.
8. Do not use this product for anything other than its intended use.
9. Keep this product out of reach of children.
10. This product is not a toy.
11. Do not play music at excessive levels especially near children, as damage to
hearing may occur.

3
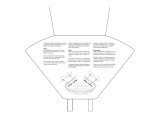
Description of Parts:
S. No.
Description
S. No.
Description
1
Detachable Suction Cups
7
Skip Forward / Higher Volume
2
Rubber Flap
8
MF / Phone button
3
Charging port
9
Skip Backward / Lower Volume
4
Digital display (with backlight)
10
LED light button
5
Built-In Microphone
11
Razor hanger
6
Mode button
12
White LED light

4
INSTRUCTIONS FOR USE
Charging the product
Note: For best results, fully charge the product before its first use.
1. Connect the USB charging cord (included) to the DC 5V charging port of the
product and insert the other end into a port on your computer or similar power
source.
2. The battery indicator will flash to indicate that the battery being charged
(press the MF button to turn on the product, if necessary). Once it is fully
charged, the battery indicator is full and stops flashing. It will take 5 - 6 hours to
fully charge the battery.
3. Once the product is fully recharged, disconnect the USB Cable and firmly close
the Rubber Flap, to cover the USB Charging Port secure. If the USB charging port
is not securely covered, water may seep into the electronics circuit and may
damage the product. This damage will NOT be covered under product warranty.
Turn On/Off the Product
Press and hold the MF button for 2-4 seconds to turn on the product (*digital display
with backlight will on, and the backlight will turn off automatically after around 15
seconds. Press the or button will also turn on the backlight again for around 15
seconds.)
Press and hold the MF button for 2-4 seconds to turn off the product.
Clock Setting
1. After turning on the product, press the Mode button until digital display showing
‘Lod’.
2. Short press the MF button, and the “hour” field on digital display will flash quickly.
3. Press the or repeatedly button to set the correct hour.
4. Press the MF button to confirm and the “minute” field will flash to prompt for
adjusting.
5. Press the or button to set the correct minute.
6. Press the MF button again to complete the clock setting.
Pairing your device with Bluetooth Speaker
Your Bluetooth Speaker can wirelessly stream audio from any Bluetooth enabled device
within the distance of up to 26-33 Feet. Simply follow the below steps.
1. After turning on the product, press the Mode button to enter Bluetooth mode
with digital display showing ‘bt’, and an indication tone is heard. Your speaker is
now ON and is entering “pairing” mode.
2. Turn on the Bluetooth on your Mobile Phone or Tablet or Computer.
3. It will search for various devices.

5
4. The pairing name of our Bluetooth Speaker is “QFX R-70S”, pair it with this
device.
5. If required, enter the password ‘0000’ to confirm to finalize pairing.
6. Once paired successfully, you would hear another indication tone.
7. If you fail to pair it within the time frame or you want to pair it with a new device
please follows the steps outlined above.
Select your favorite song at the Bluetooth device and music would now stream through
Bluetooth speaker.
(Note: Speaker automatically pairs with the previously paired devices.)
Answering Phone Calls through the Bluetooth Speaker
Please ensure that your cell phone is paired with the Bluetooth Speaker to use the
below functions.
Function
Operation
Button
Answer Incoming
Call
Incoming Call
Short press the Phone button to answer an incoming
call.
End Call
Incoming Call
After your phone conversation, short press the Phone
button
Volume Increase
During a call
Long press on the button will increase the volume
Volume Decrease
During a call
Long press on the button will decrease the volume
Redial last number
Standby mode
and connected
to a device
Short press the Phone button twice
Listening to Music Wirelessly
Please ensure that your device (iPhone, Tablet or Other Smart Phone) is paired with the
Bluetooth Speaker to stream music wirelessly. Once it is paired, play music from your
device.
Function
Operation
Button
Increase /
Decrease
Volume
Playing music
Long press the button to increase the volume or long
press the button to decrease the volume
Pause
Playing music
Short press the MF button to pause the music
Play
Pause
Short press the MF button to resume the music
Skip Forward /
Skip Backward
Playing music
Short press the button to skip forward the track. Short
press the button to skip backward the track.

6
FM Radio
1. After turning on the product, press the Mode button to enter FM mode with
digital display showing ‘FM’ and frequency value.
2. To AUTO-SCAN the stations, press MF button once.
3. It will take few minutes to search and store all the stations in memory.
4. Press the or button to skip selected stations.
(Remark: Relocate the position of the product, if the FM reception is not good.)
AM Radio
1. After turning on the product, press the Mode button to enter AM mode with
digital display showing ‘AM’ and frequency value.
2. To AUTO-SCAN the stations, press MF button once.
3. It will take few minutes to search and store all the stations in memory.
4. Press the or button to skip selected stations.
(Remark: Relocate the position of the product, if the AM reception is not good.)
Turning On/Off white LED light
Short press the LED light button will turn On/Off the white LED light.
Do’s and Don’ts
Do not play music at excessive levels. Damage to hearing and/or equipment may result.
Do not use outdoors in wet surroundings.
This unit can only be installed on glass or mirror surface. Please do not try to install on a
ny Marbles,Tiles,Granite porous surface or any other surface as it will not hold the item
properly.
Specification
Bluetooth version : V2.1+EDR
Speaker : 3 Watts
FM radio frequency : 87.5 to 108MHz
Unit Size : 8-5/8”x1-1/4”x11” (without Detachable Suction Cups)
Unit Weight : 21.6 oz (without Detachable Suction Cups)
Play time : 3-4 hours
Charge Voltage : DC 5V (USB)
Charging Time : 5-6 hours
Bluetooth Range : 26-33 Feet
Built-In Rechargeable
Battery : 3.7V / 1200mAh
(Note: Battery life & charging time may vary, based on usage & types of devices used.)

7
Troubleshooting
Problem
Possible Cause
Solution
Low sound level
Source (Tablet, Mobile Phone,
Laptop, etc.) volume too low.
Battery dead
Adjust source volume.
Charge Battery.
Sound distorted
Battery nearly dead
Charge Battery.
No sound at all.
Source (Tablet, Mobile Phone,
Laptop.) turned off.
Speaker turned off.
Volume turned down source.
Media paused on source.
Turn the source on.
Turn the speaker on.
Adjust volume source.
Play media from source.
Care and Maintenance
Clean the unit with a soft, damp cloth. Never use chemicals or hard abrasives.
Keep this unit away from wet or damp surroundings.
The crossed out wheelie bin symbol on this item indicates that this product needs to be
disposed of in an environmentally friendly way when it becomes of no further use or has
worn out. Contact your local authorities for details of where to take the item for re-
cycling.
Note: iPod and iPhone are trademarks of Apple Inc, registered in the US, and other
countries.
FCC Instructions
Changes or modifications not expressly approved by the party responsible for
compliance could void the user’s authority to operate the product.
NOTE: This product has been tested and found to comply with the limits for a Class B
digital device, pursuant to Part 15 of the FCC Rules. These limits are designed to provide
reasonable protection against harmful interference in a residential installation. This
product generates, uses and can radiate radio frequency energy and, if not installed and
used in accordance with the instructions, may cause harmful interference to radio
communications. However, there is no guarantee that interference will not occur in a
particular installation. If the product does cause harmful interference to radio or
television reception, which can be determined by turning the equipment off and on, the
user is encouraged to try to correct the interference by one or more of the following
measures :
- Reorient or relocate the receiving antenna.
- Increase the separation between the product and receiver.

8
- Connect the product into an outlet on a circuit different from that to which the
receiver is connected.
- Consult the dealer or an experienced radio/TV technician for help.
This device complies with part 15 of the FCC Rules. Operation is subject to the following
two conditions: (1) This device may not cause harmful interference, and (2) this device
must accept any interference received, including interference that may cause undesired
operation.
Limited Warranty
This manufacturer's product warranty extends to the original consumer purchaser of the
product. Neither the retailer nor any other company involved in the sale or promotion of this
product is a co-warrantor of this manufacturer warranty.
WARRANTY DURATION: All materials and workmanship are warranted to the original
consumer purchaser for a period of ninety (90) days from the original purchase date.
WARRANTY COVERAGE: This product is warranted against defective materials or
workmanship. This warranty is void if the product has been damaged by accident, in
shipment, unreasonable use, misuse, neglect, improper service, commercial use, repairs by
unauthorized personnel or other causes not arising out of defects in materials or
workmanship. This warranty is effective only if the product is purchased and operated in
USA, and does not extend to any units which have been used in violation of written
instructions furnished by manufacturer or to units which have been altered or modified or, to
damaged products or parts thereof which have had the serial number removed, altered,
defaced or rendered illegible.
WARRANTY DISCLAIMERS: This warranty is in lieu of all warranties expressed or implied and no
representative or person is authorized to assume for manufacturer any other liability in
connection with the sale of our products. There shall be no claims for defects or failure under
any theory of tort, contractor commercial law including but not limited to, negligence, gross
negligence, strict liability, breach of warranty and breach of contract. Under no circumstances
will Manufacturer’s / Distributor’s maximum liability exceed the retail value of the product.
WARRANTY PERFORMANCE: During the above 90 day warranty period, a product with a defect
will be either repaired or replaced with a reconditioned comparable model (at
manufacturer's option). The repaired or replacement product will be in warranty for the
balance of the 90 day warranty period and an additional one-month period. No charge will
be applicable for such repair or replacement.
SERVICE AND REPAIR: If service is required for this product, you should first contact Midwest
6900 Ext. 34 or Toll Free: (800) 864-CLUB, Monday to Friday 10am to 6pm EST.
NOTE: Manufacturer cannot assume responsibility for loss or damage during incoming
shipment. As a precautionary measure, carefully package the product for shipment, and
insure it with the carrier. Be sure to enclose the following details with the product: your full

9
name, return address and daytime phone number, a note describing the problem you
experienced, a copy of your sales receipt or other proof of purchase to determine warranty
status. C.O.D. shipments cannot be accepted.

1
Miroir lumineux sans buée et
Haut-parleur sans fil résistant aux
éclaboussures
R-70S
MANUEL D'INSTRUCTIONS
VEUILLEZ LIRE ATTENTIVEMENT
TOUTES LES INSTRUCTIONS ET
CONSERVER POUR UNE UTILISATION
FUTURE
/