GE ZGU364NDP7SS Owner's manual
- Category
- Barbecues & grills
- Type
- Owner's manual
Page is loading ...

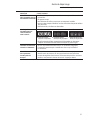
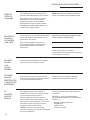
2
Consumer Information
Professional Rangetops
Contents
Surface Cooking
Burners ..............................9
Controls ......................... 9, 10
Cookware ...........................10
Dual-Flame Stacked Burners. . . . . . . . . .9
Features ............................ 8
Griddle ............................. 13
Grill ............................. 11, 12
Care and Cleaning
Burner Caps ....................... 14
Burner Grates ...................... 15
Control Panel and Knobs ............16
Cutting Board ......................16
Grease Troughs .....................15
Griddle ............................. 16
Grill ................................ 17
Stainless Steel. . . . . . . . . . . . . . . . . . . . . . .14
Consumer Services
Important Phone Numbers ......... 19
Model and Serial Number ............ 3
Problem Solver ..................... 18
Safety Instructions ................ 4–7
Warranty .......................... 20
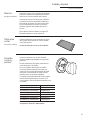
³ 'RQRWVWRUHRUXVHJDVROLQHRURWKHUIODPPDEOH
YDSRUVDQGOLTXLGVLQWKHYLFLQLW\RIWKLVRUDQ\
RWKHUDSSOLDQFH
³ :+$772'2,)<2860(//*$6
'RQRWWU\WROLJKWDQ\DSSOLDQFH
'RQRWWRXFKDQ\HOHFWULFDOVZLWFK
GRQRWXVHDQ\SKRQHLQ\RXUEXLOGLQJ
,PPHGLDWHO\FDOO\RXUJDVVXSSOLHUIURPD
QHLJKERU·VSKRQH)ROORZWKHJDVVXSSOLHU·V
LQVWUXFWLRQV
,I\RXFDQQRWUHDFK\RXUJDVVXSSOLHUFDOOWKH
ILUHGHSDUWPHQW
³ ,QVWDOODWLRQDQGVHUYLFHPXVWEHSHUIRUPHGE\
DTXDOLILHGLQVWDOOHUVHUYLFHDJHQF\RUWKHJDV
VXSSOLHU
:$51,1*,IWKHLQIRUPDWLRQLQWKLV
PDQXDOLVQRWIROORZHGH[DFWO\DILUHRUH[SORVLRQ
PD\UHVXOWFDXVLQJSURSHUW\GDPDJHSHUVRQDO
LQMXU\RUGHDWK
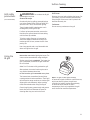
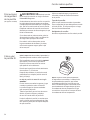
This is the safety alert symbol. This symbol alerts you to potential hazards that can kill
or hurt you and others. All safety messages will follow the safety alert symbol and the word
“DANGER”, “WARNING”, or “CAUTION”. These words are defined as:
DANGER
Indicates a hazardous situation which, if not avoided, will result in death or
serious injury.
WARNING
Indicates a hazardous situation which, if not avoided, could result in death or
serious injury.
CAUTION
Indicates a hazardous situation which, if not avoided, could result in minor or
moderate injury.

3
Consumer Information
Professional Rangetops
Write
down the
model
& serial
numbers
You’ll find them on a label located behind
the left burner knob or on the bottom
of the rangetop.
%HIRUHVHQGLQJLQWKHUHJLVWUDWLRQFDUGSOHDVH
ZULWHWKHVHQXPEHUVKHUH
Model Number
Serial Number
Use these numbers in any correspondence or
service calls concerning your rangetop.
If you
received a
damaged
rangetop
Immediately contact the dealer (or builder) that
sold you the rangetop.
Trouble-
shooting
tips
Before you request service, check the Problem
Solver in the back of this manual.
It lists causes of minor operating problems that
you can correct yourself.
If you
need
service
To obtain service, see the Consumer Services
page in the back of this manual.
We’re proud of our service and want you to be
pleased. If for some reason you are not happy
with the service you receive, here are the steps
to follow for further help.
FIRST, contact the people who serviced your
appliance. Explain why you are not pleased.
In most cases, this will solve the problem.
NEXT, if you are still not pleased, write all the
GHWDLOV³LQFOXGLQJ\RXUSKRQHQXPEHU³WR
Manager, Customer Relations
GE Appliances
Appliance Park
Louisville, KY 40225
Remove
packaging
tape
Carefully remove all packaging, foam pads
and tape.
To assure no damage is done to the finish
of the product, the safest way to remove
the adhesive from packaging tape on new
appliances is an application of a household
liquid dishwashing detergent. Apply with a
soft cloth and allow to soak.
NOTE: The adhesive must be removed from all
parts. It cannot be removed if it is heated.

4
IMPORTANT SAFETY INSTRUCTIONS
IMPORTANT SAFETY NOTICE
• The California Safe Drinking Water and Toxic
Enforcement Act requires the Governor of
California to publish a list of substances known
to the state to cause cancer, birth defects
or other reproductive harm, and requires
businesses to warn customers of potential
exposure to such substances.
• Gas appliances can cause minor exposure
to four of these substances, namely benzene,
carbon monoxide, formaldehyde and
soot, caused primarily by the incomplete
combustion of natural gas or LP fuels.
Properly adjusted burners, indicated by a
bluish rather than a yellow flame, will minimize
incomplete combustion. Exposure to these
substances can be minimized by venting
with an open window or using a ventilation
fan or hood.
:$51,1* SAFETY PRECAUTIONS
:KHQXVLQJ\RXUDSSOLDQFHIROORZEDVLF
VDIHW\SUHFDXWLRQVLQFOXGLQJWKHIROORZLQJ
• +DYHWKHLQVWDOOHUVKRZ\RXWKHORFDWLRQRI
WKHUDQJHWRSJDVVKXWRIIYDOYHDQGKRZWR
WXUQLWRIILIQHFHVVDU\
• Be sure all packing materials are removed
IURPWKHUDQJHWRS before operating it to
prevent fire or smoke damage should the
packing material ignite.
• /RFDWHWKHUDQJHWRSRXWRINLWFKHQWUDIILF
SDWKDQGRXWRIGUDIW\ORFDWLRQVDQGDUHDV
ZLWKSRRUDLUFLUFXODWLRQ
• 'RQRWLQVWDOOWKLVSURGXFWZLWKDQDLUFXUWDLQ
KRRGor other range hood that operates by
blowing air down on the cooktop. This airflow
may interfere with operation of the gas
burners resulting in fire or explosion hazard.

5
IMPORTANT SAFETY INSTRUCTIONS
:$51,1* SAFETY PRECAUTIONS
•8VHWKLVDSSOLDQFHRQO\IRULWVLQWHQGHGXVH
as described in this manual.
• %HVXUH\RXUDSSOLDQFHLVSURSHUO\LQVWDOOHG
and grounded by a qualified technician in
accordance with the provided installation
instructions.
• 'RQRWDWWHPSWWRUHSDLURUUHSODFHDQ\SDUW
RI\RXUUDQJHWRSXQOHVVLWLVVSHFLILFDOO\
UHFRPPHQGHGLQWKLVPDQXDO All other
servicing should be referred to a qualified
technician.
• %HIRUHSHUIRUPLQJDQ\VHUYLFH',6&211(&7
7+(5$1*(72332:(56833/<$77+(
+286(+2/'',675,%87,213$1(/ BY
REMOVING THE FUSE OR SWITCHING OFF
THE CIRCUIT BREAKER.
• 'RQRWOHDYHFKLOGUHQDORQH³children should
not be left alone or unattended in an area
where an appliance is in use. They should
never be allowed to sit or stand on any part of
the appliance.
'RQRWVWRUHIODPPDEOHPDWHULDOVQHDU
WKHUDQJHWRS
'RQRWVWRUHSODVWLFIODPPDEOHOLTXLGVRU
FRPEXVWLEOHPDWHULDOVRQWRSRIWKHRSWLRQDO
KLJKVKHOI
&$87,21,7(062),17(5(6772
&+,/'5(16+28/'127%(6725(',1
&$%,1(76$%29($5$1*(72325217+(
%$&.63/$6+2)$5$1*(723³&+,/'5(1
&/,0%,1*217+(5$1*(723725($&+
,7(06&28/'%(6(5,286/<,1-85('
• 1HYHUXVHWKLVDSSOLDQFHDVDVSDFHKHDWHU
WRKHDWRUZDUPWKHURRPDoing so may
result in carbon monoxide poisoning or
overheating of the appliance.
• 1HYHUZHDUORRVHILWWLQJRUKDQJLQJ
JDUPHQWVZKLOHXVLQJWKHDSSOLDQFH Be
careful when reaching for items stored over
the rangetop. Flammable material could be
ignited if brought in contact with surface
burners or burner grates and may cause
severe burns.
• 8VHRQO\GU\SRWKROGHUV³moist or damp pot
holders on hot surfaces may result in burns
from steam. Do not let pot holders touch
surface burners, burner grates or oven heating
elements. Do not use a towel or other bulky
cloth.
• :KHQVXUIDFHFRRNLQJGRQRWWRXFKVXUIDFH
EXUQHUVEXUQHUJUDWHVJULOORUJULGGOHRQ
VRPHPRGHOVRUWKHVXUURXQGLQJDUHDV
These surfaces may be hot enough to burn.
During and after use, do not touch, or let
clothing or other flammable materials contact,
the surface burners, grill or griddle (on some
models), and areas near the surface burners;
allow sufficient time for cooling first.
Potentially hot surfaces include the rangetop,
areas facing the rangetop, or any backguard
or high shelf surface.
• .HHSWKHYHQWLODWRUKRRGDQGJUHDVHILOWHUV
clean to maintain good venting and to avoid
JUHDVHILUHVTurn the ventilator OFF in case
of fire or when intentionally “flaming” liquor or
other spirits on the rangetop. The blower, if in
operation, could spread the flames.

6
IMPORTANT SAFETY INSTRUCTIONS
:$51,1* SAFETY PRECAUTIONS
• 'RQRWXVHZDWHURQJUHDVHILUHV1HYHU
SLFNXSDIODPLQJSDQTurn the controls
off. Smother a flaming pan on a surface unit
by covering the pan completely with a well-
fitting lid, cookie sheet or flat tray. Use a
multi-purpose dry chemical or foam-type fire
extinguisher.
Flaming grease outside a pan can be put out
by covering it with baking soda or, if available,
by using a multi-purpose dry chemical or
foam-type fire extinguisher.
• '21276725(2586(&20%867,%/(
0$7(5,$/6*$62/,1(2527+(5
)/$00$%/(9$3256$1'/,48,'6,1
7+(9,&,1,7<2)7+,625$1<27+(5
$33/,$1&(
'RQRWOHWFRRNLQJJUHDVHRURWKHU
IODPPDEOHPDWHULDOVDFFXPXODWHLQRUQHDU
WKHUDQJHWRS&OHDQJUHDVHWURXJKVVRPH
PRGHOVDQGEXUQHUSDQVDIWHUHYHU\XVH
• ,I\RXVPHOOJDV the installer has not done a
proper job of checking for leaks. You can have a
small leak, and therefore a faint gas smell, if the
connections are not completely tight.
Finding a gas leak is 127 a do-it-yourself
procedure. Some leaks can only be found
with the burner control in the ON position. For
your protection, it must be done by a qualified
service technician. Never use an open flame to
locate a leak.
• ,IE\VRPHFKDQFHDEXUQHUJRHVRXWDQG
JDVHVFDSHVRSHQDZLQGRZRUDGRRUWR
OHWWKHURRPDLURXWDo not attempt to use
the appliance until the gas has had time to
dissipate. Follow the instructions in “What to
do if You Smell Gas” on page 2.
• %HVXUHDOOWKHFRQWUROVDUHWXUQHGRIIDQG
WKHDSSOLDQFHLVFRRObefore using any type of
aerosol cleaner or cooking spray on or around
the appliance. The chemical that produces the
spraying action could, in the presence of heat,
ignite or cause metal parts to corrode.
• 'RQRWKHDWXQRSHQHGIRRGFRQWDLQHUVa
buildup of pressure may cause the container
to burst.
• 6HWWKHEXUQHUFRQWUROVRWKDWWKHIODPH
KHDWVRQO\WKHERWWRPRIWKHSDQand does
not extend beyond the bottom of the pan.
Excessive flame is hazardous. The high BTU
burners can easily melt cookware handles.
• +ROGWKHKDQGOHRIWKHSDQXVLQJDGU\SRW
KROGHU to prevent movement of the utensil
when stirring or turning food.
• $OZD\VXVHWKH/,7(SRVLWLRQZKHQLJQLWLQJ
WKHVXUIDFHEXUQHUV and make sure the
burners have ignited.

7
IMPORTANT SAFETY INSTRUCTIONS
:$51,1*SURFACE COOKING SAFETY PRECAUTIONS
• 1HYHUOHDYHWKHVXUIDFHEXUQHUVXQDWWHQGHG
DWKLJKIODPHVHWWLQJV Boilovers cause
smoking and greasy spillovers that may catch
on fire. If the burner flames are smothered
by a severe boilover which affects the igniter,
unburned gas will escape into the room.
• 7RPLQLPL]HWKHSRVVLELOLW\RIEXUQV ignition
of flammable materials and spillage, turn
cookware handles toward the side or back of
the rangetop without extending over adjacent
burners.
• $OZD\VWXUQWKHVXUIDFHEXUQHUVWR2))
EHIRUHUHPRYLQJFRRNZDUH
&DUHIXOO\ZDWFKIRRGVEHLQJIULHGDWDKLJK
IODPHVHWWLQJ
• )RRGVIRUIU\LQJVKRXOGEHDVGU\DVSRVVLEOH
Frost on frozen foods or moisture on fresh
foods can cause hot fat to bubble up and over
the sides of the pan.
• 8VHWKHOHDVWSRVVLEOHDPRXQWRIIDWIRU
HIIHFWLYHVKDOORZRUGHHSIDWIU\LQJFilling the
pan too full of fat can cause spillovers when
food is added.
• 8VHDGHHSIDWWKHUPRPHWHU whenever
possible to prevent overheating fat beyond the
smoking point.
• $OZD\VKHDWIDWVORZO\DQGZDWFKDVLW
KHDWV
1HYHUWU\WRPRYHDSDQRIKRWIDW especially
a deep fat fryer. Wait until the fat is cool.
• ,IDFRPELQDWLRQRIRLOVRUIDWVZLOOEHXVHGLQ
IU\LQJstir together before heating or as fats
melt slowly.
• :KHQXVLQJJODVVFRRNZDUH make sure it is
designed for top-of-rangetop cooking.
• 'RQRWOHDYHDQ\LWHPVRQWKHUDQJHWRS The
hot air from the vent may ignite flammable
items and will increase pressure in closed
containers, which may cause them to burst.
• 'RQRWXVHDOXPLQXPIRLOWRFRYHUWKHJUDWHV
RUOLQHDQ\SDUWRIWKHUDQJHWRS Doing so
may result in carbon monoxide poisoning,
overheating of the rangetop surfaces, or a
potential fire hazard.
• 8VHSURSHUSDQVL]H³avoid pans that are
unstable or easily tipped. Select cookware
having flat bottoms large enough to properly
contain food and avoid boilovers and
spillovers and large enough to cover burner
grate. This will save cleaning time and prevent
hazardous accumulations of food, since heavy
spattering or spillovers left on the rangetop
can ignite. Use pans with handles that can be
easily grasped and remain cool.
• 'RQRWOHDYHSODVWLFLWHPVRQWKHUDQJHWRS³
they may melt if left too close to the vent or
burner.
• 7RDYRLGWKHSRVVLELOLW\RIDEXUQalways be
certain that the controls for all burners are at
the OFF position and all grates are cool before
attempting to remove them.
• *UHDVHLVIODPPDEOH Let hot grease cool
before attempting to handle it. Avoid letting
grease deposits collect in the grill or the
griddle grease troughs (some models). Clean
these areas after each use.
• )RUSURSHUOLJKWLQJDQGSHUIRUPDQFHRIWKH
UDQJHWRSEXUQHUVNHHSWKHEXUQHUSRUWV
FOHDQIt may be necessary to clean these
when there is a boilover or when the burner
does not light, even though the electronic
igniters click.
• $IWHUFOHDQLQJLWLVLPSRUWDQWWRPDNHVXUH
WKHFDSDQGEXUQHUSRUWDUHSURSHUO\DOLJQHG
ZLWKWKHEXUQHUEDVHIncorrect alignment
will produce poor burner performance. Never
operate the burner without all burner parts in
place.
• &OHDQWKHUDQJHWRSZLWKFDXWLRQAvoid
steam burns; do not use a wet sponge or cloth
to clean the rangetop while it is hot. Some
cleaners produce noxious fumes if applied to a
hot surface. Follow manufacturer’s directions.
• 'RQRWXVHWKHJULOOIRUFRRNLQJH[FHVVLYHO\
IDWW\PHDWVRUSURGXFWVWKDWFDQIODUHXS
• ,IWKHUDQJHWRSLVORFDWHGQHDUDZLQGRZ do
not hang long curtains that could blow over
the surface burners and create a fire hazard.
SAVE THESE INSTRUCTIONS

8
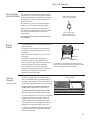
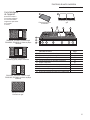
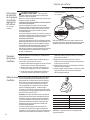
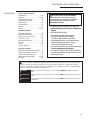
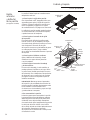
Design
information
(Not all features
are on all models.
Appearance may
vary.)
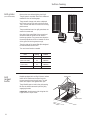
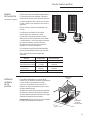
Features of Your Rangetop
Professional Rangetops
)HDWXUH,QGH[ 3DJH
1 Bamboo Cutting Board 16
2 Grill and Griddle Covers ³³
3 IR (Infrared) Grill 11, 12
4 Grill and Griddle Grease Troughs 15
5 Griddle 16
6 Rangetop Burner Grates 15
7 Burner Location Indicator ³³
8 LED Bullnose Task Lighting Control ³³
9 Burner Control Knob with Lighted Bezel ³³
9
7
8
6
1
4
3
ZGU486NR, ZGU486LR–6 burners and grill
ZGU486ND, ZGU486LD–6 burners and
griddle
ZGU484NG, ZGU484LG
4 burners, grill and griddle
ZGU364NR, ZGU364LR–4 burners and grill
ZGU364ND, ZGU364LD–4 burners and
griddle
ZGU366N, ZGU366L
6 gas burners
2
Bamboo Cutting
Board
Grill and Griddle Covers
5

9
Rangetop Controls
Professional Rangetops
Push the control knob in and turn it
counterclockwise to the /,7( position.
$IWHUWKHEXUQHULJQLWHVturn the knob to adjust
the flame size.
7RWXUQDEXUQHURII turn the knob clockwise,
as far as it will go, to the 2)) position.
• Do not operate a burner for an extended
period of time without cookware on the grate.
The finish on the grate may chip without
cookware to absorb the heat.
• The indicator light on each bezel verifies the
burner is on. However, it should not be a
substitute for visually checking the flame at the
burner.
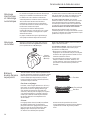
Electronic
ignition &
automatic
reignition
The rangetop is equipped with electronic ignition
which eliminates the need for a standing pilot
light.
The burners will automatically relight if the flame
goes out.
All surface burner igniters will spark and make
clicking sounds when any burner is turned on.
Do not touch any of the burners when igniters
are clicking.
Occasionally the burners may spark if excess
wind or a draft blows the flame away from the
burner’s flame sensor.
The griddle and IR (infrared) grill are equipped
with Glo-Bar igniters. The Glo-Bar remains
energized whenever the griddle or IR grill is in
use to ensure the burner always stays lit.
,QFDVHRIDSRZHURXWDJH you can light the
surface burners on your rangetop with a match.
Hold a lighted match to the burner, then turn the
knob to the LOW position. 8VHH[WUHPHFDXWLRQ
ZKHQOLJKWLQJEXUQHUVWKLVZD\
Do not attempt to light the grill or griddle during
a power outage. The gas to these burners will
automatically shut off during a power outage.
To light
a surface
burner
ON
Indicator
Light
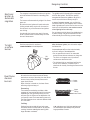
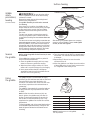
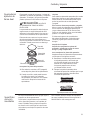
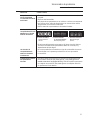
Dual-flame
stacked
burners
All surface burners have two sets of flames
stacked one on top of the other; the dual-flame
burners have a lower (simmer) flame and a
upper (main) flame.
When a burner is turned on, the lower flame
will always light and stay on.
6LPPHULQJ
The stacked burner design provides a wide
rangetop of heat settings with which to simmer.
Depending on the type and quantity of food,
and pan size, the flame can be adjusted to suit
your specific need. The lowest setting uses only
the lower flame and can maintain delicate foods
at a safe 140°F.
&RRNLQJ
Settings from /2 to;+I will use both upper
and lower flames. Use /2 to +, for all purpose
cooking. Use +, or;+, (highest setting) with
larger diameter cookware.
Upper
Flame
Lower Flame
Lower
Flame
;+, and +, are very high heat settings and
are intended to sear foods quickly and boil
large quantities of water.

10
How to
select
flame size
Watch the flame, not the knob, as you increase
or reduce heat.
The flame size on a gas burner should match
the cookware you are using.
FOR SAFE HANDLING OF COOKWARE, NEVER
LET THE FLAME EXTEND UP THE SIDES OF THE
COOKWARE. Any flame larger than the bottom of
the cookware will not result in faster heating and
could be hazardous.
For surface stability, 6” minimum diameter
cookware is recommended. Use larger
diameter cookware for heat settings between
+, and ;+,.
Surface Cooking
Professional Rangetops
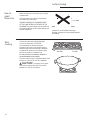
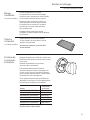
Wok
cooking
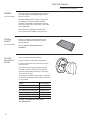
The burner grates are uniquely designed
to cook on either side. The flat side
accommodates flat bottom cookware
(stockpots, sauce pans, frying pans and flat
bottom woks), while the wok side is designed
to hold a wide variety of round bottom woks
without the need for a separate ring.
)RUHDV\DFFHVVDIURQWEXUQHUORFDWLRQLV
UHFRPPHQGHGIRUZRNFRRNLQJ
The front center burner is recommended for wok
cooking on 6-burner 36” and 48” rangetops.
&$87,21 To properly fit the grate
and match the flame size, the wok must be
between 12” and 14” in diameter.
Wok Side
Flat Side

11
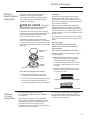
Grill safety
precautions
(on some models)
:$51,1* Do not leave the IR grill
unattended at any time.
*UHDVH)ODUHXSV
Occasionally, during grilling, grease drippings
can ignite creating minor bursts of flame for a
second or two. This is normal when grilling.
The grill radiant baffle is designed to catch
excess grease, limiting flare-ups.
If a flare-up becomes excessive, remove the
food from the grill and lower the heat setting
until the flare-up subsides.
To further reduce flare-ups, trim excess fat
around the edges of steaks and chops, use
hamburger that is lean, remove the skin from
poultry, etc.
Use a long spatula and a non-flammable mitt
when turning food on the grill.
*ULOO&RYHU
Remove the cover before lighting the burner. For
your safety, the cover must be removed when
using the grill. If the cover is left in place it will
become extremely hot.
&RRNZDUH
Do not use any cookware on the grill.
Using the
IR grill
5HPRYHWKHFRYHU before lighting the burner. The
cover must be removed when using the IR grill.
Set the control knob to 35(+($7. The longer the
grill is preheated, the darker the grill marks will
be on the food.
Allow 5 to 15 minutes to fully preheat the grill.
After preheat, the control knob may be set to
any position between +, and /2.
'RQRWOHDYHWKHJULOOXQDWWHQGHGDWDQ\WLPH
The intense heat caramelizes fats and juices
creating authentic barbecued flavor. The IR grill
will achieve the same results as an outdoor grill.
All gas grills cook differently. Adjust cooking
times and methods when using the IR grill.
Clean the grill grate, grease trough and grease
basin after each use. Remove the parts for
cleaning after they are cool to the touch.
127( The grill will take approximately
45 seconds to ignite. Unlike the surface burners,
which use electric igniters, the grill uses
a Glo-Bar for ignition. It takes approximately
45 seconds for the Glo-Bar to reach
temperature. Gas is only supplied to the grill
once the Glo-Bar reaches temperature.
Surface Cooking
Professional Rangetops

12
Surface Cooking
Professional Rangetops
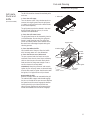
Grill
radiant
baffle
Models equipped with an IR grill have a radiant
baffle which distributes the heat from the
burners evenly across the grill area. The grill
baffle also helps to limit grease flare-ups.
The grill baffle rests on tabs in the grill opening.
Be sure the baffle is secured in place by fully
engaging the tabs.
,03257$17 Avoid contact with the igniter. It is
fragile and can chip or break.
Support Tabs
Grill grates
(on some models)
Remove the cover before lighting the IR grill.
The grill grate is reversible. Place the handle end
toward the front of the Rangetop.
The grate will change color when subjected
to the heat, and as oils cook onto the surface.
This is normal and does not affect the cooking
performance.
The porcelainized cast-iron grill grate does not
need to be seasoned.
One side of the grate (Side A) is grooved and
should be used for foods such as steak or
hamburger patties. The grooves are sloped so
the excess liquids and oils run toward the front
of the grill and into the grease trough.
The other side of the grate (Side B) is designed
for delicate foods such as fish.
Turn and move foods as needed.
Side A
Side B
Glo-Bar Igniter
)RRG 6HWWLQJ 3UHKHDW
Hamburger Patties (8) HI or LO 5 Minutes
Chicken Breast (6)
(Bone side down) LO 5 Minutes
T-Bone Steak
(1-1/2” thick) LO 5 Minutes
Salmon LO 5 Minutes

)RRG,WHP 7HPSHUDWXUH6HWWLQJ
Pancakes 375ºF
Hamburgers 400ºF
Bacon* 400ºF
Grilled Cheese 350ºF
Eggs 275ºF
The griddle surface is a combination of highly
polished Type 304 stainless steel and an aluminum
thermal plate for even heat distribution. It is
normal for it to darken with use as oils cook onto
the surface to provide a stick-resistant base or
“seasoning.”
The griddle is thermostatically controlled and can
be set to maintain any temperature from 200ºF
to 450ºF.
127( Unlike the surface burners, which use
electric igniters, the griddle uses a Glo-Bar for
ignition. It takes approximately 45 seconds for
the Glo-Bar to reach temperature. Gas is only
supplied to the griddle once the Glo-Bar reaches
temperature.
To heat the griddle, push in the control knob and turn
to the desired temperature setting. The light on the
bezel will glow to indicate the thermostat control
is working.
127( Place bacon on a cold griddle.
Do not preheat.
13
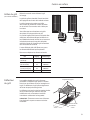
Griddle
safety
precautions,
leveling
(on some models)
:$51,1* Do not allow the airflow
from the griddle flue cover to be obstructed by
cookware or towels.
Remove the metal cover and the cutting board
before turning the griddle on.
7KHJULGGOHDVVHPEO\VKRXOGQRWEHUHPRYHG
IRUFOHDQLQJ
Once the unit is in position, the griddle can be
leveled. Remove the flue cover by lifting it straight
up. Be careful not to scratch the surrounding
stainless steel surfaces during removal of the
flue cover.
The two inner screws are clamping screws for
securing the griddle in place. Loosen these two
screws before leveling. 'RQRWUHPRYHWKHVHWZR
VFUHZV
The two outer screws are leveling screws. 'RQRW
UHPRYHWKHVHWZRVFUHZV They can be turned to
level the griddle or to provide a forward slope to
help grease and oils to drain away from the food
being cooked. After the first few uses, you will be
able to judge the slope best suited for the foods
you are cooking and personal preference.
After leveling the griddle, tighten the clamping
screws to secure griddle in place. +DQGWLJKWHQ
VFUHZVGRQRWRYHUWLJKWHQ
Surface Cooking
Professional Rangetops
Griddle flue cover
Clamping
screws
Leveling screws
Season
the griddle
%HIRUHXVLQJWKHJULGGOHIRUWKHILUVWWLPHLWPXVW
EHVHDVRQHG
If the griddle has not been used for a period of
time, it should be reseasoned.
Clean the griddle thoroughly with hot, soapy
water to remove any protective coating.
Wipe the surface using a solution of 1 quart
water and 1 cup white vinegar. Dry thoroughly.
Use a paper towel and wipe 1 tablespoon
vegetable oil evenly acros s the griddle. Do not
use corn oil as it can get sticky.
Turn the control knob to 400°F for approximately
30 minutes. Turn the heat off when the oil starts
to shimmer.
Repeat Step 3. Be sure to cover the entire
surface with the oil.
Allow the griddle to cool. Wipe the entire surface
of the griddle using a heavy cloth to remove the
oil. The griddle is now ready to use.
Using
the griddle

14
Care and Cleaning
Professional Rangetops
Dual-flame
stacked burners
7KHEXUQHUFRQVLVWVRIWKUHHSDUWVWKHEXUQHU
base, burner head and burner cap. The burner
head and burner cap can be lifted off, making
them easy to clean.
&$87,21DO NOT OPERATE THE
BURNER WITHOUT ALL BURNER PARTS IN PLACE.
Surface burners should be cleaned routinely,
especially after bad spillovers, which could clog
the slots and holes in the burner heads.
The electrode is located at the rear of each
burner. Do not attempt to disassemble or clean
around any burner while another burner is on. An
electric shock may result.
7RUHPRYHWKHEXUQHUSDUWV
Turn all controls 2)) before removing any
burner parts.
When cool, you may lift off the burner grates,
burner caps and burner heads for easier
cleaning. 'RQRWUHPRYHWKHEXUQHUEDVHV
Cleaning
Lift off burner parts only when cool. Wash in hot,
soapy water. You may use a plastic scouring pad
to remove burned-on food particles.
7RUHPRYHEXUQHGRQIRRGsoak the burner
heads in a solution of mild liquid detergent and
hot water for 20–30 minutes. For more stubborn
stains, use a plastic scouring pad or toothbrush.
If the spill goes inside the burner head assembly,
wash it under running water and shake to
remove excess water.
$IWHU&OHDQLQJ
%HIRUHUHSODFLQJWKHEXUQHUSDUWVVKDNHRXW
H[FHVVZDWHUDQGWKHQGU\WKHPWKRURXJKO\
7RUHSODFHWKHEXUQHUSDUWV
Make sure that the burner parts are replaced in
the correct location.
1. Replace the burner head on top of the burner
base, making sure that the hole in the burner
head is properly aligned with the electrode
in the burner base. A small gap between the
base and head is normal.
2. Place the burner cap on top of the burner
head. Make sure that the burner cap is
properly seated on the burner head.
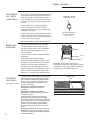
Burner
Head
Burner Base
Electrode
Burner Cap
Burner cap not properly seated
Burner cap properly seated
Do not use a steel-wool pad; it will permanently
scratch the surface.
To clean the stainless steel surface, use
warm sudsy water or a stainless steel cleaner.
Always wipe the surface in the direction of the
grain. Follow the cleaner instructions for cleaning
the stainless steel surface.
To inquire about purchasing stainless steel
appliance cleaner, please call our toll-free
number, 800.626.2002 or visit monogram.com.
Stainless
steel
surfaces

Spark igniter
and electrodes
The electrode of the electronic ignition system is
positioned at the rear of the burner base. When
cleaning the rangetop, be careful not to snag the
igniter with your cleaning cloth. Damage to the
igniter could occur.
Be careful not to push in a control knob while
cleaning. It could cause the igniter to spark.
Make sure that the white ceramic igniters on
the rangetop are dry and clean. Clean the metal
portion of the electrode with a soft cloth or
emery board.
'RQRWDWWHPSWWRUHPRYHWKHHOHFWURGHIURP
WKHUDQJHWRS
Clean this metal part
with an emery board.
Do not clean this
white ceramic part
with an emery board.
Care and Cleaning
Professional Rangetops
Burner
grates
The enameled cast-iron burner grates should be
cleaned regularly.
The grates can be cleaned in the dishwasher.
The frames may be cleaned by hand or in the
dishwasher.
Wash them in hot soapy water, rinse, and dry
thoroughly.
Although they are durable, the grates will
gradually lose their shine, regardless of the
best care you can give them. This is due to their
continual exposure to high temperatures.
Do not operate a burner for an extended
period of time without cookware on the grate.
The finish on the grate may chip without
cookware to absorb the heat.
For stability, the frames have rubber pads on
each corner. During cleaning and use, be careful
not to damage or snag rubber pads.
Grates
15
Frame
Pads
Grease
troughs
(on some models)
Grease from the griddle and the grill will drain
into the enameled cast-iron grease troughs at
the front of the rangetop. Once the troughs have
cooled, they may be lifted out for easier cleaning.
7RUHPRYHWKHFRROJUHDVHWURXJKIURPWKH
JULGGOHslide it toward the front and lift up.
7RUHPRYHWKHFRROJUHDVHWURXJKIURPWKH
JULOOlift the grill frame and lift out the trough.
Do not allow grease to accumulate in the grease
troughs as it can be a fire hazard. Clean the
grease troughs as soon as they are cool. The
grease troughs can be cleaned by hand with
hot soapy water or in the dishwasher. Wipe any
spillage in the trough basin with a soft cloth.
For stability, the troughs have rubber pads at the
front. Be careful not to damage the pads when
removing for cleaning.
Grease troughs

16
Care and Cleaning
Professional Rangetops
Griddle
(on some models)
Thoroughly clean the griddle of grease and food
particles, using a square-edged metal spatula,
while it is still hot.
Wipe the griddle with a dry, heavy, coarse cloth
to remove any remaining residue and food
particles. If the griddle is cleaned with anything
other than a dry, heavy, coarse cloth, it will need
to be reseasoned.
Never flood the hot griddle with cold water.
This could cause the griddle to crack or warp.
Cutting
board
(on some models)
Wash the bamboo cutting board with warm
water and a mild soap. Occasionally, wipe it
with mineral oil.
'RQRWFOHDQWKHFXWWLQJERDUGLQWKH
GLVKZDVKHU
Control
panel and
knobs
Clean up spatters with a damp cloth.
Remove heavier soil with warm, soapy water.
Do not use abrasives of any kind on the control
panel or knobs.
The control knobs may be removed for easier
cleaning. To remove a knob, pull it straight off
the control panel. Wash the knobs in hot soapy
water, but do not soak.
An optional set of black control knobs is available
for purchase at additional cost. Order the knob set
for your model.
7RRUGHUFDOO*(1DWLRQDO3DUWV&HQWHU
DW
0RGHOV 2UGHU1XPEHUV
ZGU366NPSS, ZGU366LPSS WB03K10269
ZGU364NRPSS, ZGU364LRPSS WB03K10270
ZGU364NDPSS, ZGU364LDPSS WB03K10271
ZGU484NGPSS, ZGU484LGPSS WB03K10272
ZGU486NRPSS, ZGU486LRPSS WB03K10273
ZGU486NDPSS, ZGU486LDPSS WB03K10274

Care and Cleaning
Professional Rangetops
17
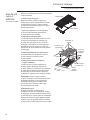
Grill grate,
frame and
baffle
(on some models)
The IR Grill should be cleaned immediately after
each use.
&OHDQWKH*ULOO*UDWH
Turn the burner to OFF. Use a barbecue mitt to
remove the hot grill grate. Place the grill grate
in a basin or sink and scrub with a brass bristle
brush. Rinse frequently.
The grill grate may also be cleaned in the oven
during the self-cleaning cycle, or, it can be
cleaned in the dishwasher.
&OHDQWKH*ULOO*UDWH)UDPH
The grill grate frame can be cleaned by hand or
in the dishwasher. Do not clean the grill grate
frame in a self-cleaning oven. The grill grate
frame has rubber pads on each bottom corner.
Be careful not to damage the pads during the
cleaning process.
&OHDQWKH5DGLDQWEDIIOH
Lift the baffle out of the pan. Clean the baffle
with hot soapy water or in the dishwasher.
&OHDQWKH3DQ6XUURXQG:LUH0HVK
The pan surround and wire mesh cannot be
removed. Clean them in place. Use a soft damp
cloth to clean the pan surround. Gently brush
food particles into the grease trough or use a
vacuum cleaner for excess debris.
,03257$17 Keep the grill burner and ceramic
igniter dry. Do not spray water or cleaner directly
onto the wire mesh or igniter. Avoid contact with
the igniter, it is fragile and can chip or break.
5HDVVHPEOHWKH*ULOO
Reverse the steps above to reassemble the grill.
The radiant baffle support tabs should engage
the pins on the side of the pan surround. Replace
the grate frame. Be sure to engage the bottom
locator pin with the pin hole at the left rear
side of the pan. Replace the grill grate with the
handle end towards the front of the rangetop.
1. Grill Grate
2. Grate
Frame
Support Tabs
Glo-Bar Igniter
3. Radiant Baffle
4. Pan Surround
Wire Mesh
Burner
Locator
Pin Hole

18
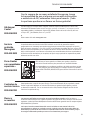
The Problem Solver
Professional Rangetops
352%/(0 3266,%/(&$86(
%851(56'2127 • Electrical plug is not plugged into a live power outlet.
/,*+72563$5.
• Gas not turned on.
5$1'20/<
• Burner parts not replaced correctly.
• Holes in the simmer rings or slits in the burner rings are clogged.
• Clogged orifice, or wet burners or electrodes.
%851(56+$9( • Burner parts not replaced correctly.
<(//2:25
<(//2:7,33('
)/$0(6
• If burner flames look like $, call for service. Normal burner flames
should look like % or &, depending on the type of gas.
%851(5)/$0(6 • The rangetop may be connected to the wrong fuel type. Contact the
9(5</$5*( person who installed your rangetop or made the conversion.
25<(//2:
%851(5&21752/ • When the knob is at the 2)) position, it must be pushed in before
.12%:,//127 it can be turned, and it can only be turned in a counterclockwise
7851 direction. When the knob is at any other position, it can be turned
in either direction without being pushed inwards.
$<HOORZIODPHV Call for
service.
%<HOORZWLSVRQRXWHU
FRQHV Normal for LP gas.
&6RIWEOXHIODPHV
Normal for natural gas.

19
:LWKWKHSXUFKDVHRI\RXUQHZ0RQRJUDPDSSOLDQFHUHFHLYH
WKHDVVXUDQFHWKDWLI\RXHYHUQHHGLQIRUPDWLRQRUDVVLVWDQFH
IURP*(ZH·OOEHWKHUH$OO\RXKDYHWRGRLVFDOO³WROO IUHH
GE Answer Center
®
In the USA:
800.626.2000
Whatever your question about any Monogram major appliance, GE Answer Center
®
information service
LVDYDLODEOHWRKHOS<RXUFDOO³DQG\RXUTXHVWLRQ³ZLOOEHDQVZHUHGSURPSWO\DQGFRXUWHRXVO\&DOOWKH
GE Answer Center
®
Monday to Friday, 8 a.m. to 10 p.m. EST, and Saturday, 8 a.m. to 7 p.m. EST.
25
9LVLWRXU:HEVLWHDWPRQRJUDPFRP
In Canada, call 800.561.3344.
In-Home
Repair Service
In the USA:
800.444.1845
In Canada:
800.561.3344
A GE consumer service professional will provide expert repair service, scheduled at a time that’s
convenient for you. To schedule service, call Monday to Friday, 7 a.m. to 10 p.m. EST, or Saturday
and Sunday, 8 a.m. to 6 p.m. EST. Many GE Consumer Service company- operated locations offer
you service today or tomorrow, or at your con venience. Our factory-trained technicians know your
DSSOLDQFHLQVLGHDQGRXW³VRPRVWUHSDLUVFDQEHKDQGOHGLQMXVWRQHYLVLW
,Q&DQDGD0RQGD\WR)ULGD\DPWRSPDQG6DWXUGD\DPWRSP('67
Service Contracts
In the USA:
800.626.2224
In Canada:
800.561.3344
You can have the secure feeling that GE Consumer Service will still be there after your
warranty expires. Purchase a GE contract while your warranty is still in effect and you’ll
receive a substantial discount. With a multiple -year contract, you’re assured of future
service at today’s prices.
Parts and
Accessories
In the USA:
800.626.2002
In Canada:
800.561.3344
,QGLYLGXDOVTXDOLILHGWRVHUYLFHWKHLURZQDSSOLDQFHVcan have parts or accessories sent directly
to their home. The GE parts system provides access to over 47,000 parts…and all GE Genuine
Renewal Parts are fully warranted. VISA, MasterCard and Discover cards are accepted.
8VHUPDLQWHQDQFHLQVWUXFWLRQVFRQWDLQHGLQWKLVPDQXDOFRYHUSURFHGXUHVLQWHQGHGWREH
SHUIRUPHGE\DQ\XVHU2WKHUVHUYLFLQJJHQHUDOO\VKRXOGEHUHIHUUHGWRTXDOLILHGVHUYLFH
SHUVRQQHO&DXWLRQPXVWEHH[HUFLVHGVLQFHLPSURSHUVHUYLFLQJPD\FDXVHXQVDIHRSHUDWLRQ
For Customers With
Special Needs…
In the USA:
800.626.2000
GE offers, free of charge, a brochure to assist in planning a barrier-free
kitchen for persons with limited mobility.
Consumers with impaired hearing or speech who have access to a
TDD or a conventional teletypewriter may call 800.TDD.GEAC
(800.833.4322) to request information or service.
Consumer Services
Professional Rangetops

Warranty
Professional Dual Fuel Range
WHAT IS
COVERED
/,0,7('7:2<($5:$55$17<
For two years from date of original purchase,
we will provide, free of charge, parts and
service labor in your home to repair or replace
DQ\SDUWRIWKHUDQJH that fails because of a
manufacturing defect.
/,0,7('),9(<($5:$55$17<
For five years from the date of original purchase,
we will provide, free of charge, replacement gas
VXUIDFHEXUQHUVif they fail in normal household
use. (The grill, griddle and oven burners are not
included.) You pay for the service trip to your
home and all service labor charges.
/,0,7('/,)(7,0(:$55$17<
For the lifetime of the gray porcelain enamel
oven racks, we will provide, free of charge,
replacement racks if they fail in normal
household use. You pay for the service trip to
your home and all service labor charges.
This warranty is extended to the original
purchaser and any succeeding owner for
products purchased for ordinary home use in
the 48 mainland states, Hawaii and Washington,
D.C. In Alaska the warranty is the same except
that it is LIMITED because you must pay to ship
the product to the service shop or for the service
technician’s travel costs to your home.
All warranty service will be provided by our
Factory Service Centers or by our authorized
Customer Care
®
servicers during normal working
hours.
Should your appliance need service, during
warranty period or beyond, in the U.S.A. call
,Q&DQDGD
Some states do not allow the exclusion or limitation of incidental or consequential damages, so the
above limitation or exclusion may not apply to you. This warranty gives you specific legal rights, and
you may also have other rights which vary from state to state.
To know what your legal rights are in your state, consult your local or state consumer affairs office or
your state’s Attorney General.
:DUUDQWRU*HQHUDO(OHFWULF&RPSDQ\/RXLVYLOOH.<
WHAT IS NOT
COVERED
6HUYLFHWULSVWR\RXUKRPHWRWHDFK\RXKRZ
WRXVHWKHSURGXFW
'LVFRORUDWLRQRIWKHJULGGOHSODWHRURYHQUDFNV
&KLSSLQJRISRUFHODLQHQDPHOJUDWHVRURYHQ
UDFNV
5HSODFHPHQWRIKRXVHIXVHVRUUHVHWWLQJRI
FLUFXLWEUHDNHUV
,QFLGHQWDORUFRQVHTXHQWLDOGDPDJHFDXVHG
E\SRVVLEOHGHIHFWVZLWKWKLVDSSOLDQFH
'DPDJHDIWHUGHOLYHU\
'DPDJHWRWKHSURGXFWFDXVHGE\DFFLGHQW
ILUHIORRGVRUDFWVRI*RG
)DLOXUHRIWKHSURGXFWLILWLVXVHGIRU
RWKHUWKDQLWVLQWHQGHGSXUSRVHRUXVHG
FRPPHUFLDOO\
,PSURSHULQVWDOODWLRQGHOLYHU\RU
PDLQWHQDQFH
,I\RXKDYHDQLQVWDOODWLRQSUREOHPFRQWDFW
\RXUGHDOHURULQVWDOOHU<RXDUHUHVSRQVLEOHIRU
SURYLGLQJDGHTXDWHHOHFWULFDOJDVH[KDXVWLQJ
DQGRWKHUFRQQHFWLQJIDFLOLWLHVDVGHVFULEHGLQ
WKH,QVWDOODWLRQ,QVWUXFWLRQVSURYLGHGZLWKWKH
SURGXFW
3URGXFWQRWDFFHVVLEOHWRSURYLGHUHTXLUHG
VHUYLFH
YOUR MONOGRAM RANGE WARRANTY
Staple sales slip or cancelled check here. Proof of original purchase
date is needed to obtain service under warranty. Please have serial
number and model number available when calling for service.
(;&/86,212),03/,(':$55$17,(6³<RXUVROHDQGH[FOXVLYHUHPHG\LVSURGXFWUHSDLUDV
provided in this Limited Warranty. Any implied warranties, including the implied warranties
of merchantability or fitness for a particular purpose, are limited to one year or the shortest
period allowed by law.
20
Page is loading ...
Page is loading ...
Page is loading ...
Page is loading ...
Page is loading ...
Page is loading ...
Page is loading ...
Page is loading ...
Page is loading ...
Page is loading ...
Page is loading ...
Page is loading ...
Page is loading ...
Page is loading ...
Page is loading ...
Page is loading ...
Page is loading ...
Page is loading ...
Page is loading ...
Page is loading ...
Page is loading ...
Page is loading ...
Page is loading ...
Page is loading ...
Page is loading ...
Page is loading ...
Page is loading ...
Page is loading ...
Page is loading ...
Page is loading ...
Page is loading ...
Page is loading ...
Page is loading ...
Page is loading ...
Page is loading ...
Page is loading ...
Page is loading ...
Page is loading ...
Page is loading ...
Page is loading ...
-
 1
1
-
 2
2
-
 3
3
-
 4
4
-
 5
5
-
 6
6
-
 7
7
-
 8
8
-
 9
9
-
 10
10
-
 11
11
-
 12
12
-
 13
13
-
 14
14
-
 15
15
-
 16
16
-
 17
17
-
 18
18
-
 19
19
-
 20
20
-
 21
21
-
 22
22
-
 23
23
-
 24
24
-
 25
25
-
 26
26
-
 27
27
-
 28
28
-
 29
29
-
 30
30
-
 31
31
-
 32
32
-
 33
33
-
 34
34
-
 35
35
-
 36
36
-
 37
37
-
 38
38
-
 39
39
-
 40
40
-
 41
41
-
 42
42
-
 43
43
-
 44
44
-
 45
45
-
 46
46
-
 47
47
-
 48
48
-
 49
49
-
 50
50
-
 51
51
-
 52
52
-
 53
53
-
 54
54
-
 55
55
-
 56
56
-
 57
57
-
 58
58
-
 59
59
-
 60
60


GE ZGU364NDP7SS Owner's manual
- Category
- Barbecues & grills
- Type
- Owner's manual
Ask a question and I''ll find the answer in the document
Finding information in a document is now easier with AI
in other languages
Related papers
-
GE ZGU36N6HSS Owner's manual
-
GE ZGU484LGP3SS Owner's manual
-
GE ZDP486NDNSS Owner's manual
-
GE ZGU366NTSS Owner's manual
-
Yes P2S930YPFS Owner's manual
-
GE ZGU364NDPSS Owner's manual
-
GE CGU366P2TS1 User manual
-
GE CGU486P2MS1 Owner's manual
-
GE Cafe CGS750P2MS1 Owner's manual
-
GE CGU486P2MS1 Installation guide
Other documents
-
Fisher & Paykel CPV2-485GDN N User guide
-
Monogram ZGP366NRSS User manual
-
-
Monogram ZGU366NTSS Owner's manual
-
-
-
GEAppliances ZGU364NDPSS Owner's manual
-
Gaggenau VG 295 150CA Owner's manual
-
-
 Cafe CGU486P2MS1 Owner's manual
