Sony HT-S100F User manual

Category
Bluetooth music receivers
Type
User manual

This manual is also suitable for

HT-S100F
4-727-410-61(1)
HT-S100F
4-727-410-61(1)
K:\081\Win7 CS\new3\4727410611_HT-S100F_GB-FR-PR-
AR\00COV\010COV.fm
masterpage:
Right
HT-S100F
4-727-410-61(1)
HT-S100F
Operating Instructions
GB
Manuel d’instructions
FR
4-727-410-61(1)
Sound Bar
©2018 Sony Corporation Printed in China
H:\0186-PC115\ML\4727410611_HT-S100F_GB-FR-PR-
AR\00COV\010BCO.fm
masterpage:
Right
HT-S100F
4-727-410-61(1)
HT-S100F
PR
AR
http://www.sony.net/
Sound Bar
2
GB
Do not install the appliance in a
confined space, such as a bookcase or
built-in cabinet.
To reduce the risk of fire, do not cover
the ventilation opening of the appliance
with newspapers, tablecloths, curtains,
etc.
Do not expose the appliance to naked
flame sources (for example, lighted
candles).
To reduce the risk of fire or electric
shock, do not expose this appliance to
dripping or splashing, and do not place
objects filled with liquids, such as vases,
on the appliance.
The unit is not disconnected from the
mains as long as it is connected to the
AC outlet, even if the unit itself has been
turned off.
As the main plug is used to disconnect
the unit from the mains, connect the
unit to an easily accessible AC outlet.
Should you notice an abnormality in the
unit, disconnect the main plug from the
AC outlet immediately.
Do not expose batteries or appliances
with battery-installed to excessive heat,
such as sunshine and fire.
Indoor use only.
Recommended cables
Properly shielded and grounded cables
and connectors must be used for
connection to host computers and/or
peripherals.
For the Bar Speaker
The nameplate is located on the bottom
of the Bar Speaker.
WARNING
3
GB
Table of Contents
About These Operating
Instructions ..............................3
What’s in the Box ..........................4
What You Can Do with the
System .....................................5
Guide to Parts and Controls ..........6
Preparing for Using the
System
Mounting the Bar Speaker on a
Wall .........................................12
When the TV Remote Control does
not Work ................................ 14
Listening to the Sound
Listening to a TV and Other
Devices .................................. 15
Listening to Music on a USB
Device .................................... 16
Selecting the Sound Effect
Adjusting the Sound .................... 18
Listening to Music/Sound
with the BLUETOOTH®
Function
Listening to Music from a Mobile
Device ....................................20
Turning the System On by
Operating the BLUETOOTH
Device .................................... 22
Turning the BLUETOOTH Function
Off .......................................... 22
Using the Various Functions
Using the Control for HDMI
Function .................................23
Saving Power Consumption ........24
Troubleshooting
Troubleshooting ..........................25
Resetting the System ..................29
Additional Information
Specifications ...............................30
Playable Types of Files
(USB Input) ............................. 31
Supported Input Audio Formats
(HDMI OUT (TV (ARC)) or TV IN
(OPTICAL)) .............................. 31
On BLUETOOTH
Communication .....................32
Precautions ..................................33
About These Operating
Instructions
The instructions in these Operating
Instructions describe the controls on
the remote control.
Some illustrations are presented as
conceptual drawings, and may be
different from the actual products.
The default settings are underlined on
each feature description.
Basic Setup
Startup Guide
(separate
document)
GB
4
GB
What’s in the Box
•Bar Speaker (1)
Remote control (1)
R03 (size AAA) battery (2)
Optical digital cable (1)
AC power cord (mains lead) (1)
• WALL MOUNT TEMPLATE (1)
•Startup Guide
• Operating Instructions
5
GB
What You Can Do with the System
“Listening to a TV and Other Devices”
(page 15)
Blu-ray Disc™ player, cable
box, satellite box, etc.
Connecting the TV
(refer to “Startup Guide” (separate
document))
“Using the Control for HDMI Function”
(page 23)
“Listening to Music
on a USB Device”
(page 16)
“Listening to Music from a
Mobile Device” (page 20)
6
GB
Guide to Parts and Controls
Details are omitted from the illustrations.
Front
Remote control sensor
Point the remote control at the
remote control sensor to operate
the system.
 (power) button
Turns on the system or sets it to
standby mode.
(input select) button
(page 15)
BLUETOOTH button (page 20)
+/– (volume) buttons
Indicators
For details, see “About the
indicators on the Bar Speaker”
(page 7).
Bar Speaker
7
GB
About the indicators on the Bar Speaker
Lighting and flashing of the indicator(s) on the Bar Speaker indicate the input or
status of the input device.
The indicators flash when turning on/off the function setting or operating the remote
control.
Indicators Status
Lights: TV input is selected.
Lights in blue: BLUETOOTH connection is established (BLUETOOTH input is
selected).
Flashes quickly in blue: While waiting for connection with a device.
Flashes in blue: While reconnecting or performing pairing.
Lights: USB input is selected.
Flashes twice: The play mode is changed.
Flashes three times first, then flashes slowly repeatedly: When connecting an
unsupported device.
Flashes repeatedly: While reading data of the connected USB device.
Indicators Status
Flashes twice: One of the following functions is set to on.
–Night mode (page18)
–Voice mode (page18)
Flashes once: The audio channel is set to Main (page 19), the sound mode is
selected (page 18), or one of the following functions is set to off.
–Night mode (page18)
–Voice mode (page18)
Flashes twice: One of the following functions is set to on.
–Dolby DRC (page19)
Control for HDMI (page 23)
BLUETOOTH standby (page 22)
BLUETOOTH function (page 22)
Auto standby (page 24)
IR repeater (page 14)
Flashes once: The audio channel is set to Sub (page 19) or one of the following
functions is set to off.
–Dolby DRC (page19)
Control for HDMI (page 23)
BLUETOOTH standby (page 22)
BLUETOOTH function (page 22)
Auto standby (page 24)
IR repeater (page 14)
Flash once: The audio channel is set to Main/Sub (page 19).
Flash quickly: The protection feature is activated (page 28).
• Flash slowly: The system enters standby mode by the auto standby
function (page 24).
8
GB
The indicators flash while adjusting the volume level.
Tip
You can turn the indicators off by pressing INDICATOR.
Even if the indicators are turned off by pressing INDICATOR, if you operate the system, the
indicators in relation to the operation light or flash.
Indicators Status
Flashes once: The volume level is low.
Flash once: The volume level is medium.
Flash once: The volume level is high.
Flash repeatedly: The sound is muted.
Flash twice: The volume level is set to maximum/minimum.
9
GB
Rear
AC IN terminal
HDMI OUT (TV (ARC)) jack
Connect a TV that has an HDMI
input jack with an HDMI cable.
The system is compatible with
Audio Return Channel (ARC). ARC
is the function that sends TV
sound to an AV device such as the
system from the TV’s HDMI jack.
(USB) port (page 16)
TV IN (OPTICAL) jack
IR repeater (page 14)
Transmits the remote signal of
the TV remote control to the TV.
10
GB
Some buttons function differently
depending on how long the button is
pressed. The icons below indicate how
long to press the button.
: Press the button.
: Press and hold the button for 5
seconds.
INPUT (page 15)
Selects the playback source. When
you press INPUT once, the current
input indicator flashes.
Press INPUT again to select the
device you want.
Each time you press INPUT, the
input changes cyclically as follows.
TV input BLUETOOTH input
USB input
AUTO SOUND (page 18)
Selects AUTO SOUND for the sound
effect.
CINEMA
: Selects CINEMA for the sound
effect. (page 18)
: Turns on/off the auto standby
function. (page 24)
VOICE
: Turns on/off the voice mode.
(page 18)
: Turns on/off the Control for
HDMI function. (page 23)
(volume) +*/–
Adjusts the volume.
INDICATOR (page 7)
Turns on/off the indicators on the
Bar Speaker.
PLAY MODE (page 16)
Selects the play mode for USB
playback.
/ (page 16)
Select the content on the TV screen
for USB playback.
Remote Control
11
GB
/ (previous/next)
(page 16, 20)
Pressing the button shortly goes to
the beginning of the previous or
next file.
Pressing and holding searches
backward or forward (rewind/fast
forward).
 (power)
Turns on the system or sets it to
standby mode.
STANDARD
: Selects STANDARD for the
sound effect. (page 18)
: Turns on/off the IR repeater
function. (page 14)
MUSIC (page 18)
Selects MUSIC for the sound effect.
NIGHT
: Turns on/off the night mode.
(page 18)
: Turns on/off the BLUETOOTH
standby mode. (page 22)
(muting)
Turns off the sound temporarily or
turn on the sound.
AUDIO*
: Selects the audio channel for
Dolby Digital multiplex broadcast.
(page 19)
: Turns on/off the Dolby DRC
function. (page 19)
ENTER (page 16)
Plays the content that is selected by
/ for USB playback.
 (play/pause)* (page 16, 20)
Pauses or resumes playback.
*The AUDIO, +, and  buttons have
a tactile dot. Use it as a guide during
operation.
12
GB
Mounting the Bar
Speaker on a Wall
You can mount the Bar Speaker on a
wall.
Prepare screws (not supplied) that are
suitable for the wall material and
strength. As a plasterboard wall is
especially fragile, attach the screws
securely in the wall beam. Install the
speakers horizontally, hung by screws in
studs in a continuous flat section of the
wall.
Have the installation done by a Sony
dealer or licensed contractor and pay
special attention to safety during the
installation.
Sony shall not be held responsible for
accidents or damage caused by improper
installation, insufficient wall strength,
improper screw installation or natural
disaster, etc.
1 Prepare two screws (not supplied)
that are suitable for the wall
mount holes on the rear of the Bar
Speaker.
2 Stick WALL MOUNT TEMPLATE
(supplied) on a wall.
1 Align TV CENTER LINE () of
WALL MOUNT TEMPLATE with the
center line of your TV.
2 Align TV BOTTOM LINE () of
WALL MOUNT TEMPLATE with the
bottom of your TV, then stick
WALL MOUNT TEMPLATE on a
wall by using a commercially
available adhesive tape, etc.
Preparing for Using the System
Notes
Hole on the rear of the Bar Speaker
4mm
More than 30 mm
5 mm
10 mm
Center of the TV
WALL MOUNT
TEMPLATE
Adhesive tape,
etc.
13
GB
3 Fasten the screws into the marks
on SCREW LINE () of WALL
MOUNT TEMPLATE as the
illustration below.
4 Remove WALL MOUNT TEMPLATE.
5 Hang the Bar Speaker on the
screws.
Align the holes of the rear of the Bar
Speaker with the screws, then hang
the Bar Speaker on the two screws.
When sticking WALL MOUNT TEMPLATE,
smooth it out fully.
Screws
Marks
6 mm to
7mm
228.5 mm
228.5 mm
Note
14
GB
When the TV Remote
Control does not Work
When the Bar Speaker obstructs the
remote control sensor of the TV, the TV
remote control may not work. In that
case, enable the IR repeater function of
the system.
You can control the TV with the TV
remote control by sending the remote
signal from the rear of the Bar Speaker.
Press and hold STANDARD for 5
seconds to set the function to on or
off.
Be sure to check that the TV remote
control cannot control the TV, and then
set the IR repeater function to on. If it is
set to on when the remote control can
control the TV, appropriate operation
may not be obtained because of the
interference between the direct
command from the remote control and
the command via the Bar Speaker.
On some TVs, this function may not work
correctly. In this case, place the Bar
Speaker slightly further away from the TV.
IR repeater on
The USB indicator flashes twice.
IR repeater off
The USB indicator flashes once.
Notes
15
GB
Listening to a TV and
Other Devices
1 Press INPUT repeatedly.
When you press INPUT once, the
current input indicator flashes.
Press INPUT again to select the
device you want.
The indicator of the selected device
lights up.
Each time you press INPUT, the
input changes cyclically as follows.
TV input BLUETOOTH input
USB input
2 Adjust the volume by pressing
+/– on the remote control.
Tip
You can also select the input by pressing
on the Bar Speaker.
Listening to the Sound
INPUT
+/–
TV input
TV that is connected to the TV IN
(OPTICAL) jack
TV compatible with the Audio Return
Channel (ARC) function that is
connected to the HDMI OUT (TV (ARC))
jack
When you connect the TV to both the
HDMI OUT (TV (ARC)) and TV IN
(OPTICAL) jacks, the input of the HDMI
OUT (TV (ARC)) jack has priority.
BLUETOOTH input
BLUETOOTH device that supports A2DP
For details, see “Listening to Music/
Sound with the BLUETOOTH® Function”
(page 20).
USB input
USB device that is connected to the
(USB) port
For details, see “Listening to Music on a
USB Device” (page 16).
16
GB
Listening to Music on a
USB Device
You can play music files stored on a
connected USB device.
For playable types of files, see “Playable
Types of Files (USB Input)” (page 31).
To view the USB content list on the TV
screen, make sure you connect the
system to the TV using an HDMI cable.
Change the input of the TV to the input
which the Bar Speaker is connected.
1 Connect the USB device to the
(USB) port.
2 Press INPUT repeatedly to select
the USB input.
The USB indicator lights up and the
USB content list appears on the TV
screen.
3 Press / to select the content
you want, then press ENTER.
The selected content starts playing.
4 Press PLAY MODE repeatedly to
select the play mode you want.
None: Plays back all tracks.
[Repeat One]: Repeats one track.
[Repeat Folder]: Repeats all tracks
in a folder.
[Shuffle]: Repeats all tracks in a
folder in random order.
The USB indicator flashes twice
each time you press PLAY MODE.
5 Adjust the volume by pressing
+/– on the remote control.
Notes
ENTER
PLAY MODE
+/–

/
INPUT
/
17
GB
Other operations
Do not remove the USB device during
operation. To avoid data corruption or
damage to the USB device, turn the
system off before connecting or
removing the USB device.
• The USB indicator flashes three times first,
then flashes slowly repeatedly if you
connect an unsupported USB device.
Depending on the file format, rewind and
fast forward do not work.
Playing time
Total playing time
Selected file index/Total files in the
folder
Play mode
Playback status
Rewind/fast forward speed
The following messages appear on the
TV screen depending on the status of
the USB device.
•[No USB]
No USB device is inserted.
•[Waiting]
The system is searching a USB device.
Depending on the playback source, some
information may not be displayed.
Depending on the play mode, the
information displayed may be different.
To Do this
Pause or resume
playback
Press .
Select the previous or
next track
Press /.
Search backward or
forward (rewind/fast
forward)
Press and hold
/.
Notes
Information of USB Device
on the TV Screen
Notes
18
GB
Adjusting the Sound
You can easily enjoy pre-programmed
sound effects that are tailored to
different kinds of sound sources.
Press AUTO SOUND, CINEMA, MUSIC,
or STANDARD to select the sound
mode.
When selecting the sound mode, the TV
indicator flashes once.
You can compress sound in accordance
with the information contained in the
content by setting the night mode to on.
Sound is output at low volume with
minimum loss of fidelity and clarity of
dialogue.
Press NIGHT to set the function to on
or off.
When you turn the system off, the night
mode is set to off automatically.
You can make dialogs clearer by setting
the voice mode to on.
Press VOICE to set the function to on
or off.
Selecting the Sound Effect
Enjoying the Sound Effect
that is Tailored to Sound
Sources (Sound Mode)
AUTO SOUND
You can enjoy the sound with Sony-
recommended sound mode. The sound
mode is automatically optimized according
to playback content and function.
CINEMA
Sounds are played back with surround
effects, and they are realistic and powerful,
making them suitable for movies.
MUSIC
Sound effects are optimized for listening to
music.
STANDARD
AUTO SOUND
MUSIC
CINEMA
STANDARD
Sound effects are optimized for the
individual source.
Enjoying Clear Sound with
Low Volume at Midnight
(NIGHT)
Night mode on
The TV indicator flashes twice.
Night mode off
The TV indicator flashes once.
Note
Making Dialogs Clearer
(VOICE)
Voice mode on
The TV indicator flashes twice.
Voice mode off
The TV indicator flashes once.
19
GB
This function works only when playing
the Dolby Digital signal of the device
that is connected to the TV IN
(OPTICAL)/HDMI OUT (TV (ARC)) jack.
When you set Dolby DRC (Dynamic
Range Control) to on, dynamic range of
the audio signal (range between the
maximum and minimum volume) is
compressed and sound with low
volume is easy to hear.
Press and hold AUDIO for 5 seconds to
set the function to on or off.
You can enjoy multiplex broadcast
sound when the system receives a
Dolby Digital multiplex broadcast signal.
Press AUDIO repeatedly.
The channel changes cyclically as
follows.
Main
Sub Main/Sub
To receive a Dolby Digital signal, you need
to connect a TV or other devices to the TV
IN (OPTICAL) jack with the optical digital
cable (supplied) or the HDMI OUT (TV
(ARC)) jack with an HDMI cable (not
supplied).
Making Sound with Low
Volume Easy to Hear by
Compressing Dynamic
Range
Dolby DRC on
The USB indicator flashes twice.
Dolby DRC off
The USB indicator flashes once.
Enjoying Multiplex
Broadcast Sound (AUDIO)
Main
Outputs only the main channel.
The TV indicator flashes once.
Sub
Outputs only the sub channel.
The USB indicator flashes once.
Main/Sub
Main sound is output from the left speaker
and sub sound is output from the right
speaker.
The TV and USB indicators flash once.
Note
20
GB
Listening to Music from
a Mobile Device
You can listen to music stored on a
mobile device such as a smartphone or
tablet via a wireless connection by
connecting the system and the mobile
device with the BLUETOOTH function.
When connecting to the mobile device
with the BLUETOOTH function, you can
operate by simply using the supplied
remote control without turning the TV
on.
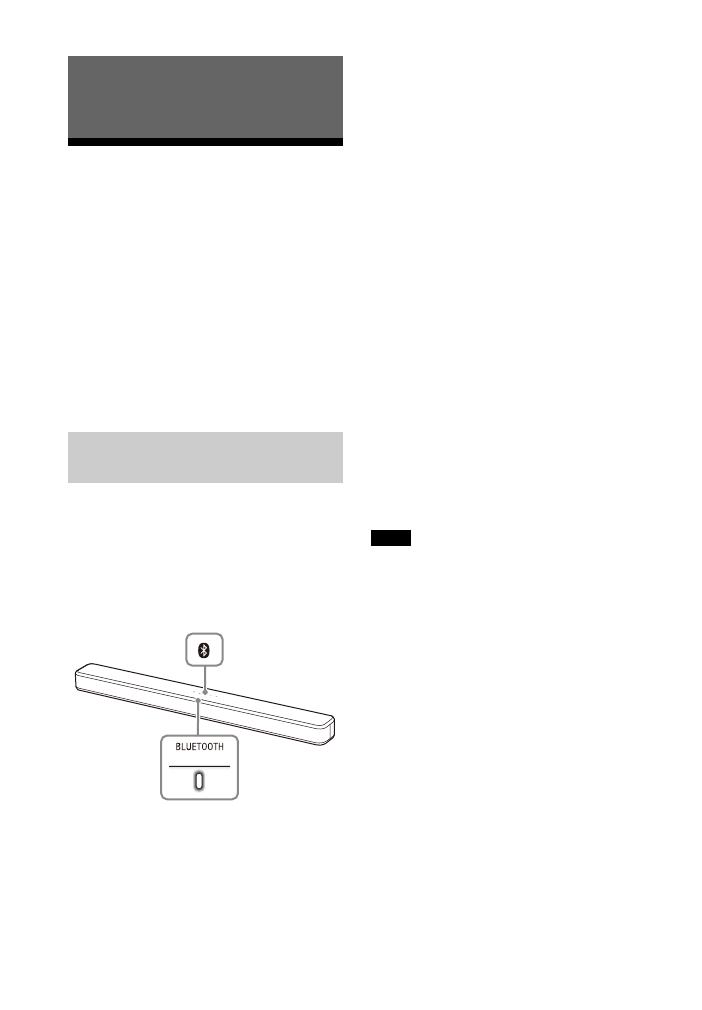
1 Press and hold the BLUETOOTH
button on the Bar Speaker for 5
seconds.
The system enters the pairing mode
and the BLUETOOTH indicator
flashes quickly.
2 On the mobile device, turn on the
BLUETOOTH function, and then
select “HT-S100F” after searching
for it.
If a Passkey is requested, enter
“0000.”
3 Make sure that the BLUETOOTH
indicator on the Bar Speaker lights
in blue.
A connection between the system
and mobile device has been
established.
4 Start audio playback with the
music app on the connected
mobile device.
Sound is output from the Bar
Speaker.
5 Adjust the volume.
Adjust the volume by pressing
+/– on the remote control.
 and / on the remote
control can be used for the
BLUETOOTH function.
You can pair up to 8 BLUETOOTH devices.
If a 9th BLUETOOTH device is paired, the
least recently connected device will be
replaced by the new one.
Perform pairing for the second and
subsequent mobile devices.
Tips
You can check the connection status of
the BLUETOOTH function by checking the
BLUETOOTH indicator status (page 7).
While the BLUETOOTH input is being
selected, the system enters the pairing
mode by pressing the BLUETOOTH button
on the Bar Speaker shortly.
Listening to Music/Sound with the
BLUETOOTH® Function
Listening to Music by Pairing
with a Mobile Device
BLUETOOTH
indicator
BLUETOOTH
button
Notes
  • Page 1 1
  • Page 2 2
  • Page 3 3
  • Page 4 4
  • Page 5 5
  • Page 6 6
  • Page 7 7
  • Page 8 8
  • Page 9 9
  • Page 10 10
  • Page 11 11
  • Page 12 12
  • Page 13 13
  • Page 14 14
  • Page 15 15
  • Page 16 16
  • Page 17 17
  • Page 18 18
  • Page 19 19
  • Page 20 20
  • Page 21 21
  • Page 22 22
  • Page 23 23
  • Page 24 24
  • Page 25 25
  • Page 26 26
  • Page 27 27
  • Page 28 28
  • Page 29 29
  • Page 30 30
  • Page 31 31
  • Page 32 32
  • Page 33 33
  • Page 34 34
  • Page 35 35
  • Page 36 36
  • Page 37 37
  • Page 38 38
  • Page 39 39
  • Page 40 40
  • Page 41 41
  • Page 42 42
  • Page 43 43
  • Page 44 44
  • Page 45 45
  • Page 46 46
  • Page 47 47
  • Page 48 48
  • Page 49 49
  • Page 50 50
  • Page 51 51
  • Page 52 52
  • Page 53 53
  • Page 54 54
  • Page 55 55
  • Page 56 56
  • Page 57 57
  • Page 58 58
  • Page 59 59
  • Page 60 60
  • Page 61 61
  • Page 62 62
  • Page 63 63
  • Page 64 64
  • Page 65 65
  • Page 66 66
  • Page 67 67
  • Page 68 68
  • Page 69 69
  • Page 70 70
  • Page 71 71
  • Page 72 72
  • Page 73 73
  • Page 74 74
  • Page 75 75
  • Page 76 76
  • Page 77 77
  • Page 78 78
  • Page 79 79
  • Page 80 80
  • Page 81 81
  • Page 82 82
  • Page 83 83
  • Page 84 84
  • Page 85 85
  • Page 86 86
  • Page 87 87
  • Page 88 88
  • Page 89 89
  • Page 90 90
  • Page 91 91
  • Page 92 92
  • Page 93 93
  • Page 94 94
  • Page 95 95
  • Page 96 96
  • Page 97 97
  • Page 98 98
  • Page 99 99
  • Page 100 100
  • Page 101 101
  • Page 102 102
  • Page 103 103
  • Page 104 104
  • Page 105 105
  • Page 106 106
  • Page 107 107
  • Page 108 108
  • Page 109 109
  • Page 110 110
  • Page 111 111
  • Page 112 112
  • Page 113 113
  • Page 114 114
  • Page 115 115
  • Page 116 116
  • Page 117 117
  • Page 118 118
  • Page 119 119
  • Page 120 120
  • Page 121 121
  • Page 122 122
  • Page 123 123
  • Page 124 124
  • Page 125 125
  • Page 126 126
  • Page 127 127
  • Page 128 128
  • Page 129 129
  • Page 130 130
  • Page 131 131
  • Page 132 132
  • Page 133 133
  • Page 134 134
  • Page 135 135
  • Page 136 136
  • Page 137 137
  • Page 138 138
  • Page 139 139

Sony HT-S100F User manual

Category
Bluetooth music receivers
Type
User manual
This manual is also suitable for

Ask a question and I''ll find the answer in the document

Finding information in a document is now easier with AI

in other languages