Nyrius ARIES NPCS550 User manual
- Category
- AV extenders
- Type
- User manual
This manual is also suitable for

Thank you for your purchase of this Nyrius product. Please read this instruction manual carefully before
using product to ensure proper use. Keep this manual in a safe place for future reference.
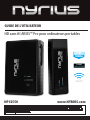
USER GUIDE
ARIES™ Pro Wireless HD for Laptops
NPCS550
www.NYRIUS.com

- 2 -
• Digital Wireless HD Transmitter
• Digital Wireless HD Receiver
• Mounting Bracket for Receiver
• Velcro® STRIPS
• External IR Receiver
• Remote Control
• 100-240V AC Power Adapter
• 5 ft HDMI Cable
• Right Angle HDMI Adapter
• USB Power Cable
• Female USB Adapter
• Instruction Manual
• 1 Year Warranty
• Lifetime Customer Support
What’s Included ........................................................................................................................2
Buttons and Connections ........................................................................................................3
Setup ..........................................................................................................................................5
Setting up the Receiver ...............................................................................................5
Connecting the Receiver .............................................................................................5
Connecting the Transmitter ........................................................................................6
Connecting Multiple Transmitters With One Receiver ..................................................7
Renaming a Video Source ...........................................................................................7
Selecting a video source .............................................................................................9
Removing a video source ............................................................................................9
Standby Mode ..........................................................................................................10
Windows OS Audio setting to switch to HDMI output ...............................................10
Troubleshooting .....................................................................................................................12
Specications ..........................................................................................................................13
FCC Statement.........................................................................................................................14
Safety Information ................................................................................................................15
NYRIUS Warranty ....................................................................................................................17
TABLE OF CONTENTS
WHAT’S INCLUDED
Disclaimers
• HDMI is a registered trademark of HDMI Licensing LLC.
• Maximum transmission range is 160ft under clear line of sight. When transmitting through walls, oors or
ceilings the range will decrease depending on the environment.
• Bluetooth is a registered trademark of Bluetooth SIG Inc. Wi-Fi is a registered trademark of Wi-Fi Alliance.
• Dolby is a registered trademark of Dolby Laboratories Licensing Corporation.
• Playstation is a registered trademark of Sony Computer Entertainment Inc. Xbox is a registered trademark of
Microsoft Corporation.
• Nyrius®, the Nyrius® logo, ARIES™ and any other Nyrius® marks may be registered. All other trademarks are
property of their respective owners.

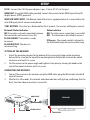
- 3 -
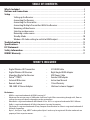
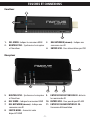
1. VIDEO LED - Indicates HDMI Connection
2. SYNC BUTTON - Synchronizes receiver
and transmitter
3. NETWORK LED - Indicates wireless
connection
4. USB INPUT - For USB Power Connection
BUTTONS AND CONNECTIONS
Transmitter
Receiver
8
5. SYNC BUTTON - Synchronizes receiver
and transmitter
6. VIDEO LED - Indicates HDMI connection
7. NETWORK LED - Indicates wireless
connection
8. HDMI OUTPUT - Connect your
HDMI device
9. IR EXTENDER INPUT - Detects
IR commands
10. USB INPUT - For HID features
11. 5V DC POWER INPUT - Connect to
power supply
1
3
2
4
6
7
5
9
10
11

- 4 -
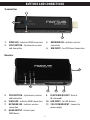
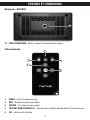
BUTTONS AND CONNECTIONS
12. MOUNTING HOLE - Connects the mounting bracket to the receiver
Receiver - BOTTOM
12
1. MENU – Enter the main menu
2. EXIT – Return to previous menu
3. SOURCE – Select video source
4. DIRECTIONAL KEYS – To Toggle UP/DOWN/LEFT/RIGHT in the menu screen
5. OK – Conrm your selection
Remote Control
2
1
3
4
5

- 5 -
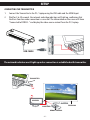
SETUP
DC IN - Connect the 5V/2A power adapter ( spec: 3.5mm, DC 5V ) to this port.
HDMI OUT- Using the HDMI cable provided, connect the receiver to the HDMI Input of any HD
display device (HDTV, projector).
MINI USB INPUT PORT - HID Remote Control function is supported when it is connected to the
mini USB input port of a mouse or keyboard.
SYNC BUTTON - Press the Sync Button button for 5 seconds , the receiver will begin to connect.
SETTING UP THE RECEIVER
1. Install the mounting bracket to the bottom of the receiver by lining up the mounting
hole with the screw on the top of the mounting bracket. Rotate the screw on the mount
clockwise until until it is secure.
2. Set the receiver to the proper angle and tighten it into place by turning the knob on the
side of the mount clockwise until it is secure.
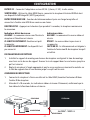
CONNECTING THE RECEIVER
1. Connect the receiver to the monitor using the HDMI cable, plug the IR Extender into the IR
input of receiver.
2. Wait for 5 to 10 seconds, the network and video indicators will light up, conrming that the
Basic Function video connection is successful.
HDMI IN
HDMI
HDMI
TELEVISION
POWER SUPPLY
RECEIVER
HDMI CABLE
IR RECEIVER
Network Status Indicator -
ON:The wireless network connection between
the transmitter and receiver successful.
FLASH SLOWLY: Transmitter is ready
to connect.
FLASH RAPIDLY: The device is
not connecting.
Video indicator -
ON: The video source connection is successful.
OFF : The video source has failed to connect.
IR Sensor - The remote control is aligned to
the IR Extender Input of receiver when using.

- 6 -
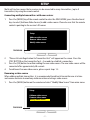
SETUP
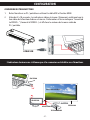
CONNECTING THE TRANSMITTER
1. Connect the Transmitter to the PC / Laptop using the USB cable and the HDMI Input.
2. Wait for 5 to 10 seconds, the network and video indicators will light up, conrming that
the Basic Function video connection is successful. The information on the screen will show
"Connected to NYRIUS..." and display the video source content from the PC/ Laptop.
HDMI
USB
USB CABLE
The network indicator won’t light up unless connection is established with transmitter
TELEVISION
REMOTE CONTROL
IR RECEIVER
TRANSMITTER
N
E
T
W
O
R
K
V
I
D
E
O
VIDEONETWORK
8> ^^^
^6,XK W ^^^
4+:=581)544+):/4-
Connected to NYRIUS...
RECEIVER

- 7 -
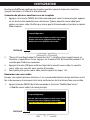
Multicast function means that a receiver can be connected to many transmitters, (up to 8
transmitters) by using the remote control.
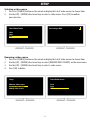
Connecting multiple transmitters with one receiver
1. Press the [MENU] key of the remote control to enter the MAIN MENU, press the directional
keys to select [Add new Video Source] to add a video source. Please be sure that the remote
control is pointing to the receiver’s IR sensor.
2. "Please Activate Registration On Transmitter Unit" will appear on the screen. Press the
SYNC BUTTON on the transmitter for 3~5 seconds to establish a connection.
3. Press the [OK] button to conrm adding the new video source. The new video source will be
connected after approximately 30 seconds.
4. To add more than one video source, please repeat steps 1-3.
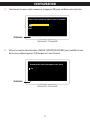
Renaming a video source
When adding multiple transmitters, it is recommended to add each transmitter one at a time
and rename each one to avoid any confusion when selecting a video source.
1. Press the [MENU] button on the remote and select "Modify Video Source" from main menu.
TELEVISION
Setup
Add new video source
Remove video source
Modify video source
TELEVISION
Setup
Add new video source
Remove video source
Modify video source
SETUP

- 8 -
2. Select the video source to rename and press [OK] to conrm your selection.
3. Use [LEFT ][RIGHT ][UP][DOWN] direction keys to modify the name of the video source and
press [OK] when you are done.
TELEVISION
Choose Source to Rename
Sony
DVD
Stick
TELEVISION
Rename Video Source
Stick
SETUP

- 9 -
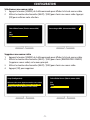
Selecting a video source
1. Press the [SOURCE] button on the remote to display the list of video sources to choose from.
2. Use the [UP] / [DOWN] directional keys to select a video source. Press [OK] to conrm
your selection.
Removing a video source
1. Press the [SOURCE] button on the remote to display the list of video sources to choose from.
2. Use the [UP] / [DOWN] directional keys to select [REMOVE VIDEO SOURCE] on the main menu.
3. Use the [UP] / [DOWN] directional keys to select a video source.
4. Press [OK] to delete.
Select Video Source
Stick
Sony
DVD
DVD
Connecting to DVD...
Setup
Add new video source
Modify video source
Remove video source
Select Video Source
Stick
Sony
DVD
DVD
SETUP

- 10 -
Standby Mode
1. When the receiver’s signal is disconnected from the transmitter, the system will go into
Standby Mode and the OSD will display "Wireless O".
2. Press [SOURCE] or [MENU] to return to the main menu.
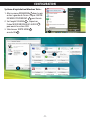
Changing Audio Output to TV
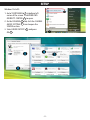
Windows OS Audio setting to switch to HDMI output:
Windows7 OS:
1. Go to START MENU in bottom left corner
of screen. Click Control Panel -->
Hardware and Sound --> Sound -->
Playback to open AUDIO SETTINGS.
2. Select HDMI OUTPUT
1
and Press
OK
2
.
WindowsXP OS:
1. Go to START MENU in bottom left corner of the screen. Click CONTROL PANEL to open
AUDIO setting.
2. Select HDMI OUTPUT and Press OK.
Wireless O
SETUP

- 11 -
Windows Vista OS:
1. Go to START MENU
1
in bottom left
corner of the screen. Click WINDOWS
MOBILITY CENTER
2
to open.
2. On the VOLUME
3
tab, click the CHANGE
AUDIO SETTING
4
icon to open the
SOUND section.
3. Select HDMI OUTPUT
5
and press
OK
6
.
SETUP

- 12 -
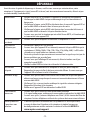
TROUBLESHOOTING
Before following the troubleshooting guide below please make sure that your Transmitter, Receiver and
attached equipment (HD source and display) are all properly connected switched on and not in Standby Mode.
No Video • Check the status of the Link LEDs, and check if the HD device is working
normally
• Check the HDMI cable is undamaged and is plugged into the correct socket
• Check that the correct HDMI output has been selected from the HD device’s
menu and that the HDMI cable is plugged into the correct output socket
• Check that the correct HDMI input has been selected from the TV menu and
that the HDMI cable is plugged into the input socket selected
• Make sure that it is the Receiver that is connected to the HDTV display, and the
Transmitter that is connected to your HD device
Power LED OFF • Make sure the power is connected, and check the power adaptor output to the
Receiver is 5V/2A DC
Video LED OFF • Check the HD device is powered on
• Make sure the HD device is on, connected to the HDMI socket and outputting
a supported resolution. The Video LED will switch OFF if an unsupported video
signal is output
• Part of the system is not properly connected or the signal received is not of
good enough quality/strength
• Make sure the HD display is connected, switched ON and set to the right
channel/input (e.g. HDMI channel)
• Check the HDMI cable is undamaged and is plugged into the correct socket
Network LED
Flashes
• Make sure the Transmitter and Receiver are not positioned too far apart. Move
them closer together to check minimum eective range. Make sure the HD
device is switched ON and had been connected to Receiver
Bad Picture • Make sure the HDMI cable used are undamaged and that you can get a good
picture when the source is connected directly to the display with an HDMI cable
• Make sure nothing is touching or blocking the signal to the built in antennas
• Move Transmitter and Receiver closer together
• Restart the HD device or reconnect the HDMI cable
Bad Audio/No
Audio
• Make sure that the source is outputting supported audio formats
• If the audio signal drops out, restart the audio source and reconnect the
HDMI cable
• Make sure there is no 5.8GHz wireless phone within 50cm of the Receiver.
Some phones use substandard transmission schemes
Other Issues/
Unresolved Issues
• If any other issue occurs of if the above issues persist, try disconnecting both
Transmitter and Receiver and repeating the link setup process
For further questions or inquiries, please contact NYRIUS customer support at:
www.nyrius.com/support

- 13 -
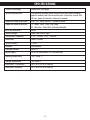
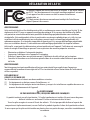
SPECIFICATIONS
Wireless Technology GigaXtreme Technology
System Requirements Any laptop or desktop system containing an HDMI port including
popular models from these manufacturers: Alienware, Lenovo, Dell,
HP, Acer, Apple (Display Port cable not included)
Supported Audio Resolutions PCM , DTS , Dolby Digital 5.1 surround sound
Supported Video Resolutions TV: 1080p, 1080i, 720p, 576p, 480p
PC: 1024x768, 1280x1024, 640x480, 800x600
Ports and Interfaces HDMI
Wireless Range 160ft Clear Line of Sight
Transmission Frequency 5.15~ 5.25GHz, 5.725~ 5.85GHz
Bandwidth 20MHz /40MHz
System Latency < 1 ms
Antenna PCB antenna
Standard Protocol HDMI 1.3
Power supply 5V1A (for Transmitter) 5V2A (for Receiver)
Working temperature -10°C to 40 °C
Storage temperature -20° to 80° C
Dimensions (Transmitter) 98 (L) x 29 (W) x 14.5mm(H)
Dimensions (Receiver) 99 (L) x 56 (W) x 20.5mm(H)

- 14 -
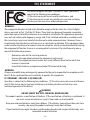
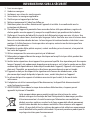
This device complies with part 15 of the FCC rules. Operation is
subject to the following two conditions:
(1) this device may not cause harmful interference, and
(2) this device must accept any interference received, including
interference that may cause undesired operation.
WARNING:
This equipment has been tested and is found to comply with the limits for a Class B digital
device, pursuant to Part 15 of the FCC Rules. These limits are designed to provide reasonable
protection against harmful interference in a residential installation. This equipment generates,
uses and can radiate radio frequency energy and, if not installed and used in accordance with
the instructions, may cause harmful interference to radio communications. However, there is
no guarantee that interference will not occur in a particular installation. If this equipment does
cause harmful interference to radio or television reception, which can be determined by turning
the equipment o and on, the user is encouraged to try to correct the interference by one or
more of the following measures:
• Reorient or relocate the receiving antenna
• Increase the separation between the equipment and receiver
• Connect the equipment into an outlet on a circuit dierent from that to which the
receiver is connected
• Consult the dealer or an experienced radio/TV technician for help
WARNING:
Changes or modications not expressly approved by the party responsible for compliance with
the FCC Rules could void the user’s authority to operate this equipment.
IC STATEMENT / CAN ICES-3 (B)/NMB-3(B)
Operation is subject to the following two conditions: (1) This device may not cause interference,
and (2) This device must accept any interference, including interference that may cause
undesired operation of the device.
!
WARNING
DO NOT INGEST BATTERY, CHEMICAL BURN HAZARD
This product contains a coin/button cell battery. If the coin/button cell battery is swallowed, it
can cause severe internal burns in just 2 hours and can lead to death.
Keep new and used batteries away from children. If the battery compartment does not close
securely, stop using the product and keep it away from children.
If you think batteries might have been swallowed or placed inside any part of the body, seek
immediate medical attention.
FCC STATEMENT

- 15 -
SAFETY INFORMATION
1. Read all instructions.
2. Keep these instructions.
3. Heed all warnings.
4. Follow all instructions.
5. Do not use this apparatus near water.
6. Clean only with a dry cloth.
7. Do not block any ventilation openings. Install in accordance with the manufacturer’s
instructions.
8. Do not install near any heat sources such as radiators, heat registers, stoves, or other
apparatus (including ampliers) that produce heat.
9. Do not defeat the safety purpose of the polarized or grounding-type plug. A polarized plug
has two blades with one wider than the other. A grounding type plug has two blades and
a third grounding prong. The wide blade or the third prong are provided for your safety. If
the provided plug does not t into your outlet, consult an electrician for replacement of the
obsolete outlet.
10. Protect the power cord from being walked on or pinched particularily at plugs, convenience
receptacles, and the point where they exit from the apparatus.
11. Only use attachments/accessories specied by the manufacturer.
12. Unplug this apparatus during lightning storms or when unused for long periods of time.
13. Refer all servicing to qualied service personnel. Servicing is required when the apparatus
has been damaged in any way, such as power-supply cord or plug is damaged. Liquid has
been spilled or objects have fallen into the apparatus, the apparatus has been exposed to
rain or moisture, does not operate normally, or has been dropped.
14. Apparatus shall not be exposed to dripping or splashing, and that no objects lled
with liquids, such as vases, shall be placed on the apparatus.
15. The battery shall not be exposed to excessive heat such as sunshine, re or the like.
16. The direct plug-in adapter is used as disconnect device, the disconnect device shall remain
readily operable.
17. WARNING: To reduce the risk of re or electric shock, do not expose this apparatus to rain or
moisture.
Waste electrical and electronic products should not be disposed of with household
waste. Please recycle where facilities exist. Check with your Local Authority for
recycling advice.

- 16 -
Do not use close to refrigerators, washing machines and metal furniture. Place on a stable surface
and make sure connecting wires are routed to minimize the chance of accidents.
Only use the DC power adaptors supplied, if they must be replaced make sure the replacements
have the same output rating of 5V 2A DC.
Avoid exposing your equipment to harsh conditions such as wet or damp places, high humidity,
strong vibration, extremely high or low temperatures, strong sunlight and places that are very
dusty.
Do not cover or place heavy objects on the units. Make sure there is sucient clearance around the
units to allow adequate ventilation.
Never push objects into holes or ventilation slots.
To save power turn OFF the switches on the power adaptor leads or unplug the power adaptors
from the power sockets when you are not using the equipment.
Don’t continue to use any part of this equipment if you have spilled liquids on it, if it is damaged
in any way or if it does not work normally. Immediately unplug the equipment and get expert
advice.
Cleaning: disconnect the main power supply and use only a lightly dampened cloth. Do not use
chemical solvents or strong detergents as these may damage the cosmetic nish.
• To prevent electric shock, do not remove any cover.
• If anything goes wrong, do not try to repair yourself, get a qualied engineer to look at it.
• Do not expose this equipment to dripping or splashing liquids.
• Never allow a naked ame on or near the equipment.
• This product is not a toy. Do not let young children play with the equipment.
.
SAFETY INFORMATION

- 17 -
Thank you for choosing NYRIUS® Consumer Electronics Products!
NYRIUS gives the following express warranty to the original consumer purchaser or gift recipient for this NYRIUS product,
when shipped in its original container and sold or distributed by NYRIUS or by an Authorized NYRIUS Dealer: NYRIUS
warrants that this product is free, under normal use and maintenance, from any defects in material and workmanship. If
any such defects should be found in this product within the applicable warranty period, NYRIUS shall, at its option, repair or
replace the product as specied herein. Replacement parts furnished in connection with this warranty shall be warranted
for a period equal to the unexpired portion of the original equipment warranty.
This warranty shall not apply to:
A. Any defects caused or repairs required as a result of abusive operation, negligence, accident, improper installation
or inappropriate use as outlined in the owner’s manual.
B. Any NYRIUS product tampered with, modied, adjusted or repaired by any party other than NYRIUS or NYRIUS’s
Authorized Service Centres.
C. Damage caused or repairs required as a result of the use with items not specied or approved by NYRIUS including
but not limited to head cleaning tapes and chemical cleaning agents.
D. Any replacement of accessories, glassware, consumable or peripheral items required through normal use of the
product including but not limited to earphones, remote controls, AC adapters, batteries, stylus, trays, lters,
cables, paper, cabinet, cabinet parts, knobs, buttons, baskets, stands and shelves.
E. Any cosmetic damage to the surface or exterior that has been defaced or caused by normal wear and tear.
F. Any damage caused by external or environmental conditions, including but not limited to transmission line/power
line voltage or liquid spillage.
G. Any product received without appropriate model, serial number and CSA /cUL /cULus /cETL /cETLus markings.
H. Any products used for rental or commercial purposes.
I. Any installation, setup and/or programming charges.
Should this NYRIUS product fail to operate during the warranty period, warranty service may be obtained upon delivery
of the NYRIUS product together with proof of purchase and a copy of this LIMITED WARRANTY statement to an Authorized
NYRIUS Service Centre. In-home warranty service may be provided at NYRIUS discretion on any NYRIUS television with
the screen size of 40” or larger. This warranty constitutes the entire express warranty granted by NYRIUS and no other
dealer, service centre or their agent or employee is authorized to extend, enlarge or transfer this warranty on behalf of
NYRIUS. To the extent the law permits, NYRIUS disclaims any and all liability for direct or indirect damages or losses or
for any incidental, special or consequential damages or loss of prots resulting from a defect in material or workmanship
relating to the product, including damages for the loss of time or use of this NYRIUS product or the loss of information.
The purchaser will be responsible for any removal, reinstallation, transportation and insurance costs incurred. Correction
of defects, in the manner and period of time described herein, constitute complete fulllment of all obligations and
responsibilities of NYRIUS Electronics to the purchaser with respect to the product and shall constitute full satisfaction of
all claims, whether based on contract, negligence, strict liability or otherwise.
1 YEAR PARTS & LABOUR WARRANTY PERIODS
TO OBTAIN THE NAME AND ADDRESS OF THE NEAREST AUTHORIZED NYRIUS SERVICE CENTRE OR FOR MORE
INFORMATION ON THIS WARRANTY
Contact NYRIUS Support:
• Support: www.nyrius.com/support
• Website: www.nyrius.com
• By mail: NYRIUS Customer Service, 4080 Montrose Road, Niagara Falls, ON L2H 1J9
NYRIUS is a registered trade-mark of Circus World Displays Limited 01.2014
WARRANTY
Page is loading ...
Page is loading ...
Page is loading ...
Page is loading ...
Page is loading ...
Page is loading ...
Page is loading ...
Page is loading ...
Page is loading ...
Page is loading ...
Page is loading ...
Page is loading ...
Page is loading ...
Page is loading ...
Page is loading ...
Page is loading ...
Page is loading ...
Page is loading ...
Page is loading ...
-
 1
1
-
 2
2
-
 3
3
-
 4
4
-
 5
5
-
 6
6
-
 7
7
-
 8
8
-
 9
9
-
 10
10
-
 11
11
-
 12
12
-
 13
13
-
 14
14
-
 15
15
-
 16
16
-
 17
17
-
 18
18
-
 19
19
-
 20
20
-
 21
21
-
 22
22
-
 23
23
-
 24
24
-
 25
25
-
 26
26
-
 27
27
-
 28
28
-
 29
29
-
 30
30
-
 31
31
-
 32
32
-
 33
33
-
 34
34
-
 35
35
-
 36
36


Nyrius ARIES NPCS550 User manual
- Category
- AV extenders
- Type
- User manual
- This manual is also suitable for
Ask a question and I''ll find the answer in the document
Finding information in a document is now easier with AI
in other languages
- français: Nyrius ARIES NPCS550 Manuel utilisateur
Related papers
Other documents
-
Philips SWW1810/27 Quick start guide
-
Sony SRS-X2 Reference guide
-
Sony SRS-X3 Reference guide
-
Alba Manual 2-Way HDMI Selector User manual
-
Steelseries SIBERIA P800 User manual
-
Svat Global Talking Translator User manual
-
-
Focal USB Transmitter User manual
-
Huion HUION-US-GS1331-Green-Stand User guide
-
Armacost Lighting Wireless Light Switch Remote User manual