Page is loading ...

1
Operating instructions
Contents
Installation, 2-3-4
Positioning and levelling
Connecting the water and electricity supplies
Advice regarding the first wash cycle
Technical data
Electrical Connection
Ecodesign Regulation
Description of the appliance, 5
Overall view
Control panel
Loading the racks, 6
Lower rack
Cutlery basket
Upper rack
Start-up and use, 7-8
Starting the dishwasher
Measuring out the detergent
Wash options
Wash cycles, 9
Table of wash cycles
Rinse aid and refined salt, 10
Measuring out the rinse aid
Measuring out the refined salt
Care and maintenance, 11
Shutting off the water and electricity supplies
Cleaning the dishwasher
Preventing unpleasant odours
Cleaning the sprayer arms
Cleaning the water inlet filter
Cleaning the filters
Leaving the machine unused for extended periods
Precautions, advice and Assistance,12
General safety
Disposal
Saving energy and respecting the environment
Assistance
Troubleshooting, 13
English,1
EN
LDF 12H54
DISHWASHER
Français, 14
FR
AR
FA
27
40

EN
2
Installation
Keep this instruction manual in a safe place for future
reference. If the appliance is sold, given away or moved,
please ensure the manual is kept with the machine, so that
the new owner may benefit from the advice contained within
it.
Please read this instruction manual carefully: it contains
important information regarding the safe installation, use and
maintenance of the appliance.
If the appliance must be moved at any time, keep it in an
upright position; if absolutely necessary, it may be tilted onto
its back.
This appliance is intended to be used in household and
similar applications such as:
- staff kitchen areas in shops, offices and other working
environments;
- farm houses;
- by clients in hotels, motels and other residential type
environments;
- bed and breakfast type environments.
Positioning and levelling
1. Remove the appliance from all packaging and check that it
has not been damaged during transportation.
If it has been damaged, contact the retailer and do not proceed
any further with the installation process.
2. Check the dishwasher by placing it so that its sides or back
panel are in contact with the adjacent cabinets or even with
the wall. This appliance can also be recessed under a single
worktop
* (
see the Assembly instruction sheet
).
3. Position the dishwasher on a level and sturdy floor. If the
floor is uneven, the front feet of the appliance may be adjusted
until it reaches a horizontal position. If the appliance is levelled
correctly, it will be more stable and much less likely to move
or cause vibrations and noise while it is operating.
4.
* Adjust the height of the rear foot from the front of the
appliance* on the central lower part of the dishwasher, turning
a hexagonal spanner (red color) with an opening of 8 mm in a
clockwise direction to increase the height or in an anticlockwise
direction to decrease the height.
Connecting the water and electricity
supplies
Connection to the water and electricity supplies should
only be performed by a qualified technician.
The dishwasher should not stand on top of the water hoses
or the electricity supply cable.
The appliance must be connected to the water supply
network using new hoses.
Do not use old hoses.
The water inlet and outlet hoses and the electricity supply cable
may be positioned towards the right or the left in order to
achieve the best possible installation.
Connecting the water inlet hose
• To a suitable cold water connection point: before attaching
the hose, run the water until it is perfectly clear so that any
impurities that may be present in the water do not clog the
appliance; after performing this operation, screw the inlet
hose tightly onto a tap with a ¾ gas threaded connection.
• To a suitable hot water connection point: your dishwasher
may be supplied with hot water from the mains supply (if
you have a central heating system with radiators) provided
that it does not exceed a temperature of 60°C.
Screw the hose to the tap as described for connection to a
cold water supply.
If the inlet hose is not long enough, contact a specialist
store or an authorised technician (
see Assistance
).
The water pressure must be within the values indicated in
the Technical data table (
see adjacent information
).
The hose should not be bent or compressed.
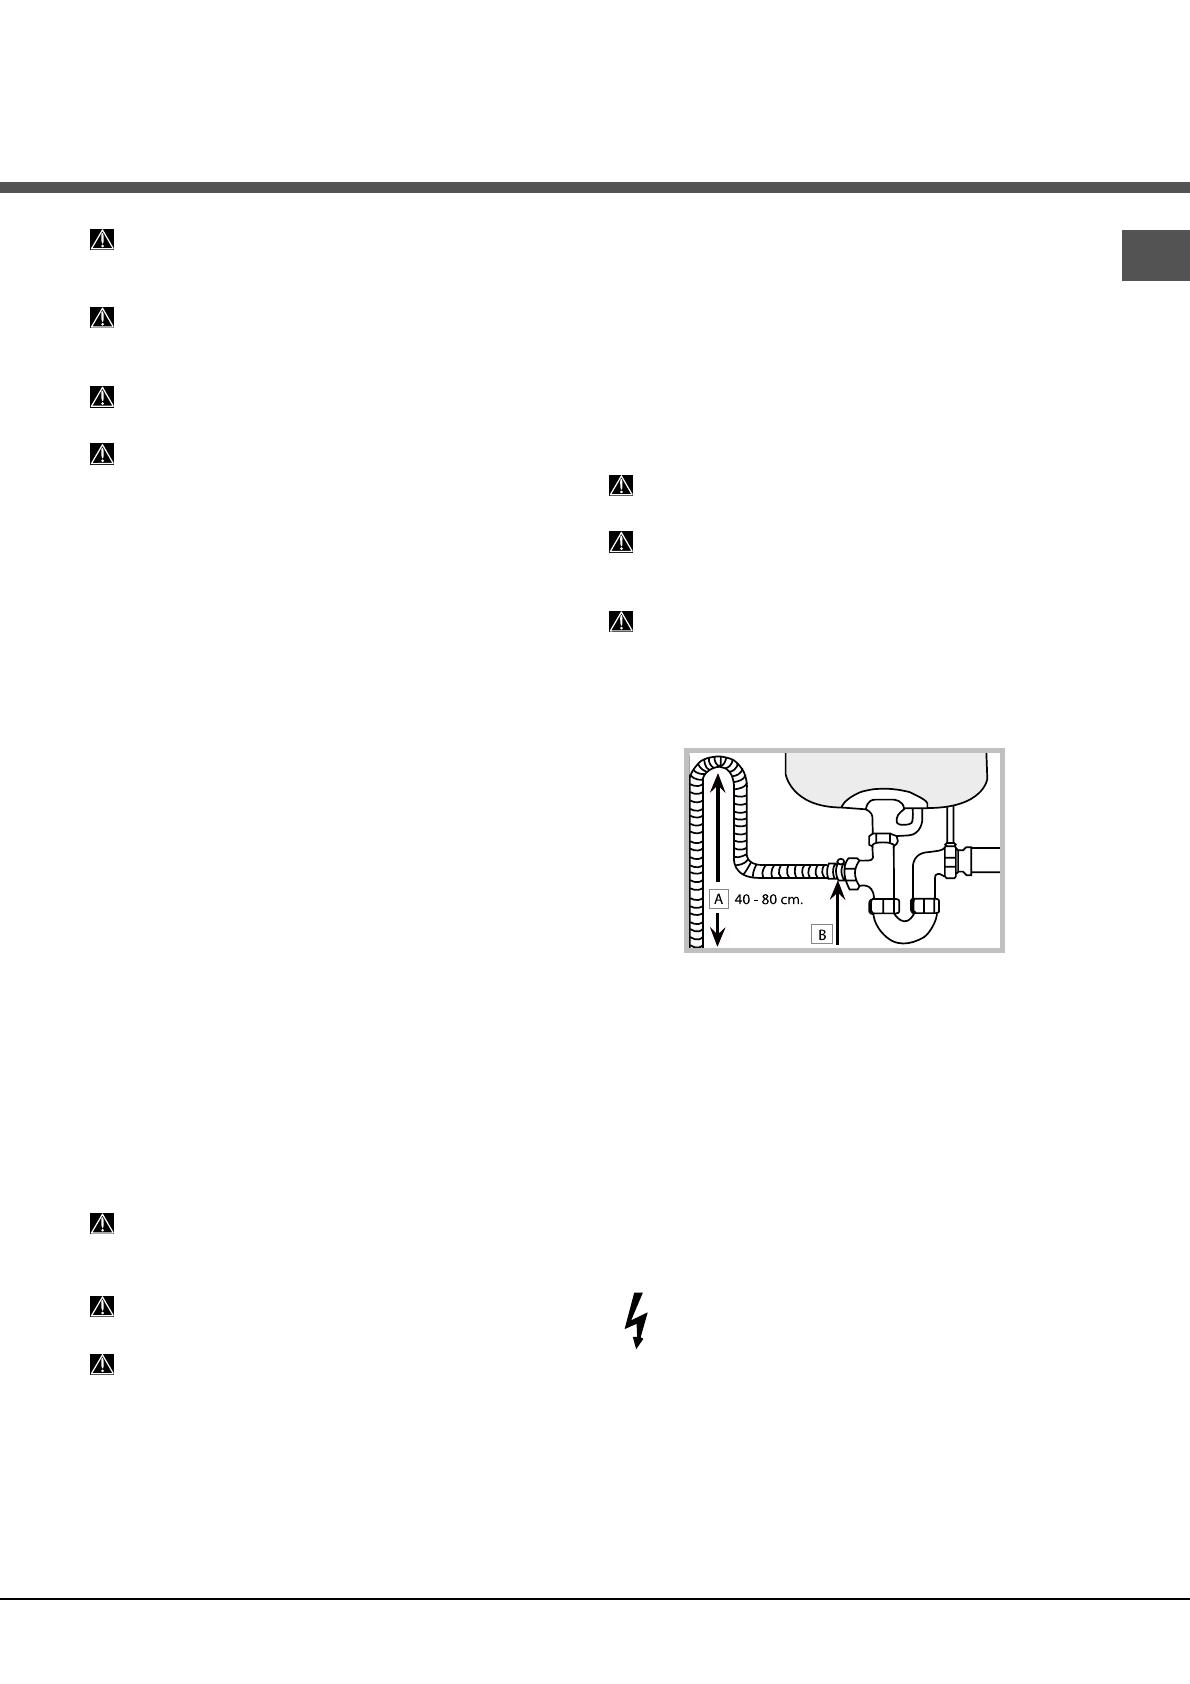
Connecting the water outlet hose
Connect the outlet hose (without bending it) to a drain duct
with a minimum diameter of 4 cm.
The outlet hose must be at a height ranging from 40 to 80 cm
from the floor / surface where the dishwasher rests (A).
Before connecting the water outlet hose to the sink drain,
remove the plastic plug (B).
Anti-flooding protection
To ensure floods do not occur, the dishwasher:
- is provided with a special system which blocks the water
supply in the event of anomalies or leaks from inside the
appliance.
Some models are also equipped with the supplementary safety
device
New Acqua Stop
*, which guarantees anti-flooding
protection even in the event of a supply hose rupture.
WARNING: HAZARDOUS VOLTAGE!
Under no circumstance should the water inlet hose be cut as
it contains live electrical parts.
* Only available in selected models.
EN
3
Electrical connection
Before inserting the plug into the electrical socket, make sure
that:
• The socket is earthed and complies with current regulations.
• The socket can withstand the maximum load of the
appliance, which is indicated on the data plate located on
the inside of the door (
see chapter entitled Description of
the appliance
).
• The power supply voltage falls within the values indicated
on the data plate on the inside of the door.
• The socket is compatible with the plug of the appliance. If
this is not the case, ask an authorised technician to replace
the plug (
see Assistance
); do not use extension cables or
multiple sockets.
Once the appliance has been installed, the power supply
cable and the electrical socket should be easily accessible.
The cable should not be bent or compressed.
If the power supply cable is damaged, it must be replaced
by the manufacturer or its Technical Assistance Service in or-
der to prevent all potential hazards. (See Assistance)
The Company shall not be held responsible for any
incidents that occur if these regulations are not observed.
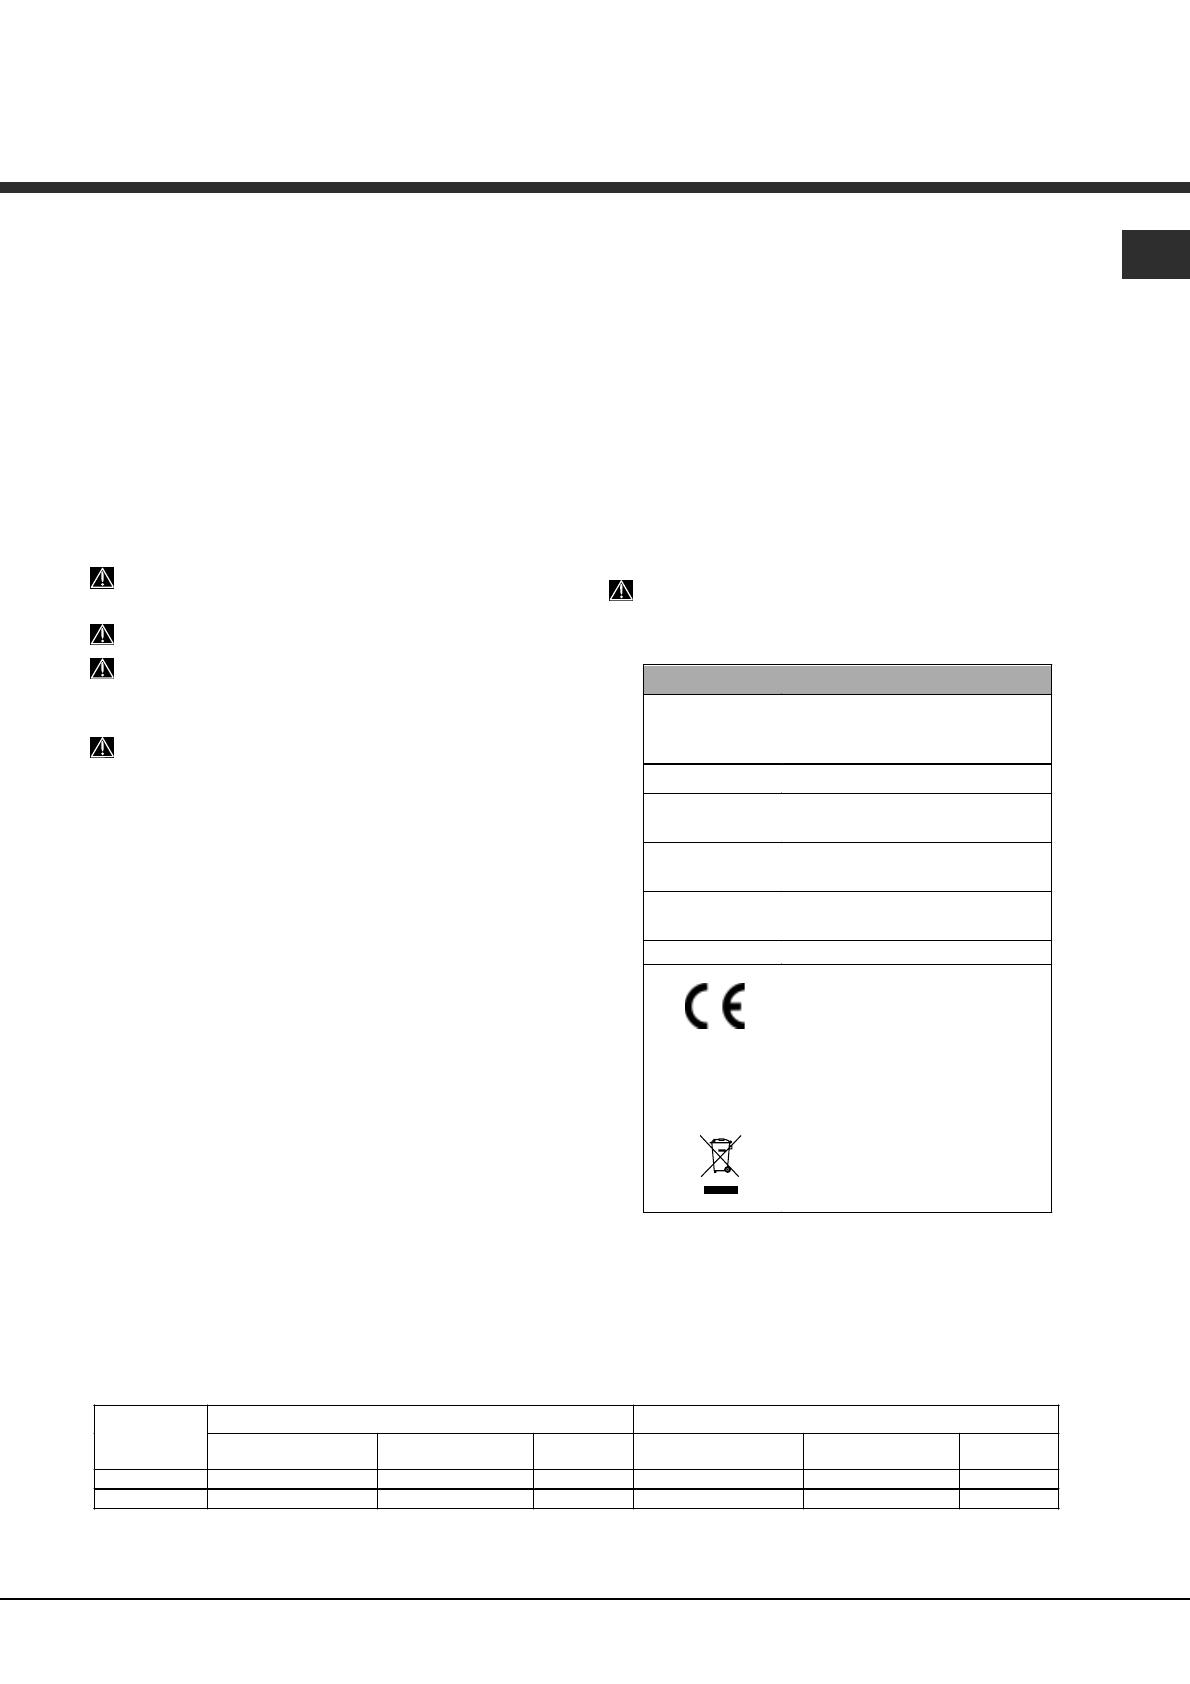
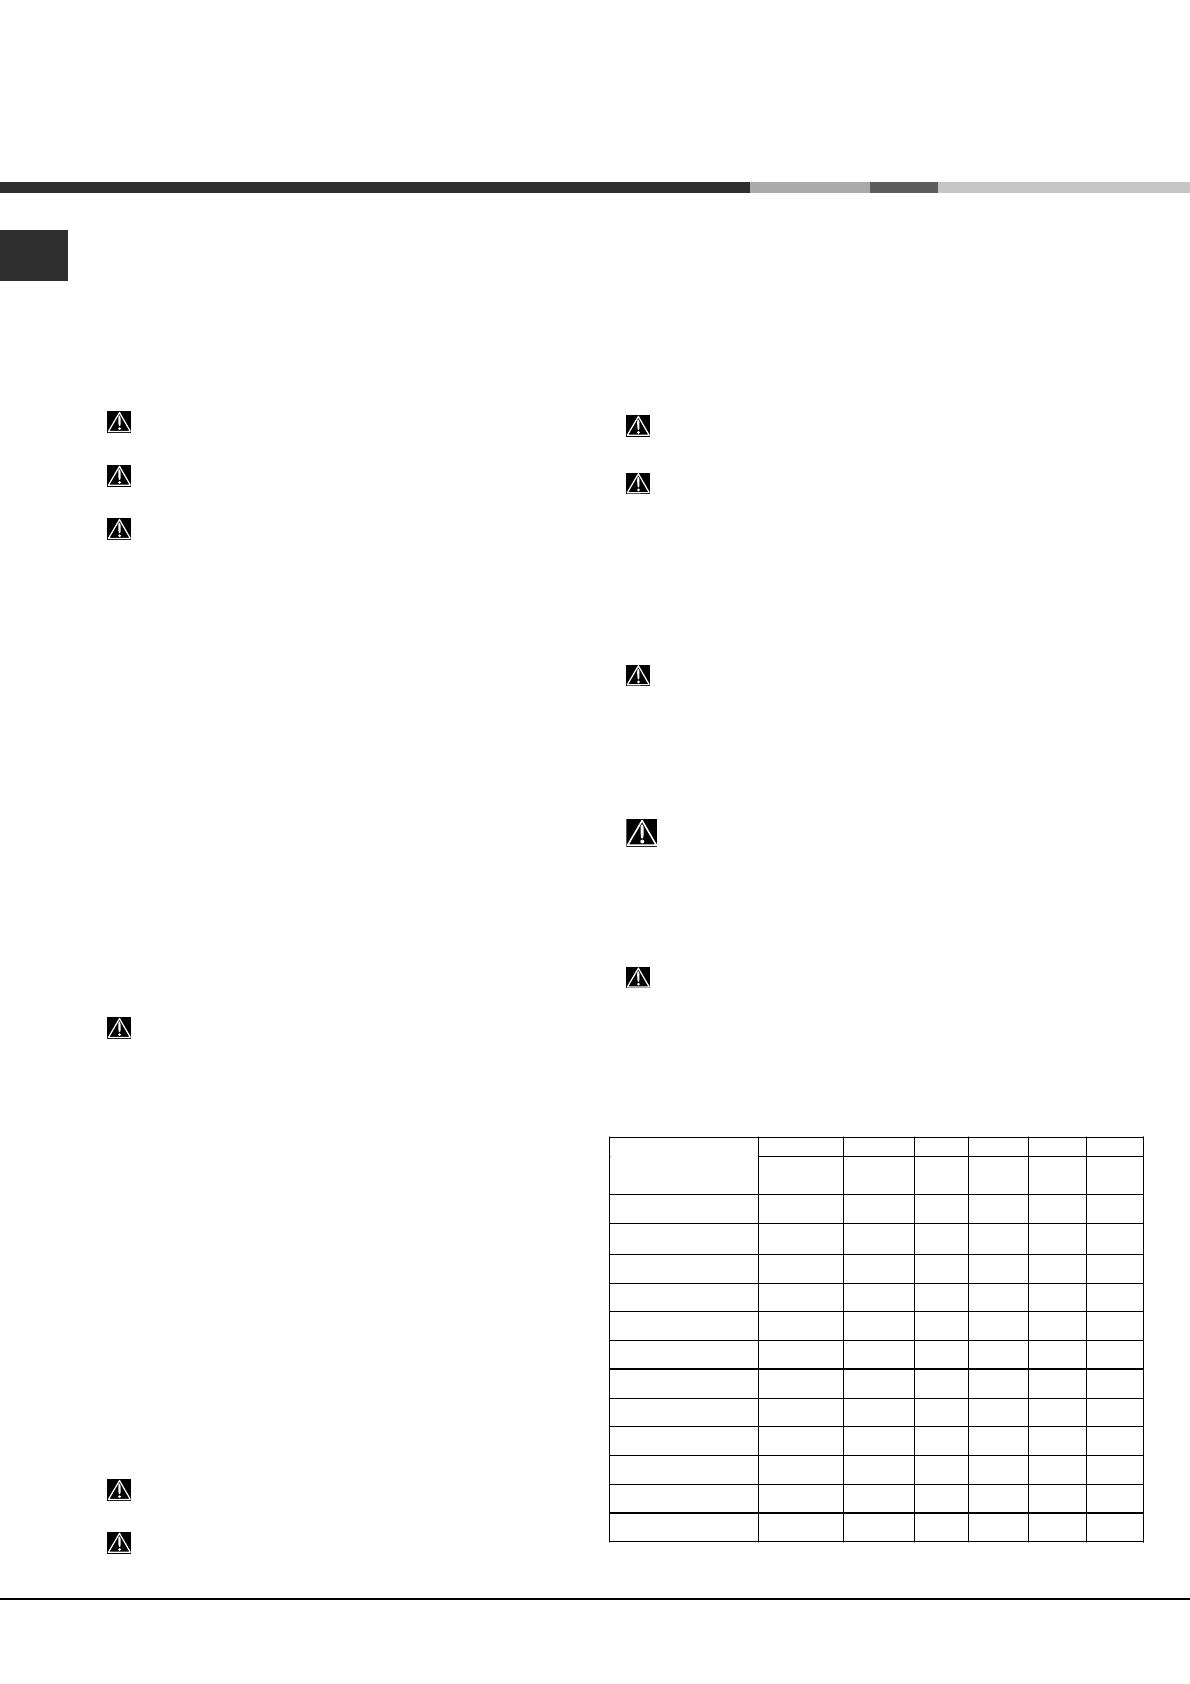
Technical data
Dimensions
width 60 cm
height 85 cm
depth 60 cm
Capacity 14 standard place-settings
Water supply
pressure
0,05 ÷ 1MPa (0.5 ÷ 10 bar)
7,25 – 145 psi
Power supply
voltage
See appliance data plate
Total absorbed
power
See appliance data plate
Fuse See appliance data plate
This dishwasher conforms to the
following European Community
Directives:
-2006/95/EC (Low Voltage)
-2004/108/EC (Electromagnetic
Compatibility)
-2009/125/EC (Comm. Reg.
1016/2010) (Ecodesign)
-97/17/EC (Labelling)
-2002/96/EC Waste Electrical
and Electronic Equipment
(WEEE)
Anti-condensation strip*
After installing the dishwasher, open the door and stick the
adhesive transparent strip under the wooden shelf in order to
protect it from any condensation which may form.
Advice regarding the first wash cycle
After the appliance has been installed, immediately before
running the first wash cycle, completely fill the salt dispenser
with water and add only then approximately 1 kg of salt (
see
chapter entitled Rinse aid and refined salt
). The water may
overflow: this is normal and is not a cause for concern. Select
the water hardness value (
see chapter entitled Rinse aid and
refined salt
). - After the salt has been poured into the
machine, the LOW SALT indicator light
* switches off.
If the salt container is not filled, the water softener and
the heating element may be damaged as a result.
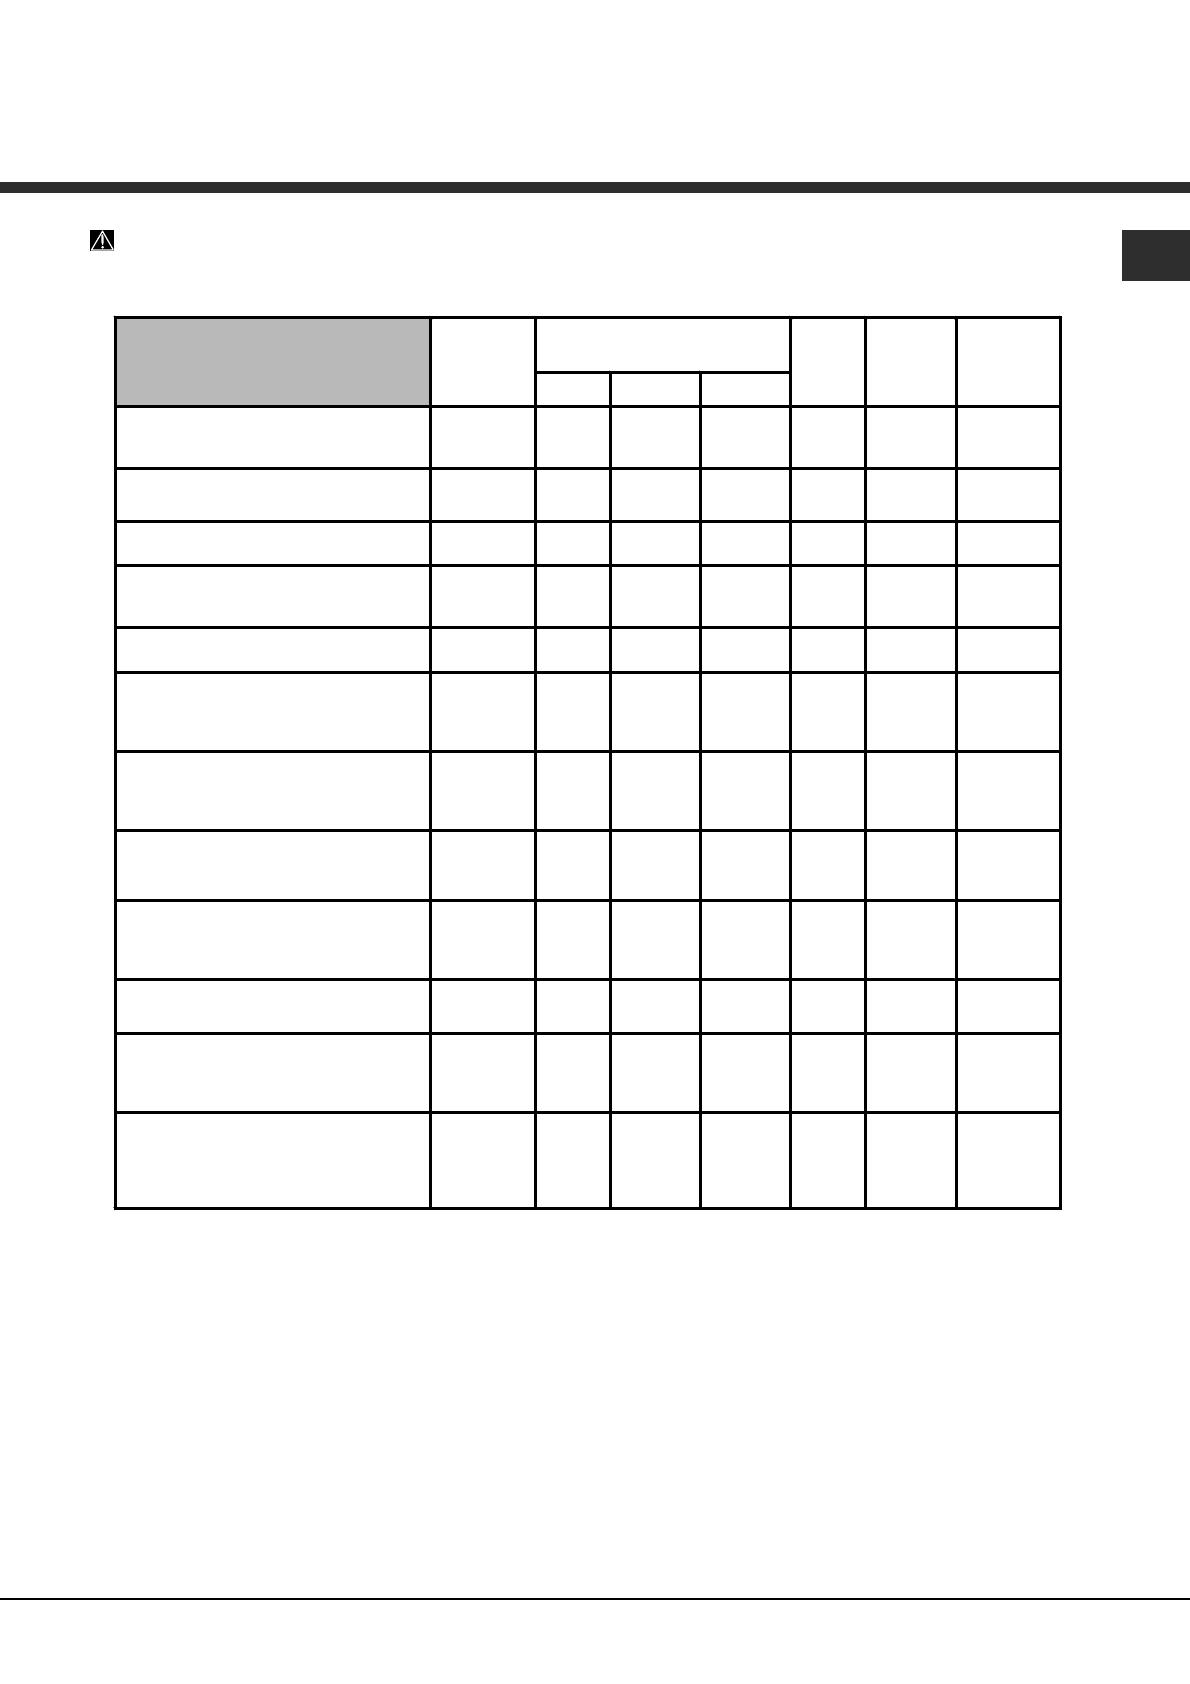
ECODESIGN REGULATION
ECO wash cycle is the standard cycle to which the energy label data refers; this cycle can be used to wash crockery with a
normal soil level and is the most efficient in terms of energy and water consumption for this type of crockery. To reduce consumption
even further, only run the dishwasher when it is full.
Standby consumption: Left-on mode consumption: 4,5 W – Off mode consumption: 1,3 W
Consumption data table for the main cycles
* Cycle data refers to the values recorded in a laboratory, in accordance with European standard EN 50242.
** Data is obtained by recording values when the appliance is operational and loaded with user crockery.
Standard conditions* User conditions**
Energy consumption
(kWh/cycle)
Water consumption
(l/cycle)
Duration
(min/cycle)
Energy consumption
(kWh/cycle)
Water consumption
(l/cycle)
Duration
(min/cycle)
INTENSIVE
1,50 15 150 1,30 14 135
NORMAL
1,20 15 120 1,05 14 110
EN
4
Electrical Connection
If your appliance is supplied with a 13 amp. fused plug
it can be plugged into a 13 amp socket for immediate
use. Before using the appliance please read the
instruction below.
WARNING: THIS APPLIANCE MUST BE
EARTHED.
THE FOLLOWING OPERATIONS SHOULD BE
CARRIED OUT BY A QUALIFIED ELECTRICIAN.
Replacing the fuse:
When replacing a faulty fuse, a 13 amp ASTA approved
fuse to BS 1362 should always be used, and the fuse
cover re-fitted. If the fuse cover is lost, the plug must not
be used until a replacement is obtained.
Replacemente fuse covers:
If a replacement fuse cover is fitted, it must be of the
correct colours as indicated by the coloured marking
or the colour that is embossed in words on the base of
the plug. Replacements can be obtained directly from
your nearest Service Depot.
Removing the plug:
Ifyour appliance has a non-rewireable moulded plug
and you should wish to remove it to re-route the mains
cable through partitions, units etc., please esure that
either:
- the plug is replaced by a fused 13 amp re-wireable
plug bearing the BSI mark of approval
- or:
- the mains cable is wired directly into a 13 amp cable
outlet, controlled by a switch, (in compliance with BS
5733) which is accessible without moving the appliance.
Disposing of the plug:
Ensure that before disposing of the plug itself, you make
the pins unusable so that it cannot be accidentally
inserted into a socket.
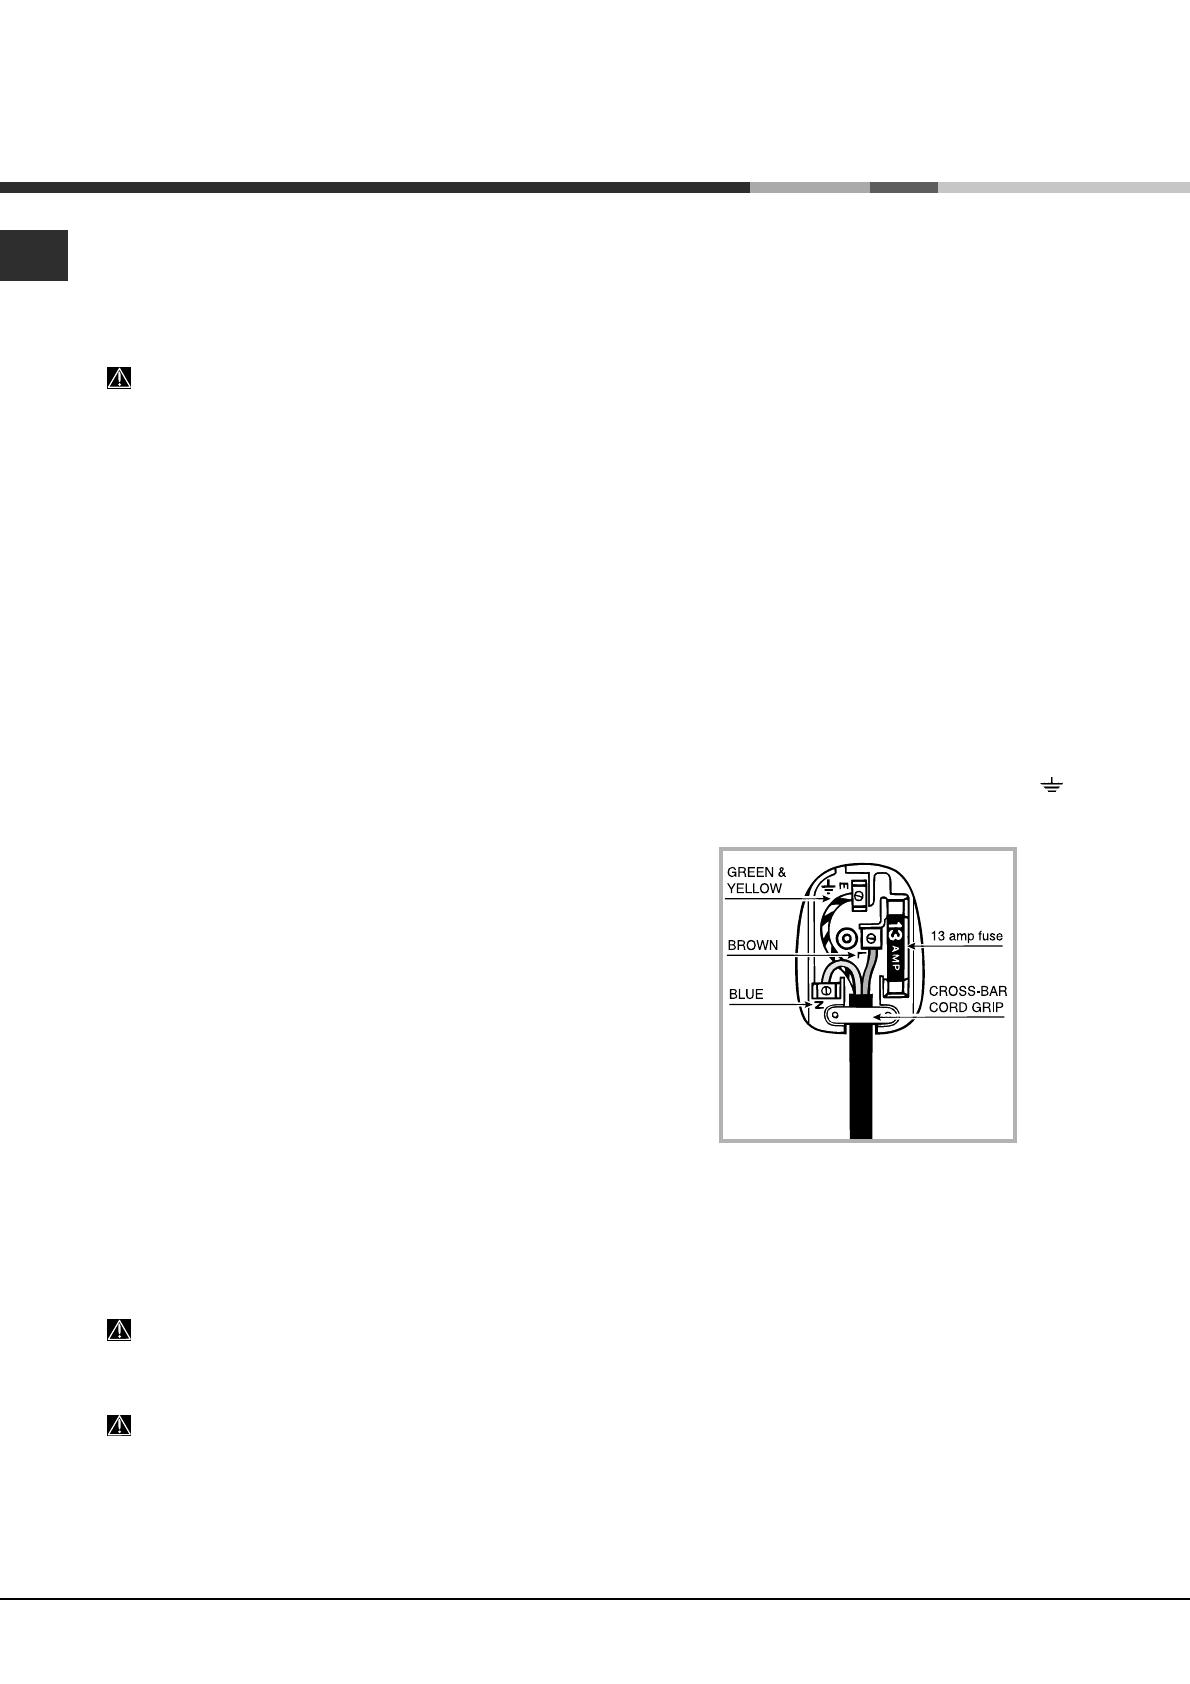
Instruction for connecting cable to an altenative plug:
Important: the wires in the mains lead are coloured in
accordance with the following code:
Green & Yellow - Earth
Blue - Neutral
Brown - Live
CAUTION:
- Once the appliance has been installed, the electrical
plug and socket should remain accessible.
- The Company shall not be held responsible for any
incidents that occur if these regulations are not
observed.
As the colours of the wires in the mains lead may not
correspond with the coloured markings identifying the
terminal in your plug, proceed as follows:
connect Green & Yellow wire to terminal market “E” or
coloured Green or Green & Yellow.
Connect Brown wire to terminal marked “L” or coloured
Red.
Connect Blue wire to terminal marked “N” or coloured
Black.
If a 13 amp plug (BS 1363) is used it must be fitted with
a 13 amp fuse. A15 amp plug must be protected by a
15 amp fuse, either in the plug or adaptor or at the
distribution board.
If you are in any doubt about the electrical supply to your
machine, consult a qualified electrician before use.
How to connect an alternative plug:
The wires in this mains lead are coloured in accordance
with the following code:
BLUE “NEUTRAL” (“N”)
BROWN “LIVE” (“L”)
GREEN AND YELLOW “EARTH” (“E”) or
Disposing of the appliance:
When disposing of the appliance please remove the
plug by cutting the mains cable as close as possible to
the plug body and dispose of it as described above.
Electrical Connection
EN
5
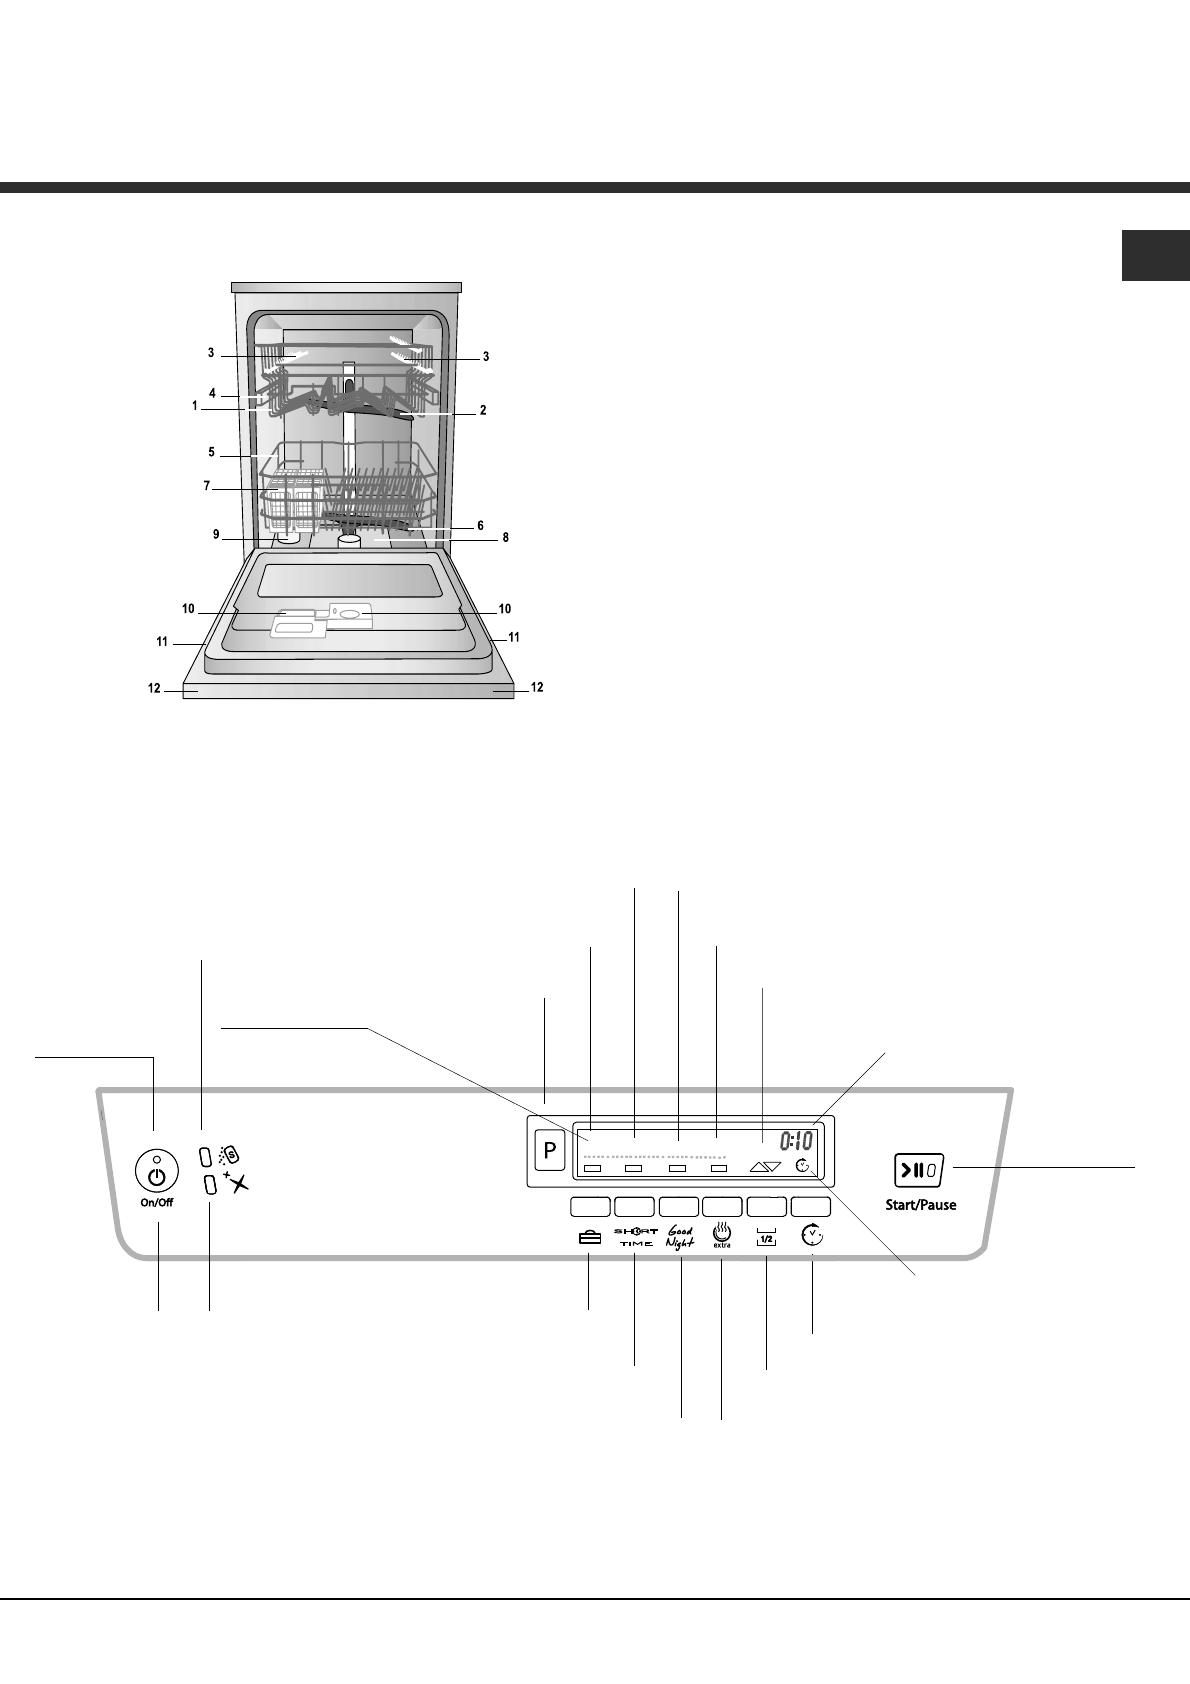
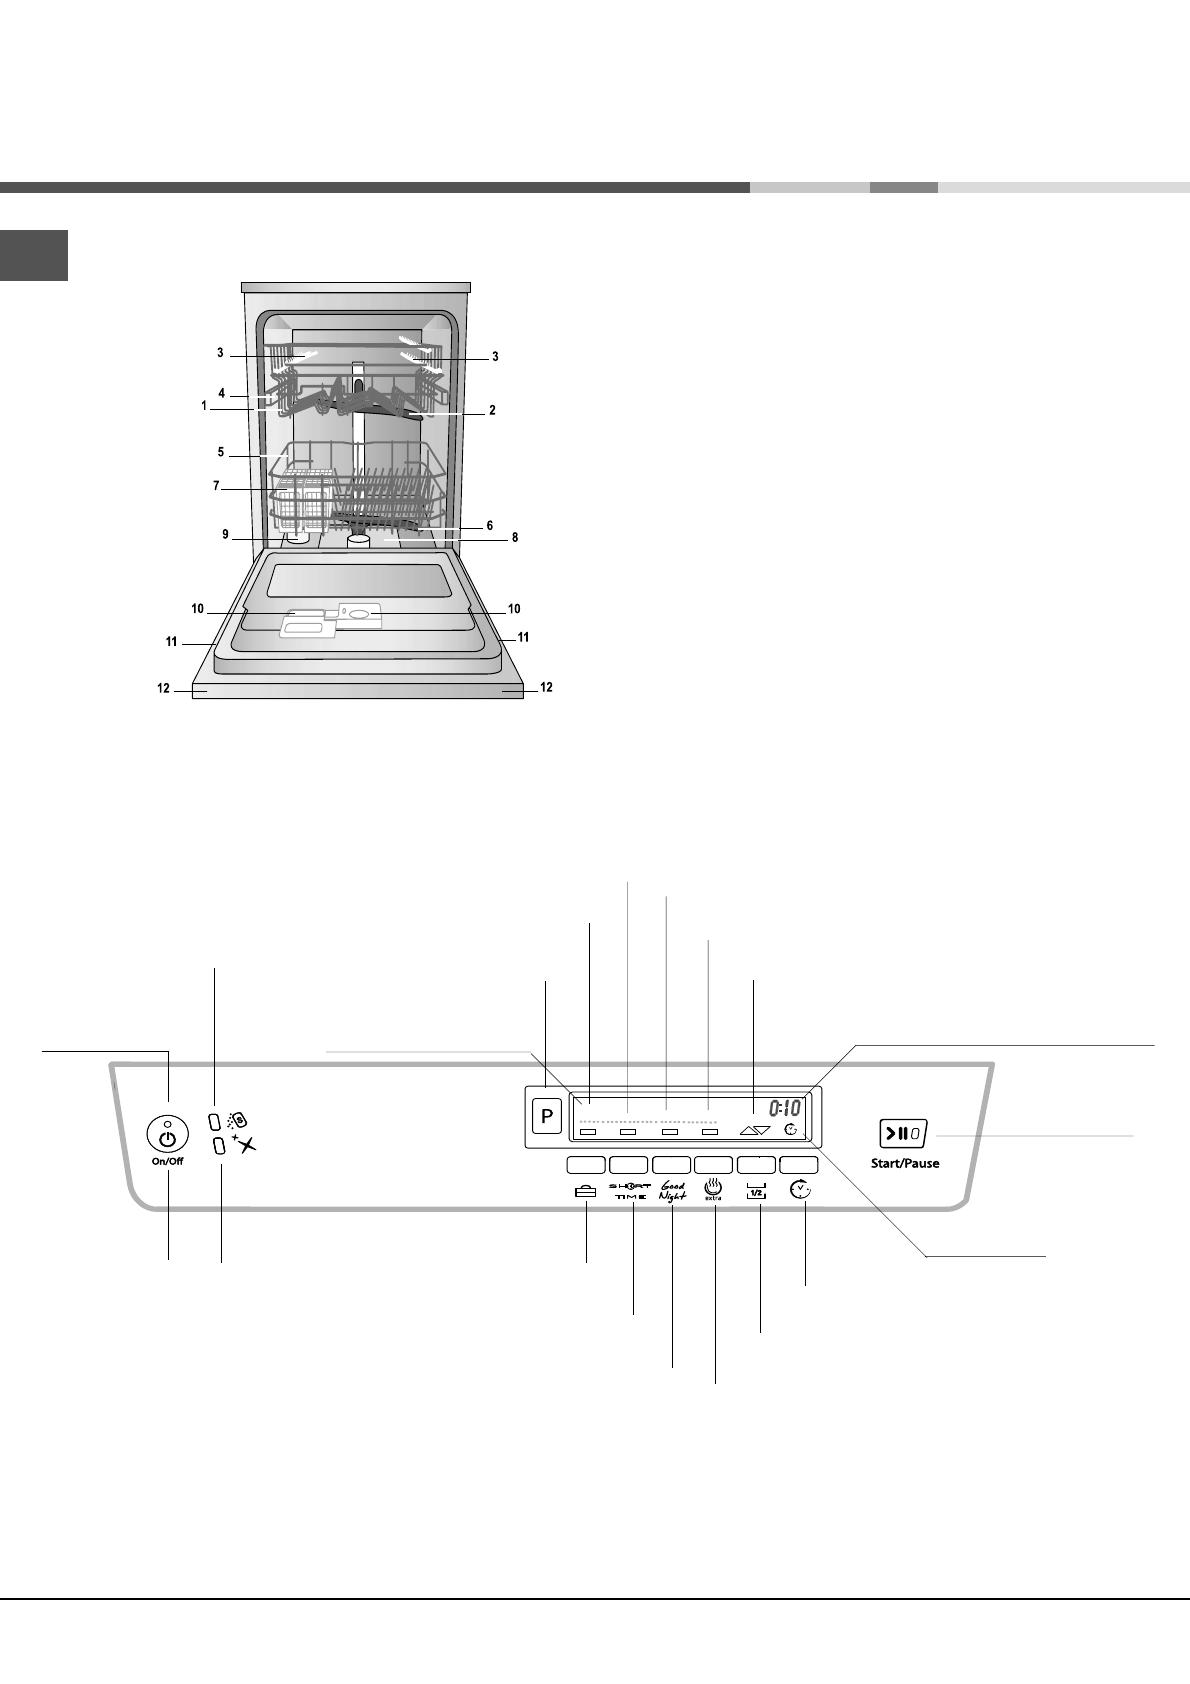
Overall view
Description of the
appliance
1. Upper rack
2. Upper sprayer arm
3. Tip-up compartments
4. Rack height adjuster
5. Lower rack
6. Lower sprayer arm
7. Cutlery basket
8. Washing filter
9. Salt dispenser
10. Detergent and rinse aid dispensers
11. Data plate
12. Control Panel
***
***Only in completely built-in models.
* Only available in selected models.
The number and type of wash cycles and options may vary depending on the dishwasher model.
Control panel
Low rinse aid
indicator light
ON/OFF/Reset
button
Half load button
Delayed start button
Extra Dry button
Wash cycle name
indicator light
ON/OFF
indicator light
Low salt
indicator light
Select wash
cycle button
Multi-functional tablets
indicator light
Short Time option
indicator light
Good Night option
indicator light
Extra Dry indicator light
Half load upper and
lower rack indicator
lights
Time remaining
light-up display
Start/Pause
button and
indicator light
Multi-functional
tablets button
Option button
Short Time
Good Night
option button
Delayed start
indicator light

EN
6
Loading the racks
* Only available in selected models. ** The number and
position may vary.
Before loading the racks, remove all food residue from
crockery and empty liquids from glasses and cups.
After loading the appliance, make sure that the sprayer
arms can rotate freely.
Lower rack and cutlery basket
The lower rack can hold pans, lids, plates, salad bowls, cutlery, etc.
Large plates and lids should ideally be placed at the sides of the
rack.
Several dishwasher models are fitted with tip-up sections
*,
which can be used in a vertical position when arranging plates
or in a horizontal position when arranging saucepans, salad
bowls and frying pans.
The type of cutlery basket may vary (modular or non-modu-
lar) according to the dishwasher model. The non-modular bas-
ket must only
be positioned at the front of the lower rack.
Both are fitted with
grilles over the top, for
improved cutlery ar-
rangement.
Knives and other utensils with sharp edges must be
placed in the cutlery basket with the points facing
downwards, or they must be positioned horizontally in the
tip-up compartments on the upper rack.
Upper rack
Load this rack with delicate and lightweight crockery: glasses,
cups, saucers and shallow salad bowls.
Adjustable position tip-up compartments
The tip-up compartments can
be positioned at different
heights, to optimise the
arrangement of crockery
throughout the rack. Wine
glasses can be placed safely
in the tip-up compartments,
by inserting the stem of each
glass into the corresponding
slots.
Some dishwasher models are fitted
with a sliding tray
* which can be
used to hold serving utensils or
small cups. For optimum washing
performance, avoid positioning
bulky crockery directly below the
tray.
Adjusting the height of the upper rack
In order to make it easier to arrange the crockery, the upper
rack may be moved to a higher or lower level.
The height of the upper rack should ideally be ad-
justed WHEN THE RACK IS EMPTY.
NEVER raise or lower the rack on one side only.
Open the left and right guide rail stops
and pull out the rack; position it higher
or lower as required, slide it along the
guide rails until the front wheels are in
place and close the stops (
see figure
).
If the rack is fitted with Dual Space
handles
* (
see figure
), pull out the
upper rack until it reaches its stop point,
grip the handles at the sides of the rack
and move it upwards or downwards,
then slowly let it fall back into place.
Items that should not be washed in the dishwasher
• Wooden items, objects with wooden or horn handles or
glued-on parts.
• Items made from aluminium, copper, brass, pewter or tin.
• Items made from plastic material which is not heat-resistant.
• Antique or hand-painted porcelain.
• Antique silver. Silver that is not antique may, however, be
washed in the dishwasher using a delicate wash cycle,
provided that it does not come into contact with other metals.
We recommend the use of crockery which is dishwasher
safe.
EN
7
Start-up and use
* Only available in selected models.
Switching the appliance on for the first time
Selecting the language
Press the ON/OFF symbol; you will hear a short beep and the
display will show the set language.
Use the DELAYED START button to scroll forwards, or the HALF
LOAD button to scroll backwards through the list until you reach
the desired language. Press the P button to confirm the
selection; you will then automatically enter the list of wash
cycles.
Every time the dishwasher is switched on subsequently, the
list of wash cycles will be displayed.
The language may also be changed at a later date, by
pressing the P button and the DELAYED START button
simultaneously for a few seconds.
Starting the dishwasher
1. Turn the water tap on.
2. Press the ON/OFF button: you will hear a short beep and
the display will light up.
3. Open the door and pour in a suitable amount of detergent
(
see below
).
4. Load the racks (
see Loading the racks
) and shut the door.
5. Select the wash cycle in accordance with the type of
crockery and its soil level (
see Table of wash cycles
) by
pressing the P button.
6. Select the wash options (
see adjacent information
).
7. Start the cycle by pressing the Start button: a long beep
signals the start of the wash cycle; the name of the selected
cycle is displayed, along with the time remaining until the end
of the cycle.
8. Two short beeps and one long one indicate the end of the
wash cycle and the text “CYCLE END” appears on the display.
Switch off the appliance by pressing the ON/OFF button, shut
off the water valve and unplug the appliance from the electricity
socket.
9. Wait for a few minutes before removing the crockery, in
order to avoid burns. Unload the racks, beginning with the
lower level.
AUTO WASH CYCLES
*: this model of dishwasher is
equipped with a special sensor which can be used to assess
the level of soiling and automatically select the most efficient
and economic wash cycle accordingly.
The duration of the auto wash cycles may vary due to the
operation of the sensor.
If the crockery is only lightly soiled or if it has been
rinsed with water before being placed in the dishwasher,
reduce the amount of detergent used accordingly.
Modifying a wash cycle in progress
If a mistake was made during the wash cycle selection process
it is possible to change the cycle, provided that it has only just
begun: once the wash cycle has started, switch off the machine
by pressing and holding the ON/OFF/Reset button. Switch it
back on using the same button and select the desired wash
cycle and options.
Adding extra crockery
Press the Start/Pause button (the corresponding indicator light
will flash). Open the door, taking care to avoid the escaping
steam, and place the crockery inside the appliance. Press
the Start/Pause button (fixed light): the cycle will restart after
a prolonged beep is emitted.
If the Start/Pause button is pressed so as to pause the
machine, the wash cycle or the Delayed Start function (if
selected) is interrupted.
At this stage it is not possible to change the wash cycle.
Accidental interruptions
If the door is opened during the wash cycle, or if there is a
power cut, the cycle stops. It starts again from the point at
which it was interrupted once the door has been shut or once
the electricity supply is restored.
Measuring out the detergent
A good wash result also depends on the correct amount
of detergent being used; exceeding the stated amount
does not result in a more effective wash and increases
environmental pollution.
Only use detergent which has been specifically
designed for dishwashers.
DO NOT USE washing up liquid.
Using excessive detergent may result in foam residue
remaining in the machine after the cycle has ended.
To achieve the best results from each washing and
drying cycle, powder detergent, rinse aid liquid and salt
should be used.
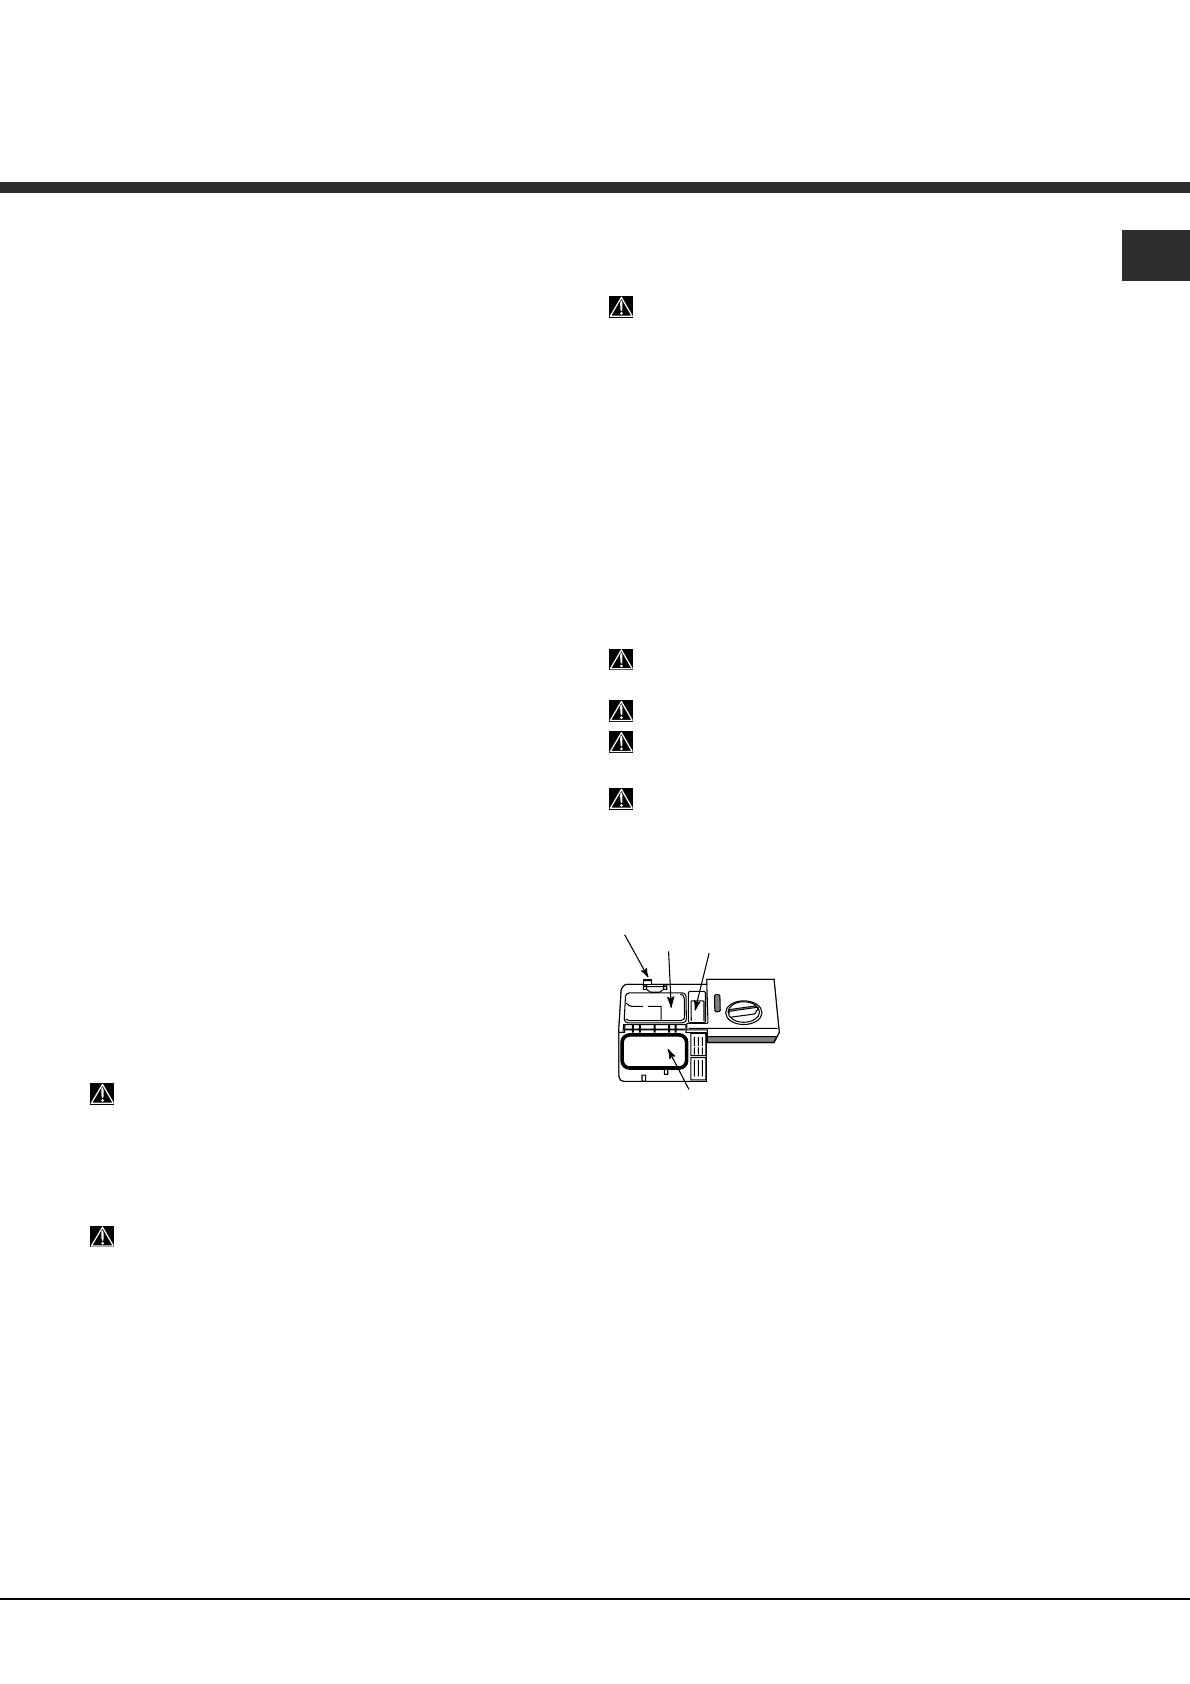
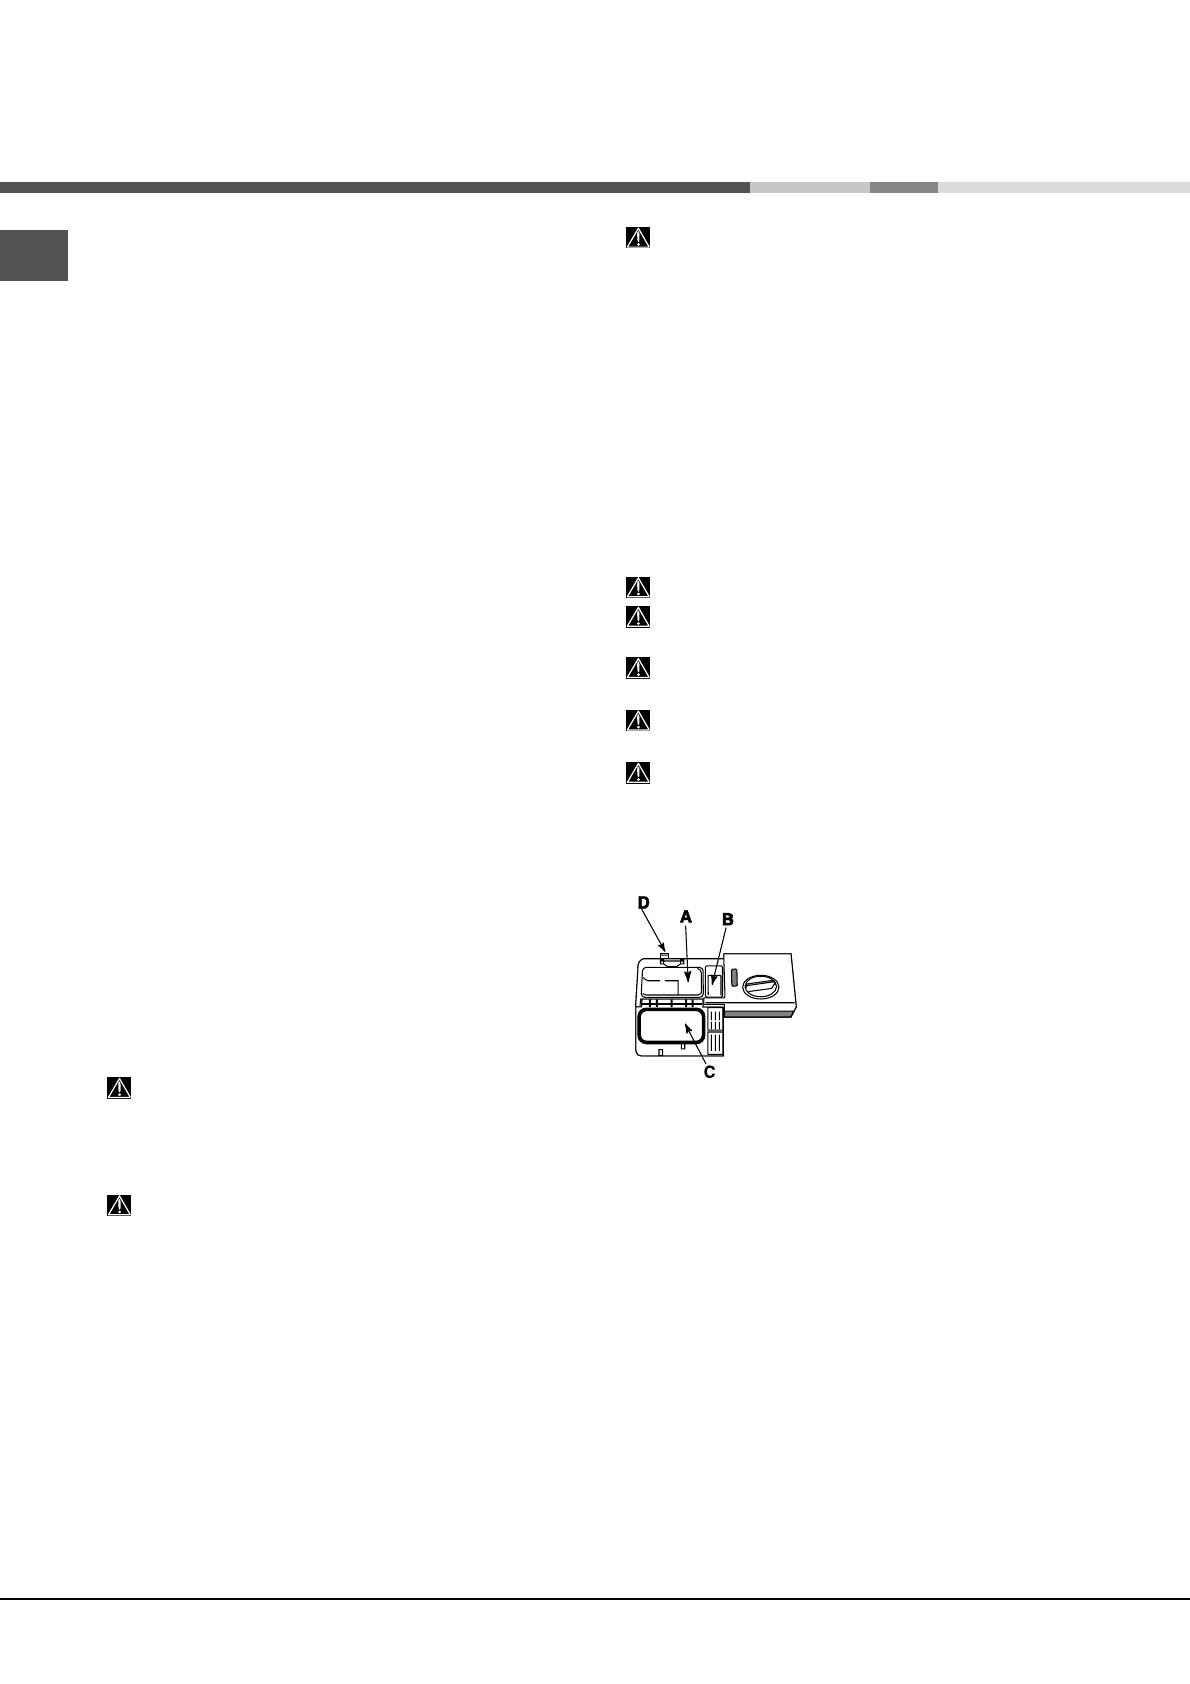
Compartment A: Washing detergent
Compartment B: Pre-wash detergent
1. Open cover C by pressing button
D.
2. Pour in the detergent after
consulting the
Table of wash cycles
:
• For powder detergent use
compartments A and B.
• For detergent in tablet form: when
the cycle requires 1 tablet, place it in
compartment A and close the cover;
when it requires 2, place the second tablet at the bottom of
the appliance.
3. Remove detergent residues from the edges of the
compartment and close the cover until it clicks.
A
B
D
C
Wash options*
The OPTIONS may only be set, modified or reset after the
wash cycle has been selected and before the Start/Pause
button has been pressed.
Only the options which are compatible with the type of wash
cycle set may be selected. If an option is not compatible with
the selected wash cycle (
see Table of wash cycles
), the cor-
responding LED flashes rapidly 3 times and 2 short beeps
will sound.
If an option is selected which is incompatible with another (pre-
viously selected) option, the indicator light corresponding to
the option selected first will flash 3 times, 3 beeps will sound
and it will be deselected, while the most recently selected op-
tion will remain active.
To deselect an option which has been set by mistake, press
the corresponding button again.
EN
8
* Only available in selected models.
Half load using the upper or lower rack
If there are not many dishes to be washed, a half load cycle
may be used in order to save water, electricity and detergent.
Select the wash cycle and press the HALF LOAD button
repeatedly: the triangle corresponding to the selected load
will illuminate and the wash cycle will take place only using
the upper or lower rack. If the button is pressed again, the
option will be deselected.
The Half Load option is not compatible with the Good
Night and Short Time options.
Remember to load the upper or lower rack only, and to
reduce the amount of detergent accordingly.
It is better to use powder detergent in this case.
Delayed start
It is possible to delay the start time of the cycle for a period of
time between 1 and 24 hours.
1. After selecting the desired wash cycle and any other options,
press the DELAYED START button. The Delayed Start symbol
will begin to flash. Use the same button to select the time at
which you wish the wash cycle to begin (after a period of 1 to
24 hours).
2. Confirm the selection using the STAR/PAUSE button; the
symbol will stop flashing and the countdown will begin. The
text “Start in…” will be displayed, the selected delay time
will flash and the START/PAUSE button will remain lit in a fixed
manner.
3. When the set time has elapsed, a long beep sounds,
the DELAYED START indicator light switches off and the
wash cycle begins.
To deselect the DLEAYED START option, press the
DELAYED START button repeatedly until the text OF
FF
FF
F
appears.
The Delayed Start function cannot be set once a wash
cycle has been started.
Short Time option
This option can be used to reduce the duration of the main
wash cycles while maintaining the same washing and drying
performance levels.
After selecting the wash cycle, press the Short Time option
button; the illumination of the corresponding indicator light
followed by a short beep indicates its selection.
To deselect the option, press the same button again.
Good Night option
This option reduces the amount of noise made by the ma-
chine and lengthens the wash cycles. It is a useful option be-
cause it enables users to benefit from the night-time energy
rate.
After selecting the wash cycle, press the Good Night option
button; the illumination of the corresponding indicator light
followed by a short beep indicates its selection.
To deselect the option, press the same button again.
Multi-functional tablets
This option optimises washing and drying results.
When using multi-functional tablets, press the MULTI-
FUNCTIONAL TABLETS button; the corresponding indicator
light will illuminate. If the button is pressed again the option
will be deselected.
The “Multi-functional tablets” option results in the
lengthening of the wash cycle.
The use of tablets is only recommended when the
MULTI-FUNCTIONAL TABLETS option is available.
This option is not recommended for use with wash
cycles which do not specify the use of multi-functional
tablets (
see Table of options
).
The Short Time and Good Night options are not
compatible with each other.
The Short Time and Good Night options are not
compatible with the HALF LOAD option.
Extra drying
To improve the dryness level of the crockery, press the EX-
TRA DRYING button; the indicator light will illuminate. If it is
pressed again the option will be deselected.
The EXTRA DRYING option increases the duration of
the wash cycle.
SELFCARE WASH CYCLE
This disinfecting wash cycle deep cleans the inside of the
dishwasher, thereby reducing the formation of bad odours.
WARNINGWARNING
WARNINGWARNING
WARNING
The SELFCARE wash cycle should be performed as part of
your dishwasher maintenance routine, using special single-
dose products (follow the instructions on the packaging)
while the dishwasher is EMPTY.
A B C D E F
Table of
options
Delayed
Start
Half
Load
Tabs
Extra
Dry
Short
Time
Good
Night
Eco 50°C
Yes
Yes
Yes
Yes
No
Yes
Normal
Yes
Yes
Yes
Yes
Yes
Yes
Daily A 60’
Yes
Yes
Yes
No
No
No
Soaking
Yes
Yes
No
No
No
No
Auto Super wash
Yes
Yes
Yes
Yes
Yes
No
Speed 25’
Yes
No
Yes
NO
No
No
Crystals
Yes
Yes
Yes
Yes
No
No
Auto Duo Wash
Yes
No
Yes
Yes
Yes
No
Ultra Intensive
Yes
Yes
Yes
Yes
No
No
Special Guest
Yes
Yes
No
Yes
No
No
Baby Cycle
Yes
No
No
No
No
No
Self Care
Yes
No
No
No
No
No
- The machine will switch off automatically during
certain periods of inactivity, in order to minimise
electricity consumption.
EN
9
Wash cycles
For available OPTIONS please refer to the Table of options on the Start-up and use page.
The number and type of wash cycles and options may vary depending on the dishwasher model.
Notes:
Optimum performance levels when using the "Daily A 60’ and "Speed 25’ “ cycles can be achieved by observing the maximum
amounts of crockery specified.
To make it easier to measure out the detergent, it is worth remembering that:
1 tablespoon = 15 grams of powder = approximately 15 ml of liquid - 1 teaspoon = 5 grams of powder = approximately 5 ml of
liquid
* The Eco wash cycle adheres to the regulation EN-50242. Although it has a longer duration than other wash cycles it uses less
energy and is les harmful to the environment.
Note for Test Laboratories
::
::
: for information relating to comparative EN testing conditions, please send an email to the following
address: [email protected]
Detergent
(A) = compartment A
(B) = compartment B
Wash cycle selection instructions Wash cycle
Powder Liquid Tablets
Wash
cycles
which
include
drying
Options
Wash cycle
duration
(tolerance
±10%)
Hrs. Min.
Environmentally-friendly wash cycle with low
energy consumption levels, suitable for pans
and dishes.
Eco
*
50° C
29 g (A)
6 g (B)
29 ml (A)
6 ml (B)
1 (A)
Yes
A–B-C-D-F
2:45’
Normally soiled pans and dishes. Standard
daily wash cycle.
Normal
29 g (A)
6 g (B)
29 ml (A)
6 ml (B)
1 (A)
Yes
A-B-C-D-
E-F
1:50’
Limited quantity of daily soiling. (4 place
settings + 1 saucepan +1 frying pan).
Daily A 60’
25 g (A)
25 ml (A)
1 (A)
No
A-B-C
1:00’
Pre-wash for dishes while awaiting
completion of the load with the dishes from
the next meal.
Soaking
No
No
No
No
A – B
0:08’
Heavily soiled dishes and pans (not to be
used for delicate items).
Auto
Super Wash
35 g (A)
35 ml (A)
1 (A)
Yes
A-B-C-D-E
2:25’
Economic and fast wash to be used for lightly
soiled dishes. (Run cycle immediately after
use) (2 plates + 2 glasses + 4 pieces of
cutlery + 1 saucepan + 1 small frying pan).
Speed 25’
25 g (A)
25 ml (A)
1 (A)
No
A - C
0:25’
Economic and fast wash for delicate items
which are sensitive to high temperatures.
(Run cycle immediately after use) (glasses,
upper rack + delicate plates, lower rack ).
Crystals
35 g (A)
35 ml (A)
1 (A)
Yes
A–B–C-D
1:30’
Wash spread over the two racks: delicate for
crystal and glasses on the upper rack and
heavy duty for the pans on the lower rack.
Auto
Duo Wash
35 g (A)
35 ml (A)
1 (A)
Yes
A–C–D-E
1:45’
Heavily soiled saucepans or pans with
residual dried-on food.
Ultra
Intensive
35 g (A)
5 g (B)
35 ml (A)
5 ml (B)
1 (A)
1 (bottom
of the
appliance)
Yes
A–B–C-D
2:35'
Rinse and drying cycle for dishes that are
seldom used and are only dusty.
Special
Guest
No
No
No
Yes
A–B – D
0:32’
Disinfecting wash cycle suitable for washing
bottles, rings and teats together with plates,
cups, glasses and cutlery. The crockery
should only be loaded on the upper rack.
Baby Cycle
20 g (A)
20 ml (A)
No
Yes
A
1:20'
Disinfecting cycle for cleaning the inside of
the dishwasher, to be carried out only when
the dishwasher is EMPTY using specific
detergents designed for dishwasher
maintenance.
SelfCare
No
No
No
No
A
0:40'
EN
10
Rinse aid and refined salt
Only use products which have been specifically
designed for dishwashers.
Do not use table salt or industrial salt, or washing up
liquid.
Follow the instructions given on the packaging.
If using a multi-functional product it is not necessary to
add rinse aid; however, we recommend that you add salt,
especially if you live in an area where the water is hard
or very hard. Follow the instructions given on the
packaging.
If you do not add salt or rinse aid, the LOW SALT*
and LOW RINSE AID* indicator lights remain lit.
Measuring out the rinse aid
Rinse aid makes it easier for the crockery to dry, as water
runs off surfaces more readily and therefore does not leave
streaks or marks.
The rinse aid dispenser should be filled:
• When the LOW RINSE AID* indicator light on the control
panel is illuminated;
1. Open the dispenser by turning the
lid (G) in an anticlockwise direction.
2. Pour in the rinse aid, making sure
it does not overflow from the
dispenser. If this happens, clean the
spill immediately with a dry cloth.
3. Screw the lid back on.
NEVER pour the rinse aid directly
into the appliance tub.
Adjusting the amount of rinse aid
If you are not completely satisfied with the drying results,
you may adjust the quantity of rinse aid used. Use a
screwdriver to turn the dosage adjuster (F) to one of the 6
pre-set positions (the default position is set to 4):
• If there are streaks on the crockery, set the adjustment
device to a lower number (1-3).
• If drops of water remain on the crockery or if there are
limescale marks present after the cycle has finished, set
the adjuster to a higher number (4-6).
Setting the water hardness
Every dishwasher is equipped with a water softener which, by
using refined salt designed especially for this type of
appliance, supplies water without limescale which is then used
to wash the crockery.
This dishwasher offers a setting which helps to reduce pollution
and optimises washing performance in accordance with the
water hardness level in your area. This information can be
obtained from the organisation which supplies your household
with water.
- Switch on the appliance by pressing the ON/OFF button.
- Press the P button and hold for a few seconds; two short
beeps will sound, The text "WATER HARDNESS" will appear
on the display and the set hardness number will also flash
slowly on the display (the water softening system is set by
default to number 3).
- Press the DELAYED START button (levels 1 to 5) or the
HALF LOAD button (levels 5 to 1) repeatedly, until the desired
hardness level has been reached (1-2-3-4-5
*, see hardness
table). You will be able to scroll through a maximum of 5 levels.
Press the
PP
PP
P button to confirm.
To exit the function, wait a few seconds or press one of the
option buttons
*, or switch off the machine using the ON/OFF
button.
Even if using multi-functional tablets, the salt dispenser should
still be filled.
(°dH = hardness measured in German degrees - °f = hardness
measured in French degrees - mmol/l = millimoles per litre)
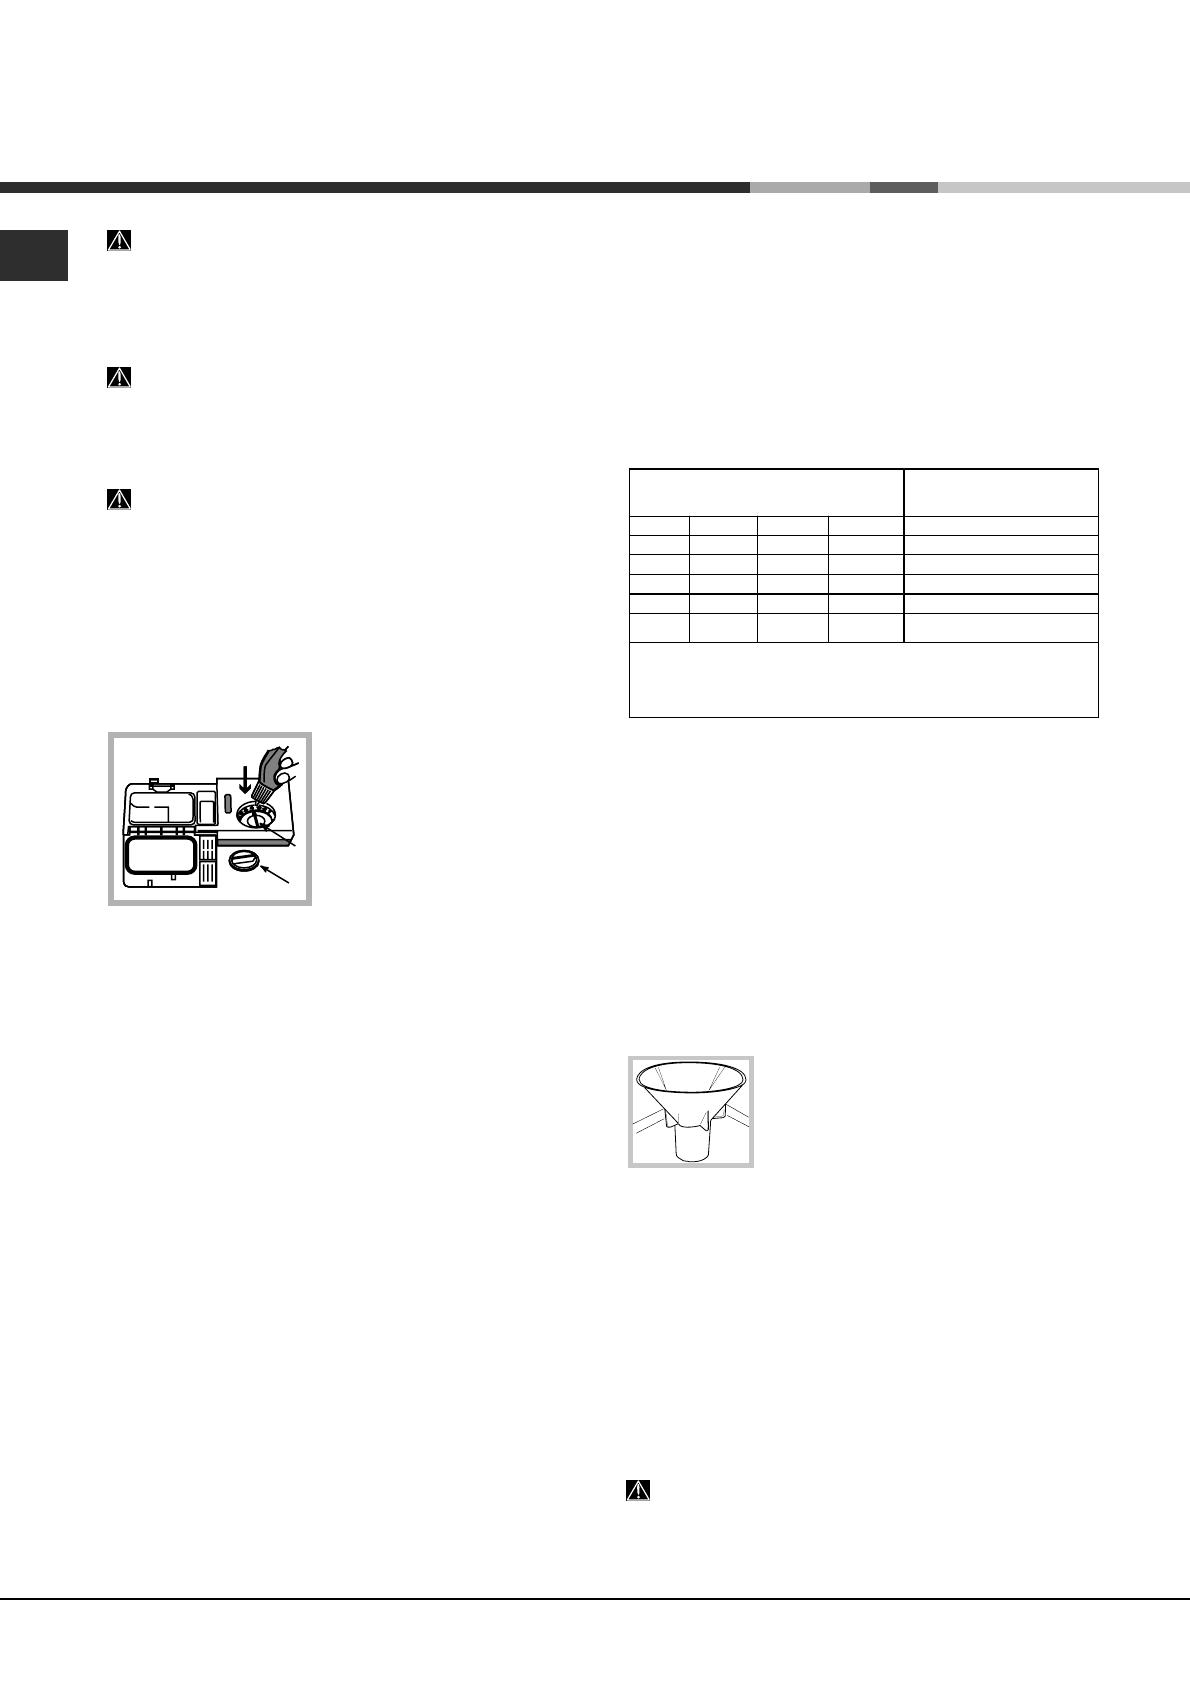
Measuring out the refined salt
In order to achieve the best possible results using a wash
cycle, make sure that the dispenser is never empty. Refined
salt removes limescale from the water, thus avoiding the
formation of deposits on crockery.
The salt dispenser is located in the lower part of the
dishwasher (
see Description
) and should be filled:
• When the green float
* cannot be seen by simply looking
at the cap of the salt dispenser.
• When the LOW SALT
* indicator light on the control panel is
illuminated;
1. Remove the lower rack and unscrew
the container cap (anticlockwise).
2. The first time you do this: fill the water
tank right up to its edge.
3. Position the funnel
* (
see figure)
and
fill the salt container right up to its edge
(this should hold approximately 1 kg); it is not unusual for a
little water to leak out.
4. Remove the funnel* and wipe any salt residue away from
the opening; rinse the cap under running water and then
screw it on, the head facing downwards so as to let the
water flow out of the four cracks which are arranged in a
star shape on the lower part of the cap. (the container cap
with the green float
*)
It is advisable to perform this procedure every time you
add salt to the container.
Make sure the cap is screwed on tightly, so that no detergent
can get into the container during the wash cycle (this could
damage the water softener beyond repair).
When necessary, measure out the salt before a wash
cycle so that any saline solution which has leaked out of the
salt dispenser is removed.
* Only available in selected models.
G
F
Water Hardness Table
Average salt container
capacity duration
**
Level
°dH
°fH
mmol/l
months
1 0 - 6 0 - 10 0 - 1
7 months
2 6 - 11 11 - 20 1,1 - 2
5 months
3 12 - 17 21 - 30 2,1 - 3
3 months
4 17 - 34 31 - 60 3,1 - 6
2 months
5
*
34 - 50
61 - 90
6,1 - 9
2/3 weeks
For values between 0°f and 10°f, we do not recommend the
use of salt
. *
this setting may cause a slight increase in the
duration of
the cycles.
**
for 1 wash cycle per day.

EN
11
Care and maintenance
Shutting off the water and electricity
supplies
• Turn off the water tap after every wash cycle to avoid leaks.
• Always unplug the appliance when cleaning it and when
performing maintenance work.
Cleaning the dishwasher
• The external surfaces of the machine and the control panel
may be cleaned using a non-abrasive cloth which has
been dampened with water. Do not use solvents or
abrasive products.
• Any marks on the inside of the appliance may be removed
using a cloth dampened with water and a little vinegar.
Preventing unpleasant odours
• Always keep the door of the appliance ajar in order to
avoid moisture from forming and being trapped inside
the machine.
• Clean the seals around the door and detergent dispensers
regularly using a damp sponge. This will avoid food
becoming trapped in the seals, which is the main cause
behind the formation of unpleasant odours.
Cleaning the sprayer arms
Food residue may become encrusted onto the sprayer arms
and block the holes used to spray the water. It is therefore
recommended that the arms are checked from time to time
and cleaned with a small non-metallic brush.
The two sprayer arms may both be removed.
To remove the upper sprayer
arm, rotate the locking ring in an
anti-clockwise direction.
The upper sprayer arm should be
replaced with the holes facing
upwards.
The lower sprayer arm can be
removed by pressing on the side
tabs and pulling it upwards.
Cleaning the water inlet filter*
If the water hoses are new or have not been used for an
extended period of time, let the water run to make sure it is
clear and free of impurities before performing the necessary
connections. If this precaution is not taken, the water inlet
could become blocked and damage the dishwasher.
Clean the water inlet filter at the tap outlet regularly.
- Turn off the water tap.
- Unscrew the end of the water inlet hose, remove the filter
and clean it carefully under running water.
- Replace the filter and screw the water hose back into
position.
Cleaning the filters
The filter assembly consists of three filters which remove food
residues from the washing water and then recirculate the
water. They should be cleaned if you wish to achieve the
best results in every wash.
Clean the filters regularly.
The dishwasher should not be used without filters, or if
the filter is loose.
• After several washes, check the filter assembly and if
necessary clean it thoroughly under running water, using a
non-metallic brush and following the instructions below:
1.1.
1.1.
1. Turn the cylindrical filter C in an anti-clockwise direction
and pull it out (fig. 1).
2.2.
2.2.
2. Remove the cup filter B by exerting a slight pressure on
the side flaps (fig. 2).
3.3.
3.3.
3. Slide out the stainless steel plate filter A (fig. 3).
4.
Inspect the trap and remove any food residue.
NEVER REMOVE the wash cycle pump (black
detail)
(fig. 4)
.
After cleaning the filters, replace the filter assembly and fix it
in position correctly; this is essential for maintaining the
efficient operation of the dishwasher.
Leaving the machine unused for extended
periods
• Disconnect the appliance from the electricity supply and
shut off the water tap.
• Leave the door of the appliance ajar.
• When you return, run a wash cycle when the dishwasher
is empty.
* Only available in selected models.
2
C
B
4
1
3

EN
12
Precautions, advice and
Assistance
This appliance was designed and manufactured in
compliance with current international safety standards. The
following information has been provided for safety reasons
and should therefore be read carefully.
General safety
• This appliance is not intended for use by persons (including
children) with reduced physical, sensory or mental
capabilities, or lack of experience and knowledge, unless
they have been given supervision or instruction concerning
use of the appliance by a person responsible for their safety.
• Children should be supervised to ensure that they do not
play with the appliance.
• The appliance was designed for domestic use inside the
home and is not intended for commercial or industrial use.
• The appliance must be used by adults only, to wash
domestic crockery in accordance with the instructions in
this manual.
• The appliance must not be installed outdoors, even in
covered areas. It is extremely dangerous to leave the
machine exposed to rain and storms.
• Do not touch the appliance when barefoot.
• When unplugging the appliance always pull the plug from
the mains socket, do not pull on the cable.
• The water supply tap must be shut off and the plug should
be removed from the electrical socket before cleaning the
appliance or carrying out any maintenance work.
• If the appliance breaks down, do not under any
circumstances touch the internal parts in an attempt to
perform the repair work yourself.
• Never touch the heating element.
• Do not lean or sit on the open door of the appliance: this
may cause the appliance to overturn.
• The door should not be left open as it may create a
dangerous obstacle.
• Keep detergent and rinse aid out of reach of children.
• The packaging material should not be used as a toy.
Disposal
• Disposal of packaging materials: observe local legislation
so that the packaging may be reused.
• The European Directive 2002/96/EC relating to Waste
Electrical and Electronic Equipment (WEEE) states that
household appliances should not be disposed of using the
normal solid urban waste cycle. Exhausted appliances
should be collected separately in order to optimise the cost
of re-using and recycling the materials inside the machine,
while preventing potential damage to the atmosphere and
to public health. The crossed-out dustbin is marked on all
products to remind the owner of their obligations regarding
separated waste collection.
For further information relating to the correct disposal of
household appliances, owners may contact the relevant
public authority or the local appliance dealer.
Saving energy and respecting the
environment
Saving water and energy
• Only begin a wash cycle when the dishwasher is full. While
waiting for the dishwasher to be filled, prevent unpleasant
odours using the Soak cycle (
see Wash cycles
).
• Select a wash cycle which is suited to the type of crockery
and to the soil level of the crockery using the
Table of wash
cycles
:
- For dishes with a normal soil level, use the Eco wash cycle,
which guarantees low energy and water consumption
levels.
- If the load is smaller than usual activate the Half load option
*
(
see Start-up and use
).
• If your electricity supply contract gives details of electricity
saving time bands, run wash cycles during the periods
when a lower tariff is applied. The Delayed start
* button
(
see Start-up and use
) helps you organise the wash cycles
accordingly.
Phosphate-free and chlorine-free detergents
containing enzymes
• We strongly recommend that you use detergents that do
not contain phosphates or chlorine, as these products are
harmful to the environment.
• Enzymes provide a particularly effective action at
temperatures around 50°C, and as a result detergents
containing enzymes can be used in conjunction with low-
temperature wash cycles in order to achieve the same
results as a normal 65°C wash cycle.
• To avoid wasting detergent, use the product in appropriate
quantities based on the manufacturer’s recommendations,
the hardness of the water and the soil level and quantity of
crockery to be washed. Even if they are biodegradable,
detergents contain substances which may alter the balance
of nature.
Assistance
Before contacting Assistance:
• Check whether the problem can be resolved using the
Troubleshooting guide (
see Troubleshooting
).
• Restart the programme to check whether the problem has
ceased to exist.
• If the problem persists, contact the Authorised Technical
Assistance Service.
Never use the services of unauthorised technicians.
Please have the following information to hand:
• The type of malfunction.
• The appliance model (Mod.).
• The serial number (S/N).
This information can be found on the appliance data plate
(
see Description of the appliance
).
* Only available in selected models.
EN
13
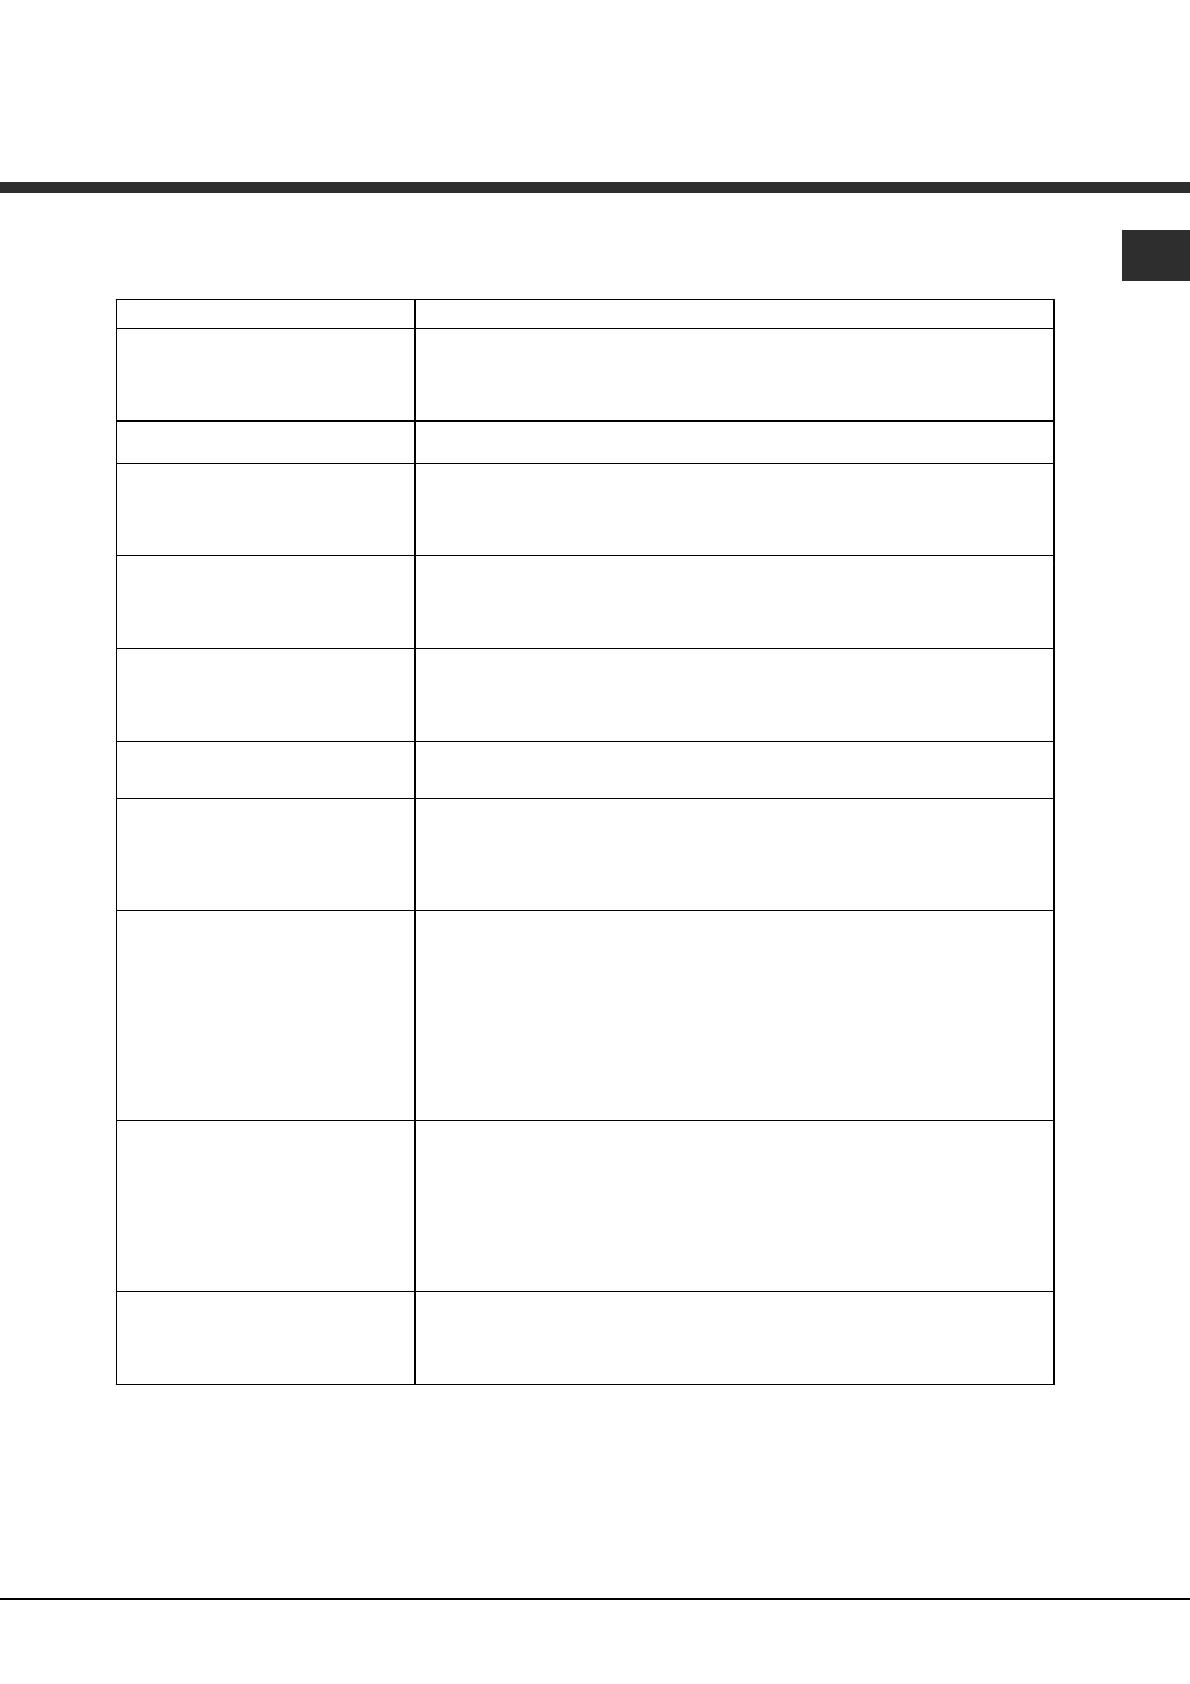
Troubleshooting
Whenever the appliance fails to work, check for a solution from the following list before calling for Assistance.
Problem:
Possible causes / Solutions:
The dishwasher does not start or
cannot be controlled
• Switch off the appliance by pressing the ON/OFF button, switch it back on after
approximately one minute and reset the program.
• The appliance has not been plugged in properly.
• The dishwasher door has not been shut properly.
The door won’t close • The lock was released. Strongly push the door until a “clacking” noise is heard.
No water drains out from the
dishwasher.
• The dishwasher cycle has not yet finished.
• The water inlet hose is bent (see Installation).
• The drain duct is blocked.
• The filter is clogged up with food residues.
The dishwasher makes excessive
noise.
• The dishes are rattling against each other or against the sprayer arms.
• An excessive amount of foam has been produced: the detergent has not been
measured out correctly or it is not suitable for use in dishwashers (see Start-up
and use).
The dishes and glasses are
covered in a white film or
limescale deposits.
• The level of the refined salt is low or the dosage setting is not suited to the
hardness of the water (see Rinse aid and salt).
• The lid on the salt dispenser is not closed properly.
• The rinse aid has been used up or the dosage is too low.
The dishes and glasses are
streaked or have a bluish tinge.
• The rinse aid dosage is too high.
The crockery has not been dried
properly.
• A wash cycle without a drying program has been selected.
• The rinse aid has been used up or the dosage is too low (see Rinse aid and
salt).
• The rinse aid dispenser setting is not suitable.
• The crockery is made from non-stick material or plastic.
The dishes are not clean. • The racks are overloaded (see Loading the racks).
• The crockery has not been arranged well.
• The sprayer arms cannot move freely.
• The wash cycle is too gentle (see Wash cycles).
• An excessive amount of foam has been produced: the detergent has not been
measured out correctly or it is not suitable for use in dishwashers (see Start-up
and use).
• The lid on the rinse aid compartment has not been shut correctly.
• The filter is dirty or blocked (see Care and maintenance).
• The refined salt level is low (see Rinse aid and salt).
The dishwasher does not take any
water in - Tap shut-off alarm
(the ON/OFF indicator light flashes and
the following message appears on the
display: No water. Open tap. After a
few seconds, A:6 will appear).
• There is no water in the mains supply.
• The water inlet hose is bent (see Installation).
• Turn on the tap and the appliance will start after a few minutes.
• The appliance lock has been activated because no action was taken when the
beeps sounded.
Switch off the appliance using the ON/OFF button, turn on the tap and switch
the appliance back on after 20 seconds by pressing the same button. Re-
program the appliance and restart the wash cycle.
Water inlet hose alarm / Water inlet
filter blocked
(the ON/OFF indicator light flashes and
the display shows A:7).
• Switch off the appliance by pressing the ON/OFF button. Shut off the water tap
to eliminate the risk of flooding and remove the plug from the electrical socket.
Make sure the water inlet filter has not become blocked by impurities (see “Care
and maintenance” chapter).

14
Mode d’emploi
Sommaire
Installation, 15-16-17
Mise en place et mise à niveau
Raccordements eau et électricité
Conseils pour le premier lavage
Caractéristiques techniques
Ecodesign Regulation
Raccordement électrique
Description de l’appareil, 18
Vue d’ensemble
Tableau de bord
Charger les paniers, 19
Panier inférieur
Panier à couverts
Panier supérieur
Mise en marche et utilisation,20-21
Mettre en marche le lave-vaisselle
Charger le produit de lavage
Options de lavage
Programmes, 22
Tableau des programmes
Produit de rinçage et sel régénérant, 23
Charger le produit de rinçage
Charger le sel régénérant
Entretien et soin, 24
Coupure de l’arrivée d’eau et de courant
Nettoyer le lave-vaisselle
Eviter les mauvaises odeurs
Nettoyer les bras de lavage
Nettoyage du filtre d’entrée d’eau
Nettoyer les filtres
En cas d’absence pendant de longues périodes
Précautions conseils et Service, 25
Sécurité générale
Mise au rebut
Economies et respect de l’environnement
Service
Anomalies et remèdes, 26
Français, 14
FR
LDF 12H54
LAVE-VAISSELLE
FR
15
Installation
Conserver ce mode d’emploi pour pouvoir le consulter à tout
moment. En cas de vente, de cession ou de déménagement,
s’assurer qu’il accompagne bien l’appareil.
Lire attentivement les instructions: elles contiennent des
conseils importants sur l’installation, l’utilisation et la sécurité de
l’appareil.
En cas de déménagement, transporter l’appareil
verticalement; si besoin est, l’incliner sur le dos.
Cet appareil est conçu pour un usage domestique ou autres
applications similaires, telles que:
- lieux aménagés en espace cuisine pour le personnel de
magasins, bureaux et autres lieux de travail;
- fermes;
- utilisation par les clients d'hôtels, de motels ou autres locaux de
type résidentiel;
- chambres d'hôtes.
Mise en place et mise à niveau
1. Déballer l’appareil et s’assurer qu’il n’a pas été endommagé
pendant le transport.
S’il est abîmé, ne pas le raccorder et contacter le revendeur.
2. Installer le lave-vaisselle de manière à ce que les côtés et la
paroi arrière touchent aux meubles adjacents ou au mur. L’appareil
peut être encastré sous un plan de travail continu
* (
voir feuille de
Montage
).
3. Installer le lave-vaisselle sur un sol plat et rigide. Compenser
les irrégularités en vissant ou en dévissant les pieds avant jusqu’à
ce que l’horizontalité de l’appareil soit parfaite. Une bonne
horizontalité garantit la stabilité de l’appareil et supprime tout
risque de vibrations, bruits et déplacements.
4
*. Pour régler la hauteur du pied arrière, agir sur la douille
rouge à six pans située dans la partie avant du lave-vaisselle, en
bas et au milieu, à l’aide d’une clé mâle à six pans, ouverture 8
mm. Tourner dans le sens des aiguilles d’une montre pour
augmenter la hauteur et dans le sens inverse pour la diminuer.
(consulter la notice d’instructions encastré jointe à la
documentation)
Raccordements eau et électricité
L’adaptation des installations électriques et les travaux de
plomberie de l’installation doivent être effectués par du personnel
qualifié.
Le lave-vaisselle ne doit pas écraser les tuyaux ou le câble
d’alimentation électrique.
Utiliser des tuyaux neufs pour effectuer le raccordement de
l’appareil au réseau de distribution de l’eau.
Ne pas réutiliser les anciens tuyaux.
Les tuyaux d’amenée et d’évacuation de l’eau et le câble
d’alimentation électrique peuvent être orientés vers la droite ou
vers la gauche pour simplifier l’installation
.
Raccord du tuyau d’amenée de l’eau
• A une prise d’eau froide: bien visser le tuyau d’amenée à un
robinet à embout fileté 3/4 gaz; avant de visser, faire couler
l’eau jusqu’à ce quelle devienne limpide et dépourvue
d’impuretés qui pourraient engorger l’appareil.
• A une prise d’eau chaude: en cas d’installation de chauffage
centralisé (radiateurs), le lave-vaisselle peut être alimenté avec
de l’eau chaude de réseau ne dépassant pas 60°C.
Visser le tuyau au robinet en procédant comme pour la prise
d’eau froide.
Si la longueur du tuyau d’amenée ne suffit pas, s’adresser à
un magasin spécialisé ou à un technicien agréé (
voir Assistance
).
La pression de l’eau doit être comprise entre les valeurs
reportées dans le tableau des Caractéristiques techniques (
voir ci-
contre
).
Faire attention à ce que le tuyau ne soit ni plié ni écrasé.
Raccordement du tuyau d'évacuation de l'eau
Raccorder le tuyau d'évacuation, sans le plier, à une conduite
d'évacuation ayant au moins 4 cm de diamètre.
Le tuyau d'évacuation doit être placé entre 40 et 80 cm au-dessus
du sol ou du plan d'appui du lave-vaisselle (A).
Avant de raccorder le tuyau d'évacuation de l'eau au siphon de
l'évier, retirer le bouchon en plastique (B).
Sécurité anti-fuite
Pour éviter tout risque d’inondation, le lave-vaisselle:
- est équipé d’un dispositif qui coupe l’arrivée de l’eau en cas
d’anomalie ou de fuite à l’intérieur de l’appareil.
Quelques modèles sont équipés d’un dispositif de sécurité
supplémentaire
New Acqua Stop
* qui garantit contre tout risque
d’inondation même en cas de rupture du tuyau d’amenée de
l’eau.
ATTENTION: TENSION DANGEREUSE!
Il ne faut en aucun cas couper le tuyau d’amenée de l’eau car il
contient des parties sous tension.
* Présent uniquement sur certains modèles.

FR
16
Raccordement électrique
Avant de brancher la fiche dans la prise de courant, s’assurer
que:
• la prise dispose de mise à la terre et est conforme aux normes;
• la prise est bien apte à supporter la puissance maximale de
l’appareil reportée sur la plaque signalétique fixée à la contre-
porte (
voir paragraphe Description du lave-vaisselle
);
• la tension d’alimentation est bien comprise entre les valeurs
figurant sur la plaque signalétique de la contre-porte;
• la prise est bien compatible avec la fiche de l’appareil.
Autrement, faire remplacer la fiche par un technicien agréé
(
voir Assistance
); n’utiliser ni rallonges ni prises multiples.
Après installation de l’appareil, le câble d’alimentation
électrique et la prise de courant doivent être facilement
accessibles.
Le câble ne doit être ni plié ni trop écrasé.
Afin d’éviter tout danger, faire changer le cordon d’alimenta-
tion abîmé, par le fabricant ou par son service après-vente. (Voir
Assistance)
Nous déclinons toute responsabilité en cas de non-respect
des normes énumérées ci-dessus.
Caractéristiques techniques
Dimensions
largeur 60 cm
hauteur 85 cm
profondeur 60 cm
Capacité 14 couverts standard
Pression eau
d’alimentation
0,05 ÷ 1 MPa (0,5 ÷ 10 bar)
7,25 – 145 psi
Tension
d’alimentation
Voir étiquette des caractéristiques
Puissance totale
absorbée
Voir étiquette des caractéristiques
Fusible Voir étiquette des caractéristiques
Cet appareil est conforme aux
Directives Communautaires
suivantes:
- 2006/95/EC (Basse Tension)
- 2004/108/EC (Compatibilité
Electromagnétique)
-2009/125/EC (Comm. Reg.
1016/2010) (Ecodesign)
-97/17/EC (Etiquetage)
-2002/96/EC (DEEE)
Ruban anti-condensation*
Après avoir encastré le lave-vaisselle, ouvrir la porte et coller le
ruban adhésif transparent sous le plan en bois pour le protéger
contre la formation de condensation.
Conseils pour le premier lavage
Une fois l’installation terminée et tout de suite avant le premier
lavage, remplir complètement d’eau le réservoir à sel et ajouter
environ 1 kg de sel (
voir Produit de rinçage et sel régénérant
) : il
est tout à fait normal que de l’eau déborde. Sélectionner le degré
de dureté de l’eau (
voir Produit de rinçage et sel régénérant
). -
Après remplissage du réservoir à sel, le voyant SEL
* s'éteint.
Le manque de remplissage du réservoir à sel, peut
endommager l'adoucisseur d'eau et l'élément chauffant.
ECODESIGN REGULATION
Le cycle de lavage ECO c’est le programme standard auquel se référent les données de l’étiquette-énergie. Ce cycle est prévu pour
le lavage de la vaisselle normalement sale et est le programme le plus efficace en termes de consommation d’énergie et d’eau pour ce
type de vaisselle. Pour consommer moins, utiliser le lave-vaisselle à pleine charge.
Consommations en stand-by: Consommation en left-on mode: 4,5 W - Consommation en off-mode: 1,3 W
Tableau des consommations pour les cycles principaux
* Les données du programme sont des valeurs de mesure de laboratoire obtenues selon la norme européenne EN 50242.
** Les données sont obtenues en effectuant des mesures dans les conditions d’utilisation et de charge de la vaisselle de l’usager.
Conditions standard* Conditions usager**
Consommation
d'énergie (KWh/cycle)
Consommation
d'eau (litre/cycle)
Durée
(min/cycle)
Consommation
d'énergie (KWh/cycle)
Consommation
d'eau (litre/cycle)
Durée
(min/cycle)
INTENSIF
1,50 15 150 1,30 14 135
NORMAL
1,20 15 120 1,05 14 110

FR
17
Raccordement électrique
Si votre appareil est muni d'une fiche avec fusible 13
ampères, cette dernière peut être branchée dans une
prise 13 ampères et vous pouvez utiliser votre appareil
immédiatement. Avant toute utilisation de l'appareil, li-
sez attentivement les instructions suivantes.
ATTENTION! CET APPAREIL DOIT ETRE RELIE
A LA TERRE.
CES OPERATIONS DOIVENT ETRE EFFECTUEES
PAR UN ELECTRICIEN QUALIFIE.
Remplacement du fusible.
En cas de remplacement d'un fusible défectueux, utili-
sez toujours un fusible BS 1362 homologué ASTA de
13 ampères. Le couvercle du fusible doit toujours être
remis en place. En cas de perte du couvercle du fusi-
ble, n'utilisez pas la fiche tant que le couvercle n'aura
pas été remplacé.
Couvercles de fusible de rechange.
En cas d'utilisation d'un couvercle de rechange, il faut
que ce dernier soit bien de la même couleur que la
marque colorée ou que la couleur imprimée en relief à
la base de la fiche. Commandez directement vos cou-
vercles de fusible de rechange au dépôt de pièces dé-
tachées le plus proche de votre domicile.
Dépose de la fiche.
Si l'appareil est muni d'une fiche moulée ne pouvant
pas être câblée de nouveau et qu'il faut déposer pour
ajouter une rallonge ou pour réacheminer le câble d'ali-
mentation à travers des partitions, des unités, etc., con-
trôlez que:
- la fiche est bien remplacée par une fiche avec fusible
13 ampères pouvant être câblée de nouveau portant la
marque BSI;
ou bien que:
- le câble d'alimentation est bien directement raccordé
à une prise de 13 ampères et commandé par un inter-
rupteur (conformément à BS 5733) accessible sans qu'il
faille déplacer l'appareil.
Mise au rebut de la fiche.
Avant d'éliminer la fiche, rendez ses broches inutilisa-
bles. Vous éviterez ainsi que la fiche ne puisse être bran-
chée accidentellement dans une prise.
Instructions pour le raccordement du câble à un
autre type de fiche:
Important : Les fils du conducteur d'alimentation sont
colorés conformément aux normes en vigueur comme
suit:
vert et jaune - terre
bleu - neutre
marron - phase
Du moment que les couleurs des fils du conducteur d'ali-
mentation pourraient ne pas correspondre au marquage
des couleurs qui repèrent les cosses sur la fiche, nous
conseillons de procéder comme suit:
- raccordez le fil vert et jaune à la cosse marquée "E"
ou bien de couleur verte ou verte et jaune.
- raccordez le fil marron à la cosse marquée "L" ou de
couleur rouge.
- raccordez le fil marron à la cosse marquée "N" ou de
couleur noire.
En cas d'utilisation d'une fiche 13 ampères (BS 1363),
montez un fusible de 13 ampères. Une fiche de 15 am-
pères doit être protégée par un fusible 15 ampères
monté dans la fiche / dans l'adaptateur ou dans le ta-
bleau de distribution.
En cas de doute sur l'alimentation électrique du dispo-
sitif, consultez un électricien qualifié avant toute utilisa-
tion.
Raccordement d'un autre type de fiche.
Les fils de ce conducteur d'alimentation sont colorés
conformément aux normes en vigueur comme suit :
BLEU “NEUTRE” (“N”)
MARRON “PHASE” (“L”)
VERT ET JAUNE “TERRE” (“E”) ou
Mise au rebut de l'appareil.
Avant d'éliminer l'appareil, débarrassez-le de sa fiche
en coupant le câble d'alimentation le plus près possi-
ble du corps de la fiche. Puis éliminez-la comme décrit
plus haut.
ATTENTION:
La fiche du lave-vaisselle doit toujours être accessible
même en cas d'installation d'un lave-vaisselle encastré
pour pouvoir effectuer les opérations d'entretien en toute
sécurité.
Nous déclinons toute responsabilité en cas de non-
respect des normes énumérées ci-dessus.
Raccordement électrique
FR
18
Vue d’ensemble
Description de l’appareil
1. Panier supérieur
2. Bras de lavage supérieur
3. Clayettes rabattables
4. Réglage hauteur du panier
5. Panier inférieur
6. Bras de lavage inférieur
7. Panier à couverts
8. Filtre lavage
9. Réservoir à sel
10. Bacs produit de lavage et réservoir à
produit de rinçage
11. Plaque signalétique
12. Tableau de bord
***
*** Uniquement pour modèles tout intégrables.
* Présent uniquement sur certains modèles.
Le nombre et les types de programmes et des options, varient selon le modele de lave-vaisselle.
Tableau de bord
Touche Sélection de programme
Touche Pastilles
multifonction
Touche
Départ différé
Voyant
Demi-charge Supérieur/inférieur
Voyant ON-OFF
Voyant
Manque de sel
Voyant Manque de
produit de rinçage
Touche option
GoodNight
Touche et voyant
Marche/Arret
Indicateur lumineux du temps restant
Touche
ON-OFF/RESET
Touche
Demi-charge
Voyant pastilles
multifonction
Voyant
Départ différé
Voyant option GoodNight
Touche
Séchage Super
Voyant Séchage Super
Touche option
Short Time
Voyant option Short Time
Indicateur lumineux du
nom du programme

FR
19
Charger les paniers
Avant de charger les paniers, débarrasser la vaisselle
des déchets plus importants et vider les verres et les coupes.
Après avoir chargé le lave-vaisselle, s’assurer que les bras
de lavage tournent librement.
Panier inférieur et panier à couverts
Le panier du bas peut contenir des casseroles, des
couvercles, des assiettes, des saladiers, des couverts etc.Les
assiettes et couvercles de grandes dimensions doivent être
de préférence rangés sur les côtés du panier.
Certains modèles de lave-vaisselle sont pourvus de tiges
rabattables
*, qui peuvent être utilisés en position verticale pour
accueillir les assiettes ou en position horizontale pour accueillir
casseroles, saladiers et poêles.
Le panier à couverts peut varier selon le modèle de lave-
vaisselle et être séparable ou non séparable. Le panier à
couverts non séparable doit être placé obligatoirement dans
la partie avant du panier inférieur.
Ils sont tous deux
équipés de grilles
supérieures
permettant de
mieux ranger les
couverts.
Ranger les couteaux et les ustensiles de cuisine pointus
et coupants dans le panier à couverts, pointes tournées
vers le bas, ou, à plat, sur les clayettes rabattables du
panier supérieur.
Panier supérieur
Réservé au chargement de la vaisselle fragile et légère: verres,
tasses, petites assiettes, saladiers bas.
Clayettes rabattables à inclinaison variable
Les clayettes peuvent être placées
à deux hauteurs différentes afin
d’optimiser la disposition de la
vaisselle dans le panier. Les verres
à pied peuvent être placés en
position stable contre les clayettes,
en insérant la tige de leurs pieds
dans les fentes prévues à cet
effet.
Certains modèles de lave-vaisselle
sont dotés d’un plateau
* coulissant
qui peut être utilisé pour contenir les
couverts à service ou les tasses de
petite taille. Pour de meilleures
performances de lavage, éviter de
mettre sous le plateau de la vaisselle
encombrante.
Régler la hauteur du panier supérieur
Pour faciliter le rangement de la vaisselle, il est possible de
régler le panier supérieur en position haute ou basse.
Régler de préférence la hauteur du panier supérieur
quand ce dernier est VIDE.
Ne JAMAIS soulever ou abaisser le panier d’un seul côté.
Ouvrir les butées des glissières du
panier à droite et à gauche et sortir le
panier. Positionner le panier en position
haute ou basse, le faire glisser le long
des glissières jusqu’à ce que les roues
avant entrent elles aussi et refermer les
butées (
voir figure
).
Si le panier est équipé de poignées
Dual Space
* (
voir figure
), sortir le
panier du haut en fin de corse, saisir les
poignées sur les côtés du panier et
déplacer vers le haut ou vers le bas ;
laisser redescendre le panier en
l’accompagnant.
Vaisselle n’allant pas au lave-vaisselle
• Objets en bois, avec des manches en bois ou en corne ou
ayant des parties collées.
• Objets en aluminium, cuivre, laiton ou étain.
• Vaisselle en plastique non thermorésistant.
• Porcelaines anciennes ou peintes à la main.
• Argenterie ancienne. Les pièces d’argenterie non ancienne
peuvent par contre être lavées avec un programme délicat
après s’être assuré qu’elles n’entrent pas en contact avec
d’autres métaux.
* Présent uniquement sur certains modèles. Leur nombre
et leur position varient.
Nous vous conseillons dutiliser de la vaisselle adapte
pour passer au lave-vaisselle.
FR
20
Mise en marche et
utilisation
Charger le produit de lavage
Un bon résultat de lavage dépend aussi d’un bon dosage du
produit de lavage. Un excès de produit de lavage ne lave pas
mieux et pollue l’environnement.
N’utiliser que du produit de lavage spécial lave-vaisselle.
NE PAS UTILISER de produits pour laver la vaisselle à la
main.
Une utilisation excessive de produit de lavage peut
laisser des résidus de mousse en fin de cycle.
L'utilisation de pastilles n'est conseillée que pour les
modèles qui prévoient l'option PASTILLES MULTIFONCTION.
Pour obtenir des performances de lavage et de séchage
optimales, utiliser des produits de lavage en poudre, du
liquide de rinçage et du sel.
bac A: Produit de lavage
bac B: Produit de prélavage
1. Appuyer sur la touche D pour ouvrir
le couvercle C.
2. Pour doser le produit de lavage se
reporter au
Tableau des programmes
:
• en poudre : bacs A et B.
• pastilles: si le programme en prévoit
1, placer cette dernière dans le bac A
et fermer le couvercle; s’il en prévoit 2,
mettre la deuxième dans le fond de la
cuve.
3. Eliminer les résidus de produit de lavage sur les bords du bac
et fermer le couvercle jusqu’au déclic.
* Présent uniquement sur certains modèles.
Première mise en service
Choisir la langue
Appuyer sur ON/OFF, un bip bref retentit et la langue sélectionnée
s’affiche.
Faire défiler la liste des langues, à l’aide de la touche DÉPART
DIFFÉRÉ pour avancer et celle de DEMI-CHARGE pour revenir
en arrière, jusqu’à la langue voulue. Appuyer sur la touche P
pour confirmer et entrer automatiquement dans la liste des
programmes de lavage.
A chaque allumage qui suit la première mise en service, le lave-
vaisselle affiche la liste des programmes.
Pour modifier le choix de la langue après la première mise en
service, il suffit d’appuyer simultanément pendant quelques
secondes sur la touche P et sur la touche de DÉPART DIFFÉRÉ.
Mettre en marche le lave-vaisselle
1. Ouvrir l’arrivée d’eau.
2. Appuyer sur la touche ON-OFF : un bip court retentit, le voyant
ON/OFF et l’afficheur s’allument.
3. Ouvrir la porte et doser le produit de lavage (
voir plus bas
).
4. Charger les paniers (
voir Charger les paniers
) et fermer la
porte.
5. Pour sélectionner le programme selon le type de vaisselle et
son degré de salissure (
voir tableau des programmes
), appuyer
sur la touche P.
6. Sélectionner les options de lavage (
voir ci-contre
).
7. Appuyer sur la touche Marche pour faire démarrer le lavage :
un bip prolongé signale le démarrage du programme et le nom
du programme sélectionné ainsi que le temps de lavage restant
s’affichent.
8. A la fin, deux bips courts et un bip prolongé annoncent la fin du
programme et le message FIN DE CYCLE s’affiche à l’écran.
Eteindre l’appareil par pression sur la touche ON-OFF, fermer le
robinet de l’eau et débrancher la fiche de la prise de courant.
9. Attendre quelques minutes avant de sortir la vaisselle pour
éviter de se brûler. Décharger les paniers en commençant par
celui du bas.
PROGRAMMES AUTO
*: grâce à un capteur spécial, ce
modèle de lave-vaisselle peut évaluer le degré de salissure et
sélectionner le lavage le plus efficace et le plus économique.
La durée des programmes automatiques peut varier du fait de
l’intervention du capteur.
En cas de vaisselle peu sale ou précédemment rincée à
l’eau, réduire considérablement la quantité de produit de
lavage.
Modifier un programme en cours
En cas d’erreur de sélection d’un programme, il est possible de
le modifier, à condition qu’il vienne tout juste de démarrer : pour
changer un cycle de lavage en cours, éteindre puis rallumer
l’appareil par une pression prolongée sur la touche ON/OFF,
sélectionner ensuite le nouveau programme et les options
désirées.
Introduire de la vaisselle en cours de lavage
Appuyer sur la touche Marche/Pause, (la touche se met à
clignoter). Ouvrir la porte en faisant attention à la vapeur chaude
qui s’échappe et introduire la vaisselle. Appuyer sur la touche
Marche/Pause (lumière fixe): le cycle repart après un bip prolongé.
Appuyer sur la touche Marche/Pause pour mettre l’appareil
en pause, le programme et le départ différé éventuellement
sélectionné sont stoppés.
Pendant cette phase, aucun changement de programme n’est
possible.
Interruptions accidentelles
En cas d’ouverture de la porte en cours de lavage ou de coupure
de courant, le programme s’arrête. Il redémarre du point où il a
été interrompu dès que le courant revient ou que la porte est
refermée.
Options de lavage*
La sélection, la modification ou l’annulation des OPTIONS n’est
possible qu’après avoir choisi le programme de lavage et avant
d’appuyer sur la touche Marche/Pause.
Seules les options compatibles avec le programme choisi peuvent
être sélectionnées. Si une option n’est pas compatible avec le
programme sélectionné,
(voir tableau programmes)
la led
correspondante clignote 3 fois de suite et 2 bips courts
retentissent.
En cas de sélection d’une option incompatible avec une option
précédemment sélectionnée, celle-ci clignote 3 fois de suite, 3
bips retentissent puis elle s’éteint, tandis que la dernière sélection
effectuée reste allumée.
Pour désactiver une option sélectionnée par erreur, appuyer à
nouveau sur la touche correspondante.
/