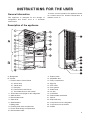
Zanussi Z 97/4 W is a fridge freezer with a range of features to help you keep your food fresh and organized.
The fridge has a salad drawer to keep your vegetables and fruits crisp, and a dairy compartment to keep your cheese and milk fresh. The freezer has a fast freeze function to quickly freeze fresh food, and a defrost water outlet to make defrosting easy.
Overall, the Zanussi Z 97/4 W is a great choice for anyone looking for a reliable and feature-packed fridge freezer. Here are some of the benefits of using this appliance:
- Keep your food fresh and organized with the Zanussi Z 97/4 W fridge freezer.


-
 1
1
-
 2
2
-
 3
3
-
 4
4
-
 5
5
-
 6
6
-
 7
7
-
 8
8
-
 9
9
-
 10
10
-
 11
11
-
 12
12
-
 13
13
-
 14
14
-
 15
15
-
 16
16
-
 17
17
-
 18
18
-
 19
19
-
 20
20


Zanussi Z 97/4 W is a fridge freezer with a range of features to help you keep your food fresh and organized.
The fridge has a salad drawer to keep your vegetables and fruits crisp, and a dairy compartment to keep your cheese and milk fresh. The freezer has a fast freeze function to quickly freeze fresh food, and a defrost water outlet to make defrosting easy.
Overall, the Zanussi Z 97/4 W is a great choice for anyone looking for a reliable and feature-packed fridge freezer. Here are some of the benefits of using this appliance:
- Keep your food fresh and organized with the Zanussi Z 97/4 W fridge freezer.
Ask a question and I''ll find the answer in the document
Finding information in a document is now easier with AI
Related papers
Other documents
-
 Zanussi - Electrolux ZEF226 User manual
-
Zanussi-Electrolux ZRT175W User manual
-
 Zanussi - Electrolux CZUF145W User manual
-
-
Electrolux EU2120C User manual
-
-
John Lewis JLW6004 User manual
-
John Lewis JLS6009 User manual
-
-

