Bauknecht MHC 8812 PT User guide
- Category
- Microwaves
- Type
- User guide
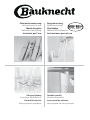
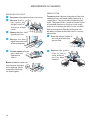
Bauknecht MHC 8812 PT is a multi-functional appliance that combines a microwave and a cooker hood. It can be used for a variety of cooking tasks, from reheating leftovers to defrosting frozen foods. The microwave also features a grill function, which allows you to brown and crisp food. The cooker hood helps to remove smoke and odours from the kitchen, making it a great choice for homes with open-plan kitchens.
Bauknecht MHC 8812 PT is a multi-functional appliance that combines a microwave and a cooker hood. It can be used for a variety of cooking tasks, from reheating leftovers to defrosting frozen foods. The microwave also features a grill function, which allows you to brown and crisp food. The cooker hood helps to remove smoke and odours from the kitchen, making it a great choice for homes with open-plan kitchens.


-
 1
1
-
 2
2
-
 3
3
-
 4
4
-
 5
5
-
 6
6
-
 7
7
-
 8
8
-
 9
9
-
 10
10
-
 11
11
-
 12
12
-
 13
13
-
 14
14
-
 15
15
-
 16
16


Bauknecht MHC 8812 PT User guide
- Category
- Microwaves
- Type
- User guide
Bauknecht MHC 8812 PT is a multi-functional appliance that combines a microwave and a cooker hood. It can be used for a variety of cooking tasks, from reheating leftovers to defrosting frozen foods. The microwave also features a grill function, which allows you to brown and crisp food. The cooker hood helps to remove smoke and odours from the kitchen, making it a great choice for homes with open-plan kitchens.
Ask a question and I''ll find the answer in the document
Finding information in a document is now easier with AI
Related papers
Other documents
-
Kueppersbusch UNO BL/F/60 User guide
-
Whirlpool UNO BL/F/60 User guide
-
-
-
Whirlpool AVM 965 WH User guide
-
-
-
-
-