IMPORTANT INFORMATION
3
It is most important that this instruction book should
be retained with the appliance for future reference.
Should the appliance be sold or transferred to
another owner, or should you move house and leave
the appliance, always ensure that the book is sup-
plied with the appliance in order that the new owner
can get to know the functioning of the appliance and
the relevant warnings.
These warnings have been provided in the interest
of safety. You MUST read them carefully before
installing or using the appliance.
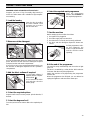
INSTALLATION
n
This appliance is heavy. Care should be taken when
moving it.
n
All packing and transit bolts must be removed before
use. Serious damage can occur to the product and to
property if this is not adhered to. See relevant section
in instructions.
n
Any plumbing work required to install this appliance
should be carried out by a qualified plumber or com-
petent person.
n
Any electrical work required to install this appliance
should be carried out by a qualified electrician or
competent person.
n
Care must be taken to ensure that the appliance
does not stand on the electrical supply cable.
n
If the machine is situated on a carpeted floor, please
adjust the feet in order to allow air to circulate freely.
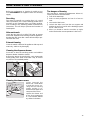
USE
n
Always unplug the appliance and turn off the water
after use.
n
Do not overload the appliance. See relevant section
in instruction book.
n
Only wash fabrics which are designed to be machine
washed. If in doubt, consult the care label on the
clothes.
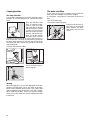
n
Before washing, ensure that all pockets are empty
and buttons and zips are fastened. Avoid washing
frayed or torn articles and treat stains such as paint,
ink, rust, and grass before washing. Underwired bras
must NOT be machine washed.
n
Any objects such as coins, safety pins, nails, screws,
stones or any other hard, sharp material can cause
extensive damage and must not be placed into the
machine.
n
Garments which have been in contact with volatile
petroleum products should not be machine washed.
If volatile cleaning fluids are used, care should be
taken to ensure that the fluid is removed from the
garment before placing in the machine.
n
Wash small items such as socks, laces, washable
belts etc in a washing bag or pillow case as it is pos-
sible for such items to slip down between the tub and
the inner drum.
n
Only use the advised quantities of fabric softener.
Damage to the fabric can ensue if you over-fill. Refer
to the manufacturer’s recommendations of quantities.
n
As some duvets and eiderdowns should be washed
in large commercial machines because of their bulk,
please check with the manufacturer of the item be-
fore washing in a domestic machine.
n
The users should always check that they have not
left their gas lighters (disposable or otherwise) in their
clothing.
n
Leave the porthole door slightly ajar between washes
to preserve the door seal.
SERVICE/REPAIR
n
Under no circumstances should you attempt to repair
the machine yourself. Repairs carried out by inexpe-
rienced persons may cause injury or serious malfunc-
tioning. Contact your local Zanussi Service Centre.
Always insist on genuine Zanussi spare parts.
GENERAL SAFETY
n
It is dangerous to alter the specifications or attempt to
modify this product in any way.
n
This appliance is designed to be operated by adults.
Children should not be allowed to tamper with the
controls or play with the product.
n
Pets and children have been known to climb into
washing machines. Please check your drum before
use.
n
The glass door becomes very hot during the washing
cycle. Keep children away from the vicinity of the
appliance whilst it is in operation.
n
When disposing of your old washing machine, the
electric cable must be cut off and the door catch must
be made unusable.
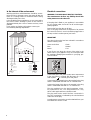
Your machine is fitted with a balance control
device, which ensures the machine is stable during
the spin.
If the wash load appears not to have been spun
sufficiently at the end of the wash cycle, because it
is not evenly distributed in the drum, the balance
control device may have operated. It will therefore
be necessary to redistribute the wash load manual-
ly and select a spin programme. For more detailed
information see the section headed “Servicing”.


 1
1
 2
2
 3
3
 4
4
 5
5
 6
6
 7
7
 8
8
 9
9
 10
10
 11
11
 12
12
 13
13
 14
14
 15
15
 16
16
 17
17
 18
18
 19
19


