
User Guide
AT&T Z432

Devices purchased for use on AT&T’s system are designed for use exclusively
on AT&T’s system. You agree that you won’t make any modifications to the
Equipment or programming to enable the Equipment to operate on any
other system. A voice plan is required on all voice-capable devices, unless
specifically noted otherwise in the terms governing your agreement. Some
devices or plans may require you to subscribe to a data plan.
Your phone is designed to make it easy for you to access a wide variety
of content. For your protection, we want you to be aware that some
applications that you enable may involve the location of your phone being
shared. For applications available through AT&T, we offer privacy controls
that let you decide how an application may use the location of your phone
and other phones on your account. However, the AT&T privacy tools do not
apply to applications available outside of AT&T. Please review the terms and
conditions and the associated privacy policy for each location-based service
to learn how location information will be used and protected. In addition,
your AT&T phone may be used to access the Internet and to down load, and/
or purchase goods, applications, and services from AT&T or elsewhere from
third parties. AT&T provides tools for you to control access to the Internet
and certain Internet content. These controls may not be available for certain
devices which bypass AT&T controls.
AT&T may collect certain types of information from your device when you
use AT&T services to provide customer support and to improve its services.
For more information on AT&T’s Privacy Policy, visit att.com/privacy.
The Bluetooth
®
word mark and logos are registered trademarks owned by
Bluetooth SIG, Inc.
Copyright © 2014 ZTE CORPORATION.
All rights reserved.
No part of this publication may be excerpted, reproduced, translated or
utilized in any form or by any means, electronic or mechanical, including
photocopying and microfilm, without the prior written permission of
ZTE Corporation.
The manual is published by ZTE Corporation. We reserve the right to make
modifications on print errors or update specifications without prior notice.
microSD logo is trademark of SD-3C, LLC. Qualcomm
®
and Snapdragon™
are trademarks of Qualcomm Incorporated, registered in the United
States and other countries. Used with permission.
Version No. : V1.0
Edition Time: August 2014
Manual No. : 8090170400MT

Getting Started ..........................................................................................................................1
Starting Up ................................................................................................................................1
Charging the Battery ..........................................................................................................4
Switching Your Phone On/Off ........................................................................................5
Getting to Know Your Phone ..........................................................................................6
Key Functions ....................................................................................................................... 7
Home Screen ......................................................................................................................... 9
Main Menu .............................................................................................................................. 11
Phone Calls ................................................................................................................................ 13
How to Make Calls .............................................................................................................. 13
How to Receive Calls ........................................................................................................ 13
Adjusting Your Call Settings .......................................................................................... 13
Adjusting the Volume.......................................................................................................14
Recent Calls ..........................................................................................................................14
Address Book ........................................................................................................................... 15
Adding a New Contact .................................................................................................... 15
Importing/Exporting Contacts from/to the SIM Card ..................................... 15
Searching Contacts ..........................................................................................................16
Configuring Speed Dial....................................................................................................16
Performing a Speed Dial ................................................................................................. 17
Entering Text ............................................................................................................................19
Contents
iContents

Tools ............................................................................................................................................. 38
Alarm .......................................................................................................................................38
Notepad ................................................................................................................................38
Calculator .............................................................................................................................39
Tip Calculator .....................................................................................................................40
Stopwatch ............................................................................................................................40
World Time ............................................................................................................................ 41
Conversion ............................................................................................................................41
Settings .......................................................................................................................................43
Display Settings .................................................................................................................43
Phone Settings ................................................................................................................... 43
Profiles ....................................................................................................................................44
Call Settings ......................................................................................................................... 45
Connection Settings .......................................................................................................46
Security Settings ............................................................................................................... 47
AT&T Software Update ..................................................................................................49
Customization ........................................................................................................................50
Accessibility .............................................................................................................................. 51
TTY Mode .............................................................................................................................. 51
HAC (Hearing Aid Compatibility) Mode .................................................................. 51
iiiContents
Messaging ................................................................................................................................... 21
SMS and MMS Messages ................................................................................................ 21
General Settings ................................................................................................................ 23
Voicemail .............................................................................................................................. 24
Email ............................................................................................................................................. 25
Setting Up Your Email Account .................................................................................. 25
Browsing the Internet ........................................................................................................ 27
Using Mobile Web ............................................................................................................. 27
Using the ATT.net Homepage ..................................................................................... 27
Visiting a Website from within the Browser ......................................................... 27
Bluetooth
®
.................................................................................................................................28
Enabling Bluetooth ...........................................................................................................28
Connecting to Other Devices .....................................................................................28
Sending Data ....................................................................................................................... 29
Receiving Data ....................................................................................................................30
Entertainment ......................................................................................................................... 31
Capturing and Viewing Pictures .................................................................................. 31
Capturing and Viewing Video ...................................................................................... 32
Music ....................................................................................................................................... 33
Voice Recorder .................................................................................................................. 35
Calendar .....................................................................................................................................36
AT&T Navigator
®
.....................................................................................................................37
ii Contents

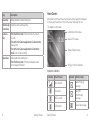
Note: In this User Manual, “press a key” means to press the key and release
it, while “hold a key” means to press the key for at least two seconds and
then release it.
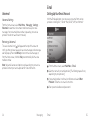
Starting Up
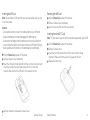
Removing the Back Cover and Installing the Battery
Note: If you do not plan to use the battery for a long time, remove it from
the phone and store it in a cool, dry place.
Hold the Power Key to power off
the phone.
Remove the back cover as shown.
Carefully insert the battery with
the contacts located against the
metal springs.
Push down the battery until fully seated.
Replace the cover on the back of
the phone.
Removing the Battery
Hold the Power Key to power off the phone.
Remove the back cover.
Use the SIM card notch to lift the end of the
battery to remove it.
Getting Started
1Getting Started
Care and Maintenance ...................................................................................................... 52
General Care ....................................................................................................................... 52
General Guidelines ..........................................................................................................54
CTIA Requirements .........................................................................................................56
Aircraft Safety ..................................................................................................................... 57
Hospital Safety ................................................................................................................... 57
Road Safety .......................................................................................................................... 57
Vehicles Equipped with Airbags ................................................................................58
Declaration of Conformity ........................................................................................... 58
Disposing of Your Phone ............................................................................................... 58
Emergency Service ..........................................................................................................59
HAC Mode ........................................................................................................................... 60
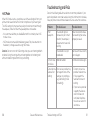
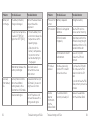
Troubleshooting and FAQs ..............................................................................................61
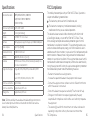
Specifications .........................................................................................................................64
FCC Compliance ...................................................................................................................65
Radio Frequency (RF) Energy ........................................................................................66
Warranty ....................................................................................................................................68
Limited Warranty. ..............................................................................................................69
How to Get Warranty Service .....................................................................................70
Other Warranty Program ..............................................................................................70
Notes ............................................................................................................................................. 71
iv Contents

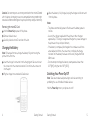
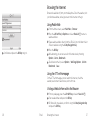
Removing the SIM Card
Hold the Power Key to power off the phone.
Remove the back cover and battery.
Gently remove the SIM card from the card slot.
Inserting the microSD™ Card
Note: This phone can support a memory card with a capacity of up to 32 GB.
Hold the Power Key to power off the phone.
Remove the back cover.
Insert the microSD card carefully with the metal contacts facing
downward. Make sure that the card is fully seated in the slot.
Replace the back cover.
3Getting Started
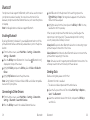
Inserting the SIM Card
Note: You can obtain a SIM card from your service provider when you sign
on as a subscriber.
Caution:
• Do not bend, scratch, or touch the metal contacts of your SIM card.
• Keep the card away from electrical appliances and magnets.
• Disconnect the charger and other accessories from your phone and
remove the battery before inserting or removing the SIM card. Failing to
do so could cause information on the card to be lost or destroyed.
Hold the Power Key to power off the phone.
Remove the back cover and battery.
Insert the SIM card into the card slot with the cut corner facing outward.
Insert the card into the card holder and push it until it clicks into
position. Make sure that the SIM card is fully seated in the slot.
Reinsert the battery and replace the back cover.
2 Getting Started

Caution: Do not attempt to use memory cards other than microSD cards
with this phone. Attempting to use non-compatible memory cards might
cause loss of data or damage to the phone, and may void your Warranty.
Removing the microSD Card
Hold the Power Key to power off the phone.
Remove the back cover.
Carefully slide the microSD card out of the slot.
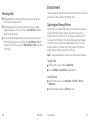
Charging the Battery
Note: For best performance, charge the battery fully prior to using the
phone for the first time.
Insert the charger’s connector into the charging port. Be sure to insert
the connector in the correct orientation. Do not force the connector
into the port.
Plug the charger into a standard AC wall outlet.
4 Getting Started
When the battery is fully charged, unplug the charger and disconnect it
from the phone.
Notes:
• The phone automatically powers off whenever the battery power is
too low.
• Use only the charger supplied with the phone, or other chargers
approved by ZTE. Using an unapproved charger may cause damage to
the phone and may void your Warranty.
• If the battery is completely discharged or has not been used for an
extended period of time, the screen may not display the charge
indicator until the battery has been continuously charged for 10 to
40 minutes.
• Do not attempt to charge the battery at temperatures lower than
32°F (0°C) or higher than 113°F (45°C).
Switching Your Phone On/Off
Note: Take care to observe all posted signs and rules restricting or
prohibiting the use of handheld mobile devices.
Hold the Power Key to turn your phone on or off.
5Getting Started

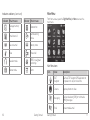
Getting to Know Your Phone
6 Getting Started
7Getting Started
Key Functions
Key Description
OK Key
In lists and menus: This key will activate the currently
selected option.
From the home screen: This key will launch the main menu.
4-Way
Navigation
Key
In lists, messages, and menus: Used to scroll up, down,
left, and right.
From the home screen: Up: Press to start a SMS (text)
message.
Down: Press to open the
Address Book.
Right: Press to access Alarm.
Left: Press to access My Stuff.
Power Key
Hold to turn the phone on/off.
Left/Right
Soft Keys
The bottom line of the display shows the options that can
be selected using the Left and Right Soft Keys. The options
change depending on the application/function being used.
Send Key
Press to dial or answer a call.
From the home screen: Press to show a list of recent calls.
End Key
Press to end a call, reject an incoming call, cancel dialing, or
return to the home screen from any screen.
Task Key
Press to launch the Multitasking screen.
Camera
Lens
Back
Cover
Speaker
Earpiece
Shift Key
Alt Key
Microphone
Micro USB
Charging
Port
Send Key
Volume
Up/Down
Keys
3.5 mm
Headset
Jack
Enter/Return
Key
Delete Key
End Key
Camera Key
Clear Key
Right Soft Key
OK Key
4-Way
Navigation Key
Lock Key
Left
Soft Key
Task Key
Symbols Key
Space
Key
Power Key

8 Getting Started
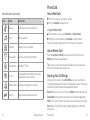
Home Screen
After powering on the phone, when the name of the network is displayed
on the screen, the phone is in the home screen and ready for use.
The display has four areas:
Indicators and Icons
9Getting Started
Indicators and Icons area
Date and Time area
Text and Graphics area
Soft Key function indicators
Indicator What it means
Signal strength
3G network
EDGE network
GSM network
Indicator What it means
New SMS (text)
message
New MMS
(multimedia)
message
New email message
Key Description
Clear Key
Delete characters when entering text.
Volume Up/
Down Keys
Adjust the volume of the phone.
Camera
Key
From the home screen: Hold to activate the camera
function.
From within the Camera application in Camera mode:
Take a photo.
From within the Camera application in Camcorder
mode: Start or stop recording.
Space Key
Add a space when entering text.
From the home screen: Hold to activate/deactivate
silent mode with vibration.

10 Getting Started 11Getting Started
Indicators and Icons (continued)
Indicator What it means
Message memory
full
Email inbox full
New voicemail
Mute
Headset mode
Vibrate mode
Indicator What it means
Bluetooth on
Call forwarding
active
Battery status
Missed call
GPRS in use (green
and white)
Alarm
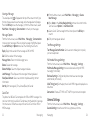
Main Menu
From home screen, press the Right Soft Key for Menu to access the
main menu.
Icon Name Description
AT&T
Navigator
Use the AT&T Navigator GPS application to
get spoken turn-by-turn directions.
Camera Capture photos or video.
Messaging
Send and read text (SMS) or multimedia
(MMS) messages.
Email Access mobile email.
Main Menu Icons

12 Getting Started
How to Make Calls
From home screen, enter a phone number.
Press the Send Key to place the call.
Using the Address Book
From the home screen, select Main Menu Address Book.
Highlight a contact and press the Send Key to call the contact.
Refer to the Address Book section in this manual for more details.
How to Receive Calls
Press the Send Key or OK Key to answer an incoming call. Press the
OK Key to activate the speakerphone.
Tip: If you have connected a headset to the phone, you can press the
button on the headset to answer the call.
Adjusting Your Call Settings
During a call, you can press the Left Soft Key to access in-call options.
The options displayed on the menu will change when certain functions are
activated. The options below will be displayed by default.
Record: Record the current call. Press the OK Key to start/stop recording.
Create Note: Write a note for later retrieval via the Notepad application.
Hold: Put the current call on hold or return to a call previously put on hold.
Go to:
Display the Contacts, Call Log, Messaging, Browser, or Main Menu
during a call.
Phone Calls
13Phone Calls
Icon Name Description
Browser Browse the Internet on your phone.
Music Play the audio file.
Calendar See what’s on your calendar.
Recent Calls Check the call log and call duration.
Data Balance Auto dials *777*3#.
My Stuff
View applications and tools such as Alarm,
Notepad, Calculator, and more.
Address Book Add, edit, and manage your contacts.
Settings Set up and personalize your phone.
Main Menu Icons (continued)

DTMF off: Enable or disable DTMF tones (touch-tone sounds).
End Call: Disconnect the current call.
Adjusting the Volume
During a call, press the Volume Up/Down Keys to adjust the earpiece or
speaker volume.
Recent Calls
With this feature, you can check the call log and call duration.
From the home screen, select Main Menu Recent Calls.
There are four tabs on the Screen: All Calls, Missed Calls, Dialed Calls,
and Received Calls. Press the Left Soft Key for Options and select Call
Timers to check the call timer.
Note: Call logs can also be accessed by pressing the Send Key from the
home screen.
14 Phone Calls
You can store contacts with multiple phone numbers and email
addresses, as well as a physical address and additional details.
The phone can store up to 1000 items. Your SIM card can store contact
information as well; however, a SIM card may not be able to save all of the
contact fields supported by the phone. Check with your service provider
for more details about your SIM card, including its capacity.
Adding a New Contact
Select Main Menu Address Book Left Soft Key for Options
New Contact.
Enter the contact information into the appropriate fields.
Press the OK Key to save the new contact.
Importing/Exporting Contacts from/to the SIM Card
Select Main Menu Address Book Left Soft Key for Options
Settings SIM Management.
To export contacts, select Copy contacts to SIM card. To import
contacts, select Copy contacts from SIM card.
Highlight a contact and press the OK Key, or choose Select All.
Press the Left Soft Key for Done. Press it again for Yes.
Address Book
15Address Book

Performing a Speed Dial
Note: The 1 Key is reserved for the Voicemail number.
From the home screen, hold the corresponding Number Key (2 to 9) in
the speed dial list to make the call.
Press the End Key to end the call.
Using Address Book Entry Options
From the home screen, select Main Menu Address Book.
Scroll to the desired contact and press the Left Soft Key for Options to
reveal the following menu settings.
Send Message: Send SMS or MMS messages to the highlighted contact.
Call: Call the highlighted contact.
New Contact: Create a new contact.
Edit: Edit the highlighted contact’s information.
Send Contact Info: Send the contact information formatted as a
business card via MMS message or in an email.
Delete: Delete the highlighted contact.
Add to Group: Add the highlighted contact to a group: Colleagues, Family,
Friends, and more.
Searching Contacts
Select Main Menu Address Book to view all contacts.
Enter a letter, and the phone will display all contacts whose first names
begin with that letter. For example, to search for “Sam Green,” press the
S Key once. All first names starting with “S” or “s” will be displayed.
Note: If you have changed the Display Order setting on your phone to
show last name first (e.g. “Green, Sam”), then the search function will
display all contacts whose last names begin with the letter(s) you enter. In
this example, typing the G Key would result in the contact being displayed.
You can refine a search by entering one or more letters that appear
subsequent to the first letter in the contact’s name. For example, typing
“JN” into the search field will return contacts named “John” and “Julian,”
but not “James.”
Configuring Speed Dial
From the home screen, select Main Menu Address Book.
Use the 4-Way Navigation Key to select a contact, press the Left Soft
Key for Options. Scroll down to Set as Speed Dial. Press the OK Key
to select.
Press Up or Down on the 4-Way Navigation Key to select an
Unassigned slot. Press the OK Key Left Soft Key for Yes to assign the
speed dial number.
Press the Right Soft Key for Back to return to the previous menu or
press the End Key to return to the home screen.
16 Address Book 17Address Book

Multi-Select: Apply an action to all of the contacts you select. You have
three options:
Send Message: Send an SMS or MMS message to all of the
selected contacts.
Send Email: Send an email to all of the selected contacts.
Delete: Delete all of the selected contacts.
Set as Speed Dial: Assign the highlighted contact to one of the Speed
Dial positions.
Settings: Change global Address Book settings. You have five options:
AT&T Address Book: Open AT&T address book to view the contacts.
SIM Management: Copy contacts to or from the SIM card, or delete
contacts from the SIM card.
Display Order: Choose the order in which names are displayed and
sorted (First&Last or Last&First).
Speed Dial: View and edit the Speed Dial list.
Memory Info: View current available memory and total capacity of the
phone’s internal memory as well as the SIM card.
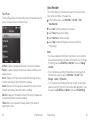
Entering Text
To enter letters, press the letter keys on the keyboard.
While on the home screen, you can use the 4-Way Navigation Key to
access shortcuts:
• Press up to start a SMS (text) message.
• Press down to open the Address Book.
• Press right to access Alarm.
• Press left to access My Stuff.
Shift Key
Alt Key
Symbols Key
Enter/Return Key
Delete Key
Clear Key
OK Key
4-Way
Navigation Key
Space Key
18 Address Book 19Entering Text

Press (Shift Key) to switch the uppercase and lowercase letters. Press
the Shift Key twice to change to all caps.
Press (Alt Key) to enter a number or alternate character shown on a
key. Press the Alt Key twice to change to numeric mode.
To enter symbols, press (Symbols Key), then use the 4-Way
Navigation Key to locate a symbol. Press the OK Key to enter the symbol.
To move the cursor, press the 4-Way Navigation Key.
To delete the character before the cursor, press (Delete Key) or the
Clear Key. Hold the Delete Key or the Clear Key to delete all characters
before the cursor.
To enter a carriage return, press (Enter/Return Key).
To enter a space, press (Space Key).
Messaging
This phone supports the following message types:
• Text Messages (SMS)
• Multimedia (Picture) Messages (MMS)
Short Message Service (SMS) lets you send and receive text messages to
and from other mobile phones and email addresses.
Multimedia Message Service (MMS) lets you send and receive
multimedia (picture and video) messages to and from other mobile
phones and email addresses.
Note: These features require subscription-based messaging plans.
Charges may apply. Contact your service provider for more information.
SMS and MMS Messages
Sending a New SMS Message
Select Main Menu Messaging Create New Message.
Enter a name, mobile phone number, or press the OK Key to choose
the message recipient(s) from the Address Book.
Press down on the 4-Way Navigation Key to move the cursor to the
Text field.
Enter your message. Press down on the 4-Way Navigation Key to add a
picture, audio, or video file.
Press the OK Key to send the message.
Note: To save an unfinished message, press the Left Soft Key for
Options Save as Draft to save it to the Drafts folder. You can edit and
send the message at a later time.
20 Entering Text 21Messaging

Viewing a Message
The envelope icon ( ) will appear at the top of the screen to notify you
that you have received a new message, and a message alert will pop up.
Press the OK Key to view the message, or, from the home screen, select
Main Menu Messaging Conversations to check your messages.
Message Options
From the home screen, select Main Menu Messaging Conversations
to access your messages. While any single message is highlighted, press
the Left Soft Key for Options to access the following menu items.
Reply: Reply to the sender of the message via SMS or MMS.
Call: Call the sender of the message.
Message Menu: Return to the Messaging menu.
Delete: Delete the message.
Delete Multiple: Select multiple messages to delete.
Lock Message: This will prevent the message from being deleted.
View/Save Contact: Save a new contact or update existing contact
information.
Sort by: Sort messages by Time, Unread/Read, or Sender.
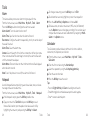
Quick Text
The phone has 10 Quick Text templates for SMS and MMS messages. You
can insert commonly used Quick Text phrases into the body of a message
for convenience. Follow these steps to insert Quick Text into an SMS or
MMS message.
23Messaging
From the home screen, select Main Menu Messaging Create
New Message.
Press down on the 4-Way Navigation Key to move the cursor into the
Text field. Select Options Insert Quick Text.
Select a Quick Text message from the list and press the OK Key to
insert it.
Edit your message as desired.
Text Message Settings
Text Message Center Number: Service center number given to you by
your service provider.
Multimedia Message Settings
From the home screen, select Main Menu Messaging Settings
Multimedia Message Settings to access advanced settings for MMS
messaging functionality.
Retrieval Settings: Configure the phone to retrieve new messages
automatically or manually.
Slide Timing (sec): Set the play time of each MMS image when played as a
slide show.
Connection: Choose ATT MMS or ATT WAP for your connection option.
General Settings
From the home screen, select Main Menu Messaging Settings
General Settings to set the text font size, signature, and more.
22 Messaging

Voicemail
Voicemail Settings
From the home screen, select Main Menu Messaging Settings
Voicemail to determine the number to dial to retrieve your voice
messages. Your voicemail phone number is preset by your service
provider. You do not need to set it manually.
Retrieving a Voicemail
The new voicemail icon ( ) will appear at the top of the screen to
notify you that you have received a new voice message, and a message
alert will pop up. Press the OK Key to listen to the voice message, or,
from the home screen, hold the 1 Key to automatically dial the voice
mailbox number.
Note: Voicemail features and options vary depending on your service
provider. Contact your service provider for more information.
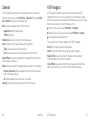
Email
Setting Up Your Email Account
With the Email application, you can access your email from various
providers including AOL
®
, Yahoo!
®
Mail, Gmail™, AIM,
®
and Hotmail.
®
From the home screen, select Main Menu Email.
Select the name of your email provider. (The following steps will vary
depending on your provider.)
If your email provider is not listed, scroll down and select Other
Providers. Follow the on-screen instructions.
Enter your email address and password.
24 Messaging 25Email

Scroll down and press the OK Key to sign in.
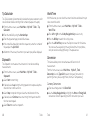
Browsing the Internet
Browse the web directly from your mobile phone. Check the weather, visit
your favorite websites, and enjoy access to the Internet on the go.
Using Mobile Web
From the home screen, select Main Menu Browser.
Press the Left Soft Key for Options and select New Link [*] to enter a
website address.
Type a website address directly into the URL field, or, scroll down the list
of recent websites using the 4-Way Navigation Key.
Press the OK Key.
While browsing, you can access a list of favorite sites by choosing
Options Go to Bookmarks.
To add a site to the list, select Options Web Page Options Add to
Bookmarks Save.
Using the ATT.net Homepage
On the ATT.net homepage, you can search the Internet, check the
weather, read current news stories, and much more.
Visiting a Website from within the Browser
From any web page, press the Left Soft Key and select New Link [*].
Enter a web address and press the OK Key.
To follow a link on a website, scroll to it using the 4-Way Navigation Key
and press the OK Key.
27Browsing the Internet26 Email

Your phone includes support for Bluetooth, which can be used to connect
your phone to a wireless headset. You can also use it to transfer files
between your phone and other Bluetooth devices, such as another phone
or a laptop.
Note: Not all applications and devices support Bluetooth.
Enabling Bluetooth
By default, Bluetooth is disabled. If you enable Bluetooth and turn off the
phone, Bluetooth will be automatically enabled when you turn the phone
back on.
From the home screen, select Main Menu Settings Connection
Settings Bluetooth.
Press the OK Key to turn Bluetooth on. You will see (Bluetooth icon)
displayed at the top of the screen.
Highlight Visibility and press the OK Key. Select Visible or Visible for
60 sec.
Highlight My Device and enter the phone name.
Note: Setting Visibility to Visible or Visible for 60 sec will allow compatible
devices to find your phone.
Connecting to Other Devices
From the home screen, select Main Menu Settings Connection
Settings Bluetooth Search for Devices.
Press the OK Key to search for available Bluetooth devices.
Bluetooth
29Bluetooth
Wait 60 seconds for the phone to finish searching, or press the
Right Soft Key for Stop if the target device appears in the list before
60 seconds have elapsed.
Highlight a device from the list and press the OK Key for Pair. You may
be asked to confirm a passkey.
When you pair your phone with another device, you will be given the
option to set incoming security. There are two options for incoming
security: Always Ask and Always Connect.
Always Ask: Require the other Bluetooth device that is connecting to your
phone to request connections in the future.
Always Connect: Authorize the other Bluetooth device to connect to the
phone without requesting in the future.
Note: Some devices don’t support automatic Bluetooth connections. You
will always need to connect manually with these devices.
Sending Data
Before sending data, please confirm that:
• Bluetooth function is enabled.
• The device is visible and paired with the other device.
Open the file you wish to send. Press the Left Soft Key for Options
Send Via Bluetooth.
Select the destination device from the list, and press the OK Key to
send the file.
28 Bluetooth

Receiving Data
Enable Bluetooth function and pair the phone with the device from
which you wish to receive the file.
When the paired device tries to send a file to your phone, a popup
dialogue will appear in your screen. Press the Left Soft Key for Yes to
authorize the connection.
You will see another popup asking you to accept or reject the specific
file that the other device is sending. Press the Left Soft Key for Yes to
accept the incoming file, or press the Right Soft Key for No to reject the
incoming file.
The Camera feature allows you to take photos and shoot video clips. Z432
also features a Voice Recorder for capturing notes.
Capturing and Viewing Pictures
Your phone has an integrated digital camera, which allows you to capture
images. Photos taken with the camera can be stored in the phone’s
memory or on the microSD card. You can share these photos via MMS
message, email, or Bluetooth, or use them as the background wallpaper
for the phone or as an avatar for an Address Book contact. The photo
browser will allow you to delete, zoom, rotate, rename, and frame the
photos stored on the phone and the microSD card.
Note: The preloaded images on the phone cannot be shared or deleted.
Taking a Photo
From the home screen, hold the Camera Key.
Press the OK Key or Camera Key to take the photo.
Viewing Pictures
From the home screen, select Main Menu My Stuff Pictures
My Pictures.
Highlight a photo and press the OK Key to view it.
Entertainment
30 Bluetooth 31Entertainment
Page is loading ...
Page is loading ...
Page is loading ...
Page is loading ...
Page is loading ...
Page is loading ...
Page is loading ...
Page is loading ...
Page is loading ...
Page is loading ...
Page is loading ...
Page is loading ...
Page is loading ...
Page is loading ...
Page is loading ...
Page is loading ...
Page is loading ...
Page is loading ...
Page is loading ...
Page is loading ...
Page is loading ...
-
 1
1
-
 2
2
-
 3
3
-
 4
4
-
 5
5
-
 6
6
-
 7
7
-
 8
8
-
 9
9
-
 10
10
-
 11
11
-
 12
12
-
 13
13
-
 14
14
-
 15
15
-
 16
16
-
 17
17
-
 18
18
-
 19
19
-
 20
20
-
 21
21
-
 22
22
-
 23
23
-
 24
24
-
 25
25
-
 26
26
-
 27
27
-
 28
28
-
 29
29
-
 30
30
-
 31
31
-
 32
32
-
 33
33
-
 34
34
-
 35
35
-
 36
36
-
 37
37
-
 38
38
-
 39
39
-
 40
40
-
 41
41


Ask a question and I''ll find the answer in the document
Finding information in a document is now easier with AI