
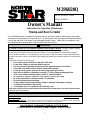
1
Owner's Manual
Instructions for Operation, Maintenance
Stump and Root Grinder
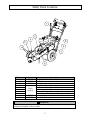
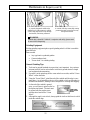
Your NorthStar grinder is intended for outdoor-use only and can be used to remove many tree stumps
and exposed root systems close to ground level. By moving the wheel in sweeping movements laterally
over the top and front of the stump, you can gradually grind it away. Make sure you completely read
and understand this manual before using the grinder for the first time.
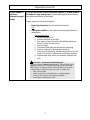
WARNING
READ and UNDERSTAND this manual completely before using the grinder! Failure to properly operate,
and maintain this grinder could result in serious injury or death to the operator or bystanders.
All machines have hazards associated with their operation. This stump grinder has certain special hazards,
which you must be aware of. As an operator or owner you have a duty to be aware of these hazards and know
preventive measures to take to avoid them. When reading this manual pay particular attention to avoiding these
hazards.
In particular, be aware of the following:
• Know location of buried electrical and other utility lines.
• Do not allow children or untrained adults to operate.
• Wear eye protection and other personal protection against flying rocks and debris.
• Check that cutter wheel teeth are secured, sharp and not missing.
• Do not operate if operator presence bar fails to stop engine upon release.
• Make sure no children or bystanders are within 75' (feet) of stump grinding operation.
• Protect cars, windows and other objects within 75' from flying debris.
• Be prepared for machine “kickback” when initially contacting the stump.
• Be aware of potential for carbon monoxide (CO) poisoning.
• Prevent fires/explosions from fueling.
• Do not attempt to perform adjustments, declog or clean unit while engine is running.
• Avoid burns from engine or hot exhaust.
• Avoid using in wet or icy conditions where falls may occur.
Details about these hazards are found throughout the manual and are summarized at the end of the manual under
“Important Safety Information.”
STOP!
ADD ENGINE OIL: Your stump grinder comes fully assembled and requires only that you add engine oil to crankcase
and fuel to tank.
INSPECT COMPONENTS: Closely inspect to make sure no components are missing or damaged. See the “Receiving
Your Unit” section for instructions on whom to contact to report missing or damaged parts.
Any Questions, Comments, Problems, or Parts Orders
Call your dealer or NorthStar Product Support 1-800-270-0810
MODEL NUMBER: 296020
SERIAL NUMBER: _____________
M296020Q

Hazard Signal Word Definitions
2

Table of Contents
3
Part I. Introduction
About Your Grinder ............................................................................................................. 4
Safety Decal Locations ........................................................................................................... 5
Safety Decals ........................................................................................................................... 6
Transporting & Receiving:
1. Receiving Your Unit ..................................................................................................... 7
2. Towing Instructions ...................................................................................................... 7
Machine Component Identification ...................................................................................... 8
Part II. Operation
Operation:
1. Pre-Start Check List & Procedures ...............................................................................9
2. Starting the Grinder .......................................................................................................11
3. Stopping Engine ............................................................................................................13
4. Grinding Stump .............................................................................................................13
5. Refueling ......................................................................................................................15
6. Storing Machine ............................................................................................................16
Part III. Maintenance and Repair
Maintenance (To be done by owner or rental dealer) .............................................................18
1. Belt Tension Adjustment............................................................................................. 20
2. Stop-Switch Adjustment ............................................................................................. 21
3. Setting & Sharpening Teeth ........................................................................................ 21
4. Schedule ...................................................................................................................... 24
Specifications ......................................................................................................................... 25
Part IV: Important Safety Information
Summary of Important Safety Information for Operation ............................................... 26
Special Safety Information on Static Electricity ................................................................ 29
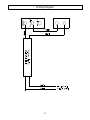
Parts Explosion ......................................................................................................................... 30
Wiring Diagram ....................................................................................................................... 32
Warranty .................................................................................................................................... 33
California Proposition 65 Information ............................................................................ 34

About Your Grinder
4
Thank you for purchasing or renting your NorthStar grinder!
Owner/Operator/Renter Training
Read and follow all instructions and safety precautions presented throughout this manual. A summary of
important safety information can be found at the end of the manual. Keep this manual for reference and
review. If the owner of this unit is different than the operator, give a copy of this manual to any
operator to read.
Rental Companies
All persons to whom you rent/loan this grinder must have access to this manual and read it. Check the
tube on the side of the unit to make sure a manual is inside. Advise all persons who will operate the
machine to read it. You should also provide personal instruction on how to safely operate the grinder and
remain available to answer any questions a renter/borrower might have. If videos are available, have
renter watch training video.
Engine Instructions
For detailed Engine operation and maintenance information, always refer to the engine Owner's Manual
furnished with the grinder.
Product Suitability
Before using, the user shall determine the suitability of this product for this intended use and assumes
liability therein.
Your NorthStar grinder can be used to remove many tree stumps and exposed root systems close to
ground level. By moving the wheel in sweeping movements laterally over the top and front of the stump,
you can gradually grind it away. Make sure you completely read and understand this manual before using
the grinder for the first time. If you have any questions, contact your retail or rental dealer or NorthStar
Product Support at 1-800-270-0810.
WARNING: Never attempt to cut on a slope exceeding 15.
Exercise caution when cutting stumps on an incline, as the machine may shift or slide unpredictably. Never
attempt to cut with the machine uphill or downhill from you as it may slide toward you or you may fall
toward the machine. Cut only on a slope from the side.
˙
NorthStar is constantly improving its products. The specifications outlined herein are subject to change
without prior notice or obligation. The purchaser and/or user shall assume liability for any modification
and/or alterations of this equipment from original design and manufacture.
Contact NorthStar Product Support at 1-800-270-0810 for any questions about the appropriate use
of this grinder or about optional accessories.
Warranty Registration
Please fill out and submit the warranty registration card so that we have your contact information for any
future product literature or replacement parts you may need.

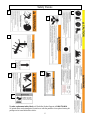
Safety Decal Locations
5
Reference #
Part #
Description
2
784291
Flying Debris Hazard (direction)
3
784079
Tow Position
7
783540
Control Panel
1
799611
decal kit
Flying Debris Hazard (person)
4
Amputation and Entanglement Hazard
--
---
6
Poisonous Gas Hazard
8
Personal Injury / Fire, Explosion / Entanglement Hazards
9
786635
Burn Hazard
10
799952
Spark-Strike Warning
WARNING
ALWAYS make sure safety labels are in place and in good condition. If a safety label is
missing or not legible, order new labels.

Safety Decals
6
To order replacement safety labels, call NorthStar Product Support at 1-800-270-0810.
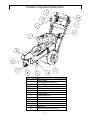
All grinder units can be transported via trailers or with the purchase of an optional towing kit
package can be towed behind the vehicle.
2
1
3
6
7
8
4
9
10

Transporting and Receiving
7
1. Receiving Your Unit
For all Units
You should inspect the grinder immediately after you receive delivery.
See the “Machine Component Identification” section of this manual for a
diagram of the grinder and its components.
If you have missing or damaged components, please contact NorthStar Product
Support at 1-800-270-0810.
New Unit: Truck
Delivery
Depending on your unit and model, it may have been shipped on a wooden skid,
cardboard container or other appropriate method.
If any assembly is required. Separate assembly instructions will be included.
New Unit: From a
Dealer
Your unit should have been delivered completely assembled and ready to run.
Read the “Operation: Preparing for Operation” section (page 9), and verify that the
unit has been properly “prepped” before initial use.
Factory Delivery
In these cases, your unit has been completely assembled, tested and pre-run.
It should be ready for usage. See “Pre-Start Checklist and Procedures”.
2. Towing Instructions
On Towable
Models
Optional tow
package:
Item # 296022
Each state has legal requirements for towing equipment and trailers (such as lighting
and licensing). Be sure receiver on towing vehicle is bolted tightly. Towing vehicle
capability must be matched to trailer weight and type of hitch arrangement.
1. Review towing safety instructions in
your vehicle manual.
2. Attach grinder to vehicle hitch using
only a 2" ball.
3. Be sure the tow bar is bolted tightly to
the towing vehicle receiver.
4. Position tow bar into socket, then
insert lock pin with safety clip.
5. Be sure that the stump grinder safety
chains are hooked, closed and locked to
the towing vehicle by using the
coupling links.
6. Make sure the grinder wheel lug nuts
are fastened tightly, tires are fully
inflated and in good repair.
WARNING:
Do not tow over 45 mph unless a higher speed rated trailer is being used.

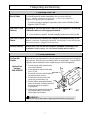
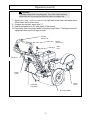
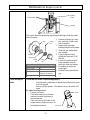
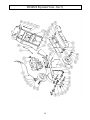
Machine Component Identification
8
Reference #
Description
1
Control Panel
2
Pin Adjustment Handle Bar
3
Tire and Hub
4
Discharge Flap
5
Belt Guard
6
Tooth Pocket
7
Cutting Tooth
8
Cutter Wheel Disc
9
Cutter Guard
10
Throttle Control Lever
11
Engine
12
Adjustable Brake Lever
13
Handle Bar
14
Operator Presence Handle Bar

Operation
9
1. Pre-start Check List & Procedures
CAUTION:
Add engine crankcase oil. A new engine is shipped without oil. You must add the correct
amount of oil to engine crankcase or engine will be damaged beyond repair.
Before starting the engine you will want to make sure you have completed the following:
1. Marking Underground Utilities
2. Checking Controls
3. Checking/Adding Oil
4. Filling Stump Grinder Gasoline Tank
5. Inspecting Fuel System for Leaks
6. Adjusting Handle Bar
7. Wearing Personal Protection
8. Trimming Stump with Saw
9. Clearing Area of People and Objects
10. Working During Daylight
Each of these procedures is discussed in detail below.
Marking
Underground
Utilities
Call 811 or your local utility company to request marking utilities 3
days before stump grinding. Trees can grow on top of and around
underground wiring that was installed many years before a tree was
planted.
Check controls.
Check that:
• All guards are in place and tight
• Operator presence bar switch is free moving.
• Inspect tires and rims for looseness, damage, and tire inflation.
Check cutting teeth
Inspect cutting teeth for tightness and sharpness. Only use factory-approved
parts for repair.
Check/add oil
Check the oil level using the dipstick and add oil as needed daily.
Using a funnel, add oil up to the FULL mark on the dipstick with the
recommended oil type for your engine and expected ambient conditions.
(See engine Owner's Manual for oil type and capacity, and more detailed oil
check/fill instructions.)
WARNING: Burn hazard
Never open oil fill port while engine is running. Hot oil can spray
over face and body.
˙

Operation (cont’d)
10
Fill stump grinder
gasoline tank
Check the gasoline level in the grinder's fuel tank. If needed, fill tank with
fresh unleaded gasoline from a portable container, after first reading the
warnings and instructions below.
- Do NOT fill the gas tank to the top. Gasoline may spill when operating
on a slope.
- Do NOT overfill the gasoline tank. Allow at least 1" of empty space
below the fill neck to allow for fuel expansion.
WARNING: Gasoline fire/explosion hazard
Gasoline is highly flammable and explosive. Heat, sparks, and
flames can ignite gasoline vapors, which can become widespread
during fueling. A flash fire ignition and/or explosion could result
and cause serious injury or death. The following conditions could
result in gasoline ignition/explosion:
• gas vapor collection inside enclosures
• static electric sparks
• sparks from electric wiring, batteries, or running engines
• sources of heat (such as a hot engine or exhaust)
• open flames, including pilot lights
Inspect Fuel
System / Check for
Leaks
Inspect fuel system & check for leaks BEFORE starting grinder.
WARNING: Fuel leak hazard
A leaking fuel line no matter how small can be the source of a fire or
explosion when starting or operating the engine.
• Inspect the entire fuel system. Look for: Signs of leaks or deterioration,
chafed or spongy fuel hose, loose connections, loose or missing fuel
hose clamps, damaged gasoline tank, or defective gasoline shut-off
valve.
If grinder is in an enclosed area and you smell gas, DO NOT start
engine! DO NOT light a match. DO NOT flip on an electrical
switch. Exit area immediately leaving doors open and call fire
department.
Adjust Handle Bar
Handle bar may have to be adjusted to accommodate for the height of stump
or desired depth. When grinding above or below ground level, adjust handle
bar for better control and comfort. Note: Your stump grinder should not be
used more than 10 inches maximum below ground
Personal Protection
Use approved protective clothing and approved protective equipment
when using the machine.
1) Always wear ANSI-approved and OSHA-compliant safety glasses
with side shields and a full-face shield.
2) The use of ear plugs or other hearing protection device is also
recommended for persons working within 15-20 feet of the running
grinder for longer than a few minutes. Hearing can be damaged from

Operation (cont’d)
11
prolonged, close-range exposure to the type of noise produced by this
grinder.
3) Wear long pants to protect legs from sparks, hot engine and flying
debris.
4) Never wear jewelry or loose-fitting clothing when starting or
operating the grinder or any mechanical device. Loose or dangling
apparel, jewelry or hair can become entangled in moving parts.
Trim Stump with
Saw
Cut or trim the stump preferably to ground level using a power saw.
Clear Area
Dig away the earth and remove any stones near the tree stump or roots that
may interfere with your work.
Work During
Daylight Hours
Only use the machine in daylight or in well-lit conditions. Never operate
the grinder after dark.
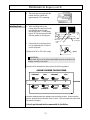
2. Starting the Grinder
After you have completed the pre-start checklist and procedures, you are ready to start the
grinder.
The following directions detail how to start the engine of your grinder.
WARNING:
Never attempt to use the grinder without proper protective equipment,
particularly eye protection and a full-face shield.
To start the grinder:
Note: For additional engine starting instructions see your Honda engine manual.
1) Before starting you should raise or lower the handle bar to a comfortable position to
accommodate the height of the stump you will be grinding.
2) Place stump machine into position with cutting wheel near the front-top edge of the stump.
3) Use lever on handle to lock the one wheel brake.
Note: For tighter brake adjustment, turn knob on top of brake lever. (See Maintenance and
Repair section for instructions.)
WARNING:
Stay in the OPERATOR POSITION while actuating controls. Never leave grinder unattended.
4) Pull Engine Switches to the ON/RUN position on engine and on the control panel.
5) Pull choke if engine is cold. If engine is hot, do not use choke.
6) Grip Operator presence bar & Grinder handle bar together in left hand.

Operation (cont’d)
12
WARNING:
A rotating cutting wheel is very dangerous. Stay at the controls and keep
others away until you are sure the wheel has come to a complete stop.
7) Rapidly pull “Start” cord (recoil starter) with right hand several times until engine starts.
Allow starter cord to return slowly.
8) If engine does not start, repeat steps 5-7.
9) Press down handle bar to lift cutter wheel off the ground.
10) Grip throttle lever and grinder handle bar together in right hand. Centrifugal clutch will
engage and cutter wheel will begin to rotate.
Handle bar
adjustment
Cutting
wheel
Brake
lever
Operator
presence bar
Handle bar
Throttle
control lever
Engine
switch
Recoil start handle

Operation (cont’d)
13
3. Stopping the Engine
Stop the engine using the following steps:
1. While holding cutting wheel off ground,
release the operator presence bar. Wait
until the cutting wheel completely stops.
Lower the cutting wheel so it is resting
against the ground.
2. Make sure brake is set before leaving the
controls, particularly if you are on an
incline.
3. Turn engine switch to OFF position.
4. Allow the engine to cool for at least 5
minutes before releasing brake and
moving to storage or transporting. A hot
engine can be a fire hazard.
4. Grinding the Stump
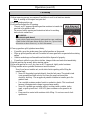
WARNING: Flying Debris Hazard
Stones, chips, and debris can cause serious injury or property damage.
Debris can fly 75 ft. in any direction out of the chute. They can bounce off
any fixed objects as well and hit operator, bystanders or breakable objects.
1. Set/engage the brake.
Note: Always make sure the cutting teeth are not in contact with anything before operating the
throttle lever. Damage can occur to clutch if the cutting wheel is not free to rotate when the
throttle is activated.
2. Pivot the grinder toward the side of the stump with the cutter wheel off the ground, and not
touching the stump. Hold down throttle control lever and allow the cutting wheel to begin
turning. Once the cutting wheel has reached full speed, lower it approximately 1/2" to 1" into
the front-top corner of the stump. Slowly pivot the cutting wheel back and forth, lowering the
cutting wheel approximately 1/2" to 1" before each sweep, until you have removed the front
portion of the stump to ground level.
WARNING: Rotating cutter wheel.
Keep hands and feet away. Contact with cutter wheel rotating teeth will
cause serious personal injury.
Note: If the engine bogs down at any point while grinding, move the cutter wheel away from
stump and allow cutter wheel to come back up to full speed before you resume grinding.
3. Raise cutting wheel until center of wheel is just above top of stump.
4. With cutting wheel off to one side, advance the machine horizontally by releasing and resetting
the brake. Advance the machine forward to engage the cutting wheel into the stump so that
when swept across the stump it will remove 1/2" to 1" of stump with each sweep.
Operator
presence bar

Operation (cont’d)
14
5. Sweep the cutting wheel across the stump, cutting away 1/2" to 1" of stump.
6. Advance cutting wheel 1/2" to 1", and sweep again across stump in opposite direction.
7. Continue sweeping cutting wheel left and right across stump, advancing it before each sweep,
cutting 1/2" to 1" depth of stump with each sweep.
8. Cut complete stump flush with ground, then go back and cut to further depth, if desired.
Chip Build-up
9. When grinding larger stumps, chips may begin to build up under the wheels.
• Release brake and pull machine towards you so that the “chip pile” is directly under
the cutting wheel.
• Drop cutter wheel down on “chip pile”, material will be discharged from machine
area.
WARNING: Flying Debris Hazard
Stones, chips, and debris can cause serious injury or property damage.
Debris can fly 75 ft. in any direction out of the chute and bounce off objects
and hit operator, bystanders or breakable objects.
• On these larger stumps, DO NOT allow grinder wheels to drop into stump hole. If a hole
is in the way of your progress, fill it with chips or change position.
WARNING:
Stop engine and set brake before leaving operator's position. KEEP BRAKE
ENGAGED except when changing locations.
10. When finished, stop the machine.
11. Pull machine away from stump, and rake chips away from stump.
Chip pile
Cutter wheel
Direction of
grinding
NOT CORRECT
CORRECT
Wheel
Chip pile / debris
Hole

Operation (cont’d)
15
5. Refueling
1) Before removing gas cap, turn engine off and allow to cool for at least two minutes.
Note: A running or hot engine can ignite fuel.
2) Remove grinder gasoline cap.
3) Add gasoline through the fill opening:
- Use only an UL-approved portable gasoline container to transfer the
gasoline to the grinder's tank.
- Be aware of safety warning and instructions below for avoiding
static electric caused fires.
WARNING:
Static electric spark hazard
A static electric spark can explosively ignite gasoline vapor, resulting in
a flash fire that could cause serious injury or death. See “Special Safety
Information on Static Electricity” at end of this manual.
4) Clean up gasoline spills /splashes immediately.
• If possible, move the grinder away from spilled gasoline on the ground.
• Wipe up spilled gasoline, and wait 5 minutes for excess gasoline to evaporate before starting
engine.
• Gasoline soaked rags are flammable and should be disposed of properly.
• If gasoline is spilled on your skin or clothes, change clothes and wash skin immediately.
5) Replace gasoline cap securely before starting engine.
6) Store extra gasoline in a cool, dry place in an UL-approved, tightly sealed container.
7) Filling towable units or portable containers at service stations:
Even if you have a towable unit, avoid static electric sparking while filling the
gasoline tank:
• Never fill the grinder's gas tank directly from the fuel pump. The grinder's tank
is not grounded and high velocity flow from the pump can cause static
electricity build-up. Use an approved portable container to transfer gas to the
grinder's tank.
• Use a portable container made of metal or conductive plastic. This is preferred
because it dissipates static charge to ground more readily.
• Never fill a portable gas container while it is sitting inside a vehicle, trailer,
trunk, or pick-up truck bed. ALWAYS place container on the ground to be
filled.
• Keep nozzle in contact with container while filling. Do not use a nozzle lock-
open device.

Operation (cont’d)
16
6. Storing the Grinder
When you are finished using the grinder and it has cooled, you must:
o Cool engine before storage.
o Clean the grinder.
o Inspect for worn or damaged parts.
o Choose covered storage location.
o Prevent accidental starting.
o Plan on exercising the engine at least monthly unless the grinder is prepared for long-term
storage.
Detailed instructions are provided below.
Cool engine
Let engine cool for at least five minutes before storing. A hot engine can
be a fire hazard.
Clean grinder
Clean all grease, dirt, mud and other foreign matter from the machine.
Touch up paint damage to prevent rust.
Inspect grinder
Inspect the machine for worn or damaged parts and tighten any nuts or
screws that may have become loose. Pay particular attention to the
cutting teeth.
Choose a storage
location
Store the grinder in a location that is:
o Clean and dry
o Away from sources of heat, open flames, sparks, or pilot lights, even
if the grinder's gas tank is empty. Residual gasoline could ignite.
o Away from extreme high or low temperatures.
o Cover it for extra protection
Remove key
Remove key from starter and secure key in a safe location, or remove
spark plug, in order to ensure the grinder cannot be started in a storage
location or by untrained persons or children.
Start grinder every
4 weeks
The grinder should be started regularly. At least every four weeks, start
the engine and let it run for 10 to 15 minutes.
Monthly exercising of the grinder will dry out any moisture that has
accumulated, lubricate cylinders, and clean out old gas in the carburetor.
Moisture, old gas, and dry mechanical parts cause deterioration in stored
engines.

Operation (cont’d)
17
Prepare engine for
long term
(seasonal) storage if
needed
If you will not be able to start the grinder regularly, you must prepare
the engine for long term storage to prevent gum deposits from forming
and causing malfunction of the engine.
Prepare engine for long term storage by:
o Removing all gasoline from the tank and carburetor
OR
o Adding fuel stabilizer to the gasoline (following manufacturer's
instructions)
Fuel stabilizer steps:
1. Ensure gas tank is full.
2. Add fuel stabilizer to fuel tank.
3. Run engine at least 10 minutes after adding stabilizer to
allow it to enter the fuel system.
4. Shut off engine
5. Disconnect spark plug wire and remove spark plug
6. Add one teaspoon oil through spark plug hole
7. Place rag over spark plug hole and turn starter (or pull the
recoil) a few times to lubricate the combustion chamber.
8. Replace spark plug, but do not reconnect the spark plug
wire.
WARNING: Gasoline fire/explosion hazard
Gasoline is highly flammable and explosive. Drain the fuel into an
approved container OUTDOORS and far away from open flame.
NEVER store an engine with fuel in the tank indoors or in poorly
ventilated spaces where fuel vapor can come in contact with
• static electric sparks
• sparks from electric wiring, batteries, or running engines
• sources of heat (such as a hot engine or exhaust)
• open flames, including pilot lights

Maintenance & Repair
18
WARNING
ALWAYS shut off the engine, make sure the engine is cool, and disconnect the spark plug
before cleaning, adjusting, or servicing the grinder. Make sure all guards and shields are
replaced before using.
Maintenance
Perform regular
maintenance
Perform periodic maintenance as directed in this manual to keep the
grinder in safe working condition.
Follow safety rules
Read and follow these safety rules whenever you will be servicing the
grinder:
• Turn off grinder. Always turn off grinder and remove spark plug or spark
plug wire, and disconnect battery on electric start models before working on
the engine or grinder to prevent accidental starting.
• Replace guards/shields. Make sure all guards and shields are replaced after
servicing the grinder.
• Burns. Muffler will be hot even after unit is stopped. Allow unit to cool
before servicing.
• Repair. Major service, including the installation or replacement of parts,
should be performed only by a qualified electrical service technician. Obtain
factory approved parts from NorthStar Service at 1-800-270-0810.
• Replacement parts. If a part needs replacement, only use factory approved
repair parts. Replacement parts that do not meet specifications may result in a
safety hazard or poor operation of the grinder and will void the warranty.
Perform engine
maintenance
Perform engine maintenance as specified in the engine owner's manual.
Engine maintenance items include:
1. Oil and oil filter changing
2. Air filter check/replacement
3. Spark plug cleaning and replacement
4. Fuel filter check/replacement
5. Fuel tank cleaning.
Inspect fuel system
/ check for leaks
Inspect the fuel system and check for leaks on a regular basis.
Look for: signs of leaks or deterioration, chafed or spongy fuel hose, loose
connections, loose or missing fuel hose clamps, damaged gasoline tank, or
defective gasoline shut-off valve.
Lubricate
Cutter shaft bearings and wheel bearings should be greased.
The cutter shaft bearing is greased by pumping grease into zerks located on
the housing of the bearing.

Maintenance & Repair (cont’d)
19
The wheels should be greased by repacking the bearings inside the wheel
hub with grease.
Grease Specification
Soap Type
Lithium Complex
NLGI Grade
#2
Dropping Point
230°C (446°F)
Additives
Corrosion and Oxidation
inhibitors, EP optional
Viscosity Index
80 Minimum
Check and adjust
brake
Check that the brake is functioning properly.
- Lock the brake, push down on handle bar so that cutter wheel
is off the ground.
- Push or pull the grinder- if the brake is loose, the wheel will
rotate.
To adjust braking tension:
- Unscrew set screw.
- Turn knob clockwise to increase
tension or counter-clockwise to
decrease tension.
- Once you have set the brake to the
proper tension, tighten set screw to
lock adjustment knob.
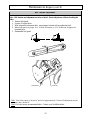
Grease zerks
Cutting
wheel
Bearing
Hub
Cotter
pin
Castle
nut
Dust
cap
Bearing
Washer
1. Remove existing cap, cotter
pin, castle nut, washer, and
hub off spindle.
2. Inspect inner and outer
bearing and pack with grease.
3. Slide hub and washer back
onto spindle.
4. Using a torque wrench,
tighten the castle nut 30-40
foot-lbs.
5. Loosen the castle nut until
loose enough to turn the
castle nut with your fingers.
6. Re-tighten the castle nut
finger tight.
7. Reinstall cotter pin and dust
cap.
Set screw
Knob

Maintenance & Repair (cont’d)
20
Belt Tension Adjustment
Note: Belt tension and alignment are inter-related. Do not adjust one without checking the
other.
1. Remove belt guard.
2. Loosen (4) engine bolts.
3. With long socket extension drive, move engine forward with rear adjusting bolt.
4. When belt tension is proper 11 to 14 ft/lbs of tension, or 3/16” deflection, retighten all
loosened bolts.
5. Reassemble belt guard.
Note: New belts require a “break-in” period of approximately 10 hours. Readjustment may be
necessary after “break-in.”
Note: Use only factory recommended belts. Contact your NorthStar dealer.
Lock nut
Tension bolt
Page is loading ...
Page is loading ...
Page is loading ...
Page is loading ...
Page is loading ...
Page is loading ...
Page is loading ...
Page is loading ...
Page is loading ...
Page is loading ...
Page is loading ...
Page is loading ...
Page is loading ...
Page is loading ...
-
 1
1
-
 2
2
-
 3
3
-
 4
4
-
 5
5
-
 6
6
-
 7
7
-
 8
8
-
 9
9
-
 10
10
-
 11
11
-
 12
12
-
 13
13
-
 14
14
-
 15
15
-
 16
16
-
 17
17
-
 18
18
-
 19
19
-
 20
20
-
 21
21
-
 22
22
-
 23
23
-
 24
24
-
 25
25
-
 26
26
-
 27
27
-
 28
28
-
 29
29
-
 30
30
-
 31
31
-
 32
32
-
 33
33
-
 34
34


Ask a question and I''ll find the answer in the document
Finding information in a document is now easier with AI
Other documents
-
AGT INDUSTRIAL AGT-SSSTG200 Owner's manual
-
Power King PK0803-EH User manual
-
DR Stump Grinder Operating Instructions Manual
-
Toro SGR-6 Stump Grinder User manual
-
Ventrac LC150 Owner's manual
-
-
-
Toro CE Kit, STX-26 Stump Grinder User manual
-
-