Page is loading ...

Assembly Instructions - Important:
Carefully unpack and identify each component before attempting to assemble. Refer to parts list. Please take care when
assembling the unit and always set the parts on a clean, soft surface. If you require any assistance with assembly, parts or
information on other products, please visit our website: www.ofcestar.net or call or write us.
N
E
P
A
S
U
T
I
L
I
S
E
R
D
'
O
U
T
I
L
S
É
L
E
C
T
R
I
Q
U
E
S
O
N
T
H
I
S
P
R
O
D
U
C
T
D
O
N
O
T
U
S
E
P
O
W
E
R
T
O
O
L
S
RV938
April, 2023
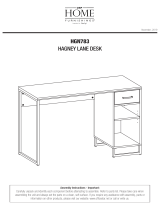
DESK

LIMITED WARRANTY
OSP Home Furnishings® warrants to the original purchaser that this product will be free from defects in material and workmanship as described
below. Home Furnishings® will repair or replace, at its option, without charge to the original purchaser only, defective products or parts for one (1) year
from the date of purchase. Replacement parts can only be supplied if parts are available. Items out of production may be unavailable. This warranty
shall be effective for the applicable time period beginning from the date of purchase as shown on your original sales receipt. This warranty is your sole
remedy for product defects and excludes defects due to or arising in connection with product abuseor misuse, use modication of, or attachments to
the product, and products or parts not used, maintained, or installed in accordance with the company’s installation, maintenance and/or applicable
guidelines. There are no other warranties, express or implied, other than those specically described, including without limitation any implied warranty
of merchantability or of tness for a particular purpose. OSP Home Furnishings® will not be responsible for incidental or consequential damages. Some
states do not allow the exclusion or limitation of incidentalor consequential damages, so the above limitations or exclusions may not apply to you. This
warranty gives you specic legal rights and you may also have other rights which may vary from state to state. Our quality standards are among the
highest in the industry. Sometimes, nomatter how hard we try, there are times when parts are damaged or missing. Our Parts Department will do
everything possible to promptly remedy the problem. Contact us via e-mail parts.department@ofcestar.net by Fax 1-909-930-5629, or toll free parts
number 1-800-950-7262, Monday through Friday 8:00 a.m. - 3:30 p.m. Pacic Time. To make a warranty claim, contact Parts Department.
Provide model number, proof of purchase, description of the problem and obtain return authorization. At its option OSP Home Furnishings® will:
(a) Supply compatible components of current manufacture. (b) Repair the customer’s component. The customer must prepay freight on any
components returned to the factory. Return freight on components still in warranty will be paid by OSP Home Furnishings®.
1. Do not use this product unless all screws and bolts are securely tightened.
2. Check that all screws and bolts are tight every three months or as needed.
3. Dispose of packing material properly. Do not use plastic cover as head covering. It may cause suffocation.
4. Do not use this product as a stepladder.
5. Use this product for its intended purpose only.
6. FOR INDOOR RESIDENTIAL USE ONLY.

PARTS
(C) Divider Panel (1 PC) (D) Right Frame (1 PC)
(E) Bottom Panel (1 PC) (F) Shelf (2 PCS)
(A) Top Panel (1 PC) (B) Left Side Panel (1 PC)
(I) Right Back Panel (1 PC) (J) Left Back Panel (1 PC)
(G) Right Cross Rail (1 PC) (H) Left Back Rail (2 PCS)

PARTS
(M) Drawer Right Side Panel (1 PC) (N) Drawer Back Panel (1 PC)
(O) Drawer Bottom Panel (1 PC) (P) Drawer Support (1 PC)
(K) Front Drawer Panel (1 PC) (L) Drawer Left Side Panel (1 PC)
180°
CAM LOCK INSTALLATION
IMPORTANT NOTE:
Use hand tools only for assembly as power tools may cause damage.
Rubber mallet also needed for assembly (not provided).
Phillips Screwdriver also needed for assembly (not provided).

HARDWARE LIST
NO DRAWING DESCRIPTION QUANTITY
1
2
3
4
5
6
7
9
8
10
11
12
13
14
15
16
Screw 12 PCS + 2 EXTRA
20 PCS + 2 EXTRA
10 PCS + 2 EXTRA
4 PCS + 1 EXTRA
5 PCS + 1 EXTRA
17 PCS + 2 EXTRA
4 PCS +1 EXTRA
22 PCS + 2 EXTRA
2 PCS
22 PCS + 2 EXTRA
1 PC
1 PC
1 PC
1 PC
12 PCS + 2 EXTRA
8 PCS + 1 EXTRA
Screw
Screw
Cam Screw
Cam Screw
Cam Screw
Cam Nut
Cam Nut
Wooden Dowel
Wooden Dowel
Drawer Rail
Drawer Rail
Drawer Rail
Drawer Rail
Plastic Cap
Shelf Pin

STEP 2
STEP 1
(B)
(C)
(C)
(10)
(11)
(11)
(1)
(6)
(6)
(6)
(10)
FULLY TIGHTEN CAM SCREWS (6).
FULLY TIGHTEN CAM SCREWS (6) & SCREWS (1).

STEP 3
STEP 4
(I)
(H)
(H)
(G)
(13)
(10)
(D)
(5)
(6)
(1)
FULLY TIGHTEN CAM SCREWS (5 & 6) AND SCREWS (1).

STEP 5
STEP 6
(B)
(B)
(H)
(H)
(C)
(8)
(15)
(8)
(15)
FULLY TIGHTEN CAM NUTS (8).
FULLY TIGHTEN CAM NUTS (8).

STEP 7
STEP 8
(B)
(E)
(3)
(C)
(I)
(G)
(C)
(8)
(15)
FINISHED EDGE
FULLY TIGHTEN SCREWS (3).
FULLY TIGHTEN CAM NUTS (8).

STEP 9
STEP 10
(A)
(6)
(B)
(8)
(15)
(A)
(C)
(I)
(G)
FULLY TIGHTEN CAM SCREWS (6).
FULLY TIGHTEN CAM NUTS (8).

STEP 11
STEP 12
(8)
(I)
(D)
(G)
(A)
(15)
(I)
(J)
(2)
(A)
DETAIL A
1mm
1mm
FULLY TIGHTEN CAM NUTS (8).
ALIGN LEFT BACK PANEL (J) TO ASSEMBLY (SEE DETAIL A). FULLY TIGHTEN SCREWS (2).

STEP 13
STEP 14
(16) (F)
FINISHED EDGE
(K)
(4)
(L)
(M)
(9)
FULLY TIGHTEN CAM LOCK SCREWS (4).

STEP 15
STEP 16
(L)
(P)
(15) (7)
(M)
(M)
(L)
(O)
FULLY TIGHTEN CAM NUTS (7).

STEP 17
STEP 18
(M)
(3) (L)
(N)
(P)
(12)
(12)
(1)
(14)
(14)
(M)
(N)
(L)
FULLY TIGHTEN SCREWS (3).
FULLY TIGHTEN SCREWS (1).

STEP 19
(K)
/