Page is loading ...

For Technical Support/Warranty Information please call 800-757-7075
EGR Inc., 4000 East Greystone Drive, Ontario, CA 91761
Installation Instructions
Front and Rear Bolt-On Look Fender Flares
TOYOTA TACOMA (16-On) FF789
( Fits with or without factory installed Fender Flares, but without factory Mud Guards )
Hardware Included QTY Hardware Included QTY Bolt Kit Included QTY
Extrusion 26.0 ft
“X” stamped Short Clip 4 Nuts 34
Alcohol Towelette 4 Hooked end Short Clip 2 Allen Key Bolts 34
Hooked end Long Clip 2
Important: Please read instructions entirely before installing this product.
STEP 1:
Attach bolts and nuts to each Fender Flare
using a 3/16” Allen key and a 10mm wrench/socket
(wrench /socket and Allen key not supplied).
Ensure inside of Fender Flares where the rubber seal
is attached is clean, using the alcohol wipes provided.
Wipe away any residue with a dry clean cloth.
STEP 2:
Attach the included rubber seal to the Fender
Flares along the top leading edge where the Flare will
make contact with the vehicle body. Peel back 2” of the
adhesive backing and apply the double sided tape to
the inside surface of the Fender Flare, peeling back a
few inches at a time and applying pressure to secure
rubber seal to Fender Flare.
Ensure that both left and right hand front Fender Flares suit the profile of the vehicle. Note the areas where the
Fender Flares come in contact with the vehicle. NOTE: Before fitting Fender Flares remove any moldings, strips or
existing flares from the wheel arch. If there is a body side molding, mark where the molding is to be cut,
alternatively the Fender Flare can be cut to go around the molding. Be sure to allow enough room for the
extrusion. No drilling of vehicle is required for Bolt-On Look Fender Flares. This is a non-drill product.
*PRIOR TO ANY PAINTING & INSTALLATION, PRODUCT SHOULD BE THOROUGHLY INSPECTED FOR
ALL COMPONENTS LISTED ABOVE. PRODUCT SHOULD ALSO BE TEST FITTED PRIOR TO ANY
PAINTING & INSTALLATION. PLEASE CONTACT EGR IF YOU HAVE ANY FITMENT QUESTIONS AND OR
MISSING COMPONENTS.
PAINTING INSTRUCTIONS – If Fender Flares are being painted; do not install edge extrusion until painting is complete.
Prior to painting, clean all surfaces to be painted using clean water and a mild detergent, do not use lacquer thinner or
any solvent based products. Wipe completely dry. Best results will be achieved by wiping the areas to be painted with a
tack rag just prior to painting. Most automotive paints can be applied directly to the Fender Flares, however some may
require a primer (check paint manufacturer specifications). Good adhesion will be achieved without sanding. Select a
paint (and primer if necessary) that is suitable for rigid plastics PMMA (Acrylic). If using a paint system that requires
baking, do not expose the product to temperatures above 70°C (158°F). Do not fit the extrusion or any of the hardware
to the Fender Flares until the paint is completely dry.

For Technical Support/Warranty Information please call 800-757-7075
EGR Inc., 4000 East Greystone Drive, Ontario, CA 91761
Installation Instructions
Front and Rear Bolt-On Look Fender Flares
TOYOTA TACOMA (16-On) FF789
( Fits with or without factory installed Fender Flares, but without factory Mud Guards )
STEP
5
:
Hold Fender Flare on the vehicle in the position
of best fit. For models with factory installed Fender Flares,
note where above marked holes in Fender Flare align with
existing screws in the vehicle. Make special note of “A”.
Remove the EGR Fender Flare and remove the (5) above
indicated screws from the factory flare with a 10mm socket.
DO NOT remove the factory flare, the EGR Fender Flare
installs directly over the factory flare.
STEP 3:
Trim rubber seal to end of each Fender Flare.
Discard any excess rubber seal once all 4 parts are
complete.
STEP 4:
Clean the vehicle body areas with a mild soap
and water solution, where the Fender Flares will make
contact. Ensure fenders are dry prior to install.
IMPORTANT NOTE
:
For rear area of rear Fender Flare.
Trim rubber seal to initial contact edge of protective
plastic stone guard / wind splitter attached to vehicle.
DO NOT install rubber trim past this detail area.
(Refer to above image)
A
FRONT FENDER FLARE INSTALLATION

For Technical Support/Warranty Information please call 800-757-7075
EGR Inc., 4000 East Greystone Drive, Ontario, CA 91761
Installation Instructions
Front and Rear Bolt-On Look Fender Flares
TOYOTA TACOMA (16-On) FF789
( Fits with or without factory installed Fender Flares, but without factory Mud Guards )
STEP
7
:
Again using a 10mm socket, remove the screw
from the body sheet metal join referenced in STEP 5 as
Special Note area “A” and retain for later re-installation.
STEP
8
:
Remove Hooked end Long Clip from hardware
kit and install in above shown orientation using the 10mm
screw removed from the body sheet metal join in STEP 8
as Special Note area “A”.
Fully tighten screw and ensure that finished position of clip
is horizontal to ground, with the hook end pointing down.
STEP
6
:
For models without factory installed Fender
Flares, remove the (5) above indicated screws from the
wheel liner with a 10mm socket and retain for later re-
installation.
STEP
9
:
Begin installation by engaging the hook end of
the clip into the slot in the bottom of the Fender Flare and
begin rotating the Fender Flare vertically up to its position
of best fit.

For Technical Support/Warranty Information please call 800-757-7075
EGR Inc., 4000 East Greystone Drive, Ontario, CA 91761
Installation Instructions
Front and Rear Bolt-On Look Fender Flares
TOYOTA TACOMA (16-On) FF789
( Fits with or without factory installed Fender Flares, but without factory Mud Guards )
STEP 1
0
:
Ensure that the rubber seal is sitting flat
against the painted vehicle surface, pay special attention to
front area circled above. Using (3) previously removed
10mm screws from STEP 6 or 7, reinstall at above marked
hole positions. Do not fully tighten screws at this stage.
STEP 1
1
:
At remaining (2) slot positions in Fender Flare.
Remove “X” stamped Short Clips from hardware kit and
install as shown above, using the remaining 10mm screws
removed in STEP 6 or 7.
Do not fully tighten screws at this stage.
STEP 1
2
:
If necessary, make minor adjustments to the
flares position to achieve the best fit for your vehicle and to
ensure that the rubber seal is sitting flat against the painted
vehicle surface. When satisfied fully tighten all (5) screw
locations, in the above order in which they were just
installed. Repeat install for opposite side.

For Technical Support/Warranty Information please call 800-757-7075
EGR Inc., 4000 East Greystone Drive, Ontario, CA 91761
Installation Instructions
Front and Rear Bolt-On Look Fender Flares
TOYOTA TACOMA (16-On) FF789
( Fits with or without factory installed Fender Flares, but without factory Mud Guards )
REAR FENDER FLARE INSTALLATION
STEP 13:
Clean the vehicle body areas with a mild soap
and water solution, where the Fender Flares will make
contact. Ensure fenders are dry prior to install.
STEP 14:
Hold Fender Flare on vehicle in the position of
best fit. For models with factory installed Fender Flares,
note where above marked holes in Fender Flare align with
existing screws in the vehicle. Make special note of “A”.
Remove the EGR Fender Flare and remove the (4) above
indicated screws from the factory flare with a 10mm socket.
DO NOT remove the factory flare, the EGR Fender Flare
installs directly over the factory flare.
A
STEP 15:
For models without factory installed Fender
Flares, remove only the first (4) above indicated screws,
from top to bottom of the fender, (2) each side, with a
10mm socket and retain for later re-installation.
STEP 15a:
Remove ONLY these (4) above indicated
screws as mentioned in previous STEP 15, with a 10mm
socket for models without factory installed Fender Flares.
Leave all other remaining screws in wheel liner area. EGR
Fender Flare will install directly over the remaining screws.

For Technical Support/Warranty Information please call 800-757-7075
EGR Inc., 4000 East Greystone Drive, Ontario, CA 91761
Installation Instructions
Front and Rear Bolt-On Look Fender Flares
TOYOTA TACOMA (16-On) FF789
( Fits with or without factory installed Fender Flares, but without factory Mud Guards )
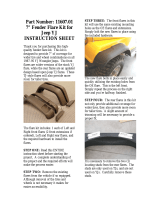
STEP 16:
The protective plastic stone guard / wind
splitter is different between with and without factory
installed Fender Flare vehicles, it is necessary to hand file
an additional approx. ¼” out of the above indicted tip area
of the Fender Flare cut-out to allow the Fender Flare to
properly seat against the vehicle painted surface.
STEP 1
7
:
Re-Install Fender Flare in position of best fit,
ensure that the rubber seal is sitting flat against the painted
vehicle surface. Using (4) previously removed 10mm
screws from STEP 14 or 15, reinstall at above mounting
hole positions. Do not fully tighten screws at this stage.
STEP
18:
Remove remaining Hooked end Short Clip
from hardware kit. Remove 10mm screw from previously
noted area “A” in STEP 14 that aligns with mounting slot in
Fender Flare. Install hook end of short clip into Fender
Flare as shown above and re-install 10mm screw.
STEP 19:
If necessary, make minor adjustments to the
flares position to achieve the best fit for your vehicle and to
ensure that the rubber seal is sitting flat against the painted
vehicle surface. When satisfied fully tighten all screw
locations, in the above order in which they were just
installed. Repeat install for opposite side.
/