
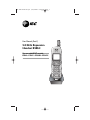
User Manual (Part 2)
5.8 GHz Expansion
Handset E580-2
For use with AT&T models
E5860 • E5865 • E5900B • E5965C
ATT-580-2CIB-d2.qxd 1/17/2004 6:06 PM Page 1

Table of contents
Copyright © 2004 Advanced American Telephones. All Rights Reserved.
AT&T and the Globe Design are trademarks of AT&T Corp.,
licensed to Advanced American Telephones.
STOP!
See pages 2-3
for easy instructions.
You must charge
batteries and register the
handset before use.
For customer service or product
information, visit our web site at
www.telephones.att.com
or call
1-800-222-3111.
Please also read
Important Product Information
Enclosed in product package.
Before you begin........................................1
Parts checklist.............................................1
Battery installation & charging................2
Registering the handset............................3
Belt clip & optional headset ....................4
Quick reference guide..............................5
ATT-580-2CIB-d2.qxd 1/17/2004 6:06 PM Page 2

1
Before you begin
This cordless telephone operates with
the maximum power allowed by the
Federal Communications Commission
(FCC). Even so, the handset and base
can communicate over only a certain
distance — which can vary with the
locations of the base and handset, the
weather, and the construction of your
home or office. For best performance,
keep the base antenna fully upright.
If you receive a call while you are
out of range, the handset might not
ring — or if it does ring, the call might
not connect when you press PHONE.
Move closer to the base, then press
PHONE to answer the call.
If you move out of range during a
phone conversation, you might hear
noise or interference. To improve
reception, move closer to the base.
If you move out of range without
pressing OFF, your phone will be left
“off the hook.” To hang up properly,
walk back toward the telephone base,
periodically pressing OFF until the call
is disconnected.
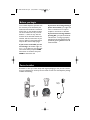
Parts checklist
Remember to save your sales receipt and original packaging in case you ever need to
ship your telephone for warranty service. Check to make sure the telephone package
includes the following:
Handset charger
Telephone
handset
Power
adapter
Belt clip
Batteries
ATT-580-2CIB-d2.qxd 1/17/2004 6:06 PM Page 1

LOW BATTERY
REDIAL CID LOG
2:10 PM
1
2
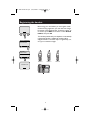
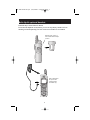
Battery installation & charging
After installation, place the handset in the charger and allow batteries to charge for 12
hours before use. You can keep batteries charged by returning the handset to the charger
after each use. When battery power is fully depleted, a full recharge takes about 8 hours.
Press coin into slot on
base of handset to
release latch, then
remove battery cover.
Insert supplied
batteries.
Place handset in charger to charge
for 12 hours before first use.
Light remains on while batteries
are charging.
Low battery indicator
Return handset to charger to recharge
when this symbol flashes. (Handset
will beep when battery is low.)
Insert top
tab first.
To replace battery cover
Press down to
click in place.
Plug power cord into jack on underside
of charger, then plug transformer into
electrical outlet.
Caution: Use only the supplied
NiMH battery (80-5461-00-00) or
AT&T model 2AA NiMH replace-
ment battery (SKU 26820). Do not
use alkaline batteries.
ATT-580-2CIB-d2.qxd 1/17/2004 6:07 PM Page 2

3
Registering the handset
Before using your new handset, you must register it with
the base. During registration, you must enter the 15-digit
ID number of the telephone base. To find this number, go
to the base, press MENU, scroll down to select DISPLAY
BASE ID, then press OK.
The handset provided with your telephone is automatically
registered as Handset 1. Additional handsets will be
assigned numbers in the order they are registered (2, 3, 4,
etc.) up to a maximum of eight.
Handset 1 Handset 2 Handset 3
MENU
CALLS LOG
BASE SETTINGS
DISPLAY BASE-ID
^
OK
V
CALLS LOG
BASE SETTINGS
DISPLAY BASE-ID
^
OK
V
123456789012345
OK
ATT-580-2CIB-d2.qxd 1/17/2004 6:08 PM Page 3

4
Belt clip & optional headset
Install belt clip as shown below if desired.
For hands-free telephone conversations, you can use any industry standard 2.5 mm
headset (purchased separately). For best results use an AT&T 2.5 mm headset.
Snap belt clip into notches on
side of handset. Rotate and pull
to remove.
Plug 2.5 mm headset
into jack on side of
handset (beneath
small rubber cap).
ATT-580-2CIB-d2.qxd 1/17/2004 6:08 PM Page 4

5
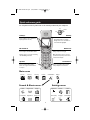
Quick reference guide
For complete instructions, please refer to the manual provided with your telephone.
NavKey
Press center button to display menus.
Press NavKey buttons to navigate
through menus. Press center button to
select menu item highlighted.
Speaker
Press to activate handset speaker-
phone. Press again to switch call back
to earpiece.
Softkeys
Press a softkey to select a menu item
displayed just above the key.
Off/Cancel
During a call, press to hang up.
While using menus, press to cancel an
operation, back up to the previous menu,
or exit the menu display.
Phone/Flash
Press to begin a call, then dial a number.
During a call, press to receive an incoming
call, if Call Waiting is activated.
Sound Select
Press to customize speaker sound for
clear speakerphone conversations.
Intercom
Vibrate Ringer Control Ringers
Low Batt Tone Keypad Tone Range Tone
Appearance Set Time Contrast
Phone Setup Language Reset Settings
Directory Calls Log Pictures Sounds&Alerts Settings
Main menu
Sounds & Alerts menu Settings menu
Left Right
Select
Up
Down
ATT-580-2CIB-d2.qxd 1/17/2004 6:09 PM Page 5

Copyright © 2004 Advanced American Telephones. All Rights Reserved.
AT&T and the Globe Design are trademarks of AT&T Corp.,
licensed to Advanced American Telephones. Printed in China. Issue 1.2 AT&T 1/19/04.
www.telephones.att.com
ATT-580-2CIB-d2.qxd 1/17/2004 6:09 PM Page 6
-
 1
1
-
 2
2
-
 3
3
-
 4
4
-
 5
5
-
 6
6
-
 7
7
-
 8
8


Ask a question and I''ll find the answer in the document
Finding information in a document is now easier with AI
Related papers
-
AT&T E5900B User manual
-
-
AT&T 5865 User manual
-
-
-
-
-
-
-
Motorola SD4502 - System Expansion Cordless Handset Extension User manual
Other documents
-
 ELECTRO FREEZE CS4 User manual
-
VTech i5803 - Cordless Extension Handset User manual
-
-
VTech i 5867 User manual
-
-
-
VTech i5803 - Cordless Extension Handset Owner's manual
-
-
-
Brother MFC-3100C Quick setup guide
