Toro Twister 1600 User manual
- Category
- Utility Vehicle
- Type
- User manual
This manual is also suitable for

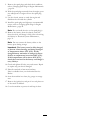
FormNo.3356-938RevA
Twister
®
1600UtilityVehicle
ModelNo.12004TC—SerialNo.270000001andUp
G002164
Registeratwww.Toro.com.OriginalInstructions(EN)

ThissparkignitionsystemcomplieswithCanadian
ICES-002.
Introduction
Readthisinformationcarefullytolearnhowtooperate
andmaintainyourproductproperlyandtoavoidinjury
andproductdamage.Youareresponsibleforoperating
theproductproperlyandsafely.
YoumaycontactTorodirectlyatwww.Toro.comfor
productandaccessoryinformation,helpndinga
dealer,ortoregisteryourproduct.
Wheneveryouneedservice,genuineToroparts,
oradditionalinformation,contactanAuthorized
ServiceDealerorToroCustomerServiceandhave
themodelandserialnumbersofyourproductready.
Figure1identiesthelocationofthemodelandserial
numbersontheproduct.Writethenumbersinthe
spaceprovided.
Figure1
1.Modelandserialnumberlocation
ModelNo.
SerialNo.
Thismanualidentiespotentialhazardsandhas
safetymessagesidentiedbythesafetyalertsymbol
(Figure2),whichsignalsahazardthatmaycauseserious
injuryordeathifyoudonotfollowtherecommended
precautions.
Figure2
1.Safetyalertsymbol
Thismanualuses2otherwordstohighlightinformation.
Importantcallsattentiontospecialmechanical
informationandNoteemphasizesgeneralinformation
worthyofspecialattention.
Contents
Introduction.................................................................2
Safety...........................................................................3
BeforeOperating.................................................3
Operation.............................................................4
Maintenance.........................................................6
SoundPressure.....................................................7
Vibration..............................................................7
SafetyandInstructionalDecals.............................7
Setup..........................................................................10
1InstallingtheWheels........................................11
2InstallingtheSteeringWheel............................11
3InstallingtheBumper.......................................12
4InstallingtheSeats...........................................12
5InstallingtheHitch..........................................13
6InstallingtheCargoBox...................................13
7ActivatingtheBattery......................................14
8AdjustingtheFrontWheelToe-in.....................14
9ReadingtheManualandViewingtheSafety
Video.............................................................15
ProductOverview......................................................17
Controls.............................................................17
Specications.....................................................20
Attachments/Accessories...................................20
Operation...................................................................20
ThinkSafetyFirst...............................................20
Pre-StartingChecks............................................20
CheckingtheEngineOil.....................................20
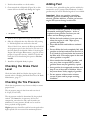
CheckingtheBrakeFluidLevel...........................21
CheckingtheTirePressure.................................21
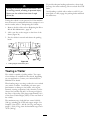
AddingFuel.......................................................21
CheckingtheTransmissionOilLevel..................22
StartingtheEngine.............................................22
StoppingtheVehicle...........................................22
ParkingtheVehicle.............................................23
OperatingtheCargoBox....................................23
BreakinginaNewVehicle..................................24
LoadingtheCargoBox.......................................24
TransportingtheVehicle.....................................24
TowingtheVehicle.............................................24
TowingaTrailer..................................................25
Maintenance...............................................................26
RecommendedMaintenanceSchedule(s)................26
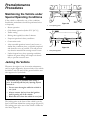
PremaintenanceProcedures....................................27
MaintainingtheVehicleunderSpecial
OperatingConditions.....................................27
©2007—TheToro®Company
8111LyndaleAvenueSouth
Bloomington,MN55420
2
Contactusatwww.Toro.com.
PrintedintheUSA.
AllRightsReserved

JackingtheVehicle..............................................27
Lubrication.............................................................28
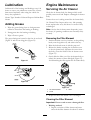
AddingGrease...................................................28
EngineMaintenance...............................................28
ServicingtheAirCleaner....................................28
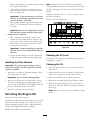
ServicingtheEngineOil.....................................29
ServicingtheSparkPlugs....................................30
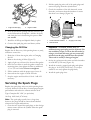
FuelSystemMaintenance.......................................31
InspectingFuelLinesandConnections...............31
ReplacingtheFuelFilter.....................................31
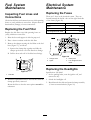
ElectricalSystemMaintenance................................31
ReplacingtheFuses............................................31
ReplacingtheHeadlights....................................31
ServicingtheBattery...........................................32
DriveSystemMaintenance.....................................33
CheckingandAdjustingNeutral.........................33
InspectingtheTires............................................34
AdjustingtheFrontSuspension..........................34
AdjustingFrontWheelToe-In............................35
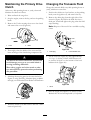
MaintainingthePrimaryDriveClutch.................36
ChangingtheTransaxleFluid..............................36
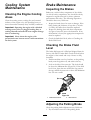
CoolingSystemMaintenance..................................37
CleaningtheEngineCoolingAreas.....................37
BrakeMaintenance.................................................37
InspectingtheBrakes.........................................37
CheckingtheBrakeFluidLevel...........................37
AdjustingtheParkingBrake................................37
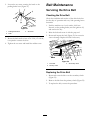
BeltMaintenance....................................................38
ServicingtheDriveBelt......................................38
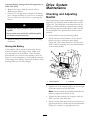
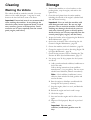
Cleaning.................................................................39
WashingtheVehicle............................................39
Storage.......................................................................39
Schematics.................................................................41
Safety
Improperuseormaintenancebytheoperatororowner
canresultininjury.Toreducethepotentialforinjury,
complywiththesesafetyinstructionsandalwayspay
attentiontothesafetyalertsymbol,whichmeans
Caution,Warning,orDanger—“personalsafety
instruction.”Failuretocomplywiththeinstructionmay
resultinpersonalinjuryordeath.
Thevehicleisanoff-highwayvehicleonlyand
isnotdesigned,equipped,ormanufacturedfor
useonpublicstreets,roads,orhighways.
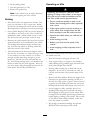
BeforeOperating
•Operatethemachineonlyafterreadingand
understandingthecontentsofthismanual.
•Neverallowchildrentooperatethevehicle.Anyone
whooperatesthevehicleshouldhaveamotor
vehiclelicense.
•Neverallowotheradultstooperatethevehicle
withoutrstreadingandunderstandingtheOperator’s
Manual.Makesurethatalloperatorsarephysically
andmentallycapableofoperatingthevehicle.
•Thisvehicleisdesignedtocarryonlytheoperator
andonepassengerintheseatprovidedbythe
manufacturer.Nevercarryanyotherpassengerson
thevehicle.
•Neveroperatethevehiclewhenundertheinuence
ofdrugsoralcohol.Evenprescriptiondrugsand
coldmedicinescancausedrowsiness.
•Donotdrivethevehiclewhenyouaretired.Besure
totakeoccasionalbreaks.Itisveryimportantthat
youstayalertatalltimes.
•Becomefamiliarwiththecontrolsandknowhowto
stoptheenginequickly.
•Keepallshields,safetydevices,anddecalsinplace.
Ifashield,safetydevice,ordecalismalfunctioning,
illegible,ordamaged,repairorreplaceitbefore
operatingthemachine.
•Alwayswearsubstantialshoes.Donotoperate
themachinewhilewearingsandals,tennisshoes,
orsneakers.Donotwearloosettingclothingor
jewelrywhichcouldgetcaughtinmovingpartsand
causepersonalinjury.
•Wearingsafetyglassesandlongpantsisadvisable.
•Avoiddrivingwhenitisdark,especiallyinunfamiliar
areas.Ifyoumustdrivewhenitisdark,besure
3

todrivecautiously,usetheheadlights,andeven
consideraddingadditionallights.
•Beextremelycarefulwhenoperatingaroundpeople.
Alwaysbeawareofwherebystandersmightbe.
•Beforeoperatingthevehicle,alwayscheckthe
designatedareasofthevehiclethatarestatedinthe
pre-startingsectionofthismanual.Ifsomething
iswrong,donotusethevehicle.Makesurethat
theproblemiscorrectedbeforethevehicleor
attachmentisoperated.
•Sincegasolineishighlyammable,handleitcarefully.
–Useanapprovedgasolinecontainer.
–Donotremovethecapfromthefueltankwhen
theengineishotorrunning.
–Donotsmokewhilehandlinggasoline.
–Fillthefueltankoutdoors,andllittoabout
1inch(25mm)belowthetopofthetank(the
bottomofthellerneck).Donotoverllit.
–Wipeupanyspilledgasoline.
–Donotllfuelcontainersinthecargobox;place
fuelcontainersonthegroundbeforelling.
Operation
Engineexhaustcontainscarbonmonoxide,
whichisanodorless,deadlypoisonthatcan
killyou.
Donotrunengineindoorsorinanenclosed
area.
•Theoperatorandpassengershouldremainseated
wheneverthevehicleisinmotion.Theoperator
shouldkeepbothhandsonthesteeringwheel
wheneverpossible,andthepassengershoulduse
thehandholdsprovided.Keepyourarmsandlegs
withinthevehiclebodyatalltimes.
•Driveslowerandturnlesssharplywhenyouare
carryingapassenger.Rememberyourpassengermay
notbeexpectingyoutobrakeorturnandmaynot
beready.
•Alwayswatchoutforandavoidlowoverhangssuch
astreelimbs,doorjambs,andover-headwalkways.
Makesurethereisenoughroomoverheadtoeasily
clearthevehicleandyourhead.
•Alwaysshiftintoneutralandapplytheparkingbrake
beforeleavinganidlingvehicle,orelsethevehicle
maycreep.
•Failuretooperatethevehiclesafelymayresultinan
accident,tipoverofthevehicle,andseriousinjury
ordeath.Drivecarefully.Topreventtippingorloss
ofcontrol:
–Useextremecaution,reducespeed,andmaintain
asafedistancearoundsandtraps,ditches,creeks,
ramps,unfamiliarareas,oranyareasthathave
abruptchangesingroundconditionsorelevation.
–Watchforholesorotherhiddenhazards.
–Useextracautionwhenoperatingthevehicleon
wetsurfaces,inadverseweatherconditions,at
higherspeeds,orwithafullload.Stoppingtime
anddistancewillincreasewithafullload.
–Avoidsuddenstopsandstarts.Donotgofrom
reversetoforwardorforwardtoreversewithout
rstcomingtoacompletestop.
–Slowdownbeforeturning.Donotattempt
sharpturnsorabruptmaneuversorotherunsafe
drivingactionsthatmaycausealossofvehicle
control.
–Whendumping,donotletanyonestandbehind
thevehicleanddonotdumptheloadonanyone’s
feet.Releasethetailgatelatchesfromthesideof
thebox,notfrombehind.
–Onlyoperatethevehiclewhenthecargoboxis
downandlatched.
–Beforebackingup,looktotherearandensure
thatnooneisbehindyou.Backupslowly.
–Watchoutfortrafcwhenyouarenearor
crossingroads.Alwaysyieldtherightofway
topedestriansandothervehicles.Thisvehicle
isnotdesignedforuseonstreetsorhighways.
Alwayssignalyourturnsorstopearlyenough
sothatotherpeopleknowwhatyouplantodo.
Obeyalltrafcrulesandregulations.
–Theelectricalandexhaustsystemsofthevehicle
canproducesparkscapableofignitingexplosive
materials.Neveroperatethevehicleinornearan
areawherethereisdustorfumesintheairwhich
areexplosive.
•Donottouchtheengineormuferwhiletheengine
isrunningorsoonafterithasstopped.Theseareas
maybehotenoughtocauseburns.
•Ifthemachineevervibratesabnormally,stop
immediately,waitforallmotiontostop,andinspect
thevehiclefordamage.Repairalldamagebefore
commencingoperation.
•Beforegettingoffoftheseat:
1.Stopthemovementofthemachine.
4

2.Settheparkingbrake.
3.TurntheignitionkeytoOff.
4.Removetheignitionkey.
Note:Ifthevehicleisonanincline,blockthe
wheelsaftergettingoffofthevehicle.
Braking
•Slowdownbeforeyouapproachanobstacle.This
givesyouextratimetostoporturnaway.Hitting
anobstaclecandamagethevehicleanditscontents.
Moreimportant,itcaninjureyouandyourpassenger.
•GrossVehicleWeight(GVW)hasamajorimpacton
yourabilitytostopand/orturn.Heavyloadsand
attachmentsmakeavehiclehardertostoporturn.
Theheaviertheload,thelongerittakestostop.
•Decreasethevehiclespeedifthecargoboxhasbeen
removedandthereisnoattachmentonthevehicle.
Thebrakingcharacteristicschangeandfaststops
maycausetherearwheelstolockup,whichmay
affectthecontrolofthevehicle.
•Turfandpavementaremuchmoreslipperywhen
theyarewet.Itcantake2to4timesaslongtostop
onwetsurfacesasondrysurfaces.Ifyoudrive
throughstandingwaterdeepenoughtogetthe
brakeswet,theywillnotworkwelluntiltheyare
dry.Afterdrivingthroughwater,youshouldtestthe
brakestomakesuretheyworkproperly.Iftheydo
not,driveslowlywhileputtinglightpressureonthe
brakepedal.Thiswilldrythebrakesout.
OperatingonHills
Operatingthevehicleonahillmaycause
tippingorrollingofthevehicle,ortheengine
maystallandyoucouldloseheadwayonthe
hill.Thiscouldresultinpersonalinjury.
•Donotacceleratequicklyorslamonthe
brakeswhenbackingdownahill,especially
withaload.
•Iftheenginestallsoryouloseheadwayon
ahill,slowlybackstraightdownthehill.
Neverattempttoturnthevehiclearound.
•Operatethevehicleslowlyonahillanduse
caution.
•Avoidturningonahill.
•Reduceyourloadandthespeedofthe
vehicle.
•Avoidstoppingonhills,especiallywitha
load.
Theseextracautionsneedtobetakenwhenoperating
thevehicleonahill:
•Slowdownbeforestartingupordownahill.
•Iftheenginestallsoryoubegintoloseheadway
whileclimbingahill,graduallyapplythebrakesand
slowlybackstraightdownthehill.
•Turningwhiletravelingupordownhillscanbe
dangerous.Ifyouhavetoturnwhileonahill,do
itslowlyandcautiously.Nevermakesharporfast
turns.
•Heavyloadsaffectstability.Reducetheweightofthe
loadandyourspeedwhenoperatingonhillsorif
theloadhasahighcenterofgravity.Securetheload
topreventitfromshiftingandtakeextracarewhen
haulingloadsthatshifteasily(liquid,rock,sand,etc.).
•Avoidstoppingonhills,especiallywithaload.
Stoppingwhilegoingdownahillwilltakelonger
thanstoppingonlevelground.Ifthevehiclemust
bestopped,avoidsuddenspeedchanges,whichmay
initiatetippingorrollingofthevehicle.Donotslam
onthebrakeswhenrollingbackward,asthismay
causethevehicletooverturn.
•Westronglyrecommendinstallingtheoptional
ROPSKitwhenoperatingonhillyterrain.
5

OperatingonRoughTerrain
Reducespeedandloadwhenoperatingonroughterrain,
unevenground,andnearcurbs,holes,andothersudden
changesinterrain.Loadsmayshift,causingthevehicle
tobecomeunstable.
WestronglyrecommendinstallingtheoptionalROPS
Kitwhenoperatingonroughterrain.
Suddenchangesinterrainmaycauseabrupt
steeringwheelmovement,possiblyresultingin
handandarminjuries.
•Reduceyourspeedwhenoperatingonrough
terrainandnearcurbs.
•Gripthesteeringwheellooselyaroundthe
perimeter.Keepyourhandsclearofthe
steeringwheelspokes.
LoadingandDumping
Theweightandpositionofthecargoandpassenger
canchangethevehiclecenterofgravityandvehicle
handling.Toavoidlossofcontrolandpersonalinjury,
followtheseguidelines:
•Donotcarryloadswhichexceedtheloadlimits
describedonthevehicleweightlabel;referto
SpecicationsinProductOverview,page17,for
vehicleweightlimits.Theloadratingisforlevel
surfacesonly.
•Reducetheweightoftheloadwhenoperating
onhillsandroughterraintoavoidtippingor
overturningofthevehicle.
•Reducetheweightoftheloadifthecenterofgravity
ishigh.Itemssuchasbricks,fertilizer,orlandscape
timbersstackhigherinthebox.Thehigheraload
isstacked,themorelikelythevehicleistotipover.
Distributetheloadaslowaspossible,makingsure
thattheloaddoesnotaffectrearvisibility.
•Positiontheweightoftheloadevenlyfromsideto
side.Ifyoupositiontheloadtowardoneofthesides,
thevehicleismorelikelytotipoverwhileturning.
•Positiontheweightofaloadevenlyfromfrontto
back.Ifyoupositiontheloadbehindtherearaxle,
itwillreducetheweightonthefrontwheels.This
mayresultinalossofsteeringcontrolorcausethe
vehicletotipoveronhillsorbumpyterrain.
•Useextracautioniftheloadexceedsthedimensions
oftheboxandwhenhandlingoff-centerloadsthat
cannotbecentered.Keeploadsbalancedandsecure
topreventthemfromshifting.
•Alwayssecureloadssothattheydonotshift.Ifa
loadisnotsecured,oryouaretransportingaliquidin
alargecontainersuchasasprayer,theloadcanshift.
Thisshiftinghappensmostoftenwhileturning,
goingupordownhills,suddenlychangingspeeds,or
whiledrivingoverroughsurfaces.Shiftingloadscan
causethevehicletotipover.
Theweightoftheboxmaybeheavy.Handsor
otherbodypartscouldbecrushed.
–Keephandsandotherbodypartsclearwhen
loweringthebox.
–Donotdumpmaterialsonbystanders.
•Neverdumpaloadedcargoboxwhilethevehicleis
sidewaysonahill.Thechangeinweightdistribution
maycausethevehicletooverturn.
•Whenoperatingwithaheavyloadinthecargobox,
reduceyourspeedandallowforsufcientbraking
distance.Donotsuddenlyapplythebrakes.Use
extracautiononslopes.
•Beawarethatheavyloadsincreaseyourstopping
distanceandreduceyourabilitytoturnquickly
withouttippingover.
•Therearcargospaceisintendedforloadcarrying
purposesonly,notforpassengers.
•Neveroverloadyourvehicle.Thedecal(locatedon
therearframe)showsloadlimitsforthevehicle.
NeveroverloadtheattachmentsorexceedtheGross
VehicleWeight(GVW).
Maintenance
•Beforeservicingormakingadjustmentstothe
machine,stoptheengine,settheparkingbrake,
andremovethekeyfromtheignitiontoprevent
someonefromaccidentallystartingtheengine.
•Tomakesurethattheentiremachineisingood
condition,keepallnuts,bolts,andscrewsproperly
tightened.
•Toreducethepotentialforre,keeptheengine
areafreeofexcessivegrease,grass,leaves,and
accumulationofdirt.
•Neveruseanopenametocheckthelevelor
leakageoffuelorbatteryelectrolyte.
6

•Iftheenginemustberunningtoperforma
maintenanceadjustment,keepyourhands,feet,
clothing,andanypartsofyourbodyawayfromthe
engineandanymovingparts.Keepeveryoneaway.
•Donotuseopenpansoffuelorammablecleaning
uidsforcleaningparts.
•Ifmajorrepairsareeverneededorassistanceis
required,contactanAuthorizedToroDistributor.
•Tobesureofoptimumperformanceandsafety,
alwayspurchasegenuineTororeplacementpartsand
accessories.Replacementpartsandaccessoriesmade
byothermanufacturerscouldbedangerous.Altering
thisvehicleinanymannerthatmayaffectvehicle
operation,performance,durability,oritsuse,may
resultininjuryordeath.Suchusecouldvoidthe
productwarranty.
SoundPressure
Thisunithasamaximumsoundpressurelevelatthe
operator’searof80dBA,basedonmeasurementsof
identicalmachinesperEN11094.
Vibration
Thisunitdoesnotexceedahand/armvibrationlevelof
2.5m/s
2
,basedonmeasurementsofidenticalmachines
perEN1033.
Thisunitdoesnotexceedawholebodyvibration
levelof0.5m/s
2
,basedonmeasurementsofidentical
machinesperEN1032.
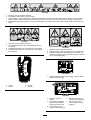
SafetyandInstructionalDecals
Safetydecalsandinstructionsareeasilyvisibletotheoperatorandarelocatednearanyareaof
potentialdanger.Replaceanydecalthatisdamagedorlost.
107–0704
1.Warning—readtheOperator’sManual.
8.Ignition—Run
2.Collisionhazard—donotoperatethevehicleonpublicstreets,
roads,orhighways.
9.Ignition—Start
3.Fallinghazard—donotcarrypassengersinthecargobed.10.Tostarttheengine,sitontheoperator’sseat,putthegear
selectorinNeutral,turntheignitionkeyon,pullthechoke
leverout(ifneeded),andpresstheacceleratorpedal.
4.Fallinghazard—donotallowchildrentooperatethevehicle.11.T ostoptheengine,releasetheacceleratorpedal,setthe
parkingbrake,turntheignitionkeyoff,andremovethe
ignitionkey.
5.Hourmeter
12.Electricalpower(powerpoint)
6.Headlights13.Horn
7.Ignition—Off
7

104–6581
1.Warning—readtheOperator’sManual.
2.Firehazard—beforefueling,stoptheengine.
3.Tippinghazard—receivetrainingbeforeoperatingthemachine,usecautionanddriveslowlywhileonslopes;driveslowlywhen
turning,keepthevehiclespeedunder19MPH(31km/h)whencarryingafullorheavyloadandwhendrivingonroughterrain.
4.Fallingandarm/leginjuryhazards—donotcarrypassengersinthecargobedandkeeparmsandlegsinsideofthevehicleatall
times.
99–7345
1.Warning—readtheOperator’sManual.
2.Hotsurface/burnhazard—stayasafedistancefromthe
hotsurface.
3.Entanglementhazard,belt—stayawayfrommovingparts
4.Crushinghazard,cargobox—usetheproprodtosupport
thecargobed
99–7952
1.Choke
3.Neutral
2.Reverse4.Forward
99–7954
1.Warning—readtheOperator’sManual.
2.Fallinghazard—donotcarrypassengersinthecargobed.
3.Explosionhazard,staticdischargeintofuelcontainer—do
notllfuelcontainersinthecargobed;placefuelcontainers
onthegroundbeforelling.
99–7350
1.Maximumtongueweightis50lb(23kg);maximumtrailer
weightis400lb(181kg).
104–6592
1.ReadtheOperator’s
Manual.
4.Thebaseweightofthe
vehicleis1100lb(500kg).
2.Themaximumcombined
operatorandpassenger
weightis400lb(181kg).
5.Themaximumgross
vehicleweightis2700lb
(1225kg).
3.Themaximumcargo
weightis1200lb(544kg).
8

99–7958
1.ReadtheOperator’s
Manualforinformationon
fuses.
5.15amp.fuseforthe
optionalElectricBedLift
Kit
2.10amp.fuseforthe
optionalRoadLightKit
6.10amp.fuseforthelow
oillightandthehourmeter
3.15amp.fuseforthe
optionalRearLiftKit
7.10amp.fuseforthe
headlights
4.10amp.fuse-open8.25amp.fuseforthe
chargecircuit
9

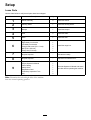
Setup
LooseParts
Usethechartbelowtoverifythatallpartshavebeenshipped.
ProcedureDescription
Qty.
Use
1
Wheelassembly4Installthewheels.
2
Steeringwheel
1Installthesteeringwheel.
3
Bumper1Installthebumper.
4
Seat
2Installtheseats.
5
Hitch1Installthehitch.
Cargobox
1
Right-handpivotbracket1
Left-handpivotbracket
1
Flangeheadscrew(3/8x1inch)
4
Bolt(5/16x3/4inch)
1
6
Flangenut(5/16inch)
1
Installthecargobox.
7
Nopartsrequired
–
Activatethebattery.
8
Nopartsrequired
–
Adjustthefrontwheeltoe-in.
Operator’sManual
1
EngineOperator’sManual
1
PartsCatalog
1
SafetyVideo
1
RegistrationCard
1
PredeliveryInspectionForm1
9
Key2
ReadtheOperator’sManualandwatch
thevideobeforeoperatingthemachine.
Note:Determinetheleftandrightsidesofthemachine
fromthenormaloperatingposition.
10

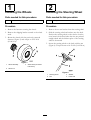
1
InstallingtheWheels
Partsneededforthisprocedure:
4Wheelassembly
Procedure
1.Removethefastenerssecuringthewheels.
2.Removetheshippingbracketsecuredtothewheel
studs.
3.Mountthewheelswiththepreviouslyremoved
fasteners(Figure3)andtorqueto45-65ft-lb
(61-88N-m).
Figure3
1.Wheelassembly
3.Wheelstud(rearwheel
hubshown)
2.Wheelnut
2
InstallingtheSteeringWheel
Partsneededforthisprocedure:
1
Steeringwheel
Procedure
1.Removethenutandwasherfromthesteeringshaft.
2.Slidethesteeringwheelandwasherontotheshaft.
Positionthesteeringwheelontheshaftsothatthe
crossbeamishorizontalwhenthetiresarepointed
straightaheadandthethickerspokeofthesteering
wheelisdownward.
3.Securethesteeringwheeltotheshaftwiththenut
(Figure4).Torquethenutto18-22ft-lb(24-29N-m)
Figure4
1.Steeringwheel
3.Washer
2.Nut4.Foamseal
11

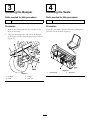
3
InstallingtheBumper
Partsneededforthisprocedure:
1Bumper
Procedure
1.Removethe4boltsandlocknutssecuredtothe
frontoftheframe.
2.Alignthemountingholesandsecurethebumper
totheframewiththefastenerspreviouslyremoved
(Figure5).
Figure5
1.Bumper3.Frame
2.Bolt4.Locknut
4
InstallingtheSeats
Partsneededforthisprocedure:
2
Seat
Procedure
Inserttheseatbracketintotheseatbaseopeningand
pivottheseatdownward(Figure6).
Figure6
1.Seatbracket2.Seatbase
12

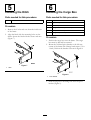
5
InstallingtheHitch
Partsneededforthisprocedure:
1Hitch
Procedure
1.Removethe4boltsandnutsfromtheinsiderear
oftheframe.
2.Alignthehitchwiththemountingholesonthe
frame.Securethehitchwiththescrewsandnuts
(Figure7).
Figure7
1.Hitch
6
InstallingtheCargoBox
Partsneededforthisprocedure:
1
Cargobox
1Right-handpivotbracket
1
Left-handpivotbracket
4
Flangeheadscrew(3/8x1inch)
1
Bolt(5/16x3/4inch)
1
Flangenut(5/16inch)
Procedure
1.Positionthecargoboxontotheframe.Thecargo
boxmustlayatandbecentered.
2.Mountthelefthandpivotbrackettotheleftrear
corneroftheframewith2angeheadscrews(3/8x
1inch).PositionthebracketasshowninFigure8.
Figure8
1.Pivotbracket
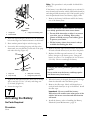
3.Slidethecargoboxmountingholeontothepivot
bracket(Figure9).
13

Figure9
1.Cargobox3.Cargoboxmountinghole
2.Pivotbracket
4.Inserttherighthandpivotbracketintothemounting
holeinthecargoboxandthenmountittotheframe.
5.Haveanotherpersonhelptoraisethecargobox.
6.Loosentheboltsecuringtheproprodcliptothe
frameuntilyoucanslidetheJ-hookendoftheprop
rodundertheclip(Figure10).
Figure10
1.Proprod
3.Bolt(5/16x3/4inch)
2.Proprodclip
4.Flangenut(5/16inch)
7.Tightentheboltandsecuretheothersideoftheclip
withanewbolt(5/16x3/4inch)andangenut
(5/16inch)(Figure10).
8.Lowerthecargobox.
7
ActivatingtheBattery
NoPartsRequired
Procedure
None
Note:ThisprocedureisonlyneededforModelNo.
07277TC.
Ifthebatteryisnotlledwithelectrolyteoractivated,it
mustberemovedfromthevehicle,lledwithelectrolyte,
andcharged.Bulkelectrolytewith1.260specicgravity
mustbepurchasedfromalocalbatterysupplyoutlet.
1.Removethebatteryhold-downandliftthebattery
outofthebatterybase.
Batteryelectrolytecontainssulfuricacidwhich
isadeadlypoisonandcausessevereburns.
•Donotdrinkelectrolyteorallowittocontact
yourskin,eyesorclothing.Wearsafety
glassestoshieldyoureyesandrubbergloves
toprotectyourhands.
•Fillthebatterywherecleanwaterisalways
availableforushingtheskin.
2.Removethellercapsfromthebatteryandslowly
lleachcelluntilelectrolyteisjustabovetheplates.
3.Replacethellercapsandconnecta3to4amp.
batterychargertothebatteryposts.Chargethe
batteryatarateof3to4amperesfor4to8hours
(12volts).Donotoverchargethebattery.
Chargingthebatteryproducesgassesthatcan
explode.
Neversmokenearthebatteryandkeepsparks
andamesawayfrombattery.
4.Whenthebatteryischarged,disconnectthecharger
fromtheelectricaloutletandbatteryposts.
5.Removethellercaps.Slowlyaddelectrolyteto
eachcelluntilelectrolyteisuptothellline.Install
thellercaps.
Important:Donotoverllthebattery.
Electrolytewilloverowontootherpartsofthe
vehicleandseverecorrosionanddeterioration
willresult.
6.Installthebattery;refertoInstallingtheBattery,
ElectricalSystemMaintenance,page31.
14

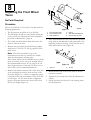
8
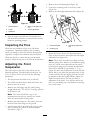
AdjustingtheFrontWheel
Toe-in
NoPartsRequired
Procedure
Thetoe-inshouldbe1/8-5/8inch(3-16mm)withthe
followingparameters:
•Thetirepressureshouldbeat12psi(83kPa).
•Therideheightshouldbecorrectbeforesettingthe
toe-in;refertotheAdjustingtheFrontSuspension
procedureinMaintenance,page26.
•Thevehicleshouldbedrivenbackandforthafew
timestorelaxtheA-arms.
•Measurethetoe-inwiththewheelsfacingstraight
aheadanda175-225lb(79-102kg)operatorinthe
driver’sseat.
Note:Thedrivershoulddriveuptothe
measurementareaandstayseatedinthevehicle
whilethemeasurementisbeingtaken.
Ifthevehiclewillberunwithmediumtoheavyloads
mostofthetime,setthetoe-inonthehighsideof
therecommendedamount.Ifitisgoingtoberun
withalightloadmostofthetime,setthetoe-inon
thelowsideoftherecommendedamount.
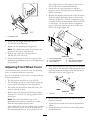
1.Measurethedistancebetweenbothofthefronttires
attheaxleheightatboththefrontandrearofthe
fronttires(Figure11).Axtureoralignmentgauge
isneededfortherearmeasurementofthefronttires
ataxleheight.Usethesamextureoralignment
gaugetoaccuratelymeasurethefrontofthefront
tiresataxleheight(Figure11).
Figure11
1.Tirecenterline-back4.Fixture
2.Tirecenterline-front
5.Axlecenterlinedistance
3.Axlecenterline
6.6inches(15cm)ruler
2.Ifthemeasurementdoesnotfallwithinthespecied
range(refertothedimensionsandparametersatthe
beginningofthisprocedure),loosenthejamnutsat
bothendsofthetierods(Figure45).
Figure12
1.Jamnut2.Tierod
3.Rotatebothtierodstomovethefrontofthetire
inwardoroutward.
4.Tightenthetierodjamnutswhentheadjustmentis
correct.
5.Ensurethatthereisfulltravelofthesteeringwheel
inbothdirections.
15

9
ReadingtheManualand
ViewingtheSafetyVideo
Partsneededforthisprocedure:
1
Operator’sManual
1
EngineOperator’sManual
1
PartsCatalog
1
SafetyVideo
1
RegistrationCard
1PredeliveryInspectionForm
2Key
Procedure
•ReadtheOperator’sManualandEngineOperator’s
Manual.
•Viewthesafetyvideo.
•Fillouttheregistrationcard.
•CompletethePredeliveryInspectionFormandleitin
yourcustomerhistoryportfolio.
16

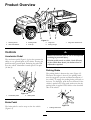
ProductOverview
G002180
6247
135
Figure13
1.Steeringwheel
3.Parkingbrake
5.Cargobox7.Cargoboxreleaselever
2.Gearshiftselector
4.Fuelcap6.Towingtounge
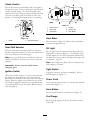
Controls
AcceleratorPedal
Theacceleratorpedal(Figure14)givestheoperatorthe
abilitytovarygroundspeedofthevehicle.Pressingthe
pedalincreasesgroundspeed.Releasingthepedalwill
slowthevehicle.Maximumforwardspeedis18mph
(26km/h).
Figure14
1.Acceleratorpedal2.Brakepedal
BrakePedal
Thebrakepedalisusedtostoporslowthevehicle
(Figure14).
Brakescanbecomewornorcanbemisadjusted
resultinginpersonalinjury.
Ifbrakepedaltravelstowithin1inch(25mm)
ofthevehicleoorboard,thebrakesmustbe
adjustedorrepaired.
ParkingBrake
Theparkingbrakeisbetweentheseats(Figure15).
Whenevertheengineisshutoff,theparkingbrake
mustbeengagedtopreventaccidentalmovementof
thevehicle.Toengagetheparkingbrake,pullbackon
thelever.Todisengage,pushtheleverforward.Ifthe
vehicleisparkedonasteepgrade,makesurethatthe
parkingbrakeisapplied.Placeblocksatthedownhill
sideofthewheels.
Figure15
1.Parkingbrakelever
17

ChokeControl
Thechokecontrolislocatedbelowandtotherightof
theoperator’sseat.Tostartacoldengine,pullthechoke
controloutward(Figure16).Aftertheenginestarts,
regulatethechoketokeeptheenginerunningsmoothly.
Assoonaspossible,pushthecontrolintotheOff
position.Awarmenginerequireslittleornochoking.
Figure16
1.Choke2.Gearshiftselector
GearShiftSelector
Thegearshiftselectorhasthreepositions:Forward,
Reverse,andNeutral(Figure16).Thegearshiftselector
mustbeinNeutraltostarttheengine.
Note:IfthegearshiftselectorisinReversewhenthe
ignitionisturnedon,abuzzerwillsoundtowarnthe
operator.
Important:Alwaysstopthevehiclebefore
changinggears.
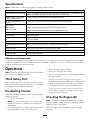
IgnitionSwitch
Theignitionswitch(Figure17),usedtostartandstop
theengine,hasthreepositions:On,Off,andStart.
RotatethekeyclockwisetotheStartpositiontostartthe
engine.Whentheenginestarts,releasethekey.When
thevehicleisstopped,rotatethekeycounterclockwise
totheOffpositiontostoptheengine.Removethekey
fromtheignition.
Figure17
1.Ignitionswitch
4.Oillight
2.Hourmeter5.PowerPoint
3.Lightswitch6.HornButton
HourMeter
Thehourmeter(Figure17)indicatesthetotalnumber
ofhourstheenginehasrun.
OilLight
Theoillightwarnstheoperatoriftheengineoillevel
dropsbelowasafelevel(Figure17).Ifthelightcomes
onandremainslit,theoillevelshouldbecheckedand
oiladdedifnecessary;refertoCheckingtheEngineOil
inOperation,page20.
Note:Theoillightmayicker.Thisisnormalandno
actionneedstobetaken.
LightSwitch
Toggletheswitchtoactivatetheheadlights.Pushto
turnthelightson(Figure17).
PowerPoint
Usethepowerpointtopower12voltoptionalelectrical
accessories(Figure17).
HornButton
Pressthehornbuttontosoundthehorn(Figure17).
FuelGauge
Thefuelgauge(Figure18)showstheamountoffuel
inthetank.
18


Specications
Note:Specicationsanddesignaresubjecttochangewithoutnotice.
Baseweight
Dry1050lb(476kg)
Ratedcapacity(onlevelground)1600lb(726kg)total,including200lb(90.7kg)operatorand200lb(90.7kg)passenger,load,
trailertongueweight,grosstrailerweight,accessories,andattachments
Maximumgrossvehicleweight
(GVW)(onlevelground)
2700lb(1225kg)total,includingalloftheweightslistedabove
Maximumcargocapacity(onlevel
ground)
1200lb(544kg)total,includingtrailertongueweightandgrosstrailerweight
Towcapacity:
StandardHitchTongueweight50lb(23kg)Maximumtrailerweight400lb(182kg)
HeavyDutyHitch
Tongueweight100lb(45kg)Maximumtrailerweight800lb(363kg)
Overallwidth59inches(150cm)
Overalllength115inches(292cm)
Groundclearance9-1/4inches(23.5cm)atthefrontwithnoloadoroperator,7inches(18cm)attherearwith
noloadoroperator
Wheelbase
79inches(200.7cm)
Wheeltread(centerlinetocenter
line)
49inches(124.5cm)inthefront,48-1/4inches(122.6cm)intherear
Cargoboxlength46inches(116.8cm)inside,51inches(129.5cm)outside
Cargoboxwidth49inches(124.5cm)inside,54inches(137.2cm)outside
Cargoboxheight10inches(25.4cm)inside
Attachments/Accessories
AselectionofToroapprovedattachmentsandaccessoriesareavailableforusewiththemachinetoenhanceand
expanditscapabilities.ContactyourAuthorizedServiceDealerorDistributororgotowww.Toro.comforalistof
allapprovedattachmentsandaccessories.
Operation
Note:Determinetheleftandrightsidesofthemachine
fromthenormaloperatingposition.
ThinkSafetyFirst
Pleasecarefullyreadallofthesafetyinstructionsand
decalsinthesafetysection.Knowingthisinformation
couldhelpyouorbystandersavoidinjury.
Pre-StartingChecks
Checkthefollowingitemseachtimeyoubeginusingthe
vehiclefortheday:
•Checkthetirepressure.
Note:Thesetiresaredifferentthancartires;they
requirelesspressuretominimizeturfcompaction
anddamage.
•Checkalluidlevelsandaddtheappropriateamount
ofspecieduids,ifanyarefoundtobelow.
•Checkthebrakepedaloperation.
•Ensurethatthelightsareworking.
•Turnthesteeringwheeltotheleftandrighttocheck
steeringresponse.
•Checkforoilleaks,looseparts,andanyother
noticeablemalfunctions.Makesuretheengineisoff
andallmovingpartshavestoppedbeforechecking
foroilleaks,looseparts,andothermalfunctions.
Ifanyoftheaboveitemsarenotcorrectandyou
arenotabletocorrecttheproblem,contactyour
AuthorizedServiceDealer.
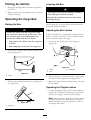
CheckingtheEngineOil
Note:Theengineisshippedwithoilinthecrankcase;
however,theleveloftheoilmustbecheckedbeforeand
aftertheengineisrststarted.
Checktheengineoillevelbeforestartingtheengine
eachday.
20
Page is loading ...
Page is loading ...
Page is loading ...
Page is loading ...
Page is loading ...
Page is loading ...
Page is loading ...
Page is loading ...
Page is loading ...
Page is loading ...
Page is loading ...
Page is loading ...
Page is loading ...
Page is loading ...
Page is loading ...
Page is loading ...
Page is loading ...
Page is loading ...
Page is loading ...
Page is loading ...
Page is loading ...
Page is loading ...
Page is loading ...
Page is loading ...
-
 1
1
-
 2
2
-
 3
3
-
 4
4
-
 5
5
-
 6
6
-
 7
7
-
 8
8
-
 9
9
-
 10
10
-
 11
11
-
 12
12
-
 13
13
-
 14
14
-
 15
15
-
 16
16
-
 17
17
-
 18
18
-
 19
19
-
 20
20
-
 21
21
-
 22
22
-
 23
23
-
 24
24
-
 25
25
-
 26
26
-
 27
27
-
 28
28
-
 29
29
-
 30
30
-
 31
31
-
 32
32
-
 33
33
-
 34
34
-
 35
35
-
 36
36
-
 37
37
-
 38
38
-
 39
39
-
 40
40
-
 41
41
-
 42
42
-
 43
43
-
 44
44


Toro Twister 1600 User manual
- Category
- Utility Vehicle
- Type
- User manual
- This manual is also suitable for
Ask a question and I''ll find the answer in the document
Finding information in a document is now easier with AI
Related papers
-
Toro Twister 1600 Utility Vehicle User manual
-
-
Toro Workman MDX Utility Vehicle User manual
-
-
-
-
-
-
-
Other documents
-
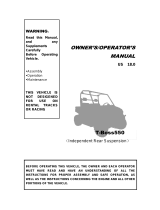 Massimo T-BOSS550 RED User manual
-
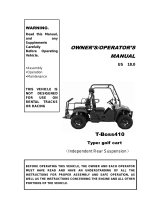 Massimo T-BOSS410 GREEN User manual
-
Bush Hog Utility Vehicle Trail Series User manual
-
-
Cub Cadet 430 User manual
-
Polaris UTV Series 10 2x4 / UTV Series 10 4x4 Utility Task Vehicle Owner's manual
-
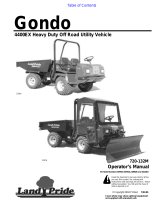 Land Pride 22076 User manual
-
ATV or Youth Sportsman X2 500 EFI / 700 EFI / 800 EFI Owner's manual
-
-


