Page is loading ...

QUICK SETUP GUIDE
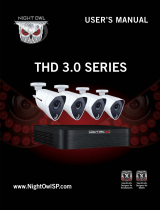
C50XFR SERIES
SECURITY SYSTEMS
Home
&
Business

1
Package Contents
DISCLAIMER: The exact components of your system, images and quantities may vary
depending on your model number. While these may vary, this QSG will address the setup
and initial conguration of your DVR and cameras.
DVR Camera(s)
60 ft. Video/Power Cables
(1 cable per camera)
Power Splitter(s)
(1 per 4 cameras)
USB Mouse (x1)
6 ft. HDMI (x1)
DVR Power Adapter (x1) Camera Power Adapter(s)
(1 per 4 cameras)
6 ft. Ethernet (x1)
Safety Sticker (x3)
Mounting Hardware
Items Not Included
NOTE: Monitor is required
for initial setup.
RouterMonitor
What’s in the Box
IMPORTANT: For best results, use all the included Night Owl accessories. Third-party
accessories may not work properly.

2
HDMI
USB
Plug included HDMI cable into
the HDMI port on the back of
the DVR.
1
Plug the USB mouse into the USB
port on the back of the DVR.
3
Plug the included Ethernet
cable into the LAN port on
the back of the DVR.
4
Plug the other end of the
HDMI cable into the back
of the TV or Monitor.
2
Plug the other end of the
Ethernet cable into a numbered
port on the back of the router.
5
STOP: BEFORE installing, test
each camera locally to confirm they
function properly.
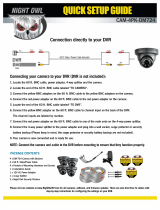
Connecting Your System
ETHERNET
NOTE: Monitor is required for initial setup. To
view cameras, TV/Monitor must be tuned to
the same Input the HDMI is plugged into.
(Router Not
Included)
DISCLAIMER: Camera/cable quantities may vary.
ETHERNET

3
Connect the DVR power adapter
to the Power Input on the rear
of the DVR.
10
Connect the red female power
leads of the video/power cables
to the male power splitter ends.
8
NOTE: Check that the UPS or surge protector
is switched ON.
Power
Splitter
Camera Power
Adapter
(Surge
Protector Not
Included)
Power Cable
Connectors
Power Splitter
Connectors
Connect the power splitter to the
camera power adapter and plug the
adapter into a surge protector or
Uninterruptible Power Supply (UPS).
9
NOTE: Some systems will beep upon booting up.
Plug the DVR power adapter into a
surge protector or Uninterruptible
Power Supply (UPS).
11
(Surge
Protector Not
included)
NOTE: Audio enabled cameras will have
a white RCA connector to transmit audio
signal (Optional).
FROM Camera TO Camera
Connect the ends of the cable
attached to the camera to the
ends of a video/power cable
labeled TO CAMERA ONLY.
6
NOTE: Make sure you twist and lock BNC connectors.
Connect the BNC connector of the
video/power cable labeled TO DVR
ONLY to an open video input on
the DVR.
7

On the Password Creation screen, please note the following:
2
Important… Please Read
1
When you power on the DVR
you will be prompted with the
following screen. Please follow
the instructions to complete the
Startup Wizard.
Startup Wizard
Booting Up for the First Time
Admin Account Creation
By default, the username will be admin. It must
remain admin upon your initial account configuration.
However, you may add additional users at a later time.
NOTE: Password can be any alphanumeric combination
between 6 and 20 characters.
Recovery Email Address
Please ensure you provide a valid email address
in case your ever forget your account information.
NOTE: You MUST enter a VALID email address. If you
don’t, you will have to call Tech Support to reset your
password, and that just seems like a waste of time.
Remember Your Password
Night Owl strongly recommends writing down your
password within the Quick Setup Guide. You will need
it every time you log into your DVR and to remotely
view on a Smart Device.
Write your
password here:
4

5
Mounting Guide for Your Intelligent Cameras
Your cameras, when properly placed, use Human Detection and Facial Capture with
Recognition to reduce false alerts. The technology is fantastic, but it does require
meeting certain conditions to get the best results. When mounting your cameras,
keep the following tips in mind.
Human Detection
Up to 40 ft.
Facial Capture with Recognition
Up to 10 ft.
Ideal Camera
Mounting Area
7 ft. - 9 ft. High
10 ft. -
0 ft. -
60˚
90˚
90˚
5 ft. -
Mount the camera 7 – 9 ft. high.
Angle the camera so it points in the direct line of sight to a
person’s face.
The person needs to look directly into the camera.
Detection occurs when a person is within a 60˚ field of view.
Lighting needs to be optimal, meaning the face needs to
have good light around it.
To be recognized, a person needs to be standing still or
walking at a normal pace. If the person is running or
walking fast, recognition is not guaranteed.
The camera detects a “Face” up to 10 ft. away.
1
2
The cameras detect a human up to 40 ft. away.
Detection occurs when a person is within a 90˚ field of view.
*Under ideal conditions
1
2
3
4
5
6
7

6
• Changes in lighting and environmental conditions may cause false alerts.
• Changes in a person’s look (glasses, hats, beards, etc.) may affect the recognition process.
• The corners of the camera’s field of view may not be as accurate.
For Your Information
Human Detection
Up to 40 ft.
Facial Capture with Recognition
Up to 10 ft.
Ideal Camera
Mounting Area
7 ft. - 9 ft. High
10 ft. -
0 ft. -
60˚
90˚
90˚
5 ft. -
Mount the camera 7 – 9 ft. high.
Angle the camera so it points in the direct line of sight to a
person’s face.
The person needs to look directly into the camera.
Detection occurs when a person is within a 60˚ field of view.
Lighting needs to be optimal, meaning the face needs to
have good light around it.
To be recognized, a person needs to be standing still or
walking at a normal pace. If the person is running or
walking fast, recognition is not guaranteed.
The camera detects a “Face” up to 10 ft. away.
1
2
The cameras detect a human up to 40 ft. away.
Detection occurs when a person is within a 90˚ field of view.
*Under ideal conditions
1
2
3
4
5
6
7

7
Download and Install Application
The Night Owl Application will lead you through the rest of the setup process.
Download the app from the App Store
or Google Play Store and install the
application on your device.
After completing the account
setup and verification process,
sign into the app and tap the
“+” symbol to add a device.
3
Create an account using an
email address for the username
and a password between
6–20 characters.
Using Night Owl Connect
2
1
NOTE: Setup is the same for
Smartphone and Tablet.

8
A device can be added to the Night Owl Connect App by using the
application’s Smart Auto Detection or through a QR Code Setup. With Smart
Auto Detection, your DVR will automatically be detected by the Night Owl
Connect software, making connecting easy! To use this preferred method, ensure
your Smart Device and DVR are both on the same network.
Connecting and Adding your Device
If your DVR and Smart Device are running
Night Owl Connect on the same network,
the Smart Auto Detection will find your
DVR. If this method is not available, please
use the QR Code Setup from step 4B below.
4A
Smart Auto Detection
4B
To use the QR Code Setup, select Setup
device by QR Code and hover your Smart
Device camera lens over the QR Code
located on the top of your DVR.
QR Code Setup
Ethernet Cable
WIFI
To begin adding a new device, first select
the yellow plus sign within the Device menu.
Then select your device type from the Device
list and follow the on screen instructions.
Adding a Device
4
NOTE: When adding a new device, it may take 5–10 minutes before you begin
receiving notifications.

9
On the Device Login screen, enter the login information for the DVR
(Remember, the DVR login and Night Owl Connect App login are different).
The DVR username is admin by default. If you are not the admin, login with
your username credentials.
5
Using Night Owl Connect
The password will be the same password you created during
the Startup Wizard and should be stored in your QSG.
NOTE: This is the password of your DVR, NOT the password
used to login to the Night Owl Connect App. You must key the
DVR password verbatim to add it to the app.
admin is case sensitive
(all lowercase).

FAQs
Frequently Asked Questions
1. Does my DVR have to be connected to the Internet?
Your DVR does not require an Internet connection for basic operation,
but you will need to connect the DVR to your router to remotely view your
system on a PC/Mac
®
or Smart Device.
2. Does my DVR have to be connected to a TV or monitor?
For initial setup, you will need to connect your DVR to a TV or monitor.
After completing the initial setup, your DVR does not need to be connected
to a TV or monitor to view or capture recordings. You can view your
system using the Night Owl Connect CMS Software on a PC/Mac
®
or by
downloading the Night Owl Connect App on your Smart Device.
3. Are my cameras weatherproof?
Yes, your cameras are weatherproof and will endure minimal moisture and
dirt/debris. However, Night Owl strongly recommends placing all outdoor
cameras under an eave or awning to help shield them from overexposure to
the elements, which could reduce your camera’s lifespan.
4. Why does my camera stop working at night?
Your camera might not be receiving enough power for the LEDs needed
for Night Vision. Plug the camera directly into the camera power adapter
(bypassing the splitter) to see if the LEDs turn on. If they do, you may need
to purchase an additional camera power adapter for that camera.
5. Why is the Night Owl Connect App not accepting my password?
Night Owl Apps require two passwords. One is for logging into the app, and
the other is the DVR’s admin password. To add a device to the app, enter
the DVR’s admin password. Remember, you MUST confirm your email by
clicking the “Confirm Email” link in the verification email sent by Night
Owl during setup.
6. Why can’t I connect using the Night Owl Connect App or Night Owl
Connect CMS Software?
If you are having trouble connecting using the mobile app or client
software: A) your system may not be connected to a router; B) the latest
firmware or client software may not be installed; C) the DVR password was
entered incorrectly; D) you may need to restart your DVR; E) the network
upload speed may be too slow, contact your ISP.
10

Rev 190510
www.NightOwlSP.com
iPhone, iPad, Mac and Mac OS X are registered trademarks of Apple Inc.
Windows, Windows XP, Windows Vista, Windows 7, Windows 8 and
Windows 10 are registered trademarks of Microsoft Corporation in the
United States and/or other countries.
Need Help?
For system manuals, troubleshooting guides, FAQs,
video tutorials and more:
Please refer to the sticker
located on top of the device
for steps on how to access your
product’s support material.
WEBSITE
24/7 Product Support
• How-To Videos
• Manuals
Contact Us
1. Please visit www.NightOwlSP.com
2. Click Support on the top of the homepage.
3. Type WXYZ in the top right search bar.
NEED SUPPORT?
With the use of your
Night Owl App, scan
now for remote viewing
on your Smart Device
EMAIL
Sales Support
Sales@NightOwlSP.com
Technical Support
PHONE (English, Spanish & French)
Technical Support
1.866.390.1303
Live Chat 24/7, 365 days a year
Pre-Sales Support
1.866.979.0580
/