
Installation and Care Guide
Kitchen and Bar Sinks
1130284-2-F

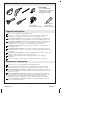
Tools and Materials
Important Information
Observe all local plumbing and building codes.
Provide your countertop manufacturer with your sink model number when
ordering your countertop; ensure the correct cut-out template is used.
For top-mount installations: The number of clips included with your sink may
differ from the number of clips illustrated. Use all clips included with the sink.
For top-mount installations: The fasteners included with the clip assembly will
accommodate countertops up to 1-3/4″ (44 mm) thick. Longer fasteners are
available for thicker countertops; contact the Customer Care Center.
For top-mount installations: If possible, install the faucet to the sink before
installing the sink.
For under-mount installations: Provide the countertop manufacturer with the
required faucet hole locations to ensure that countertop holes align with the sink
faucet holes.
For under-mount installations: Clean the underside of the countertop at the sink
installation area thoroughly before installing the sink.
Install the water supplies and drain piping according to the roughing-in
information.
Allow the sealant to cure following the sealant manufacturer’s instructions.
Informations importantes
Respecter tous les codes de plomberie et de bâtiment locaux.
Fournir le numéro du modèle de l’évier au fabricant du comptoir lors de la
commande de celui-ci; s’assurer que le gabarit de découpe correct est utilisé.
Pour des installations à montage en surface : Le nombre d’attaches incluses avec
l’évier pourrait différer du nombre d’attaches illustré. Utiliser toutes les attaches
incluses avec l’évier.
Pour des installations à montage en surface : Les dispositifs de fixation inclus
avec l’ensemble d’attaches peuvent s’adapter à des comptoirs d’une épaisseur
maximum de 1-3/4″ (44 mm). Des dispositifs de fixation plus longs sont
disponibles pour des comptoirs plus épais; contacter le service à la clientèle.
Pour des installations à montage en surface : Si possible, installer le drain sur
l’évier avant d’installer l’évier.
• 1/2" or larger Drill Bit
Mêche de 1/2" ou plus large
Broca de 1/2" o mayor
• Rags/Chiffons/Trapos
Plus/Plus/Más:
Jigsaw
Scie sauteuse
Sierra caladora eléctrica
Silicone Sealant
Joint en silicone
Sellador de silicona
1130284-2-F 2 Kohler Co.
Page is loading ...

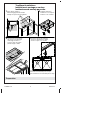
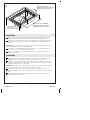
Preparation
1
34
2
Cut along the top-mount line.
Découper le long de la ligne
de montage en surface.
Corte a lo largo de la línea
para montaje por arriba.
Verify cabinet clearance.
Vérifier le dégagement du meuble.
Verifique el espacio libre del gabinete.
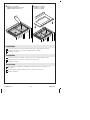
Recommended Clip Placement
Emplacement recommandé pour les clips
Lugar de instalación recomendado para los clips
Insert the clips into the channels.
Insérer les clips dans les canaux.
Inserte los clips en los canales.
Top-Mount Installations
Installations à montage en surface
Instalaciones de montaje por arriba
Install the strainer(s).
Installer la ou les crépines.
Instale la o las coladeras.
1130284-2-F 4 Kohler Co.

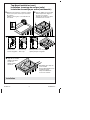
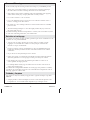
Installation
7
Verify fit. Adjust cutout if needed.
Vérifier l'ajustement. Régler la
découpe si nécessaire.
Verifique que quede bien. Ajuste
la abertura si es necesario.
56
Drill pilot hole and cut the countertop opening.
Percer un trou-pilote et découper l'ouverture
du comptoir.
Taladre el orificio guía y corte la abertura en
la encimera.
Apply silicone sealant.
Appliquer du mastic
à la silicone.
Aplique sellador
de silicona.
8
Immediately wipe away any
excess sealant.
Essuyer immédiatement tout
excédent de mastic.
Limpie inmediatamente
el exceso de sellador.
Top-Mount Installation (cont.)
Installation à montage en surface (suite)
Instalación de montaje por arriba (continuación)
Insert the sink.
Insérer l'évier.
Inserte el fregadero.
Rotate the clip.
Pivoter le clip.
Gire el clip.
Tighten to secure sink.
Serrer pour fixer l'évier en place.
Apriete para fijar el fregadero.
Kohler Co. 5 1130284-2-F
Page is loading ...
Page is loading ...

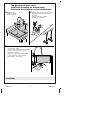
Installation
Measure the cabinet opening where the sink will be installed. Plan for adequate
clearance between the faucet handles and the backsplash or finished wall.
Construct a wood frame for the inside of the cabinet. Allow adequate clearance for
the faucet valving and sink bowl. Ensure that the frame will support the entire
sink rim.
IMPORTANT! Locate the frame so that once the sink is installed, the top of the sink
rim will be flush with the top of the cabinet walls.
Position the wood frame within the cabinet and secure. Locate the fasteners for
easy access in case the sink needs to be removed.
Apply a 1″ (25 mm) bead of sealant at each corner of the wood frame where it
will contact the sink.
Installation
Mesurer l’ouverture du meuble où l’évier sera installé. Prévoir suffisamment de
dégagement entre les poignées du robinet et le dosseret ou le mur fini.
Construire un cadre en bois pour la partie intérieure du meuble. Laisser un espace
adéquat pour les vannes de robinet et la vasque de l’évier. S’assurer que le cadre
supporte le rebord de l’évier au complet.
IMPORTANT! Positionner le cadre de manière à qu’une fois l’évier installé, le dessus
du rebord de ce dernier soit à ras du dessus des murs du meuble.
Positionner le cadre en bois dans le meuble et le fixer en place. Positionner les
dispositifs de fixation pour un accès facile dans l’éventualité où l’évier devrait être
retiré.
Appliquer un boudin de mastic d’étanchéité de 1″ (25 mm) sur chaque coin du
cadre en bois qui touche l’évier.
Apply silicone sealant.
Appliquer du mastic à la silicone.
Aplique sellador de silicona.
Wood Frame
Cadre en bois
Estructura de madera
4
Clearance for the Sink Basin
Dégagement pour cuve d'évier
Espacio libre para el fregadero
1130284-2-F 8 Kohler Co.
Page is loading ...

Installation
Lower the sink into the cabinet. Verify that the sink is supported by the frame.
Verify that the sink is level, make any adjustments as needed.
Install the countertop.
Installation
Abaisser l’évier dans le meuble. Vérifier que l’évier est supporté par le cadre.
Vérifier que l’évier est de niveau, ajuster selon les besoins.
Installer le comptoir.
Instalación
Baje el fregadero al gabinete. Verifique que el fregadero quede soportado por la
estructura.
Verifique que el fregadero quede nivelado, y ajuste de ser necesario.
Instale la encimera.
65
Apply silicone sealant.
Appliquer du mastic à la silicone.
Aplique sellador de silicona.
Install the countertop.
Installer le comptoir.
Instale la encimera.
1130284-2-F 10 Kohler Co.

Installation
78
109
Under-Mount Installation (cont.)
Installation à montage sous plan (suite)
Instalación de montaje por abajo (continuación)
Install the faucet.
Installer le robinet.
Instale la grifería.
Complete drain and faucet connections.
Effectuer les connexions du drain et
du robinet.
Termine todas las conexiones
del desagüe y la grifería.
Apply silicone sealant.
Appliquer du mastic
à la silicone.
Aplique sellador
de silicona.
Immediately wipe away any
excess sealant.
Essuyer immédiatement tout
excédent de mastic.
Limpie inmediatamente
el exceso de sellador.
Run water into the sink and check all
connections for leaks.
Laisser couler l'eau dans l'évier et vérifier
toutes les connexions pour s'assurer
de l'absence de fuites.
Haga circular agua dentro del fregadero
y revise todas las conexiones para
verificar que no haya fugas.
Kohler Co. 11 1130284-2-F

Care and Cleaning
For best results, keep the following in mind when caring for your KOHLER product:
•
Always test your cleaning solution on an inconspicuous area before applying to
the entire surface. Cleaners containing chloride are not recommended.
•
Wipe surfaces clean and rinse completely with water immediately after applying
cleaner. Rinse and dry any overspray that lands on nearby surfaces.
•
Do not allow cleaners to soak on surfaces.
•
Use a soft, dampened sponge or cloth. Never use an abrasive material such as a
brush or scouring pad to clean surfaces.
•
Be careful not to leave staining materials in contact with the surface for extended
periods of time.
•
The ideal cleaning technique is to rinse thoroughly and blot dry any water from
the surface after each use.
For detailed cleaning information and products to consider, visit www.kohler.com/clean.
To order Care & Cleaning information, call 1-800-456-4537.
Entretien et nettoyage
Pour obtenir les meilleurs résultats possibles, prendre ce qui suit en considération lors de
l’entretien de votre produit KOHLER :
•
Toujours tester la solution de nettoyage sur une surface non visible avant de
l’appliquer sur l’ensemble de la surface. Les nettoyants qui contiennent du
chlorure ne sont pas recommandés.
•
Essuyer les surfaces et rincer complètement avec de l’eau immédiatement après
l’application du nettoyant. Rincer et sécher tout éclaboussement sur les surfaces
avoisinantes.
•
Ne pas laisser les nettoyants tremper sur les surfaces.
•
Utiliser une éponge ou un chiffon doux et humide. Ne jamais utiliser de matériau
abrasif tel qu’une brosse ou une éponge à récurer pour nettoyer les surfaces.
•
Faire attention de ne pas laisser de matériaux qui tachent en contact avec la
surface pendant de longues périodes.
•
La technique idéale de nettoyage est de bien rincer et de sécher toute eau de la
surface après chaque usage.
Pour obtenir des renseignements détaillés sur le nettoyage et les produits à considérer,
consulter le site www.kohler.com/clean. Pour commander des renseignements sur& le
nettoyage, appeler le 1-800-456-4537.
Cuidado y limpieza
Para obtener los mejores resultados, tenga presente lo siguiente al limpiar su producto
KOHLER:
•
Siempre pruebe la solución de limpieza en un área oculta antes de aplicarla a toda
la superficie. No se recomienda utilizar limpiadores que contengan cloruro.
1130284-2-F 12 Kohler Co.

Cuidado y limpieza (cont.)
•
Limpie con un paño las superficies, y enjuague completa e inmediatamente con
agua después de haber aplicado algún limpiador. Enjuague y seque las superficies
cercanas donde hayan caído salpicaduras.
•
No deje mucho tiempo los limpiadores en las superficies.
•
Utilice una esponja humedecida, o un paño suave y húmedo. Para limpiar las
superficies nunca utilice materiales abrasivos, como cepillos o estropajos.
•
Tenga cuidado de no dejar sustancias que manchen en contacto con la superficie
durante mucho tiempo.
•
La técnica de limpieza ideal es enjuagar muy bien y secar el agua de la superficie
después de cada uso.
Para obtener información detallada de limpieza y de productos a considerar, visite
www.kohler.com/clean. Para solicitar información sobre cuidado y limpieza, llame
al 1-800-456-4537.
Warranty
Lifetime Limited Warranty for KOHLER
®
Stainless Steel Sinks
Kohler Co. warrants its stainless steel kitchen, bar, and utility sinks manufactured after
October 24, 2012, to be free of defects in material and workmanship during normal
residential use for as long as the original consumer purchaser owns his or her home.
Gloss reduction, scratching, staining and acid or alkaline etching of the finish over time
due to use, cleaning practices or water or atmospheric conditions, are not manufacturing
defects but are indicative of normal wear and tear. This warranty applies only to
KOHLER stainless steel kitchen, bar, and utility sinks installed in the United States of
America, Canada or Mexico (North America).
If a defect is found in normal residential use, Kohler Co. will, at its election, repair,
replace or make appropriate adjustment. Damage caused by accident, misuse, or abuse,
such as dents and scratches after installation, is not covered by this warranty. Improper
care and cleaning will void the warranty. Proof of purchase (original sales receipt) must
be provided to Kohler Co. with all warranty claims. Kohler Co. is not responsible for
labor charges, installation, or other incidental or consequential costs. In no event shall the
liability of Kohler Co. exceed the purchase price of the product.
If the stainless steel kitchen, bar, or utility sink is used commercially or is installed
outside of North America, Kohler Co. warrants the stainless steel sink to be free from
defects in material and workmanship for one (1) year from the date the product is
installed, with all other terms of this warranty applying except duration. All other
components other than the stainless steel component carry Kohler Co.’s one-year limited
warranty unless otherwise specified.
If you believe that you have a warranty claim, contact your Dealer, Plumbing Contractor,
Home Center or E-tailer, or write to Kohler at: Kohler Co., Attn.: Customer Care Center,
444 Highland Drive, Kohler, WI 53044, USA. Please be sure to provide all pertinent
information regarding your claim, including a complete description of the problem, the
product, model number, color, finish, and the date the product was purchased and from
whom the product was purchased. Also include your original invoice. For other
information, or to obtain the name and address of the service and repair facility nearest
you, call 1-800-4-KOHLER (1-800-456-4537) from within the USA and Canada, and
001-800-456-4537 from within Mexico or visit www.kohler.com within the USA,
www.ca.kohler.com from within Canada, or www.mx.kohler.com in Mexico.
KOHLER CO. AND/OR SELLER ARE PROVIDING THIS WARRANTY IN LIEU OF
ALL OTHER WARRANTIES, EXPRESSED OR IMPLIED, INCLUDING BUT NOT
LIMITED TO THE IMPLIED WARRANTIES OF MERCHANTABILITY AND
FITNESS FOR A PARTICULAR PURPOSE. KOHLER CO. AND/OR SELLER
DISCLAIMS ANY LIABILITY FOR SPECIAL, INCIDENTAL OR CONSEQUENTIAL
Kohler Co. 13 1130284-2-F
Page is loading ...
Page is loading ...
Page is loading ...
Page is loading ...
Page is loading ...
Page is loading ...
Page is loading ...
-
 1
1
-
 2
2
-
 3
3
-
 4
4
-
 5
5
-
 6
6
-
 7
7
-
 8
8
-
 9
9
-
 10
10
-
 11
11
-
 12
12
-
 13
13
-
 14
14
-
 15
15
-
 16
16
-
 17
17
-
 18
18
-
 19
19
-
 20
20


Ask a question and I''ll find the answer in the document
Finding information in a document is now easier with AI
in other languages
- français: Kohler K-3822-4-NA Manuel utilisateur
- español: Kohler K-3822-4-NA Manual de usuario
Related papers
-
Kohler K-3838-4-NA User manual
-
Kohler K-R3822-4-NA Installation guide
-
Kohler 3391-NA Installation guide
-
Kohler K-3820-3-NA Installation guide
-
-
Kohler K-3145-4-NA User manual
-
-
Kohler K-T10423-4S-G Installation guide
-
Kohler K-3847-4-NA Installation guide
-
Kohler K-20212-7 Installation guide
Other documents
-
Ticor PLZ-610 Installation guide
-
American Standard 1180SB3620SS.075 Installation guide
-
American Standard 77DB33223.308 Installation guide
-
DXV 1180DB3620.291 Installation guide
-
Sterling 1042-4-0 User manual
-
BOCCHI 1362-006-0120 User manual
-
-
IKEA AA-2378549-1 User manual
-
 LaToscana LA3019W Installation guide
-
Ancona AN-3215 User manual
