Page is loading ...

1 | P a g e
How’s It Hanging?
Step-by-Step Guide for Hanging your Wallpaper
Walls Republic offers a richer and wider selection of designs, textures and colours than ever before
found in the wallpaper world, enabling you to create the exact mood and aesthetic you have in mind.
This step-by-step guide is designed to walk you through the various stages of successful wallpaper
hanging. Our “Easy-Up” wall coverings will help you achieve the perfect look!
Please read through the entire document before starting your installation process to better understand
what is required.
First things first
If you’re as excited about your wallpaper as we are, preparation might seem like a drag, but set yourself
up properly in the beginning, and you will roll through the stages with ease.
Before you rip open the wallpaper in anticipation, make sure the rolls are all the same reference number
and batch number; this will ensure they are all the same colour and will match up to achieve the most
seamless composition.
If there is any painting to be done in conjunction with our wallpaper, make sure you do this first. Let the
paint dry fully before you start papering. If you are painting or papering the ceiling, do this before the
walls. Don’t forget to cover the floor and any furniture you have left in the room with drop cloths. You
do not want to get paste or dust on them during this process.
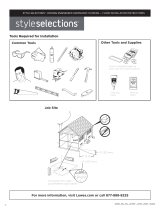
Tools for the Job
Make sure you have all the necessary tools before you start. The must haves for this process will be a
paste brush, a sponge, a plumb bob, a metal tape measure, a sharp knife, a pair of decorating scissors,
and a bucket of clean water.
Prepping the Walls
This stage is the most important part of the process; to make sure the wall surface is properly prepared.
Time spent before hanging the wallpaper will make the job easier and help insure a job well done.
Start your preparation by removing all switch plates, outlet plates and wall fixtures that are not
permanent. If you’re removing any type of electrical obstacle, please remember to turn off the power
connected to it.
The wall surface should be cleaned, dry, sound and free of stains.
Any loose paint must be removed from the wall. Glossy and semi-gloss paint should be sanded to dull
the surface and a coat of adhesion promoting primer applied prior to the installation of wallpaper.

2 | P a g e
Any wall irregularities should be corrected with either spackling, drywall compound or other wall repair
materials.
Always remember that you will be using a water-based adhesive to hang the wallpaper which puts stress
on the wall surface as the adhesive cures and the wallpaper shrinks or contracts. If the wall is not
properly prepped it could cause problems in your installation process or hinder the integrity of the
wallpaper down the road.
Making the Cut
Now that your walls are prepped and ready, it is time to start papering! Carefully measure the Height of
your wall to know how long the first strip or “DROP” will be, add 3” to this length to allow for cutting
wastage. (see figure 1)
If you are using a bold patterned wallpaper make sure your first DROP has the pattern centered the way
you want it, so each additional drop will match up to and compliment the placement of your initial
pattern.
Ensure that your pattern is hanging the right way, and do not assume the outside end of the roll is the
top-this is not always so. Mark the back of the paper with a T to avoid confusion later on.
Now consider where you will start your hanging. For papers with bolder patterns, choose a focal point in
the intended space, such as a feature wall or a chimney breast and plan to hang the first DROP from the
center (see Figure 2) If you have a more simplistic design start in an inconspicuous corner, usually
behind a door or in the back of the room.
With a bold design always cut the first length so that when it is hung and finally trimmed; top and
bottom, there will be a centered, complete motif in your preferred orientation (top of the wall, bottom,
or directly in the center) – (see figure 3) This is where your pattern repeat comes into play, for all
additional strips or DROPS, you must add the ‘pattern repeat’ to the height of your room, plus the This
is where your pattern repeat comes into play, for all additional strips or DROPS, you must add the
‘pattern repeat’ to ensure your pattern matches and in consistent throughout the space. . Larger
patterns will mean using more wallpaper in order to match the pattern up accurately. It is easiest, when
matching up your pattern, to cut all of your drops first, before starting to hang them; you will have more
room to adjust and match each strip to the previous one.

3 | P a g e
Figure 1 Figure 2 Figure 3
Pasting the Wall
Walls Republic Residential wallpapers are non-woven backings, making installation a breeze. Non-woven
papers mean you apply the paste to the wall, not the paper itself.
Any basic wallpaper paste will be suitable as long as they adhere to non-woven material. These
adhesives contain a fungicide that is necessary for vinyl and scrub-able wall coverings. Read the
instructions of the paste carefully, especially when mixing, to ensure the correct consistency.
Pasting the wall is a quicker, easier process than the traditional pasting the paper method, cutting
installation time in almost half! Do not paste the whole wall at a time, simply paste one section of the
wall at a time, apply the drops of wall paper and carry on. The beauty of paste the wall vs. the traditional
method is it is easy to re adjust your drop of paper if it doesn’t seem quite right!
Starting off Straight
Few walls are truly square or perfectly vertical. To avoid your pattern going askew in the midst of your
hanging process, always reference a vertical line made with a level or your plumb line.
You normally start hanging in the most inconspicuous corner (behind a door or a dark corner near the
back of the room.) Do not hand directly on the leveled or plumb line mark; hang parallel to it, but about
¼” short of the line, allowing the excess ¼” wrap around the corner and onto the adjoining wall (See
Figure 4, see also, how to deal with corners.) Smooth your wallpaper starting at the line edge and
moving towards the corner.
Figure 4
How’s it Hanging?
Once you have applied your paste to the wall it’s time to start hanging your paper. As explained above,
you generally want to start in the least noticeable corner. Unless you are doing a focal point or feature
wall and want to center the pattern. Make sure you know which end of the wallpaper is designated for
the top (you marked it on the back during the cutting process).
Holding the top of your drop, lightly stick it to the top of your wall, allowing for 1-2” on top for cutting
wastage. Fit your piece exactly into position based on the leveled or plumb line you made.

4 | P a g e
Smooth down the middle of the paper with a paperhanger’s brush, ensuring you have an accurate
pattern match and butt joint. Using the brush, work your way down the wallpaper drop and out to the
edges, removing air bubbles and creases (see Figure 5)
Figure 5
Once the wallpaper is in place, you should have 1-2” left at the bottom of the drop as well. Carefully run
the back of your scissors along the angle of the ceiling and the wall at the top of your drop, as well as the
bottom; whether it is along the baseboard or floor. This makes an impression of where you need to cut
and trip your paper for a perfect fit (see Figure 6).
Figure 6
Gently pull the drop away from the wall, just enough to be able to cut along your impression to trim the
paper. Once you’ve trimmed, brush paper back into place, where it should fit perfectly.
Carefully wipe any paste off of the surface of the paper, the ceiling or floor, do this using a clean, damp
sponge. Rinse the sponge frequently to ensure it is always clean when touching the surface of the paper.
Hanging around Corners
As previously mentioned, corners are rarely, if ever, truly vertical. Never attempt to hang papers around
them. Always hang them into two parts, decorating first into the corner before going onto the next wall
and decorating back into the same corner.
To do this, first measure the distance in 2 or 3 places, from the last drop into the corner. Add 5-10mm to
the longest of the distances measured and cut the length dry to that width. Paste in the normal way and
hang the paper. Fold the excess around the corner and brush tight in using a paperhangers brush.
On the next wall, measure the width of the piece cut off from the last drop and make a new vertical
plumb line at that width for the corner. Using the plumb line as a vertical guide, paste and hang the cut-

5 | P a g e
off piece back into the corner, slightly overlapping the piece turned around from the previous wall. Use
an overlap or border adhesive for overlapping into the corners. This is particularly important when
hanging vinyls. On thick or heavily embossed papers it may be necessary to overlap and double cut (cut
along the corner with a straight edge and sharp knife, remove the cut piece from underneath and
replace the top later to create a flush, butt joint.
Outlets
Be cautious when applying your wall covering over or around electrical switches, outlets or similar
items. It is recommended that the electricity for those outlets be turned off during the hanging process.
Remove the outlet casing to ensure an accurate and clean fit. Smooth the wall covering down gently,
over the fitting. Pierce the paper in the center of the outlet and make diagonal cuts from this point to
about 1” beyond each corner (see Figure 7)
Figure 7
Place the outlet cover on top of the wall covering and lightly mark its outline. Cut around this outline.
The extra 1” of diagonal cut, allows you to work in this space without tearing the wallpaper during
cutting (see Figure 8).
Figure 8
When the area is completely cut out, place the casing back on to tuck the corners away. The 1” diagonal
cuts will be firmly pressed and hidden by the casing.
/