
MANUAL DE
INSTALACIÓN Y USO
MANUAL DE
INSTALAÇÃO E USO
MANUEL
D’INSTALLATION ET D’UTILISATION
INSTALLATION
AND USER’S MANUAL
MONTAGE- UND
GEBRAUCHSANLEITUNG
GEBRUIKS- EN
MONTAGE-AANWIJZING

2
INDICE
1. INSTRUCCIONES DE INTEGRACIÓN 3
2. INFORMACIÓN SOBRE SEGURIDAD Y ADVERTENCIAS GENERALES 6
3. INSTALACIÓN 7
4. FUNCIONAMIENTO Y USO DEL APARATO 8
5. LIMPIEZA Y MANTENIMIENTO 11
6. SOLUCIÓN DE PROBLEMAS 13
7. LLAMADA AL SERVICIO DE ASISTENCIA TÉCNICA 14
Lea atentamente estas instrucciones antes de usar el aparato.
Guarde este manual para futuros usos.

3
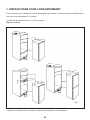
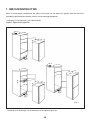
1. INSTRUCCIONES DE INTEGRACIÓN
En caso de observar daños sufridos durante el transporte del aparato, informar inmediatamente al suministrador
antes de efectuar la instalación.
- Introducción del aparato en el mueble de integración:
Figura 1, figura 2a y Figura 2b.
- Controle que las dimensiones del hueco para la integración y del aparato sean compatibles.
Fig. 1
50
50
200 cm
2
200 cm
2
min. 550
min. 550
min. 550
560
540
540
540
540
540
540
min. 560
560
A
200 cm
2
A
200 cm
2
A
200 cm
2
200 cm
2
A
50
Page is loading ...
Page is loading ...
Page is loading ...
Page is loading ...
Page is loading ...
Page is loading ...
Page is loading ...
Page is loading ...
Page is loading ...
Page is loading ...
Page is loading ...

15
ÍNDICE
1. INSTRUÇÕES DE INTEGRAÇÃO 16
2. INFORMAÇÃO SOBRE SEGURANÇA E ADVERTÊNCIAS GERAIS 19
3. INSTALAÇÃO 20
4. FUNCIONAMENTO E USO DO CONGELADOR 21
5. LIMPEZA E MANUTENÇÃO 24
6. SOLUÇÃO DE PROBLEMAS 26
7. CHAMADA AO SERVIÇO DE ASSISTÊNCIA TÉCNICA 27
Leia atentamente estas instruções antes de usar o aparelho.
Guarde este manual para futuros usos.

16
1. INSTRUÇÕES DE INTEGRAÇÃO
Caso observe danos sofridos durante o transporte do aparelho, informe imediatamente o fornecedor antes de
efectuar a instalação.
- Introdução do aparelho no móvel de integração:
Figura 1, figura 2a e figura 2b
- Assegure-se de que as dimensões do espaço para a integração e as dimensões do aparelho são compatíveis.
Fig. 1
50
50
200 cm
2
200 cm
2
min. 550
min. 550
min. 550
560
540
540
540
540
540
540
min. 560
560
A
200 cm
2
A
200 cm
2
A
200 cm
2
200 cm
2
A
50
Page is loading ...
Page is loading ...
Page is loading ...
Page is loading ...
Page is loading ...
Page is loading ...
Page is loading ...
Page is loading ...
Page is loading ...
Page is loading ...
Page is loading ...

28
TABLE DES MATIÈRES
1. INSTRUCTIONS POUR L’ENCASTREMENT 29
2. INFORMATIONS RELATIVES À LA SÉCURITÉ ET AVERTISSEMENTS D’ORDRE GÉNÉRAL
32
3. INSTALLATION 33
4. FONCTIONNEMENT ET UTILISATION DU RÉFRIGÉRATEUR 34
5. NETTOYAGE ET ENTRETIEN 37
6. RÉSOLUTION DE PROBLÈMES 39
7. SERVICE D’ASSISTANCE TECHNIQUE 40
Avant d’utiliser l’appareil, lisez attentivement les instructions de ce manuel.
Conservez ce manuel au cas où vous en auriez besoin ultérieurement.

29
1. INSTRUCTIONS POUR L’ENCASTREMENT
Si vous observez que le réfrigérateur a été endommagé lors du transport, veuillez en informer immédiatement le
fournisseur avant de procéder à l’installation.
- Introduction du réfrigérateur dans la niche du meuble :
Figures 1, 2a et 2b.
- Vérifiez que les dimensions de la niche du meuble et du réfrigérateur sont compatibles.
Fig. 1
50
50
200 cm
2
200 cm
2
min. 550
min. 550
min. 550
560
540
540
540
540
540
540
min. 560
560
A
200 cm
2
A
200 cm
2
A
200 cm
2
200 cm
2
A
50
Page is loading ...
Page is loading ...
Page is loading ...
Page is loading ...
Page is loading ...
Page is loading ...
Page is loading ...
Page is loading ...
Page is loading ...
Page is loading ...
Page is loading ...

41
TABLE OF CONTENTS
1. INTEGRATION INSTRUCTIONS 42
2. SAFETY INFORMATION AND GENERAL ADVICE 45
3. INSTALLATION 46
4. OPERATION AND USE OF THE FREEZER 47
5. CLEANING AND MAINTENANCE 50
6. TROUBLE SHOOTING 52
7. CALLING THE TECHNICAL SUPPORT SERVICE 53
Please read these instructions carefully before using the appliance.
Keep this manual for future use.

42
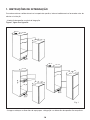
1. INTEGRATION INSTRUCTIONS
If you observe any damage when the appliance is in transit, please inform the supplier immediately before carry-
ing out the installation.
- Placing the appliance in the integration unit:
Figure 1, figure 2a and figure 2b.
- Check that the dimensions of the niche for integration and of the appliance are compatible.
Fig. 1
50
50
200 cm
2
200 cm
2
min. 550
min. 550
min. 550
560
540
540
540
540
540
540
min. 560
560
A
200 cm
2
A
200 cm
2
A
200 cm
2
200 cm
2
A
50

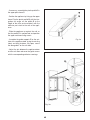
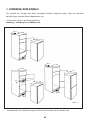
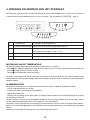
43
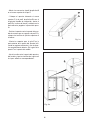
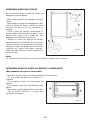
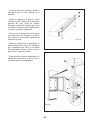
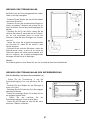
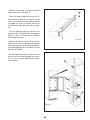
- If necessary, assemble the plastic profile B in
the upper plate frame
C
.
- Position the appliance by lining up the upper
frame
C
(or the plastic profile
B
) with the inte-
gration unit angle; cut the profile
D
to the
height of the niche and assemble it with the
adhesive part stuck to the wall of the appli-
ance.
- Slide the appliance up against the wall so
that the profile
D
is compressed, and position
the upper and lower fixing screws.
- Assemble the guide supports
E
on the out-
side of the appliance door (using the existing
holes) and with the doors fully open, secure
the door guide
F
on the unit door.
- Adjust the join between the appliance door
and the unit door and cover the guide screws
with the corresponding adhesive coverings.
Fig. 2a
Fig. 2b
B
C
E
F
D

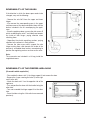
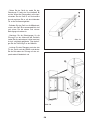
44
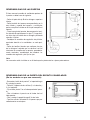
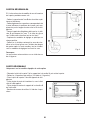
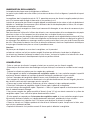
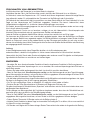
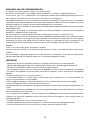
REVERSIBILITY OF THE DOORS
If the direction in which the doors open needs to be
changed, carry out the following:
- Remove the axle lid R from the upper and lower
hinges.
- Also remove the corresponding caps in the upper
and lower areas of the door and replace them with the
bushes included in the kit accompanying the appli-
ance.
- Close the appliance door, unscrew the side screws S
which are blocking the axles T and slide these towards
the inside of their hinges, paying attention when
attaching them.
- Reposition the plastic regulating washers, paying
attention to the amounts in each position.
- Remove the side screws which support the axle
hinges making them slide towards the inside of the
previously assembled door bushes, remembering to
position the regulating washers and secure the axles.
Note:
The accessories are included in a kit bag inside the
vegetable drawers.
REVERSIBILITY OF THE FREEZER AREA DOOR
(On models which require this)
- Disassemble the door catch Y, the hinge support X and remove the door.
- Remove the 4 caps covering the holes (2 to the right
and 2 to the left).
- Attach the door catch Y on the opposite side of the
appliance.
- Turn and position the door with the handle facing the
other side.
- Turn and assemble the hinge support X on the other
side.
- Cover the holes using the 4 lids which were removed
previously.
Fig. 3
Fig. 4
Y
R
X
S
T
S

45
2. SAFETY INFORMATION AND GENERAL ADVICE
RECYCLABILITY
This appliance has been manufactured with the utmost concern for environmental aspects.
OLD APPLIANCE
- To prevent damage to the environment and to recover materials, please use your local council’s collection
service.
- Ensure that the refrigerating circuit is not damaged, as it may contain substances which affect the environment.
- Disable your old appliance:
1. Cut the mains cable.
2. Remove the door to prevent children from having easy access to the interior.
PACKAGING
- The materials used in the packaging are fully recyclable. (Cardboard, plastic, EPS, etc.).
- Do not throw the packaging away, select the different materials according to local requirements for
eliminating waste and in accordance with current law.
Warning:
Do not leave packaging materials within the reach of children, as they are potentially dangerous.
SAFETY
- This appliance does not contain CFC or HFC (The refrigerating circuit contains R600A - ISOBUTANE).
- Isobutane is a natural refrigerating gas which does not affect the environment, despite the fact that in certain cir-
cumstances it may present a risk if the appropriate steps are not taken.
- Therefore, during transit, installation and use, deterioration of the refrigeration system elements must be pre-
vented. If these elements are damaged in any way, flames or incandescent bodies must be avoided at all times.
- If the refrigerant is lost, prevent open flames or ignition sources near the leak point.
- Isobutane (R600A) is heavier than air, and therefore concentrates on the floor.
In the event of deterioration, the room where the appliance is located must be ventilated.
- The appliance must be installed by two people to prevent harm to people or objects.
- This appliance may only be repaired by the technical support service and using original spare parts.
- Do not use fire elements or electrical appliances inside the refrigerator.
- The appliance must be used exclusively for the domestic preserving and/or freezing of food.
- Do not use the foot plates, drawers, doors or grilles as a brace or support.
- Do not allow children to play with the appliance
- Do not handle the appliance with wet hands and/or feet or barefoot.
- Each grille or drawer can support a distributed load of 18 kg.

46
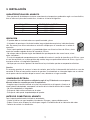
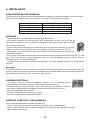
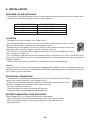
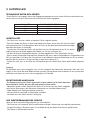
3. INSTALLATION
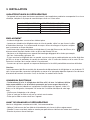
FEATURES OF THE APPLIANCE
- This appliance is designed to operate correctly at room temperature according to its climate classification, which
is stated on the features plate located on the back of the appliance.
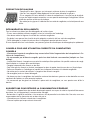
LOCATION
- The appliance must be installed on a flat, stable surface.
- When placing the appliance into the unit space, take care not to squash the mains cable. It is advis-
able not to use extensions or adaptors for connecting to the mains.
- Between the rear of the appliance and the wall, there must be a minimum distance of 20 mm and,
between possible future units hanging on the wall, a distance of 100 mm.
- Do not place any household electrical appliance which gives off heat on the appliance, such as:
ovens, microwaves, toasters, etc.
- If it is installed fully integrated, check that the aeration section in the kitchen unit is 200 cm
3
and that the venti-
lation channel at the rear of the unit has a minimum depth of 50 mm. Please follow the instructions relating to the
integration (Section 1).
- Check that there are no electrical appliances or components near the aeration openings.
Attention:
Access to the mains must be ensured to help with unplugging when required. If this is not possible, connect the
appliance to the mains by means of a double-break switch with an opening distance for the contacts of at least 3
mm, situated in an accessible place.
ELECTRICAL CONNECTION
- The appliance must be earthed in accordance with the law. The manufacturer cannot be held
liable for any incidents caused by failure to comply with this.
- Make sure that the voltage stated on the appliance’s features plate, located inside on the left-
hand side, corresponds to the voltage for the wiring in the house.
- Do not use adaptors or extensions.
- Prevent the cable from coming into contact with the motor.
- Prevent the cable from being trapped under the appliance.
BEFORE CONNECTING YOUR APPLIANCE
When the appliance is fully installed, the following is recommended:
- Clean the inside with warm water and bicarbonate of soda. Rinse and dry carefully.
- Wait 2 hours before starting up to ensure the stabilisation of the motor lubricants.
- Plug into the mains.
CLIMATE CLASSIFICATION ROOM TEMPERATURE
SN +10°C a +32°C
N +16°C a +32°C
ST +18°C a +38°C
T +18°C a +43°C

47
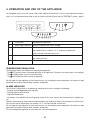
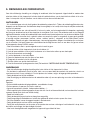
4. OPERATION AND USE OF THE APPLIANCE
The refrigerator which you have chosen allows fresh food to be preserved. If it has a low temperature compart-
ment, it can also preserve frozen food as well as freeze fresh food. (Please see the "FREEZING" section - page 9
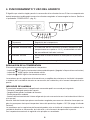
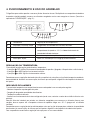
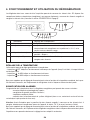
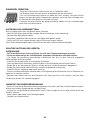
TEMPERATURE REGULATION
The thermostat allows the temperature to be regulated gradually.
- The 0 /OFF position means interrupted operation of the appliance. (Turned off, the internal light is not working).
- The 1 or MIN position means minimum operation.
- The 7 or MAX position means maximum operation.
Do not forget that the regulation of the thermostat may vary according to room temperature, the amount of food
preserved, the location and how often the doors are opened.
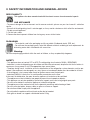
ALARM INDICATOR
The increase in temperature in the preserving compartment may be caused by the following:
- Frequent and prolonged opening of the door.
- Freezing large amounts of food.
- High room temperature.
- An anomaly in the operation of the refrigerating system (in this case, contact your nearest technical support cen-
tre).
Attention: Before placing frozen food to be preserved or fresh food to be frozen into the freezer for the first time,
wait until the internal temperature has reached –18º C (The light indicator switches off).
Do not forget that the regulation of the thermostat may vary according to room temperature, the amount of food
preserved, the location and how often the doors are opened.
The most appropriate regulation for your needs will come with experience.
1 Thermostat Temperature regulation
2Green Light Indicator Freezer supplied with mains voltage.
3 Red Light Indicator The alarm system is connected when the temperature in
the compartment is above -12º C and can be detected
when the light indicator comes on.
4Yellow Indicator This comes on when the switch is connected in
the super position.
5 Super Switch This must be used to freeze food.
5 4 3 2 1
5 4 3 2 121
5 4 2 1

48
PRESERVATION OF FOOD
In the refrigerator, the temperature may vary according to the area.
The coldest areas are the ones immediately above the fruit and vegetable drawers, near the rear wall.
In the low temperature compartment, where it can reach –18º C, frozen food can be preserved for several months.
It is recommended that you regulate the thermostat to positions 4 or 5.
Preservation time for food depends primarily on the kind of food. This preservation time for frozen food is gener-
ally stated on the packaging. Never consume food whose sell-by date has expired; it may cause food poisoning.
A product which has begun to thaw must, under no circumstances, be refrozen and must be consumed as soon
as possible.
To preserve flavours, freshness, etc., well, we recommend that you wrap food in tin foil or cling film, or place it in
covered containers.
Each of the drawers and the cooling grilles can support a maximum distributed load of 20 kg.
The space inside the refrigerator may be organised in several ways by moving the grilles and shelves according to
requirements. To move the shelves, raise the rear part, pull forwards until the rear part comes out of the guides,
turn them downwards and remove them completely. Choose the desired positoin and position the shelf by follow-
ing the opposite procedure.
Attention:
Do not place glass containers in the low temperature compartment as they could
crack or break once their content has frozen. Do not place hot food in the refrigerator compartment.
Food which absorbs smells and flavours easily, liquids, and drinks with a high alcohol content must be hermeti-
cally sealed and kept upright.
FREEZING
- Avoid products to be frozen from coming into contact with products which have already been frozen.
- Always place dry containers in the freezer to prevent several containers from forming a single block when they
freeze.
- Prepare the food in portions to help with faster freezing.
- If your appliance is fitted with a Fast Freeze Switch, to freeze the maximum amount of food products indicated
on the technical data plate, follow the instructions below:
• Press the Fast Freeze switch 24 hours before freezing.
• To freeze food, place it directly on the cooling grille and once it has frozen, place it on the shelves with sliding
drawers appropriate for preservation.
• Do not open the door unnecessarily, but if you have to, open it as quickly as possible.
• Disconnect the fast freeze switch 26 hours after you have started freezing.
The "Superfrost" fast freeze yellow light indicator will turn off and the appliance will start up its normal energy-sav-
ing operation again.
• Small amounts of food (up to 2 kg) may be frozen without connecting the fast freeze, by placing them directly
into the drawer.
- If your appliance is NOT fitted with the Fast Freeze Switch, to freeze the maximum amount of food products indi-
cated on the technical data plate, please follow the instructions below:
• Turn the thermostat 24 hours previously to position 4 or 5.
• Spread the products out on the upper shelf and try not to open the door unnecessarily; if it is essential, open it
the minimum necessary.
• Twenty-six hours after the start of freezing, position the thermostat control in the desired position again.

49
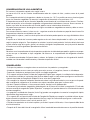
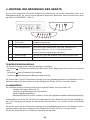
HOW TO MAKE ICE CUBES:
- Fill up the trays three quarters full of water and place them in the low temperature compart-
ment.
- Once the water has frozen, you can remove the ice cubes by gently twisting the trays.
- If one of the trays when freezing becomes stuck to the base of the compartment, do not
attempt to unstick it with cutting or pointed objects, as they may damage the appliance. Use
wooden or plastic spatulas.
- Do not swallow ice cubes immediately after extracting them as they can cause cold burns.
HOW TO THAW FOOD
Not all food should be thawed the same way.
- If you have bought frozen food from a shop, follow the instructions on the packet.
- Vegetables must be cooked from frozen.
- Generally, prepared or pre-cooked food can be cooked from frozen.
- Meat and fish must be thawed slowly in the refrigerator for several hours.
If you have a microwave, you can significantly speed up the thawing process.
HOW TO USE YOUR APPLIANCE PROPERLY:
TIPS
- Do not open the freezer door too often to prevent the temperature inside the compartment from rising.
- Do not exceed the recommended preservation expiry date on the packaging of deep-frozen products.
- The amount of food to be frozen in one go must not exceed the freezing power value indicated on the features
plate.
- Always freeze food in a good condition.
- So that food does not dry out, wrap it in tin foil or cling film.
- Place a sticker on the wrapping indicating the content and the date of freezing.
- Do not let food to be frozen touch food which has already been frozen.
- Never refreeze thawed food.
- Do not store bottles with fizzy drinks or glass bottles containing liquids in the freezer as they may explode.
- Do not consume very cold ice cream or food as they may burn your mouth.
SUGGESTIONS FOR SAVING ELECTRICITY
- Do not install the appliance in places exposed to direct sunlight or near heat sources, as this requires a higher
energy consumption.
- Do not block the grille or openings for air circulation. For this, we recommend that you dust it once or twice a
year.
- Do not place hot food in the freezer.
- Open the freezer door only when necessary.

50
5. CLEANING AND MAINTENANCE
Before any cleaning or maintenance, disconnect the appliance either by unplugging it from the socket or by turn-
ing off the mains switch.
To disconnect the appliance from the mains, unplug it. When doing so, do not pull the appliance’s mains cable.
DEFROSTING
- If your refrigerator does not have a low temperature compartment, defrosting will occur automatically. During
defrosting, drops of water run down the back wall. The water, which passes along a channel, flows into the tray
situated in the compressor where it evaporates.
- If the refrigerator has a low temperature compartment, to reduce electricity consumption it is recommended that
you remove the excess frost (3 or 4 mm) from the inside and/or cooling grilles. The thawing process must be car-
ried out as quickly as possible as if the temperature of the food rises, the preservation period will decrease.
- You can use a plastic spatula to speed up the process, but under no circumstances use metal, sharp or pointed
objects (knives, forks, metal spatulas, etc.), as they may damage the refrigerating circuit. Never use humidifiers,
braziers, hair dryers or de-icing sprays to speed up this process either. The refrigerating circuit may be damaged
irreparably and be a source of danger if the appliances operate with R-600 A.
- To defrost the freezer, follow the instructions below:
1. Unplug the appliance from the mains socket or disconnect the main switch.
2. Remove the food from the freezer and store it in cold insulation bags in a cool place.
3. Turn the thermostat to the position.
4. Let the discharge water flow into a container.
5. Collect the water which forms during defrosting with a sponge or cloth.
6. Also dry the walls and/or cooling grilles.
7. Plug into the mains.
8. Turn the thermostat to the desired position (Please refer to the
"TEMPERATURE REGULATION"
section).
MAINTENANCE
- Before starting any cleaning, disconnect the plug from the mains.
- To move or remove the drawers, pull them forwards until the front part stops, turn them upwards and remove
them completely; to position the shelf, follow the reverse procedure.
- Clean the inside when defrosting.
- To clean the inside and the accessories, we recommend that you use a water and bicarbonate of soda solution.
Avoid:
• Abrasive powders, detergents or soap.
• Scouring pads or plastic materials.
• Aggressive products (alcohol, thinners, etc.).
- Clean the outflow opening frequently, which is located on the rear wall, with either a brush or a blunt instrument
(e.g. a cotton bud).
- Rinse in clear water.
- Clean the seal of the door with water and dry it carefully.
- Carefully dry all the components and leave the door ajar for a few minutes.
- You can now place the food inside the appliance.
- Clean the outside with a soft, damp cloth.
- Clean the ventilation grille of the motor and condensor with a vacuum cleaner or soft brush, taking care not to
damage or separate the internal connections.
- For brief periods when you are away, we recommend that you leave the appliance plugged in.

51
Attention:
You must never use a steam cleaner to defrost or clean the appliance. Steam may dam-
age the parts of the low voltage appliance and cause a short circuit or an electrical dis-
charge. Steam may damage the plastic parts.
Oils and organic solvent substances must not come into contact with the walls of the
appliance, but must be positioned in suitable containers as they may affect the plastic ele-
ments.
Examples of these substances are:
- Olive and seed oils.
- Butter and animal fats.
- Lemon or orange juice.
- Detergents or products which contain acetic acid.
WHAT TO DO IN THE EVENT OF INACTIVITY
In the event of extended absence, we recommend that you unplug the appliance from the mains, empty it, clean
the inside and leave the door open to prevent bad smells from forming.
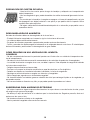
CHANGING THE LIGHT
- Unplug the appliance from the mains or turn off the mains switch for the household before replacing the light.
- Remove the damaged light and replace it with another of the same value as indicated on the bulb protection.
(e.g. maximum 15W).
- Once the light has been replaced, plug the appliance in again.
NORMAL NOISES IN YOUR APPLIANCE
- Refrigerating gas may produce bubbling as it moves through the circuits.
- The compressor may make a humming and/or a slight tapping noise, which may be more accentuated when
starting up.
- A crack made by the expansion and contraction of the materials used.
- The insulating material amplifies the noise level.

52
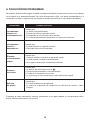
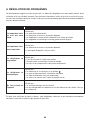
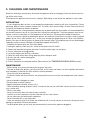
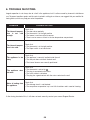
6. TROUBLE SHOOTING
Irregular operation is not always due to a fault in the appliance, but it is often caused by incorrect installation or
use. To prevent needless repairs and the costs involved in calling for assistance, we suggest that you read the fol-
lowing advice, which may help you solve the problem.
If after having checked all this, it still does not work normally, contact your nearest Support Service.
The internal tempera-
ture is not cold
enough.
The internal tempera-
ture is too cold.
The appliance is too
noisy
The appliance does
not work
Water is leaking from
the appliance.
Check that:
• The door closes perfectly.
• The thermostat is in the right position
• The freezer is not close to heat sources.
• There is not an excess of frost in the low temperature compartment.
Check that:
• The thermostat is in the right position.
• The Super switch is not connected
Check that:
• The appliance is correctly levelled inside the unit.
• The rear part does not touch the back wall.
• The internal drawers are correctly positioned.
Check that:
• The thermostat is not set to 0 .
• The plug is connected to the mains.
• The mains cable is not broken
• The plug has a good contact with the mains socket on the wall.
Check that:
• The drainage circuit is not blocked.
• The compressor evaporation tray is not full of residues and in need of cleaning.
PROBLEM
POSSIBLE SOLUTION

53
7. CALLING THE TECHNICAL SUPPORT SERVICE
Read the manual carefully and if you are unable to solve the problem, call the technical support
service. On the inside of the door to your freezer, you will find a red and white sticker with the
telephone number of the Technical Support Service.
- The address and telephone number nearest to where you live appears in the list of official tech-
nical service offices supplied with the appliance or in your local telephone directory.
- To help the technical support service, please provide them with the following details:
• Appliance model.
• Appliance reference.
• Date of purchase.
• Description of the problem.
• Your address and telephone number.
- Any repair, including the replacement of the mains cable, must be carried out by the technical suport serv-
ice or by a qualified person.
This appliance is intended to come into contact with foodstuffs and complies with l.d. 108 of
25/01/92 (European Directive 89/109 CE). This appliance has been designed, manufactured
and put on sale in accordance with:
- LOW VOLTAGE Directive 73/23 CE
- EMC Directive 89/336 CE
- CE Marking Directive 93/68/CE
- Energy Efficiency Directive 96/57 CE
Page is loading ...
Page is loading ...
Page is loading ...
Page is loading ...
Page is loading ...
Page is loading ...
Page is loading ...
Page is loading ...
Page is loading ...
Page is loading ...
Page is loading ...
Page is loading ...
Page is loading ...
Page is loading ...
Page is loading ...
Page is loading ...
Page is loading ...
Page is loading ...
Page is loading ...
Page is loading ...
Page is loading ...
Page is loading ...
Page is loading ...
Page is loading ...
Page is loading ...
Page is loading ...
Page is loading ...
-
 1
1
-
 2
2
-
 3
3
-
 4
4
-
 5
5
-
 6
6
-
 7
7
-
 8
8
-
 9
9
-
 10
10
-
 11
11
-
 12
12
-
 13
13
-
 14
14
-
 15
15
-
 16
16
-
 17
17
-
 18
18
-
 19
19
-
 20
20
-
 21
21
-
 22
22
-
 23
23
-
 24
24
-
 25
25
-
 26
26
-
 27
27
-
 28
28
-
 29
29
-
 30
30
-
 31
31
-
 32
32
-
 33
33
-
 34
34
-
 35
35
-
 36
36
-
 37
37
-
 38
38
-
 39
39
-
 40
40
-
 41
41
-
 42
42
-
 43
43
-
 44
44
-
 45
45
-
 46
46
-
 47
47
-
 48
48
-
 49
49
-
 50
50
-
 51
51
-
 52
52
-
 53
53
-
 54
54
-
 55
55
-
 56
56
-
 57
57
-
 58
58
-
 59
59
-
 60
60
-
 61
61
-
 62
62
-
 63
63
-
 64
64
-
 65
65
-
 66
66
-
 67
67
-
 68
68
-
 69
69
-
 70
70
-
 71
71
-
 72
72
-
 73
73
-
 74
74
-
 75
75
-
 76
76
-
 77
77
-
 78
78
-
 79
79
-
 80
80


Ask a question and I''ll find the answer in the document
Finding information in a document is now easier with AI
in other languages
- français: Fagor FIC-35UK Le manuel du propriétaire
- español: Fagor FIC-35UK El manual del propietario
- Deutsch: Fagor FIC-35UK Bedienungsanleitung
- Nederlands: Fagor FIC-35UK de handleiding
- português: Fagor FIC-35UK Manual do proprietário
Related papers
Other documents
-
De Dietrich DRC731JE Owner's manual
-
-
Zanussi ZBT6284 User manual
-
Zanussi ZI9280D User manual
-
Brandt SB2250E User manual
-
-
 De Dietrich DRC728JE Owner's manual
-
 De Dietrich DRC328JE1 Owner's manual
-
De Dietrich DRD727JE Owner's manual
-
 De Dietrich DRD327JE1 Owner's manual


