Frigidaire FGRU19F6QF Owner's manual

Category
Fridges
Type
Owner's manual

This manual is also suitable for

TABLE OF CONTENTS
www.frigidaire.com USA 1-800-944-9044 www.frigidaire.ca Canada 1-800-265-8352
All about the
Use & Care
of your Refrigerator
Important Safety Instructions..........................2
Feature Overview.............................................4
Installation.....................................................5
Door Removal..................................................8
Electronic Control.............................................9
Sabbath Mode................................................11
Alerts............................................................12
Changing The Filter.........................................13
Interior Lighting.............................................14
Storage Features.............................................14
Energy-Saving Tips.........................................16
Care & Cleaning.............................................16
Before you Call...............................................19
Major Appliance Warranty................................21
A01060801 (August 2014)
2
IMPORTANT SAFETY INSTRUCTIONS
Denitions
This is the safety alert symbol. It is used to
alert you to potential personal injury hazards.
Obey all safety messages that follow this symbol
to avoid possible injury or death.
Doors
Handles are secure and tight
Door seals completely to cabinet on all sides
Refrigerator door is level across the top
Leveling
Refrigerator is level, side-to-side and tilted
¼” (6mm) front-to-back
Kick plate is properly attached to refrigerator
Cabinet is setting solid on all corners
Electrical Power
House power turned on
Refrigerator plugged in
Final Checks
Shipping material removed
Fresh food temperatures set
Crisper humidity controls set
Registration card sent in
Installation Checklist
WARNING
Please read all instructions before using
this refrigerator.
DANGER
DANGER indicates an imminently hazardous
situation which, if not avoided, will result in
death or serious injury.
WARNING
WARNING indicates a potentially hazardous
situation which, if not avoided, could result in
death or serious injury.
CAUTION
CAUTION indicates a potentially hazardous
situation which, if not avoided, may result in
minor or moderate injury.
IMPORTANT
IMPORTANT indicates installation, operation or
maintenance information which is important
but not hazard-related.
WARNING
Child Safety
Destroy carton, plastic bags, and any exte-
rior wrapping material immediately after the
unit is unpacked. Children should never use
these items for play. Cartons covered with
rugs, bedspreads, plastic sheets or stretch
wrap may become airtight chambers and
can quickly cause suffocation.
An empty, discarded icebox, refrigerator, or
freezer is a very dangerous attraction
to children.
Remove the door(s) of any appliance that is
not in use, even if it is being discarded.
WARNING
For your safety
Do not store or use gasoline or other am-
mable vapors and liquids in the vicinity of this
or any other appliance. Read product labels
for ammability and other warnings.
Do not operate the unit in the presence of
explosive fumes.
Remove and discard any spacers
used to secure the shelves during
shipping. Small objects are a choke
hazard to children.
Remove all staples from the carton. Staples
can cause severe cuts, and also destroy
nishes if they come in contact with other
appliances or furniture.
3
WARNING
Risk of child entrapment
Child entrapment and suffocation are not
problems of the past. Junked or abandoned
appliances are still dangerous – even if they
will sit for “just a few days”. If you are getting
rid of your old appliance, please follow the
instructions below to help prevent accidents.
We strongly encourage responsible
appliance recycling/disposal methods. Check
with your utility company or visit www.
recyclemyoldfridge.com for more information
on recycling your old appliance.
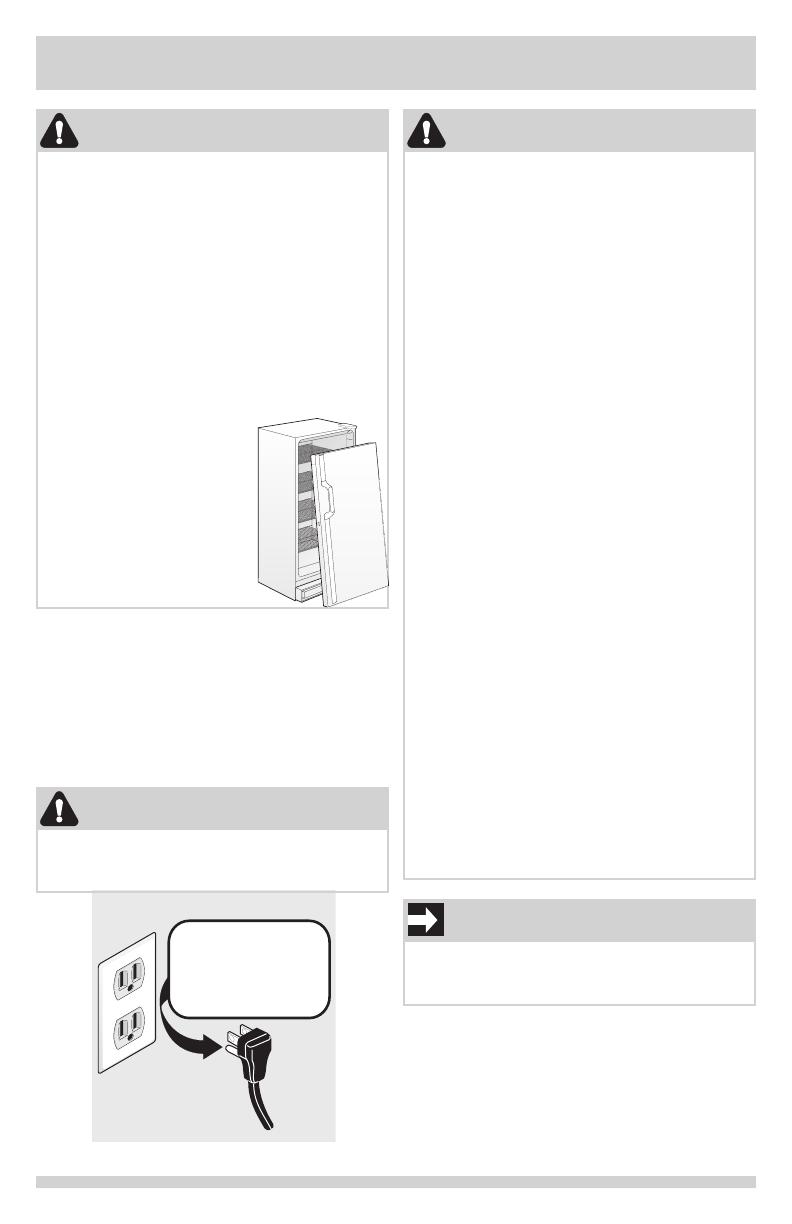
Before you throw away
your old appliance:
Remove door.
Leave shelves in place so
children may not easily
climb inside.
Have the refrigerant
removed by a
qualied technician.
IMPORTANT
To disconnect power to the unit, unplug the
unit or switch the breaker that supplies power
to the unit to the off position.
IMPORTANT SAFETY INSTRUCTIONS
Grounding type wall receptacle
Power cord with
3-prong grounded plug
Do not, under
any circumstances,
cut, remove,
or bypass the
grounding prong.
WARNING
Avoid re hazard or electric shock. Do not use
an extension cord or an adapter plug. Do not
remove any prong from power cord.
WARNING
Electrical Information
These guidelines must be followed to ensure
that safety mechanisms in the design of this
appliance will operate properly.
Refer to the serial plate for correct electrical
rating. The power cord of the appliance is
equipped with a three-prong grounding plug
for your protection against electrical shock
hazards. It must be plugged directly into a
properly grounded three-prong receptacle,
protected with a 15-amp time delay fuse
or circuit breaker. The receptacle must be
installed in accordance with the local codes
and ordinances. Consult a qualied electri-
cian. Receptacles protected by Ground Fault
Circuit Interrupters (GFCI) are NOT RECOM-
MENDED. Do NOT use an extension cord or
adapter plug.
If the power cord is damaged, it should be
replaced by an authorized service technician
to prevent any risk.
Never unplug the unit by pulling on the
power cord. Always grip the plug rmly,
and pull straight out from the receptacle to
prevent damaging the power cord.
Unplug the appliance before cleaning and
before replacing a light bulb to avoid electri-
cal shock.
If voltage varies by 10% or more, appliance
performance may be affected. Operating the
unit with insufcient power can damage the
compressor. Such damage is not covered
under the warranty. If you suspect your
household voltage is high or low, consult
your power company for testing.
To prevent the appliance from being turned
off accidentally, do not plug unit into an outlet
controlled by a wall switch or pull cord.
4
FEATURE OVERVIEW
Understanding Features and Terms
Your Frigidaire refrigerator is designed for optimal convenience and storage exibility. The illustration
below is provided to assist you with familiarizing yourself with product features and terminology.
NOTE
Features may vary according to model.
Kick
Plate
Dairy Compartment
Adjustable Door
Bins
Deli
Drawer
Light
Switch
Crisper
Drawer
with
Humidity
Controls
Air
Baffle
Pure
Advantage®
Air Filter
Adjustable
Bottom Hinge
Pro-Select™
Electronic
Control
SpaceWise™
Glass Shelves
Gallon Door
Bins
Upper Level
Lighting
Mid Level
Lighting
5
This Use & Care Guide provides general operating
instructions for your model. Use the refrigerator
only as instructed in this Use & Care Guide.
Before starting the refrigerator, follow these
important rst steps.
Refrigerator
⅜”
(10 mm)
⅜”
(10 mm)
Required Tools:
INSTALLATION
Location
Choose a place that is near a grounded
electrical outlet. Do Not use an extension
cord or an adapter plug.
If possible, place the refrigerator out of
direct sunlight and away from the range,
dishwasher or other heat sources.
The refrigerator must be installed on a oor
that is level and strong enough to support a
fully loaded refrigerator.
CAUTION
DO NOT install the refrigerator where the
temperature will drop below 55°F (13°C) or
rise above 110°F (43°C). The compressor will
not be able to maintain proper temperatures
inside the refrigerator.
DO NOT block the kick plate on the lower
front of your refrigerator. Sufcient air
circulation is essential for the proper operation
of your refrigerator.
Installation
Installation clearances:
Allow the following clearances for ease
of installation, proper air circulation, and
plumbing and electrical connections:
Sides - ⅜”
Top and Back - 1”
Allow for trim kit if it is to be installed with
the unit.
NOTE
If your refrigerator is placed with the door
hinge side against a wall, you may have to
allow additional space so the door can be
opened wider.
Door Handle Mounting Instructions
1. Remove handle from carton and any other
protective packaging.
2. Position refrigerator handle end caps over
upper and lower pre-installed shoulder bolts
(A) that are fastened into door, ensuring
the holes for the set screws are facing
towards the outside of door if a single unit
installation or the freezer door (if installing
the matching freezer).
3. While holding handle rmly against door,
fasten upper and lower Allen set screws (B)
with supplied Allen wrench.
4. Repeat steps 2 and 3 to install freezer
handle (if installing the matching freezer).
Ensure the holes for the set screws are
facing towards the refrigerator door.
6
To Level the Refrigerator:
While unit is lying on its back, note the location
of the four (4) leg levelers installed at each
corner. These leg levelers will be used to level
the refrigerator and to adjust the height. Use a
carpenter’s level to level the refrigerator from
front to back and side to side. Adjust the plastic
leveling feet in front, ½ bubble higher, so that
the door closes easily when left halfway open.
INSTALLATION
NOTE
All set screws should be tightened and sub-
ush (Allen set screw should be seated just
below the surface of the end cap) of handle
end cap. The end caps should be drawn tight
to refrigerator door with no gaps.
Kick Plate Removal
To remove the kick plate, use a Phillips head
screwdriver and remove the two screws holding
the kick plate to the cabinet. Then pull the kick
plate away from the unit.
Leveling
The refrigerator must have all bottom corners
resting rmly on a solid oor.
The oor must be strong enough to support a
fully loaded refrigerator.
It is VERY IMPORTANT for your refrigerator to be
level in order to function properly. If the refrigerator
is not leveled during installation, the door may be
misaligned and not close or seal properly, causing
cooling, frost or moisture problems.
Leveling Instructions for Matching
Refrigerator / Freezer Pair:
Level door of rst unit using all four levelers
and slide unit into place. Recheck for
levelness and adjust if necessary.
Measure distance from oor to bottom of
door on rst unit. Adjust and level second
unit so door height matches.
Leg Level Adjustments:
One full turn of all four leg levelers will raise
door 5/32”.
Slide second unit into place leaving a
minimum gap of 3/16” between units for
door swing clearance.
This last step may require at least one
extraction of the second unit to properly
align units in a “built-in” application.
Leveling Door with Adjustable Hinge
Use the lower hinge adjustment to ne tune the
door height and for nal cabinet spacing. Use a
7/16” socket or wrench to adjust the screw at the
bottom of the lower hinge.
Adjusting Doors for Matching Refrigerator /
Freezer Pair
The doors may also be adjusted side to side with
the slotted hinge for aligning the doors parallel
to each other. Loosen the two bolts with a
A
B
Single Unit Installation
Matching Refrigerator and Freezer Door
Handle Installation
Kick Plate Removal
7
wrench and one screw with a Phillips screwdriver.
Shift the doors until parallel, then retighten the
screw and bolts securely. (See illustration below.)
Door
Raise
Door
Raise
Door
Slotted Hinge
Adjustment
⅜” bolts
Freezer Refrigerator
Screw
Door
To install the shelf grommet to the shelf:
1. With the wire shelf installed, press the
shelf grommet down onto the wire that is
anchored into the freezer wall. Be sure to
keep the larger end of the shelf grommet
away from the wall.
3. Slide the shelf grommet into the grommet
already in the freezer wall until it is ush.
INSTALLATION
To install the handle clips to the basket:
1. Place the basket on a rm, at surface.
2. With the narrow side of the handle clip on
the inside of the basket, snap the handle
clip to the recessed area in the basket.
Lower Hinge Adjustment for Leveling
the Doors of the Matching Refrigerator /
Freezer Pair
To level the doors using the adjustable lower
hinge (some models):
1. If the refrigerator door is lower than the
freezer door, raise the refrigerator door by
turning the adjustment screw clockwise
using a 7/16” socket wrench. (See
illustration below.)
2. If the freezer door is lower than the
refrigerator door, raise the freezer door by
turning the adjustment screw clockwise
using a 7/16” socket wrench. (See
illustration below.)
2. Push the shelf grommet onto the wire until
it snaps in place.
8
INSTALLATION
If door must be removed:
Unplug the unit or switch the breaker that
supplies power to the unit to the off position.
Remove the plastic top hinge cover.
Hold the door in place while removing the
top hinge from the cabinet.
Remove the two ” hex head bolts from
the top hinge with a ” wrench or socket.
Lift the door upwards and pull up and away
from the cabinet until free of the bottom hinge
pin mounted on the front of the cabinet.
To replace the door, reverse the above
procedures and securely tighten all screws
to prevent hinge slippage.
CAUTION
Doors are heavy. Two people are
recommended to remove or replace the door
assembly from the cabinet.
DOOR REMOVAL
3. Once the inside surface snaps in place,
continue the process by rolling the handle
clip slightly outward and pressing down
rmly to snap onto the inside surface. If
installed incorrectly, the handle clip will not
lay at.
Hinge Cover
Hinge Bolts (2)
Hinge Plate
9
Setting the PRO-SELECT™ Electronic Control
Cool Down Period
For safe food storage, allow 4 hours for refrigerator to cool down completely. The refrigerator will run
continuously for the rst several hours.
Pro-Select™ Electronic Control
The Pro-Select™ Electronic Control is located inside the refrigerator. Temperature is factory preset to
provide satisfactory food storage temperatures. However, the temperature control is adjustable to
provide a range of temperatures for your personal satisfaction.
°F
PRO-SELECT™ Electronic Control Features
Replace Air Filter
When the “REPLACE AIR FILTER” LED is illuminated yellow, the air lter needs to be replaced. The
control will signal for air lter replacement after 3600 hours of refrigerator operation. After replacing
the air lter, reset the air lter timer by pressing the AIR FILTER key for 3 seconds. The “REPLACE
AIR FILTER” LED will be illuminated green for 3 seconds, conrming a timer reset.
°F
ELECTRONIC CONTROL
To adjust the temperature setting, press the UP () key for warmer temperature and DOWN ()
key for colder temperature on the control panel. Allow several hours for the temperature to stabilize
between adjustments. The refrigerator can be adjusted between 33°F (1°C) and 46°F (8°C). By
pressing the TEMP MODE key, the temperature display will toggle between °F and °C.
To turn the refrigerator OFF, press the UP () key until the warmest temperature setting of
46°F (8°C) shows in the display. Then press the UP () key 3 times within 3 seconds to turn the
refrigerator OFF. The display will then show “OF”. To turn the unit back ON, press the DOWN ()
key 3 times within 3 seconds. The control will then display “46°F (8°C)” and may be adjusted to the
desired temperature.
10
°F
°F
°F
HRS
HI-TEMP DURATION
Control Lock
To disable the keypads on the control, begin by pressing the CONTROL LOCK key for 3 seconds
until “LO” is displayed for 1 second. With the control locked, when keys are pressed on the control
panel, “LO” will be displayed. To unlock the control, press the CONTROL LOCK key for 3 seconds. The
display will show “UL” for one second.
Power Fail
The POWER FAIL indicator light informs you that due to a power failure, the cabinet temperature
exceeded 55°F (13°C). If the power failure lasted more than 1 hour, the display alternates between
showing the power failure duration (Hours and DURATION LED illuminate in the display) and the
cabinet temperature (°F or °C illuminates) every ½ second. This safety feature will aid in determining
what food spoilage action to take.
The Power Fail indicator light and duration display can be turned off by pressing Alert Reset.
ELECTRONIC CONTROL
11
SABBATH MODE
°F
The Sabbath mode is a feature that disables portions of the refrigerator and its controls in accordance
with observance of the weekly Sabbath and religious holidays within the Orthodox Jewish community.
To initiate or exit Sabbath Mode, press and hold the CONTROL LOCK and TEMP MODE keys for 3
seconds. Then “Sb” will be displayed on the control panel indicating that the unit is in Sabbath mode.
In the Sabbath mode, the High Temp alarm is active for health reasons. If a high temperature alarm
is activated during this time, for example due to a door left ajar, the alarm will sound for about 10
minutes. The alarm will then silence on its own and a “high temp” icon will be displayed on the
control panel. The high temp icon will continue to display even if the door is closed until Sabbath
mode is exited and the icon reset.
For further assistance, guidelines of proper usage and a complete list of models with the
Sabbath feature, please visit the web at http:\\www.star-k.org.
NOTE: While in Sabbath mode, neither the lights nor the control panel will work until Sabbath mode
has been deactivated.
The unit stays in Sabbath mode after a power failure recovery. It must be deactivated with the
buttons on the control panel.
12
There are 4 possible conditions that will cause the alert tone to sound.
High Temp Alert
If the temperature inside the cabinet exceeds 55°F (13°C), the HIGH TEMP LED will illuminate, and
after 1 hour, the HIGH TEMP Alarm will sound with 4 short beeps every ½ second, and the cabinet
temperature is shown in the display. The LED and temperature alert will remain active until the
cabinet temperature is below 55ºF (13ºC).
The audible alert can be turned off by pressing Alert RESET key.
Door Ajar Alert
This alert will sound to alert you that the door has been open for 5 minutes or more. The DOOR AJAR
LED will illuminate and the audible alert will sound until the door is closed.
The audible alert can be turned off by pressing the Alert RESET key or by closing the door. If the door
is ajar for 15 minutes, the interior light will turn off.
Temp Error Alert
The sensor alert signals you that a problem exists with a temperature sensor. The audible alarm will
sound after 1 hour and the display will alternate between “E8” or “E9” and 33°F (1°C) at ½ second
intervals. The control will then enter a mode that runs the refrigerator in a manner that maintains the
factory set cabinet temperature.
The audible alert can be turned off by pressing the Alert RESET key.
Stuck Key Alert
The stuck key alert will sound if the control reads a keypress for longer than 30 seconds. The
audible alert will sound and will be limited to one minute and will stop automatically. The display will
alternate between “E7” and 33°F (1°C) at ½ second intervals. The control will then enter a mode
that runs the refrigerator in a manner that maintains the factory set cabinet temperature until the
condition is resolved.
The audible alert can be turned off by pressing the Alert RESET key.
ALERTS
°F
HI-TEMP
13
Mid-Level Lighting Light Bulb Removal
To Remove Light Lens
Press Tabs
in Direction Shown
Mid Level Lighting
PURE ADVANTAGE™ Air Filter
Your new Pure Advantage air lter is located inside
one of the 2-Liter Door Bins. The air lter cover is
located on the upper right side of the control box.
In general, you should change the air lter with
Part Number “EAFCBF” every 6 months to ensure
optimal ltering of freezer odors. The replacement
air lter can be purchased on the Frigidaire website
(http://frigidaire.stores.yahoo.net) or call toll free
in the U.S. and Canada: 1-800-599-7569. Your
electronic control is equipped with a Replace Air
Filter indicator to remind you to change your lter.
To Install Or Replace The Air Filter
Pull down on the front of the Pure
Advantage™ air lter cover to release the
hinged bottom cover.
Allow bottom cover to swing open and then
remove the old lter and discard it.
Unpackage the new lter and place it inside
the hinged bottom cover of the housing.
Push the hinged bottom cover upward until
the tab snaps into closed position.
replace air filter
hold to reset
press & hold
air
filter
temp
mode
alarm
off
control
lock
Open Air Filter Cover
Air Filter
Remove Air Filter
The mid level and upper level lighting comes on
automatically when the door is opened.
IMPORTANT
To disconnect power to the unit, unplug the
unit or switch the breaker that supplies power
to the unit to the off position. Replace the old
bulb with a bulb of the same wattage.
To replace the light bulbs:
1. To replace the light bulb, turn the
temperature control to OFF and unplug the
electrical cord.
2. Remove the lens from the lamp housing by
unsnapping it from the lamp housing using
your ngers or a screwdriver. Be careful not to
break the locking tabs on the lamp housing.
3. Replace the old bulb with a bulb of the same
type and wattage.
4. To replace the lens, snap one side of the
lens opening to the tab on the lamp housing.
Then carefully attach the other side.
CHANGING THE FILTER INTERIOR LIGHTING
14
STORAGE FEATURES
SpaceWise™ Glass Shelves
Multi-position adjustable slide out glass shelves
can be moved to any position for larger or
smaller packages. The shipping spacers that
stabilize the shelves for shipping may be removed
and discarded.
To Adjust The Shelves
Lift front edge up.
Pull shelf out.
Replace the shelf by inserting the hooks
at rear of the shelf into the wall bracket.
Lower the shelf into the desired slots and
lock into position.
Upper Level Lighting
The upper level lighting comes on automatically
when the door is opened.
To replace the light bulbs:
INTERIOR LIGHTING
IMPORTANT
To disconnect power to the unit, unplug the
unit or switch the breaker that supplies power
to the unit to the off position. Replace the old
bulb with a bulb of the same wattage.
1. To replace the light bulb, turn the
temperature control to OFF and unplug the
electrical cord.
2. Remove the light shield by pushing in on
the sides where the two tabs are located in
the back, then rotate the light shield down
and out.
3. Replace the old bulb with a bulb of the same
type and wattage.
4. When replacing the light shield, insert the
three tabs in the front of the light shield into
the slots in the control box and then rotate
the rear upward until the two retaining
latches lock into place.
puerta entreabier ta corte de energí a
reemplace el ltro de aire
mantenga presionado
para reinicia r
ltro
de aire
modo
°F-°C
reinicio
de aler ta
traba
de cont rol
mantener
presionado
Light Shield
Light Sheld Tabs
Insert into
slots
Deli Drawer
This model is equipped with a Deli Drawer for
storage of luncheon meats, spreads, cheeses,
and other deli items.
Deli Drawer Cover
Crisper Drawer With
Adjustable Dividers
The crisper drawer, located at the bottom of the
refrigerator interior, is designed for storing fruits,
vegetables, and other fresh produce. Wash items
in clean water and then remove excess water
before placing them in the crisper. Items with
strong odors or high moisture content should be
wrapped before storing. Dividers may be adjusted
for different size items within the crisper.
15
STORAGE FEATURES
Glass Crisper Cover
To remove the Crisper Drawer or
Deli Drawer:
1. Remove the glass cover from the drawer to
be removed.
2. With both hands, lift up on the front of the
drawer until it releases from the
side supports.
3. Carefully remove the drawer from
the refrigerator.
NOTE
Leafy vegetables keep best when stored with
the humidity control set on HIGH HUMIDITY,
or in a drawer without a humidity control.
This keeps incoming air to a minimum and
maintains maximum moisture content.
Adjustable Two-Liter Door Bins
This model is equipped with adjustable door bins
that can be moved to suit individual needs.
To Move Door Bins:
Lift the bin straight up.
Remove the bin.
Place the bin in desired position.
Lower the bin onto supports until locked
in place.
Storing Foods
Fresh Food Storage
Keep the fresh food compartment
between 34°F and 40°F with an optimum
temperature of 37°F.
Avoid overcrowding the refrigerator shelves,
which reduces air circulation and causes
uneven cooling.
Fruits and Vegetables
Store fruits and vegetables in crisper drawers,
where trapped moisture helps preserve food
quality for longer time periods.
Meat
Wrap raw meat and poultry securely so
leakage and contamination of other foods or
surfaces does not occur.
Dairy Bin
Use the dairy compartment, at the top of the
fresh food compartment door, for short term
storage of cheese, spreads, or butter. The dairy
compartment is designed to be warmer than the
open storage area to accommodate these types
of food.
Full Width Gallon Bin
The full width gallon bin is especially designed to
hold gallon-sized containers like milk gallons.
16
ENERGY-SAVING TIPS
Locate the appliance in the coolest part of
the room, out of direct sunlight, and away
from heating ducts or registers. Do not
place the unit next to heat-producing
appliances such as a range, oven, or
dishwasher. If this is not possible, a section
of cabinetry or an added layer of insulation
between the two appliances will help the
unit operate more efciently.
Level appliance so that the door
closes tightly.
Refer to the “SETTING THE TEMPERATURE
CONTROL” section for the suggested
temperature control settings.
CARE AND CLEANING
Keep your refrigerator clean to prevent odor build-up. Wipe up any spills immediately and clean at
least twice a year. Never use metallic scouring pads, brushes, abrasive cleaners or strong alkaline
solutions on any surface. Do not wash any removable parts in a dishwasher. Always unplug the
electrical power.
CAUTION
When moving the refrigerator, pull straight out. Do not shift the refrigerator from
side to side as this may tear or gouge the oor covering.
Damp objects stick to cold metal surfaces. Do not touch interior metal surfaces with
wet or damp hands.
Vacation and Moving Tips
Short Vacations:
Leave the refrigerator operating during vacations of less than 3 weeks.
Long Vacations:
If the refrigerator will not be used for several months:
Remove all food and unplug the power cord.
Clean and dry the interior thoroughly.
Leave the refrigerator door open slightly, blocking it open if necessary, to prevent odor and
mold growth.
Do not overcrowd the unit or block cold air vents. Doing so causes the appliance to run longer
and use more energy.
Cover foods and wipe containers dry before placing them in the appliance. This cuts down on
moisture build-up inside the unit.
Organize the appliance to reduce door openings. Remove as many items as needed at one time
and close the door as soon as possible.
17
NOTE
Turning the refrigerator temperature control to “OFF” (See Pro Select
TM
Electronic Control) turns off
the compressor, but does not disconnect electrical power to the lights or other electrical compo-
nents. Unplug the unit or switch the breaker that supplies power to the unit to the off position.
Do not use razor blades or other sharp instruments which can scratch the appliance surface
when removing adhesive labels. Any glue left from tape or labels can be removed with a mixture
of warm water and mild detergent, or, touch the glue residue with the sticky side of tape you
have already removed. Do not remove the serial plate.
CARE AND CLEANING
Moving: When moving the refrigerator, follow these guidelines to prevent damage:
Disconnect the power cord plug from the wall outlet.
Remove foods, then defrost, and clean the refrigerator.
Secure all loose items such as base panel, baskets, and shelves by taping them securely in place
to prevent damage.
In the moving vehicle, secure refrigerator in an upright position to prevent movement. Also
protect outside of refrigerator with a blanket, or similar item.
18
Part Cleaning Agents Tips and Precautions
Interior &
Door
Liners
Soap and water
Baking soda and water
Use 2 tablespoons (25 g.) of baking soda
in 1 quart (1 l) of warm water.
Be sure to wring excess water out of
sponge or cloth before cleaning around
controls, light bulb or any electrical part.
Door Gaskets
Soap and water Wipe gaskets with a clean soft cloth.
Drawers & Bins
Soap and water Use a soft cloth to clean drawer runners
and tracks.
Do not wash any removable items (bins,
drawers, etc.) in dishwasher.
Glass Shelves
Soap and water
Glass cleaner
Mild liquid sprays
Allow glass to warm to room temperature
before immersing in warm water.
Exterior &
Handles
Soap and water
Non Abrasive Glass
Cleaner
Do not use commercial household cleaners,
ammonia, or alcohol to clean handles.
Use a soft cloth to clean smooth handles.
Do not use a dry cloth to clean smooth doors.
Exterior &
Handles
(Stainless Steel
Models Only)
Soap and water
Ammonia
Stainless Steel Cleaners
Never use CHLORIDE to clean stainless steel.
Clean stainless steel front and handles
with non-abrasive soapy water and a
dishcloth. Rinse with clean water and a
soft cloth.
Wipe stubborn spots with an ammonia-
soaked paper towel, and rinse. Use a
non-abrasive stainless steel cleaner. These
cleaners can be purchased at most home
improvement or major department stores.
Always follow manufacturer’s instruction.
NOTE: Always, clean, wipe and dry with
grain to prevent cross-grain scratching.
Wash the rest of the cabinet with warm
water and mild liquid detergent. Rinse
well, and wipe dry with a clean soft cloth.
Care and Cleaning Chart
CARE AND CLEANING
19
BEFORE YOU CALL
PROBLEM CAUSE CORRECTION
APPLIANCE OPERATION
Appliance
does not run.
Appliance is plugged into a
circuit that has a ground
fault interrupt.
Temperature Control is in the
OFF position.
Appliance may not be
plugged in or plug is loose.
House fuse blown or tripped
circuit breaker.
Power outage.
Use another circuit. If you are unsure
about the outlet, have it checked by a
certied technician.
See ELECTRONIC CONTROL section.
Ensure plug is tightly pushed into outlet.
Check/replace fuse with a 15-amp time-delay
fuse. Reset circuit breaker.
Check house lights. Call local electric company.
Appliance
runs too much
or too long.
Room or outside weather
is hot.
Appliance has recently been
disconnected for a period
of time.
Large amounts of warm
or hot food have been
stored recently.
Door is opened too frequently
or too long.
Door may be slightly open.
Temperature control is set
too low.
Gaskets are dirty, worn,
cracked, or poorly tted.
It’s normal for the appliance to work longer
under these conditions.
It takes 24 hours for the appliance to cool
down completely.
Warm food will cause appliance to run more
until the desired temperature is reached.
Warm air entering the appliance causes it to
run more. Open door less often.
See “DOOR PROBLEMS”.
Turn control knob to a warmer setting. Allow
several hours for the temperature to stabilize.
Clean or change gasket. Leaks in door seal
will cause appliance to run longer in order to
maintain desired temperatures.
APPLIANCE TEMPERATURES
Interior ap-
pliance tem-
perature is
too cold.
Temperature control is set
too low.
Set control to a warmer setting. Allow several
hours for temperature to stabilize.
Temperature
inside appli-
ance is too
warm.
Temperature control is set
too warm.
Door is opened too frequently
or too long.
Door may not be seating properly.
Large amount of warm or hot
food has been stored recently.
Appliance has recently been dis-
connected for a period of time.
Turn control to a colder setting. Allow several
hours for temperature to stabilize.
Warm air enters the appliance every time the
door is opened. Open door less often.
See “DOOR PROBLEMS”.
Wait until the appliance has had a chance to
reach its selected temperature.
Appliance requires 24 hours to cool
down completely.
“LO” is
displayed on
control.
Control has been locked. Press the CONTROL LOCK key for three
seconds to unlock.
“E7”, “E8”,
“E9” is
displayed on
control.
The control has registered an
error code.
For toll-free telephone support in the U.S.
and Canada: 1-800-374-4432
Visit our web site at
www.frigidaire.com.
1-800-944-9044 (United States)
1-800-265-8352 (Canada)
Before calling for service, review this list. It may save you time and expense. This list includes com-
mon occurrences that are not the result of defective workmanship or materials in this appliance.
20
BEFORE YOU CALL
PROBLEM CAUSE CORRECTION
“Sb” is
displayed on
control.
The control is in
Sabbath Mode.
Pressing the CONTROL LOCK and TEMP
MODE keys to exit Sabbath Mode.
SOUND AND NOISE
Louder
sound levels
whenever
appliance is
on.
Appliance operates at higher
pressures during the start of
the ON cycle.
This is normal. Sound will level off or
disappear as appliance continues to run.
Popping or
cracking
sound when
compressor
comes on.
Bubbling or
gurgling
sound.
Metal parts undergo
expansion and contraction, as
in hot water pipes.
Refrigerant (used to cool
refrigerator) is circulating
throughout the system.
This is normal. Sound will level off or
disappear as appliance continues to run.
This is normal.
Vibrating or
rattling noise.
Appliance is not level. It rocks
on the oor when it is moved
slightly.
Floor is uneven or weak.
Appliance is touching
the wall.
Level the appliance. Refer to
“Leveling” section.
Ensure oor can adequately support the
appliance. Level the appliance by putting
wood or metal shims under part of the
appliance.
Re-level appliance or move appliance
slightly. Refer to “Leveling” in the
INSTALLATION section.
WATER / MOISTURE / FROST INSIDE APPLIANCE
Moisture
forms on
inside
appliance
walls.
Weather is hot and humid,
which increases internal rate
of frost buildup.
Door is slightly open.
Door is kept open too long.
This is normal.
See “DOOR PROBLEMS”.
Open the door less often.
ODOR IN APPLIANCE
Odors in
appliance.
Interior needs to be cleaned.
Foods with strong odors are
in the appliance.
Clean interior with sponge, warm water, and
baking soda. Replace air lter.
Cover the food tightly.
DOOR PROBLEMS
Door will
not close.
Appliance is not level. It
rocks on the oor when it is
moved slightly.
Floor is uneven or weak.
This condition can force the cabinet out
of square and misalign the door. Refer to
“Leveling” section.
Ensure oor can adequately support appliance.
Level the appliance by putting wood or metal
shims under part of the appliance.
LIGHTING PROBLEMS
Light bulb is
not on.
The light bulb is burned out.
No electric current is reaching
the appliance.
Control is in Sabbath mode
(Sb is displayed on control).
Follow directions under INTERIOR
LIGHTING section.
See “Appliance does not run”.
Depress TEMP MODE key and CONTROL
LOCK key for 3 seconds.
1 / 1

Frigidaire FGRU19F6QF Owner's manual

Category
Fridges
Type
Owner's manual
This manual is also suitable for

Ask a question and I''ll find the answer in the document

Finding information in a document is now easier with AI

Ask the document