Aeg-Electrolux B3741-5-M EU R08 User manual

Category
Ovens
Type
User manual

This manual is also suitable for

B3741-5
User manual Built-In Electric Oven
2
Dear Customer
Thank you for choosing one of our high-quality products.
With this appliance you will experience the perfect combination of functional
design and cutting edge technology.
Convince yourself that our appliances are engineered to deliver the best per-
formance and control - indeed we are setting the highest standards of excel-
lence.
In addition to this you find environmental and energy saving aspects as an inte-
gral part of our products.
To ensure optimal and regular performance of your appliance please read this
instruction manual carefully. It will enable you to navigate all processes perfect-
ly and most efficiently.
To refer to this manual any time you need to, we recommend you to keep it in a
safe place. And please pass it to any future owner of the appliance.
We wish you much joy with your new appliance.
The following symbols are used in this user manual:
1
Important information concerning your personal safety and information on
how to avoid damaging the appliance.
3 General information and tips
2 Environmental information
3Contents
Contents
Operating Instructions 5
Safety instructions 5
Description of the Appliance 7
General Overview 7
Control Panel 8
Oven Features 9
Oven accessories 10
Before Using for the first time 11
Setting and changing the time 11
Initial Cleaning 12
Using the Oven 13
Switching the Oven On and Off 13
Speedcook 16
Oven Functions 16
Inserting the Oven Shelf and the Baking Tray 17
Clock Functions 18
Other Functions 23
Switching off the display 23
Oven’s child safety device 23
Oven automatic cut-out 24
Uses, Tables and Tips 24
Baking 24
Baking table 26
Table for Bakes and Gratins 29
Frozen Ready Meals Table 29
Roasting 30
Roasting table 30
Grill Sizes 32
Grilling table 32
Defrosting 33
Defrosting table 33
Drying 34
Making Preserves 35
Cleaning and Care 36
Outside of the appliance 36
Oven interior 36
Accessories 36
Contents4
Fat Filter 37
Pyrolytic cleaning 37
Shelf Support Rails 38
Oven Lighting 39
Oven door 40
Oven door glass 42
What to do if … 45
Disposal 46
Installation Instructions 47
Safety information for the installer 47
Guarantee/Customer Service 51
Service 55
5Operating Instructions
Operating Instructions
1 Safety instructions
Electrical safety
This appliance must be only connected by a registered electrician.
In the event of a fault or damage to the appliance: Take the fuses out or
switch off.
Repairs to the appliance must only be carried out by qualified service engi-
neers. Considerable danger may result from improper repairs. If repairs be-
come necessary, please contact our Customer Services or your dealer.
Child Safety
Never leave children unsupervised when the appliance is in use.
Safety whilst Using
People (including children) who, because of their physical, sensory or mental
capabilities or their inexperience or ignorance are not able to use the device
safely, should not use this device without supervision or instruction by a re-
sponsible person.
This appliance is intended to be used for cooking, roasting and baking food in
the home.
Take care when connecting electric appliances to sockets nearby. Do not allow
connecting leads to come into contact with or to catch beneath the hot oven
door.
Warning: Risk of burns! The interior of the oven becomes hot during use.
Using ingredients containing alcohol in the oven may create an alcohol-air
mixture that is easily ignited. In this case, open the door carefully. Do not have
embers, sparks or naked flames in the vicinity when opening the door.
3 Information on acrylamides
According to the latest scientific knowledge, intensive browning of food, espe-
cially in products containing starch, can constitute a health risk due to acryla-
mides. Therefore we recommend cooking at the lowest possible temperatures
and not browning foods too much.
Safety instructions6
How to avoid damage to the appliance
Do not line the oven with aluminium foil and do not place baking trays, pots,
etc. on the oven floor, as the heat that builds up will damage the oven enamel.
Fruit juices dripping from the baking tray will leave stains, which you will not
be able to remove. For very moist cakes, use a deep tray.
Do not put any strain on the oven door when open.
Never pour water directly into the oven when it is hot. This could cause dam-
age to or discoloration of the enamel.
Rough handling, especially around the edges of the front panel, can cause the
glass to break.
Do not store any flammable materials inside the oven. These could ignite
when the oven is switched on.
Do not store any moist foods inside the oven. This could damage the oven
enamel.
After switching off the cooling fan, do not keep uncovered dishes in the oven.
Moisture may condense in the oven interior or on the glass doors and may get
into the units.
3 Note on enamel coating
Changes in the colour of the oven’s enamel coating as a result of use do not af-
fect the appliance’s suitability for normal and correct use. They therefore do not
constitute a defect in the sense of the warranty law.
7Description of the Appliance
Description of the Appliance
General Overview
Full glass door
Control panel
Door
handle
Description of the Appliance8
Control Panel
Oven Functions
Temperature / Time Selection
Function buttons
Oven Power Indicator
Temperature /
Time Display
9Description of the Appliance
Oven Features
Inside of door
On the inside of the oven door you will find
the numbers of the different oven shelves.
Top heat and heating elements
Oven lighting
Fan
Bottom Heat
Shelf positions
Oven shelf runners,
removable
Description of the Appliance10
Oven accessories
Oven shelf
For cookware, cake tins, roasts and grilled
foods.
Baking tray
For cakes and biscuits.
11Before Using for the first time
Before Using for the first time
Setting and changing the time
3 The oven only operates when the time has been set.
When the appliance has been connected to
the electrical supply or when there has
been a power cut, the function indicator
Time flashes automatically.
1. To change a time that has already been set,
press the Select button repeatedly until
the function indicator Time flashes.
2. Using the / control knob, set the cur-
rent time.
After approx. 5 seconds, the flashing stops
and the clock displays the time of day set.
The appliance is now ready to use.
3 The time can only be modified, if the child
safety device is deactivated, none of the
Countdown , Cook time or End
time clock functions and no oven
function is set.
Before Using for the first time12
Initial Cleaning
Before using the oven for the first time you should clean it thoroughly.
1 Caution: Do not use any caustic or abrasive cleaners. The surface could be dam-
aged.
3 To clean metal fronts use commercially available cleaning agents.
1. Set the oven functions dial to Light .
2. Remove all accessories and the shelf support rails and wash them with warm
water and washing up liquid.
3. Then wash out the oven with warm water and washing-up liquid, and dry.
4. Wipe the front of the appliance with a damp cloth.
13Using the Oven
Using the Oven
Switching the Oven On and Off
Switching the oven on
Turn the oven functions selector to the de-
sired function. The power indicator light
lights up. The temperature display shows
the suggested temperature for the oven
function selected.
The oven starts to heat up.
When the temperature set is reached, an
audible signal sounds.
Oven Functions
Temperature / Time Selection
Temperature / Time Display
Change display
Heat indicatorSpeedcook
Oven Power Indicator
Clock FunctionsButton Speedcook
Using the Oven14
Changing the oven temperature
Turn the / knob to raise or lower the
temperature.
The setting changes in 5 °C steps.
Checking the temperature
Press Speedcook and Select buttons
at the same time.
The current oven temperature appears in
the temperature display.
Switching the oven off
To turn the oven off, turn the oven func-
tions selector to the OFF position.
3 Cooling fan
The fan switches on automatically in order to keep the appliance’s surfaces cool.
When the oven is switched off, the fan continues to run to cool the appliance
down, then switches itself off automatically.
15Using the Oven
3 Heat indicator
Indicates warming up
When the oven function has been
switched on the bars that slowly light up
one after the other indicate how far the
oven has heated up.
Fast heat indicator
When the fast heat function has been
switched on the bars that flash one
after the other indicate that fast heat is
operating. In addition the bars next to the
symbol light up.
Residual heat indicator
When the oven has been switched off, the
bars that are still lit indicate the remaining
residual heat in the oven.
Using the Oven16
Speedcook
After an oven function is selected, using the additional function
Speedcook the empty oven can be pre-heated in a relatively short time.
1 Important: Do not put the food to be cooked into the oven, until Speedcook is
completed and the oven is operating using the desired function.
1. Set the desired oven function (e. g., Conventional ). If necessary, change the
suggested temperature.
2. Press the Speedcook button. The bars next to the symbol light up.
When the bars flash one after another it shows that Speedcook is operating.
When the temperature set is reached, the bars of the heat indicator light up and
the bars next to the symbol go out. An audible signal sounds.
The oven now continues heating according to the pre-set oven function and
temperature. You can now place the food in the oven.
3 The function Speedcook can be switched on together with the oven func-
tions Fan-assisted circulation , Conventional and Rotitherm .
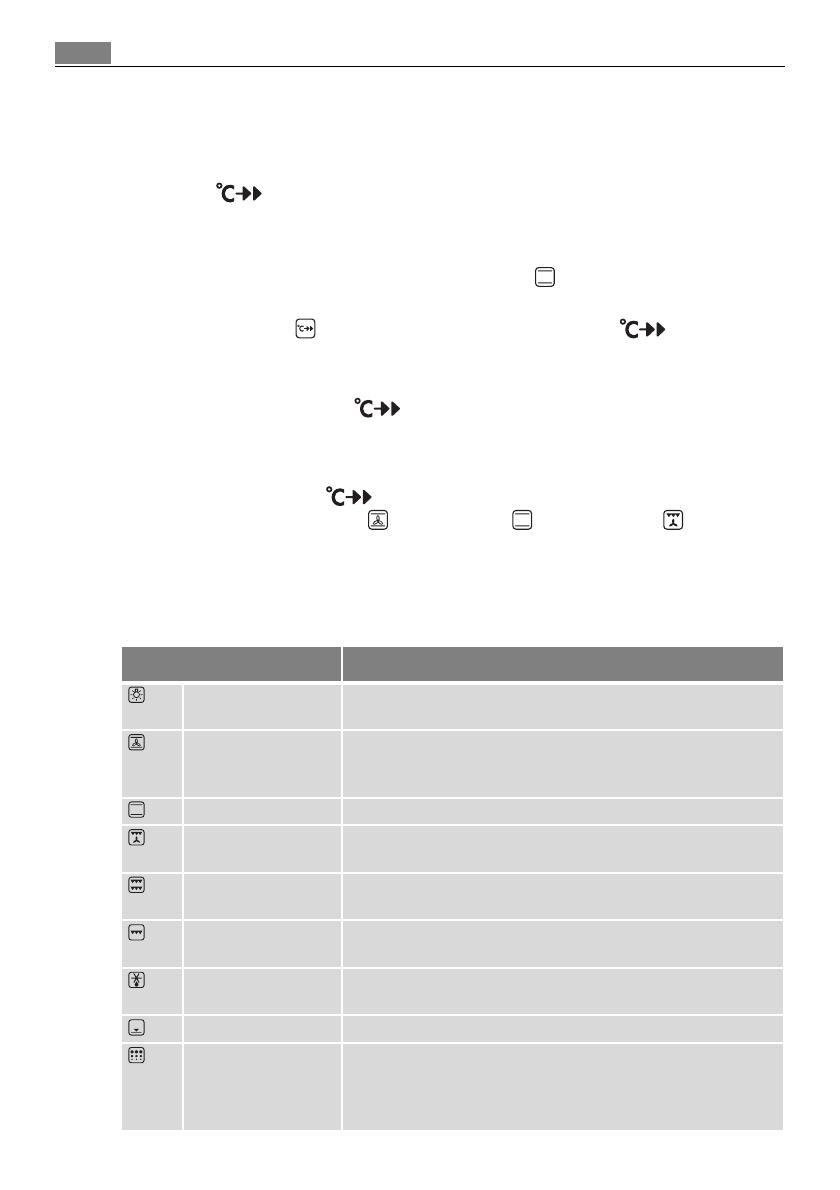
Oven Functions
The oven has the following functions:
Oven function Application
Light Using this function you can light up the oven interior, e.g. for
cleaning.
Fan-assisted
circulation
For baking on up to two oven levels.
Set the oven temperatures 20-40 °C lower than when using
Conventional.
Conventional For baking and roasting on one oven level.
Rotitherm For roasting larger joints of meat or poultry on one level.
The function is also suitable for gratinating and browning.
Dual gril For grilling flat foodstuffs in large quantities and for toast-
ing.
Grill For grilling flat foodstuffs placed in the middle of the grill
and for toasting.
Defrost For defrosting e. g. flans and gateaux, butter, bread, fruit or
other frozen foods.
Bottom heat For baking cakes with crispy or crusty bases.
Pyroluxe For automatic pyrolytic cleaning of the oven. It burns off resi-
dues in the oven, which can then be removed with a cloth
when the oven has cooled down. The oven is heated to approx-
imately 500 ×C.
17Using the Oven
Inserting the Oven Shelf and the Baking Tray
3 Shelf runner safety and anti-tip device
As a shelf runner safety device, all insertable components have a small curved
indentation at the bottom on the right and left-hand edge.
Always insert insertable components so that this indentation is at the back of
the oven interior. This indentation is also important for preventing the insertable
components from tipping.
Inserting the baking tray
Push the baking tray between the guide
bars of the selected oven level.
Inserting the oven shelf:
Insert the oven shelf so that the feet point
downwards.
Push the oven shelf between the guide bars
of the selected oven level.
3 The high rim around the oven shelf is an
additional device to prevent cookware from
slipping.
Inserting the oven shelf and the baking
tray together:
Lay the oven shelf on the baking tray.
Push the baking tray between the guide
bars of the selected oven level.
Using the Oven18
Clock Functions
Cook time
To set how long the oven is to be in use.
End time
To set when the oven is to switch off again.
Countdown
To set a countdown. A signal sounds after the time has elapsed.
This function does not affect the functioning of the oven.
Time
To set, change or check the time
(See also section “Before Using for the First Time”).
3 How to use the clock functions
After a clock function has been selected, the corresponding function indicator
flashes for about 5 seconds. During this period, the desired times can be set or
modified using the / dial.
When the desired time has been set, the function indicator continues to flash
for approx. 5 seconds. After that the function indicator is then lit. The set time
begins to run in the background.
When the clock functions Cook time and End time have been complet-
ed, the oven functions dial must be turned back to ”0“.
Using the Display button, you can switch between the oven temperature
and the time.
Temperature / Time Display
Change display
Clock function indicators
Selector Button
19Using the Oven
3 Checking the time set or remaining.
Press the Select button repeatedly, until the appropriate clock function flash-
es and the time set or remaining is displayed.
Countdown
1. Press the Select button repeatedly until
the function indicator Countdown
flashes.
2. Using the / control knob set the de-
sired countdown (max. 99.00minutes).
The function indicator Countdown
lights up.
When 90% of the time set has elapsed, an
audible signal sounds.
When the time has elapsed, ”0.00“ and the
function indicator flash.
An audible signal sounds.
To stop the flashing and the audible signal:
Press any button.
Using the Oven20
Cook time
1. Select the oven function and temperature.
2. Press the Select button repeatedly until
the function indicator Cook time flash-
es.
3. Using the / control knob set the de-
sired cooking time.
The function indicator Cook time lights
up and the oven comes on immediately.
When the time has elapsed, ”0.00“ and the
function indicator flash.
An audible signal sounds for 2 minutes. The
oven switches itself off.
To stop the flashing and the audible signal:
Turn the oven functions dial to ”0”.
  • Page 1 1
  • Page 2 2
  • Page 3 3
  • Page 4 4
  • Page 5 5
  • Page 6 6
  • Page 7 7
  • Page 8 8
  • Page 9 9
  • Page 10 10
  • Page 11 11
  • Page 12 12
  • Page 13 13
  • Page 14 14
  • Page 15 15
  • Page 16 16
  • Page 17 17
  • Page 18 18
  • Page 19 19
  • Page 20 20
  • Page 21 21
  • Page 22 22
  • Page 23 23
  • Page 24 24
  • Page 25 25
  • Page 26 26
  • Page 27 27
  • Page 28 28
  • Page 29 29
  • Page 30 30
  • Page 31 31
  • Page 32 32
  • Page 33 33
  • Page 34 34
  • Page 35 35
  • Page 36 36
  • Page 37 37
  • Page 38 38
  • Page 39 39
  • Page 40 40
  • Page 41 41
  • Page 42 42
  • Page 43 43
  • Page 44 44
  • Page 45 45
  • Page 46 46
  • Page 47 47
  • Page 48 48
  • Page 49 49
  • Page 50 50
  • Page 51 51
  • Page 52 52
  • Page 53 53
  • Page 54 54
  • Page 55 55
  • Page 56 56

Aeg-Electrolux B3741-5-M EU R08 User manual

Category
Ovens
Type
User manual
This manual is also suitable for

Ask a question and I''ll find the answer in the document

Finding information in a document is now easier with AI