
70
CQ-C9800/9700U
CQ-C9800/9700U
71
+
-
+
-
+
-
+
-
FRONT SP
REAR SP
ACC
BATTERY 15 A
L
R
S.W-OUT
PRE-OUT FRONT
CD.C-IN
AUX-IN
PRE-OUT REAR
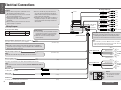
Electrical Connections
Caution:
≥ This product is designed to operate with a 12 V
DC, negative ground battery system.
≥ To prevent damage to the unit, be sure to follow
the connection diagram below.
≥ Remove approximately
1
/
4
q (5 mm) of protective
covering from the ends of the leads before
connecting.
≥ Do not insert the power connector into the unit
until the wiring is completed.
≥ Be sure to insulate any exposed wires from
a possible short-circuit from the car chassis.
Bundle all cables and keep cable terminals free
from touching any metal parts.
≥ Remember, if your car has a drive computer or
a navigation computer, the data of its memory
may be erased when the battery terminals are
disconnected.
Accessory used for wiring
Wiring Diagram
No. Item Q’ty
6
Power connector 1
External amplifi er control power lead (max. 500 mA)
This lead is for connection to the power amplifi er.
Note:
≥ This lead is used for power control when an external power amplifi er is
connected. The power supply of a power amplifi er will be activated when
turning on the power of this unit.
Dual CD changer control lead
Antenna control lead
(to motor antenna) (max. 100 mA)
This lead is not intended for use with switch actuated power antenna.
ACC power lead
To ACC power, i12 V DC.
Battery lead
To the car battery, continuous i12 V DC.
Ground lead
To a clean, bare metallic part of the car chassis.
Note:
≥ Insulate this lead with vinyl tape when you do not connect it.
Note:
≥ The power antenna extends automatically when the AM/FM radio mode is
selected.
Antenna
(Blue/white stripe)
(Brown/white stripe)
(Blue)
(Red)
(Yellow)
(Black)
CD changer
control
connector
Subwoofer cord
CD changer input cord
(red)
(white)
R (red)
L (white)
6 Power connector
Fuse (mini auto fuse type, 15 A)
≥ If the fuse (rear panel) blows frequently, they may be
something wrong with the unit or wiring connection.
Consult your nearest Panasonic Servicenter for service.
Front speaker lead
Rear speaker lead
(White)
(White/black stripe)
(Gray)
(Gray/black stripe)
Left
To front
speaker
Right
Caution:
≥ Do not connect more than
one speaker to one set of
speaker leads.
E
N
G
L
I
S
H
51
E
N
G
L
I
S
H
52
Left
To rear
speaker
Right
(Green)
(Green/black stripe)
(Violet)
(Violet/black stripe)
Preout cord (rear)
Preout cord (front)
R (red)
L (white)
R (red)
L (white)
AUX input cord
R (red)
L (white)
Monaural
CQ-C9800U
CQ-C9700U
DC/DC converter
≥ To ensure safety, ask a specialized contractor
or the dealer from whom you purchased the
equipment to install the equipment for you.
≥ Anchor the converter securely using the
screws (option).
Note:
≥
Do not bundle or position the DC/DC converter, the speaker
output cords and the antenna near the preout cords. This is in
order to prevent noise from being generated.

72
CQ-C9800/9700U
CQ-C9800/9700U
73
TWIN CD
.
C-CONT
CD.C-IN
CD.C-IN
Note:
≥ For wiring, carefully read the operating
instructions for the devices connected.
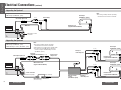
Upgrading the System 2
Electrical Connections
(continued)
Upgrading the System 1
Example combination
≥ CD changer (CX-DP880U, option)
Example combination
≥ CD changer (CX-DP880U, option)
≥ Dual CD changer selector (CA-CD55U, option)
CD changer input cord
R (red)
CD changer control
connector
RCA cord (R)
RCA cord (L)
CD changer
(CX-DP880U, option)
Extension cord
(supplied with CX-DP880U)
DIN cord
6 Power connector
CD changer input cord
RCA cord
(supplied with CA-CD55U)
Dual changer
output cord
Dual CD changer control lead
(Brown/white stripe)
Dual CD changer
selector
(CA-CD55U, option)
Changer 1
connecting cord
RCA cord
DIN extension cord
(supplied with CA-CD55U)
Extension cord
(supplied with CX-DP880U)
E
N
G
L
I
S
H
53
E
N
G
L
I
S
H
54
CD changer
(CX-DP880U, option)
Changer 2
connecting cord
DIN cord
L (white)
Note:
≥ For wiring, carefully read the operating
instructions for the devices connected.
≥ This unit does not support Sirius satellite radio.
≥ You cannot connect CD changer and Sirius
receiver using the dual CD changer selector
(CA-CD55U, option).
RCA cord
DIN cord
Extension cord
(supplied with CX-DP880U)
CD changer
(CX-DP880U, option)
Remove the vinyl cap.
Cut off the tip.
R (red)
L (white)
R (red)
L (white)
R (red)
L (white)
CQ-C9800U
CQ-C9700U
CQ-C9800U
CQ-C9700U

74
CQ-C9800/9700U
CQ-C9800/9700U
75
PRE-OUT FRONT
S.W-OUT
PRE-OUT REAR
FM Stereo Radio
Frequency range: 87.9 MHz–107.9 MHz
Usable sensitivity: 13.2 dBf. (1.26 ¨V, 75 ≠)
50 dB quieting sensitivity: 19.2 dBf. (2.51 ¨V, 75 ≠)
Frequency response: 30 Hz–15 kHz (d3 dB)
Alternate channel selectivity
: 75 dB
Stereo separation: 40 dB (1 kHz)
Image response ratio: 75 dB
IF response ratio: 100 dB
Signal to noise ratio: 62 dB
AM Radio
Frequency range: 530 kHz–1 710 kHz
Usable sensitivity: 25 dB/¨V
(11 V, S/N 20 dB)
CD Player
Sampling frequency: 8 times oversampling
Pick-up type: Astigma 3-beam
Light source: Semiconductor laser
Wave length: 780 nm
Frequency response: 20 Hz–20 kHz (d1 dB)
Signal to noise ratio: 106 dB
Total harmonic distortion
: 0.01 % (1 kHz)
Wow and fl utter: Below measurable limits
Channel separation: 86 dB
Electrical Connections
(continued)
General
Power supply: DC 12 V (11 V–16 V),
test voltage 14.4 V,
negative ground
Current consumption: Less than 2.5 A
(CD mode;
0.5 W 4-speaker)
Maximum power output: 70 Wk4 (at 1 kHz)
volume control maximum
Maximum power output: 60 Wk4 (at 1 kHz)
volume control maximum
Tone adjustment range: Bass: 28 dB at 20 Hz
Treble: 20 dB at 20 kHz
Equalizer center frequency:
62.5 Hz
, 125 Hz, 250 Hz,
500 Hz, 1 kHz, 2 kHz, 4 kHz,
8 kHz, 16 kHz
(default)
Variable range of equalizer: j12 dB to 12 dB (2 dB step)
Speaker impedance: 4–8 ≠
Pre-amp output voltage: 5 V
(
CD mode; 1 kHz, 0 dB
)
Subwoofer output voltage
: 5 V
Pre-amp output impedance
: 60 ≠
Subwoofer output impedance
: 60 ≠
External input impedance
: 10 k≠ (AUX IN)
External input sensitivity
: Max. 2 V (AUX IN)
Dimensions (WkHkD): 7qk1
15
/
16
qk6
1
/
8
q
(178k50k155 mm)
Weight: 3 lbs. 12 oz (1.7 k )
E
N
G
L
I
S
H
55
E
N
G
L
I
S
H
56
Above specifi cations comply with EIA standards.
Note:
≥ Specifi cations and design are subject to
modifi cation without notice due to improvements.
Specifi cations
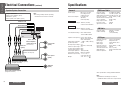
Subwoofer
(option)
Stereo power amplifi er (option)
(bridged connection)
RCA cord
(option)
Preout cord (front)
Rear speaker
(option)
Stereo power amplifi er (option)
(bridged connection)
Front speaker
(option)
External amplifi er
control power lead
(Blue/white stripe)
Speaker System Connection
Example combination
≥ Stereo power amplifi er (option)
≥ Subwoofer (option)
≥ Front speaker, rear speaker (option)
Subwoofer cord
Preout cord (rear)
Remove the vinyl cap.
CQ-C9800U
CQ-C9700U
CQ-C9800U
CQ-C9700U
Note:
≥ For wiring, carefully read the operating
instructions for the devices connected.
6 Power connector
-
 1
1
-
 2
2
-
 3
3


Panasonic CQC9800U Operating instructions
- Type
- Operating instructions
- This manual is also suitable for
Ask a question and I''ll find the answer in the document
Finding information in a document is now easier with AI
Related papers
-
Panasonic CQC9700U Operating instructions
-
-
Panasonic C9700U User manual
-
-
-
-
-
-
-