Ebode ESD18 User manual

Category
Smoke detectors
Type
User manual
www.ebodeelectronics.eu
Wireless Smoke Detector
eSD18
User guide 2
Bedienungsanleitung 7
Gebruikershandleiding 12
Användarmanual 17
Guide utilisateur 22
Manual do utilizador 27
Before using our product, please read this documents carefully.
7-5-2013 2 ebode eSD18
User Guide
Contents
1. CONFORMITY OF USE
2. INTRODUCTION
3. INSTALLATION INSTRUCTIONS
4. USING THE SMOKE DETECTOR
5. REGISTERING THE DETECTOR WITH THE BSS880 HOME PROTECTOR & CONSOLE
6. REGISTERING WITH THE SC28 HOME PROTECTOR
7. REGISTERING WITH THE BS800 HOMEGUARD
1. Conformity of Use
For carefree and safe use of this product, please read this manual and safety information
carefully and follow the instructions. The unit is registered as a device that does not cause
or suffer from radio-frequency interference. It is CE approved and it conforms with the
Low Voltage Directory. The safety and installation instructions must be observed.
Technical manipulation of the product, or any changes to the product, is forbidden, due to
security and approval issues. Please take care to set up the device correctly - consult your
user guide. Young children should use the device only under adult supervision. No
guarantee or liability will be accepted for any damage caused due to incorrect use of the
equipment supplied, other than indicated in this owner’s manual.
Safety Warnings
Avoid strong mechanical tear and wear, extreme ambient temperatures, strong
vibrations and atmospheric humidity.
Do not disassemble any part of the product: the device contains live parts and no
user-serviceable parts are inside. The product should only be repaired or serviced by
qualified and authorized service personnel. Defected pieces must be replaced by original
(spare) parts.
Batteries: keep batteries out of the reach of children. Dispose of batteries as chemical
waste. Never use old and new batteries or different types of batteries together. Remove
the batteries when you are not using the system for a longer period of time. When
inserting batteries, please be sure the polarity is right. Make sure that the batteries are
not short circuits and are not disposed in fire (danger of explosion).
In case of improper usage or if you have opened, altered and repaired the product
yourself, all guarantees expire. The supplier does not accept responsibility in the case of
improper usage of the product or when the product is used for purposes other than
specified. The supplier does not accept responsibility for additional damage other than
covered by the legal product responsibility.
7-5-2013 3 ebode eSD18
2. Introduction
Thank you for purchasing the ebode eSD18. Get warned by smoke emission and intervene
on time to avoid damage caused by smoke and fire. The ebode eSD18 smoke detector has
an optical sensor for fast response and is powered by a 9 Volt battery (not included). The
eSD18 is easy and quick to assemble and has a test button for function check. Place the
eSD18 on every floor of your home for maximum security. Upon detection of smoke, the
eSD18 will sound an alarm of 85DB. The eSD18 can be used stand-alone, and also has the
option to be connected to an X-10 alarm BS800 (HomeGuard) and Protector Plus (BS880 /
BS880 and 4/7).
3. Installation instructions
Recommended Installation Locations
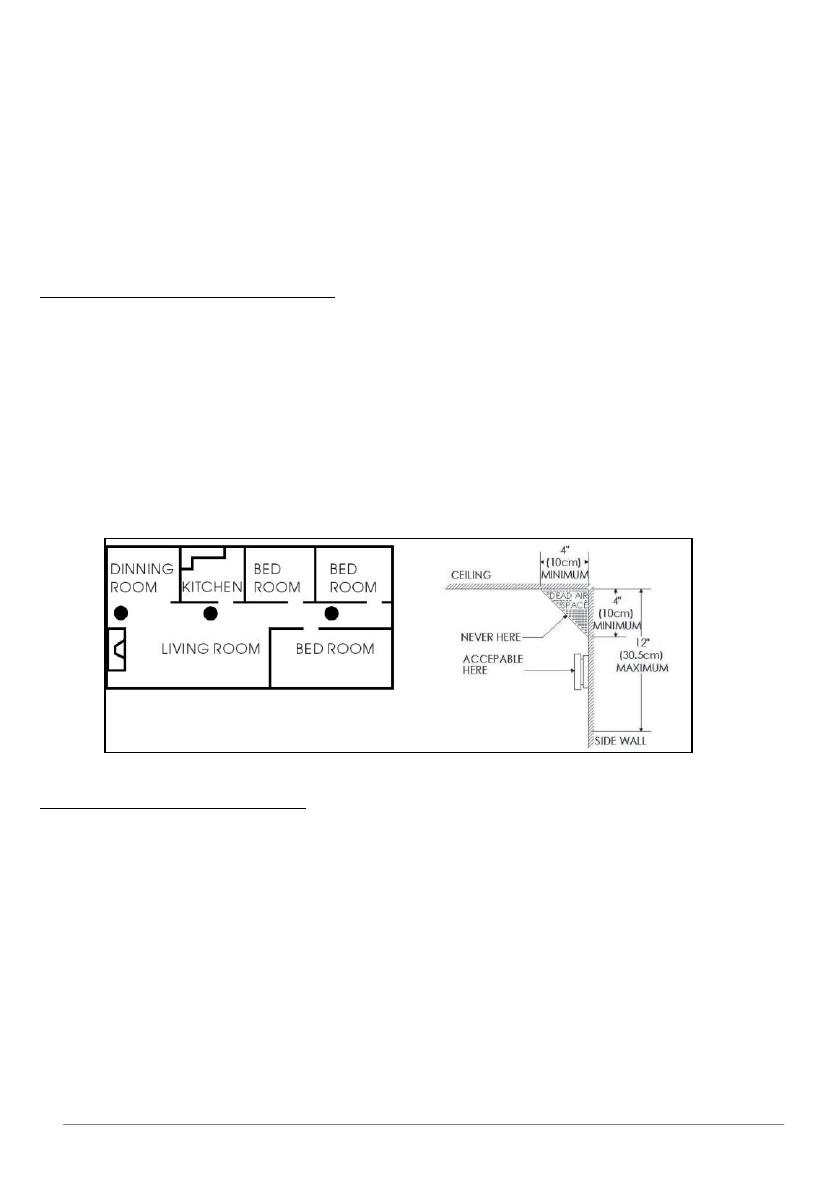
We recommend the installation of a Smoke Combination Detector in the following locations
illustrated below. For maximum protection we suggest an alarm be installed on each level of
a multilevel home including every bedroom, hallway, finished attic and basement. Put an
alarm at both ends of a bedroom, hallway or large room if the hallway or room is more
than 30ft.(9.1m) long. If you have only one alarm, ensure it is placed in the hallway outside
of the main sleeping area, or in the main bedroom. Verify the alarm can be heard in all
sleeping areas. Locate an alarm in every room where someone sleeps with the door closed.
Mount the alarm on the ceiling in the centre of the room. Ceiling mounting is preferred in
ordinary residential construction. When mounting an alarm on the ceiling, locate it at a
minimum of 4”(10cm) from the side wall. If installing the alarm on the wall, at a minimum
of 4”(10cm) and a maximum of 12”(30.5cm) below the ceiling (see diagram below).
Figure 1.1
Where not to mount the detector
Do not install in garages, kitchens, furnace rooms or bathrooms and install at least 15 feet
(5m) away from any fuel burning appliance. Do not install within 3ft (0.9m) of the
following: The kitchen door or a bathroom that contains tub or shower, forced air ducts
used for heating or cooling, ceiling or whole house ventilating fans, or other high air flow
areas. Avoid excessively dusty, dirty or greasy areas. Dust, grease or household chemicals
contaminate the alarm’s sensors, causing it to malfunction. Do not place the alarm where
drapes or other objects can block the sensor. Smoke must be able to reach the sensors to
accurately detect these conditions. Do not install in peaks of vaulted ceiling, “A” frame
ceilings or gabled roofs. Avoid installing the detector in damp and humid areas. Install at
least one foot away from fluorescent lights; electronic noise may cause false alarms.
Extreme temperatures will effect the sensitivity of the Smoke Alarm. Do not install in areas
where the temperature is below 40 degrees Fahrenheit (4.4 Celsius) or above 100 degrees
Fahrenheit (37.8 Celsius). Place the detector away from doors and windows that open to
the outside.
7-5-2013 4 ebode eSD18
4. Using the Smoke Detector
Installing the battery
Connect a 9-volt battery to the connector. Do not use a rechargeable battery. The battery
will fit only one way. Be sure the battery connector is securely attached. Place battery into
battery pocket (see picture 1.2).
Alarm
A continuous beeps will sound when smoke is detected. One “chirp” every 30 seconds will
be an indication that the battery is low or the unit is malfunctioning. In case of a low
battery level, replace the battery as soon as possible. As you install the battery, the unit
will sound “chirp” to indicate the battery is installed properly.
The red LED will flash in conjunction with the alarm beep. I.e., the red LED will flash during
an alarm and a low battery mode chirp.
Testing the detector
Press the test button on top of the smoke detector or on the inside “Test Button 1” (see
picture 1.2) for several seconds to test the detector’s electronics. The alarm will sound.
Note, Do this weekly to ensure correct functioning.
Technical Specifications
Input Voltage: DC 9V
Static Current: <30uA
Alarm Current: <30mA
Operating Temperature: -10° ~ 50°C
Operating Humidity: <95% RH
Installation Method: Ceiling mounted
Detecting Area: 60m2 (with 4 meters height)
LED Frequency: once per 5 seconds
Alarm Output: Sound & Flash Alarm
Sensor: Infrared Photocell
Sensitivity: m=0.15 0.5dB/m
Low Voltage Prompt: 7.5V
5. Registering the Detector with the BSS880 Home Protector & Console
The detector can be registered in two different modes, being either as a Remote or as a
Sensor, the difference between these mode is explained below.
Remote mode
When set to Remote mode, the detector will act as a remote, which means it will always
trigger an alarm as soon as a fault is detected. The state of the console, being Armed or
Disarmed, will make no difference. You can change the mode with the “Mode Selector
Switch” showed in picture 1.2. Modes: Up is Remote Mode, down is Sensor Mode. When the
detector stops detecting smoke it will disarm the consoles alarm automatically.
Sensor mode
In Sensor mode the smoke detector will act as a door/window sensor. When the alarm is
disarmed and smoke is detected the smoke detector will sound an alarm and the console
will sound a chime (if enabled in the console). When the alarm is armed in “Away Mode
and the smoke detector detects smoke both the alarm of the smoke detector and the alarm
of the console will sound (console will only sound alarm if enabled in the console). The
alarm of the console needs to be disabled with either the consoles PIN code or a remote.
7-5-2013 5 ebode eSD18
Figure 1.2
6. Registering with the SC28 Home Protector
1. Set the detector to the correct mode, being Remote or Sensor.
2. Access the menu of the console, done by either using the menu UP or DOWN button.
The display now shows ENTER PIN.
3. Enter your PIN; factory default is [0000]: The display is cleared and shows a * for each
number entered.
4. When the PIN code has been entered correctly, the word INSTALL will show up on the
display.
5. Press OK.
6. Press the TEST button on the Detector. The console will beep to confirm. The display will
either read ZONE 1 SET (when sensor mode was set) or RMOT 1 SET (when remote mode
was set).
A memory space for a sensor is called a zone. If you have more than 1 sensor installed,
they will be shown e.g. ZONE 2 SET, ZONE 3 SET, … ZONE 30 SET. You can choose in which
zone you want to install the sensor. If you want to install the sensor in zone 3, press 3 on
the number pad before executing step 5.
It’s advisable to write down which zone contains which sensor for your reference.
7. Repeat step 5 for every Detector you wish to register.
8. Press CLEAR to go back to the first menu item. Press CLEAR again to quit the menu. To
confirm this choice, press 1 for Yes or 2 for No. If you choose Yes, you will quit the menu. If
you choose No, you go back to the first menu item.
7-5-2013 6 ebode eSD18
7. Registering with the BS800 HomeGuard
1. Set the detector to the correct mode, being Remote or Sensor.
2. Access the menu of the console, a PIN will be requested.
3. Enter your PIN, factory default is [0000]: You will hear three high tones and one low tone
as confirmation. The green indicator starts flashing.
4. Press 1 on the keyboard of the HomeGuard; One high tone is given for confirmation.
5. Press the test button of the sensor; One low tone is given for confirmation.
6. Repeat step 1-3 for every Detector you wish to register.
7. Press any button on your HomeGuard keyboard to finalise the registration procedure.
One short low tone is given and the green indicator will stop flashing.
If successive commands are not entered within a period of 15 seconds, the base station
returns to normal operation. To restart the registration you must start the procedure from
step1.
Note. The RF range can be affected by a number of factors including building construction,
so make sure you test the detector in the desired location using the detector’s main test
button. The detector will sound an alarm and when in range the console will also
acknowledge the detector.
7-5-2013 32 ebode eSD18
DECLARATION OF CONFORMITY
Hereby, ebode declares that this eSD18 is in compliance with the essential requirements
and other relevant provisions of the following Directives:
1) Directive 1999/5/EC of the European Parliament and of the Council of 9 March 1999
on radio equipment and telecommunications terminal equipment and the mutual
recognition of their conformity
2) Directive 2004/108/EC of the European Parliament and of the Council of 15
December 2004 on the approximation of the laws of the Member States relating to
electromagnetic compatibility
3) Directive 2006/95/EC of the European Parliament and of the Council of 12
December 2006 on the harmonization of the laws of Member States relating to electrical
equipment designed for use within certain voltage limits
4) Directive 2002/95/EC of the European Parliament and of the Council of 27 January
2003 on the restriction of the use of certain hazardous substances in electrical and
electronic equipment
5) Directive 2005/32/EC of the European Parliament and of the Council of 6 July 2005
establishing a framework for the setting of eco design requirements for energy-using
Technical data and copies of the original Declaration of Conformity are available and can
be obtained from ebode electronics: PB 25, NL-4264ZG, the Netherlands.
User Information for Consumer Products Covered by EU Directive 2002/96/EC
on Waste Electric and Electronic Equipment (WEEE)
This document contains important information for users with regards to the proper
disposal and recycling of ebode products. Consumers are required to comply with this
notice for all electronic products bearing the following symbol:
Environmental Information for Customers in the European Union
European Directive 2002/96/EC requires that the equipment bearing this
symbol on the product and/or its packaging must not be disposed of with
unsorted municipal waste. The symbol indicates that this product should be
disposed of separately from regular household waste streams.
It is your responsibility to dispose of this and other electric and electronic equipment via
designated collection facilities appointed by the government or local authorities. Correct
disposal and recycling will help prevent potential negative consequences to the
environment and human health.
For more detailed information about the disposal of your old equipment, please contact
your local authorities, waste disposal service, or the shop where you purchased the
product.
7-5-2013 34 ebode eSD18
Also available from ebode: Bluetooth Speaker and Bluetooth receiver
..
Use the BT Sound to share the music on your
smartphone, tablet or laptop wirelessly with
your friends. As the BT Sound is small in size
you can enjoy your favourite songs any place,
any time, any where! Ideal for parties,
festivals or while travelling.
Transmit the music from you smartphone,
tablet or laptop wireless to your BT Sound
Receiver. You easily hook this up to your
amplifier, stereo set or your car audio
system. Enjoy your favourite songs with all
your friends at home, and on the go!
ebode is focusing on wireless audio and video products, that are affordable,
innovative and plug & play. The products provide you with comfort in your home,
help you to avoid wires, and make sure you can stream your personal audio and
video to where ever you want to look or listen to it. For more ebode products and
information, please visit www.ebodeelectronics.eu.
7-5-2013 35 ebode eSD18
Also available from ebode: Bluetooth Speaker and Bluetooth receiver
..
The indoor camera comes with a standard
6.0mm lens or you can choose the 3.6mm
WIdeEye lens. They are both pan and tilt and
can be set as a motion detector which records
videos, photos and sound. They have a build-in
microphone and speaker.
The dome camera is a waterproof camera for
both outdoor and indoor use. The camera can
Pant, Tilt, has 3x Optical Zoom and 640 x 480
pixels (300k) MPEG4 resolution. It has a metal
housing, an easy user interface and is fully
plug and play.
ebode is focusing on wireless audio and video products, that are affordable,
innovative and plug & play. The products provide you with comfort in your home,
help you to avoid wires, and make sure you can stream your personal audio and
video to where ever you want to look or listen to it. For more ebode products and
information, please visit www.ebodeelectronics.eu.
  • Page 1 1
  • Page 2 2
  • Page 3 3
  • Page 4 4
  • Page 5 5
  • Page 6 6
  • Page 7 7
  • Page 8 8
  • Page 9 9
  • Page 10 10
  • Page 11 11
  • Page 12 12
  • Page 13 13
  • Page 14 14
  • Page 15 15
  • Page 16 16
  • Page 17 17
  • Page 18 18
  • Page 19 19
  • Page 20 20
  • Page 21 21
  • Page 22 22
  • Page 23 23
  • Page 24 24
  • Page 25 25
  • Page 26 26
  • Page 27 27
  • Page 28 28
  • Page 29 29
  • Page 30 30
  • Page 31 31
  • Page 32 32
  • Page 33 33
  • Page 34 34
  • Page 35 35
  • Page 36 36

Ebode ESD18 User manual

Category
Smoke detectors
Type
User manual

Ask a question and I''ll find the answer in the document

Finding information in a document is now easier with AI