Haier HRF-660S Operating instructions

Category
Side-by-side fridge-freezers
Type
Operating instructions
Before operation
Notes on the refrigerator compartment
Notes on the freezer compartment
Defrosting Cleaning Inoperation
Troubleshooting & Customer Service
Components ....................................................................................1
Precautions...................................................................................2-4
Preparations..................................................................................5-6
Door removal................................................................................7-8
Setting up the Refrigerator/Freezer Combi .....................................9
Start-up..........................................................................................10
Digital display operation ..........................................................11-13
Refrigerator compartment........................................................14-16
Notes on refrigeration ...................................................................17
Tips on refrigeration ......................................................................18
Freezer compartment.....................................................................19
Notes on freezing ..........................................................................20
Defrosting......................................................................................21
Cleaning ........................................................................................21
Inoperation ...............................................................................22-23
Troubleshooting .......................................................................24-25
Customer service......................................................................26-27
Contents
Before start-up, be sure to read the User's Guide.
Keep the User's Guide in a safe place.
Components
Freezer
Light
Shelves
Bottle rack
Freezer drawers
Refrigerator
compartment
Veggie drawer cover
Note
The power plug must remain accessible after setting up the appliance.
If damaged, the power cord of this appliance must be replaced by the maker, their customer
service or an equally qualified person so as to prevent any hazards.
Should the refrigerant circuit have been damaged, keep away all sources of fire or sparks and
thoroughly air the room.
Children frequently do not recognise the hazards related to handling household appliances.
Therefore, children and people with impairments should only be allowed to use the refrigerator
under the supervision of a qualified person. Do not let children play with the appliance.
Do not use any mechanical or artificial devices or any tools other than those recommended by the
maker in order to accelerate the defrosting process.
Check the appliance for damages sustained during transportation. Do not connect the appliance if
it is damaged. In case of damage, contact your supplier.
Make sure that no part of the refrigerant circuit is damaged when transporting and setting up the
appliance.
To prevent damage to the appliance, its ventilation openings must not be covered or blocked.
Do not operate any electrical devices inside the food storage area, unless instructed to do so by
the maker.
Our company continually thrives towards improving all models and versions. For that
reason, we hope that you can accept our right to change their appearance, equipment or
operation.
Shelves
Bottle cover
Light
Bottle rack
Veggie drawer
1
Ice tray
Precautions
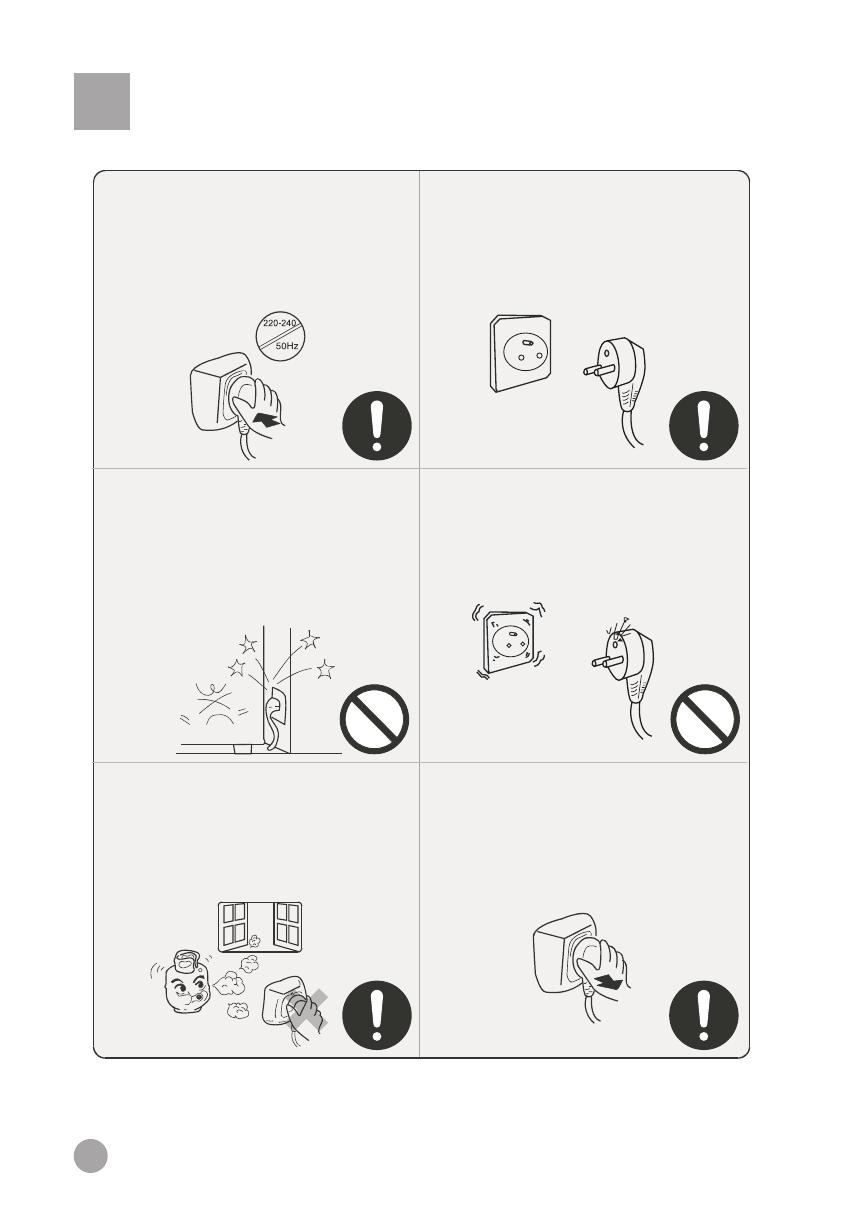
This appliance requires a 220-240V/50Hz power
supply.
If the voltage is outside of the 187-242V range,
malfunctions and damages of the controls,
thermostat or compressor may result, unless a
regulator of at least 750W was installed.
A dedicated grounded outlet is required. The
appliance is equipped with a standard
shockproof plug, whose grounding should not be
disabled. The power plug of the appliance
should always be accessible.
Do not damage the power cord.
*Never pull the plug out by the cord; always
grab and pull the plug
*Do not place the power cord under the
appliance or walk on it.
*Be sure not to damage the power cord when
moving the appliance away from the wall.
If the power cord is damaged or the plug cracked
or worn, the power cord must be replaced with a
matching one, available from the maker or their
customer service. The power cord may only be
replaced by the maker, their customer service or
an equally qualified person.
In the case of a gas or other flammable leak:
*Close the valve.
*Open the doors and windows.
*Do not pull out or insert the power cord of the
appliance.
Pull out the power plug:
*Before cleaning or repair
*When replacing a burned-out bulb
2
Precautions
Never place flammable, explosive or corrosive
materials in the refrigerator.
This appliance is intended strictly for storing
and freezing foods. It is not suitable for storing
such things as vaccines, bacteria or chemical
samples, which have demanding temperature
requirements.
Do not store fuel and other flammable products
near this appliance.
Do not put microwave ovens, voltage
regulators or power strips on this appliance. Do
not operate electrical devices and such inside
the refrigerator (except if instructed to do so by
the maker).
To avoid injuries, do not let children climb on
or hang from the appliance door.
Once the appliance has been started up, do not
touch the inside of the freezer compartment
with wet hands, otherwise they may get stuck
on the surface.
3
Precautions
To avoid injury, keep fingers away from the
door crack when opening or closing the doors.
Keep children away from the appliance doors
being opened and closed.
Do not pour water onto the appliance or set it up
in wet areas.
Refrigerators may only be repaired or altered by
professionals. Improper repair may cause
considerable damage. Please contact your dealer
or our customer service should your appliance
require repair or modification.
Keep bottles and tins out of the freezer. They
could burst when the content freezes.
Pull out the power plug in the case of a power
outage, repair or cleaning.
When disposing of the appliance, remove the
door or door seal and shelves to prevent playing
children from locking themselves in and putting
their lives at risk.
4
Preparations
Unpacking
Remove the entire packing material,
including the foam underlay and pieces of
tape used to hold accessories in place.
Separating and counting the
included accessories.
Check the items in the box against the
packing list.
In case of a mismatch, please contact
your supplier.
Setting up the appliance in a suitable
area.
(Details under “Setting up”.)
Attaching the toe moulding
Open the refrigerator and freezer
doors, remove the moulding from
the refrigerator compartment, and
then affix it as shown in the
illustration.
5
Part 1
Part 2
Part 3
Preparations
Cleaning interior
It is recommended to clean the interior before
starting up the appliance. (Details under
“Cleaning”.)
Standing still
After cleaning, let the appliance stand still for at
least six hours before turning it on to start it up.
Installing the door handle
First, screw part 2 into the threaded hole in the door (part 1); there are two
screws per door. Next, press part 3 with its larger opening onto part 2.
Finally, pull part 3 down in order to attach it firmly to the door.
6
Door removal
Removing the door
If your house door is too narrow, remove the refrigerator door and carry the
refrigerator in narrow side first.
Remove the toe moulding.
Toe moulding
Remove the freezer compartment door.
1) Unscrew the hinge covers. Disconnect
all wires except for the grounding wire.
2) Remove the screws from the upper
hinge following the direction as indicated
by Arrow (1). Then remove the upper
hinge following the direction as indicated
by Arrow (2).
3) Lift the freezer compartment door to
remove it.
Hinge cover
Wires
Upper
(hinge)
Grounding wire
Upper hinge
Screw
Lower
hinge
7
Door removal
Remove the refrigerator
compartment door.
1)Loosen the hinge cover bolts, and then
remove the cover.
3)Lift the refrigerator compartment door to
remove it.
2) Remove the screws from the upper hinge
following the direction as indicated by
Arrow (1). Then remove the upper hinge
following the direction as indicated by
Arrow (2).
Wires
Upper hinge
Screw
Lower hinge
Slide the refrigerator through the
door opening.
Slide the refrigerator through the door
opening as shown in the illustration.
Reinstall the door.
Bring the doors in the house, and then
reinstall them by reversing the removal steps.
8
Setting up the Refrigerator/Freezer Combi
Be sure to choose a flat and level setup location.
Use sturdy and fireproof supports to correct an
unevenness in the floor. Turning an appliance
foot clockwise raises the appliance, turning it
anticlockwise lowers the appliance.
Door adjustment
If the freezer compartment door is lower than
that of the refrigerator compartment, insert the
wrench in the groove of the left screw and turn it
in the direction of the arrow until both doors are
the same height.
Height difference
Height
difference
Wrench Left screw
Protect the setup location against direct sunlight
or heat sources.
If the freezer compartment door is lower than
that of the refrigerator compartment, insert the
wrench in the groove of the left screw and turn it
in the direction of the arrow until both doors are
the same height.
Height difference
Height
difference
Wrench
Right bolt
Avoid a damp setup location. Remove water
and dirt with a soft rag.
Be sure to leave at least 10 cm of space around
the appliance. When installing the appliance in
an enclosed area, leave at least 25 cm of space
on the sides and 5 cm on the top and back.
Spacing
9
Start-up
Power connection
After connecting it to the power, the appliance is automatically set to the
Intelligent and Crushed Ice modes.
This appliance has a memory function which, in the event of a power failure,
automatically stores the operating mode that was last used and restores it when
the power is turned on again.
Operating modes
Recommendation:
T
he Intelligent mode allows the appliance to achieve the
best and most energy-efficient cooling effect, regardless
of ambient temperature variations and without requiring
you to make any settings at all.
Choose one of the following two operating modes.
(1)Intelligent mode: If there are no special requirements, it is recommended to choose the
Intelligent operating mode. Press the Intelligent key once; the indicator lights up and the
appliance is started automatically. (Details in the “Features” section.)
(2)Manual mode: Make manual temperature settings using the temperature adjustment keys.
Loading foods
Operate the refrigerator empty for a while. Start
loading the refrigerator with foods only after it has
sufficiently cooled down.
Please note that changes in the temperature settings come into effect slowly.
This depends on variations of the ambient temperature, how frequently the
door is opened and the amount of foods loaded.
10
FUZZY Quick. FRZ FRZ. Temp REF. Temp
Digital display operation
Control panel
E.Intelligent mode indicator
F.Superfrost indicator
G.Freezer temperature display
H.Refrigerator temperature display
A.Intelligent mode key
B.Superfrost key
C.Freezer temperature adjustment key
D.Refrigerator temperature adjustment key
Intelligent mode
In the Intelligent operating mode, the temperature inside the appliance is adjusted
automatically according to variations of the ambient temperature. Press key A once, upon
which indicator E lights up and Intelligent mode is entered. Press key A once again, upon
which indicator E goes off and Intelligent mode is cancelled.
Malfunction indicator
In the event of major or minor control malfunctions, the freezer and refrigerator
temperatures are not displayed. Contact customer support if necessary.
11
FUZZY Quick. FRZ FRZ. Temp REF. Temp
Superfrost
It has been scientifically proven that a Superfrost type device is necessary to freeze foods
quickly and thoroughly. Press key B, upon which indicator F lights up and the Superfrost
action is turned on. Press the key again to turn off the Superfrost action, upon which
indicator F goes off. (In Intelligent mode, it is not necessary to turn on Superfrost.)
Temperature adjustments
At start-up, the Intelligent operating mode is selected. Press the Intelligent
mode key to cancel the Intelligent operating mode.
Temperature adjustment (requires the Intelligent mode to be cancelled)
Refrigerator temperature adjustment: Press key D, upon which indicator H starts blinking.
Each time key D is pressed, the temperature setting is increased by one of level from 1 to 5
(3 °C). If you keep pressing key D, the cycle starts over again from level 1 (7°C).
Freezer temperature adjustment: Press key C, upon which indicator G starts blinking. Each
time key C is pressed, the temperature setting is increased by one level from 1 to 5 (-22 °C).
If you keep pressing key C, the cycle starts over again from level 1 (-15°C).
Digital display operation
12
FUZZY Quick. FRZ FRZ. Temp REF. Temp
Open-door buzzer warning
A buzzer sounds intermittently when the door is left open permanently or is not
closed properly.
Display control
30 minutes after the last key operation the display is turned off. The display is re-
activated as soon as a key is pressed or an appliance door is opened.
Activating/Deactivating the refrigerator
The refrigerator is deactivated by holding key D (refrigerator temperature
adjustment) firmly pressed for three seconds. Indicator H (temperature and level)
goes off, but the light in the refrigerator compartment remains operational. The
refrigerator is re-activated by holding key D firmly pressed again for three
seconds. The refrigerator is re-activated and indicator H is turned on.
Digital display operation
13
Refrigerator compartment
Using the refrigerator compartment for short-
term food storage
The average refrigerator temperature of 0 °C-10 °C is not
low enough for long-term storage of foods; it is suitable
only for short-term food storage.
Adjusting the height of glass shelves
The shelves are height-adjustable to accommodate
various item sizes.
The shelves can be taken out for height adjustment and
cleaning. To clean a shelf, pull it in direction 1, and
then tilt it in direction 2 until it is in a vertical position.
Finally, remove the shelf in direction 3. To remove a
shelf, the appliance door must be open 90º.
Adjusting and cleaning bottle rack
Hold both sides of the bottle rack and pull it out in
directions (1) and (2).
Frozen foods (such as ice cream) should not be
placed in the bottle rack but rather inside the freezer
compartment to avoid that they spoil as a result of
being exposed to the temperature changes from
opening and closing the door.
After cleaning, re-place the bottle rack or adjust its
position.
Caution:
14
Refrigerator compartment
Stocking example
Foods should be grouped according to
the various temperature ranges in the
refrigerator compartment.
(1) Eggs, butter, cheese
(2) Tinned drinks and foods, seasonings
(3) Drinks, bottles
(4) Preserves
(5) Meats
(6) Flours, preserves, milk
(7) Processed meats, sausage
(8) Fruits, vegetables, lettuce
Removing the veggie drawer cover
First, lift the rear of the shelf in direction (1), and
then pull the shelf out in direction (2). Finally, tilt
the shelf in direction (3) and remove the veggie
drawer once the door is open 90º.
15
Refrigerator compartment
Using the veggie drawer
The appliance is equipped with a veggie drawer
suitable for keeping fruits and vegetables. The
humidity level in the veggie drawer is adjustable.
Reducing or closing the opening increases the
humidity inside the veggie drawer, which is
desirable for keeping cucumbers, grapes, kiwi,
plums, etc.
Increasing the opening reduces the humidity
inside the veggie drawer, which is suitable for
keeping strawberries, mandarins, beans, garlic,
water melon, plums, tomatoes, etc.
Make sure that the front of the veggie drawer
cover is located on the inside of the veggie drawer.
Remove the veggie drawer before removing its
cover.
Installation is reversed.
Replacing the bulb at the top of refrigerator
compartment
Bulb specifications: 220-240 V / 25 W
Socket: E27 (Do not use a replacement bulb of more
than 25 W.)
Replacing the bulb
Install the bulb.
Unplug the power cord.
Remove the screws under the cover.
Lift the cover in direction (1), and then pull it out in
direction (2).
16
Notes on refrigeration
Let warm foods and drinks cool down to room
temperature before putting them in the
refrigerator compartment.
Wash and dry off fresh foods before storing
them.
Pack the food into portions suitable for your
household. Place the foods that will be
consumed the soonest towards the front so as
not to leave the appliance door open longer
than necessary.
Pack and seal foods before storing them. This
prevents drying and odour dissipation.
Do not overstock the refrigerator.
Be sure to leave space between foods and between the foods and the interior compartment walls.
17
Tips on refrigeration
Remove the leaves of root vegetables to
prevent them from absorbing the nutrients.
Thawing frozen foods inside the refrigerator
helps conserve energy.
Items not requiring refrigeration: Onions,
peppers, garlic, ginger.
Items not suitable for refrigeration: Gourds,
melons, bananas, pineapple. Refrigeration
promotes their decomposition. Do refrigerate
unripe fruits.
Caution: Do not use the egg tray as an ice cube tray and never place it in the freezer or
Superfrost area to prevent it from cracking.
18
Freezer compartment
Use the freezer compartment for
long-term food storage
Removing and cleaning glass shelves
Interior light and replacement of bulb
Adjusting and cleaning bottle rack
A low temperature in the freezer compartment is
necessary for long-term food storage. Do not
exceed the maximum length of storage indicated
on the package.
First, lift the rear of the shelf in direction (1), and
then pull the shelf out in direction (2). Finally, tilt
the shelf in direction (3) and remove it once the
door is open 90º.
Bulb specifications: 220-240 V / 25 W
Socket: E27 (Do not use a replacement bulb of
more than 25 W.)
Replacing the bulb
Pull out the power plug or neutralise the
fuse.
Lift the cover in direction (1), and then
pull it out in direction (2).
Twist the bulb anticlockwise, and then
remove it. Install a new bulb of equal
specifications.
Re-install the cover.
Hold both sides of the bottle rack and pull it out in
directions (1) and (2). Clean the bottle rack, and
then re-place it or adjust its position.
Caution: Frozen foods (such as ice cream) should not be placed in the bottle rack but
rather inside the freezer compartment to avoid that they spoil as a result of being
exposed to the temperature changes from opening and closing the door.
19
  • Page 1 1
  • Page 2 2
  • Page 3 3
  • Page 4 4
  • Page 5 5
  • Page 6 6
  • Page 7 7
  • Page 8 8
  • Page 9 9
  • Page 10 10
  • Page 11 11
  • Page 12 12
  • Page 13 13
  • Page 14 14
  • Page 15 15
  • Page 16 16
  • Page 17 17
  • Page 18 18
  • Page 19 19
  • Page 20 20
  • Page 21 21
  • Page 22 22
  • Page 23 23
  • Page 24 24
  • Page 25 25
  • Page 26 26
  • Page 27 27
  • Page 28 28
  • Page 29 29
  • Page 30 30
  • Page 31 31
  • Page 32 32
  • Page 33 33
  • Page 34 34
  • Page 35 35
  • Page 36 36
  • Page 37 37
  • Page 38 38
  • Page 39 39
  • Page 40 40
  • Page 41 41
  • Page 42 42
  • Page 43 43
  • Page 44 44
  • Page 45 45
  • Page 46 46
  • Page 47 47
  • Page 48 48
  • Page 49 49
  • Page 50 50
  • Page 51 51
  • Page 52 52
  • Page 53 53
  • Page 54 54
  • Page 55 55
  • Page 56 56
  • Page 57 57
  • Page 58 58
  • Page 59 59
  • Page 60 60
  • Page 61 61
  • Page 62 62
  • Page 63 63
  • Page 64 64
  • Page 65 65
  • Page 66 66
  • Page 67 67
  • Page 68 68
  • Page 69 69
  • Page 70 70
  • Page 71 71
  • Page 72 72
  • Page 73 73
  • Page 74 74
  • Page 75 75
  • Page 76 76
  • Page 77 77
  • Page 78 78
  • Page 79 79
  • Page 80 80
  • Page 81 81
  • Page 82 82
  • Page 83 83
  • Page 84 84
  • Page 85 85
  • Page 86 86
  • Page 87 87
  • Page 88 88
  • Page 89 89
  • Page 90 90
  • Page 91 91
  • Page 92 92
  • Page 93 93
  • Page 94 94
  • Page 95 95
  • Page 96 96
  • Page 97 97
  • Page 98 98
  • Page 99 99
  • Page 100 100
  • Page 101 101
  • Page 102 102
  • Page 103 103
  • Page 104 104
  • Page 105 105
  • Page 106 106
  • Page 107 107
  • Page 108 108
  • Page 109 109
  • Page 110 110
  • Page 111 111
  • Page 112 112
  • Page 113 113
  • Page 114 114
  • Page 115 115
  • Page 116 116
  • Page 117 117
  • Page 118 118
  • Page 119 119
  • Page 120 120
  • Page 121 121
  • Page 122 122
  • Page 123 123
  • Page 124 124
  • Page 125 125
  • Page 126 126
  • Page 127 127
  • Page 128 128
  • Page 129 129
  • Page 130 130
  • Page 131 131
  • Page 132 132
  • Page 133 133
  • Page 134 134
  • Page 135 135
  • Page 136 136
  • Page 137 137
  • Page 138 138
  • Page 139 139
  • Page 140 140
  • Page 141 141
  • Page 142 142
  • Page 143 143
  • Page 144 144
  • Page 145 145
  • Page 146 146
  • Page 147 147
  • Page 148 148
  • Page 149 149
  • Page 150 150
  • Page 151 151
  • Page 152 152
  • Page 153 153
  • Page 154 154
  • Page 155 155
  • Page 156 156
  • Page 157 157
  • Page 158 158
  • Page 159 159
  • Page 160 160
  • Page 161 161
  • Page 162 162
  • Page 163 163
  • Page 164 164
  • Page 165 165
  • Page 166 166
  • Page 167 167
  • Page 168 168
  • Page 169 169
  • Page 170 170
  • Page 171 171
  • Page 172 172
  • Page 173 173
  • Page 174 174
  • Page 175 175
  • Page 176 176
  • Page 177 177
  • Page 178 178
  • Page 179 179
  • Page 180 180
  • Page 181 181
  • Page 182 182
  • Page 183 183
  • Page 184 184
  • Page 185 185
  • Page 186 186
  • Page 187 187
  • Page 188 188
  • Page 189 189
  • Page 190 190
  • Page 191 191
  • Page 192 192
  • Page 193 193
  • Page 194 194
  • Page 195 195
  • Page 196 196
  • Page 197 197
  • Page 198 198
  • Page 199 199
  • Page 200 200
  • Page 201 201
  • Page 202 202
  • Page 203 203
  • Page 204 204
  • Page 205 205
  • Page 206 206
  • Page 207 207
  • Page 208 208
  • Page 209 209
  • Page 210 210
  • Page 211 211
  • Page 212 212
  • Page 213 213
  • Page 214 214
  • Page 215 215
  • Page 216 216
  • Page 217 217
  • Page 218 218
  • Page 219 219
  • Page 220 220
  • Page 221 221
  • Page 222 222
  • Page 223 223
  • Page 224 224
  • Page 225 225
  • Page 226 226
  • Page 227 227
  • Page 228 228
  • Page 229 229
  • Page 230 230
  • Page 231 231
  • Page 232 232
  • Page 233 233
  • Page 234 234
  • Page 235 235
  • Page 236 236
  • Page 237 237
  • Page 238 238
  • Page 239 239
  • Page 240 240

Haier HRF-660S Operating instructions

Category
Side-by-side fridge-freezers
Type
Operating instructions

Ask a question and I''ll find the answer in the document

Finding information in a document is now easier with AI