10
Nederlands Italiano
English Français
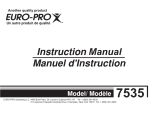
THREADING THE MACHINE
Bobbin winding
1. Set the needle at its highest position by rotating the
handwheel towards you. Open the shuttle cover. Hold
the latch of bobbin case and pull it out. Release the
latch and the bobbin comes out of the bobbin case
easily. (fig A)
NOTE
Use a TOYOTA-exclusive bobbin.
2. Pull out the spool pin until it snaps into place, as
shown in (fig B).
3. Put a spool of thread on the spool pin. Draw thread
from spool through thread guide as shown. (fig C-1)
4. Wind the end of thread from spool around the bobbin
clockwise for several times. Place bobbin on to bobbin
winder shaft. (fig C-2)
5. Move the declutch knob into the ( ) direction.
Caution!
Never touch declutch knob while sewing or it may cause
trouble.
6. Push bobbin winder shaft to right until it clicks. Press
on foot controller to wind bobbin. (fig D)
7. When the bobbin is wound enough, (see fig E) stop
the machine. Push bobbin winder shaft to the left, and
remove bobbin.
8. Take the bobbin off the bobbin winder shaft, and cut
the thread. (fig F)
9. Move the declutch knob into the ( ) direction.
10.Always turn the handwheel towards you and listen for
the “click” inside the handwheel, before sewing.
ENFILAGE DE LA MACHINE
Bobinage de la canette
1. Placer l’aiguille dans sa position la plus haute en tournant
le volant vers vous. Ouvrir le cache-navette. Tenir le
loquet de la navette et tirer dessus.
Libérer le loquet et la canette sortira facilement de la
navette. (fig. A)
NOTE
Utiliser exclusivement une canette TOYOTA.
2. Tirer sur le porte-bobine jusqu'à ce qu'il se mette en
place, comme indiqué (fig. B).
3. Mettre une bobine de fil sur le porte-bobine. Tirez le fil de
la bobine en le passant par le guide fil. Comme indiqué.
(fig. C-1)
4. Enroulez l’extrémité du fil de la bobine autour de la canette
plusieurs fois dans le sens des aiguilles d’une montre.
Placer la canette sur la tige porte-bobine. (fig.
C-2
)
5. Poussez le bouton de débrayage vers ( ) .
Attention!
Ne jamais toucher le bouton de débrayage pendant la
couture sous peine de provoquer un incident.
6. Pousser la tige porte-bobine vers la droite jusqu’à
entendre un click. Presser sur la pédale pour bobiner la
canette. (fig. D)
7. Lorsque la canette est suffisamment bobinée, (voir fig.
E) arrêter la machine, pousser la tige porte-bobine vers
la gauche, et retirer la canette.
8. Enlever la canette de la tige porte-bobine, et couper le fil.
(fig. F)
9. Pousser le bouton de débrayage vers ( ).
10.Avant de coudre, toujours tourner le volant vers vous
jusqu'à entendre un "clic".
HET INRIJGEN VAN DE MACHINE
Spoeltje opwinden
1. Breng de naald in de hoogste stand door het handwiel
naar u toe te draaien. Open de spoelhuisklep. Hou het
klepje op het spoelhuis vast en neem dit eruit. Laat het
klepje los en het spoeltje komt gemakkelijk uit het
spoelhuis. (fig A)
OPMERKING
Gebruik uitsluitend een spoeltje van TOYOTA.
2. Trek de garenpen uit totdat deze op zijn plaats klikt,
zoals aangegeven in
(fig B)
3. Zet een klos garen op de garenpen. Trek nu het garen van
de klos door de draadgeleider zoals afgebeeld. (fig
C-1
)
4. Draai het einde van de draad enkele malen rechtsom
op het spoeltje. Zet het spoeltje op de spoel
opwindas. (fig C-2)
5. Zet de ontkoppelingsknop in de ( ) richting.
Waarschuwing!
Raak de ontkoppelingsknop nooit aan tijdens het naaien
want dit kan storing veroorzaken.
6. Duw de spoel opwindas naar rechts totdat deze klikt. Duw
op het voetpedaal om het spoeltje op te winden. (fig
D
)
7. Wanneer het spoeltje voldoende is opgewonden, (zie
fig E) stop dan de machine. Duw de spoel opwindas
naar links.
8. Neem het spoeltje van de opwindas en knip de draad
af. (fig F)
9. Zet de ontkoppelingsknop in de ( ) richting.
10.Draai het handwiel altijd naar u toe en naai pas nadat
u een "klik" binnen het handwiel hoort.
PREPARAZIONE PER LA CUCITURA
Riempimento della spolina
1. Far ruotare il volantino verso di voi per portare la barra
ago nel punto più alto. Aprite il coperchio della capsula.
Aprite la levetta di chiusura della capsula che contiene la
spolina ed estraetela.
Rilasciate la levetta e quindi staccate la spolina (fig. A).
NOTA
Usare solo una spolina TOYOTA.
2. Estrarre il portarocchetto finché non scatta in posizione,
come mostrato in (fig. B).
3. Inserite un rocchetto di filo sul perno portarocchetto.
Estrarre il filo dal rocchetto, farlo correre attraverso il
guidafilo come mostrato nella (fig. C-1).
4. Avvolgete il filo a mano per alcuni giri intorno alla spolina
in senso orario. Posizionate la spolina sull’asse del
filarello (fig. C-2).
5. Spingete il tasto di disinnesto che si trova sul volantino
nella direzione ( ).
Attenzione!
Onde evitare inconvenienti non toccare mai il pomello di
sgancio della frizione mentre cucite.
6. Spostare il filarello a destra fino al click. Mantenere
premuto il reostato elettrico per il riavvolgimento della
spolina (fig. D).
7. Una volta riempita la spolina, (vedi fig. E) arrestate la
macchina e spostate il filarello a sinistra per poi estrarre
la spolina.
8. Togliete la spolina dall’asse del filarello e tagliate il filo
(fig. F).
9. Spostate il tasto di disinnesto nella direzione ( ).
10.Prima di iniziare a cucire ruotare sempre il volantino
verso di sé, finché non si sente il "clic" all'interno del
volantino.
Quilt60_EFNI.book Page 10 Thursday, March 30, 2006 3:44 PM