
If you have any questions, call 1-800-4-DEWALT (1-800-433-9258)
English
9.6, 12, 14.4, 18 Volt Heavy Duty
Flashlights
DW902 (9.6 V), DW904 (12 V), DW906 (14.4 V),
DW908 (18 V)
– Extra bulb stored in light behind
lens.
– Use with D
EWALT power packs and
chargers (both sold separately).
IF YOU HAVE ANY QUESTIONS OR COMMENTS ABOUT THIS
OR ANY DeWALT TOOL, CALL US TOLL FREE AT:
1-800-4-DEWALT (1-800-433-9258)
NOTE: D
EWALT heavy duty flashlights operate on the following
battery packs.
WARNING: When using electric tools, basic safety precautions
should always be followed to reduce risk of fire, electric shock,
and personal injury, including the following:
READ ALL INSTRUCTIONS
Safety Rules for Heavy Duty Flashlights
WARNING: DO NOT OPERATE FLASHLIGHTOR CHARGER
NEAR FLAMMABLE LIQUIDS OR IN GASEOUS OR
EXPLOSIVE ATMOSPHERES. INTERNAL SPARKS MAY
IGNITE FUMES.
WARNING: Lens and bulb become hot during use.
• During or immediately after use, don’t lay flashlight flat on lens
surface.
• Don’t touch lens surface when bulb is lit.
• Handle flashlight with care around any flammable surface.
• If bulb has been lit, let flashlight cool for several minutes
before changing bulb.
Safety Rules for Chargers
1.Before using charger, read all instructions and cautionary
markings on (1) charger, (2) battery pack, and (3) product
using battery pack.
2. DANGER: 120 volts present at charging terminals. Do not
probe with conductive objects. Danger of electric shock or
electrocution.
3.If battery pack case is cracked or damaged, do not insert into
charger. Danger of electric shock or electrocution.
4.The charger and battery pack are specifically designed to
work together. DO NOT attempt to charge the battery pack
with any chargers other than the ones in this manual.
5.Do not expose charger to rain or snow.
6.To reduce risk of damage to electric plug and cord, pull by
plug rather than cord when disconnecting charger.
7.Make sure cord is located so that it will not be stepped on,
tripped over, or otherwise subjected to damage or stress.
8.An extension cord should not be used unless absolutely
necessary. Use of improper extension cord could result in risk
of fire, electric shock, or electrocution.
9. Two wire cords can be used with 2 or 3 wire extension cords.
Only round jacketed extension cords should be used, and we
recommend that they be listed by Underwriters Laboratories
(U.L.) (C.S.A. in Canada.) The letters WA on the cord jacket
indicate that the cord is suitable for outdoor use.
10.An extension cord must have adequate wire size (AWG or
American Wire Gauge) for safety. The smaller the gauge
number of the wire, the greater the capacity of the cable, that
is 16 gauge has more capacity than 18 gauge. When using
more than one extension to make up the total length, be sure
each individual extension contains at least the minimum wire
size.
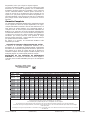
CHART FOR MINIMUM WIRE SIZE (AWG) OF EXTENSION CORDS
NAMEPLATE RATING AMPS - 0 - 10.0
Total Extension Cord Length (feet) 25 50 75 100125 150 175
Wire Gauge 18 18 16 16 14 14 12
11. The charger is ventilated through slots in the top and the
bottom of the housing. Do not place any object on top of the
charger or place the charger on a soft surface that might block
the ventilation slots and result in excessive internal heat.
Place the charger in a position away from any heat source.
12.Do not operate charger with damaged cord or plug — have
them replaced immediately.
13.Do not operate charger if it has received a sharp blow, been
dropped, or otherwise damaged in any way; take it to an
authorized DeWalt service center.
14.Do not disassemble charger; take it to an authorized DeWalt
service center when service or repair is required. Incorrect
reassembly may result in a risk of electric shock, electrocution
or fire.
15.To reduce risk of electric shock, unplug charger from outlet
before attempting any cleaning. Removing the battery pack
will not reduce this risk.
16.NEVER attempt to connect 2 chargers together.
17.DO NOT store or use the tool and battery pack in locations
where the temperature may reach or exceed 105°F (such as
outside sheds or metal buildings in summer).
18.The charger is designed to operate on standard household
electrical power (120 volts). Do not attempt to use it on any
other voltage!
Safety Rules for Batteries
1.Do not incinerate the battery pack even if it is severely
damaged or is completely worn out.The battery pack can
explode in a fire.
2.Asmall leakage of liquid from the battery pack cells may occur
under extreme usage or temperature conditions. This does
not indicate a failure. However, if the outer seal is broken and
this leakage gets on your skin:
a.Wash quickly with soap and water.
b.Neutralize with a mild acid such as lemon juice or
vinegar.
c.If battery liquid gets into your eyes, flush them with clean
water for a minimum of 10 minutes and seek immediate
medical attention. (Medical note: The liquid is 25-35%
solution of potassium hydroxide.)
3.Never attempt to open the battery pack for any reason. If the
plastic housing of the battery pack breaks or cracks,
immediately discontinue use and do not recharge.
4.Do not carry extra battery packs in aprons, pockets, or tool
boxes along with other metal objects. Battery pack could be
short circuited causing damage to the battery pack and
possibly causing severe burn or fire.
NOTE: Battery storage and carrying caps are provided for use
whenever the battery is out of the tool or charger. Remove cap
before placing battery in charger or tool.
WARNING: Do not store or carry battery so that metal

objects can contact exposed battery terminals.
For example, do not place battery in aprons, pockets,
tool boxes, product kit boxes, drawers, etc. with loose
nails, screws, keys, etc. without battery cap. Without
cap in place, battery could short circuit causing fire or
burns or damage to battery.
SAVE THESE INSTRUCTIONS FOR
FUTURE USE
Charging Procedure
Chargers require no adjustment and are designed to be as easy
as possible to operate. Simply place your battery pack into the
receptacle of a plugged in charger and it will automatically charge
the pack.
15 MINUTE CHARGER
1. Plug the charger into an appropriate AC power outlet. The
charger will beep twice, the red light will blink and go off.
2. Insert the battery pack into the charger, making sure the pack
is fully seated in the charger. The red light will blink and the
charger will beep once indicating the charging process has
started.
3. The battery pack will be fully charged in less than 15 minutes
under most conditions. This will be indicated by the red light
remaining ON and 3 beeps. The pack is fully charged and may
be used at this time or left in the charger.
Weak Battery Packs: (DW9115). The charger can also detect a
weak battery. Such batteries are still usable but should not be
expected to perform as much work. In such cases, about 10
seconds after battery insertion, the charger will beep rapidly 8
times to indicate a weak battery condition. The charger will then
go on to charge the battery to the highest capacity possible.
ONE HOUR CHARGERS
1. Plug the charger into an appropriate AC power outlet.
2. Insert the battery pack into the charger, making sure the pack
is fully seated in the charger. The red (charging) light will blink
continuously indicating that the charging process has started.
3. The completion of charge will be indicated by the red light
remaining ON continuously. The pack is fully charged and may
be used at this time or left in the charger.
Leaving the battery pack in the charger: When the red light
remains ON, the charger has switched to its "equalize charge"
mode which lasts approximately 4 hours, after which the charger
will switch to "maintenance charge" mode. The battery pack can
be removed at any time during these charge cycles, but will only
be fully charged if the red light is continuously ON. The charger
and battery pack can be left connected with the red light glowing
indefinitely. The charger will keep the battery pack fresh and fully
charged. A battery pack will slowly lose its charge when kept out
of the charger. If the battery pack has not been kept on
maintenance charge, it may need to be recharged before use. A
battery pack may also slowly lose its charge if left in a charger
that is not plugged into an appropriate AC source.
Trouble Indicators: These chargers are designed to detect
certain problems that can arise with battery packs which would be
indicated by the red light flashing at a fast rate (and continuous
beeping for DW9115, DW9107, DW9108). If this occurs, re-insert
battery pack. If problem persists, try a different battery pack to
determine if the charger is OK. If the new pack charges correctly,
then the original pack is defective and should be returned to a
service center for recycling. If the new battery pack elicits the
same trouble indication as the original, have charger tested at an
authorized service center.
PROBLEM POWER LINE (DW9107)
When these chargers are used with some portable power sources
such as generators or sources that convert DC to AC, the
chargers may temporarily suspend operation, flashing the red
light with two fast blinks followed by a pause. This indicates
the power source is out of limits.
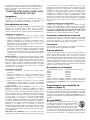
Battery Insertion and Removal
To insert the power pack into your flashlight, slide it into the end of
the light until it snaps into place. To remove the power pack,
depress the release buttons shown and withdraw the power pack.
If you have any questions, call 1-800-4-DEWALT (1-800-433-9258)
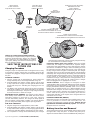
FIG. 1
FIG. 3
LENS HOLDER
PORTE-LENTILLE
SUJETADOR DE LA LENTE
BULB
AMPOULE
BOMBILLA
BATTERY RELEASE BUTTON
BOUTON DE DÉGAGEMENT DE LA PILE
BOTON DE LIBERACION DE LA BATERIA
SPARE BULB STORAGE
RANGEMENT DE L’AMPOULE DE RECHANGE
COMPARTIMIENTO PARA BOMBILLA DE REPUESTO
POWER PACK (NOT INCLUDED)
ENSEMBLE DE PILES
(NON COMPRIS)
BATERIA (NO INCLUIDA)
PIVOTING HEAD
TÊTE PIVOTANTE
CABEZA GIRATORIA
SWITCH
INTERRUPTEUR
INTERRUPTOR
FIG. 2

Switch
To turn the light on, slide the switch forward. To turn it off, slide the
switch back.
Pivoting Head (Figure 2)
Your flashlight has a pivoting head. To convert your light to a right
angle model, grasp the front end of the light forward of the switch
and hold the back end firmly. Twist the front end clockwise (as
viewed from the lens) until the head pivots 90 degrees and clicks
into place. To return the head to a straight position, rotate the head
(as viewed from the lens) counterclockwise until it clicks into the
straight position.
Replacing the Light Bulb
Worklight Cat. No. Replacement Bulb Cat. No.
DW902 DW9023
DW904 DW9043
DW906 DW9063
DW908 DW9083
To replace the light bulb, first unscrew the lens holder. Pull the bulb
out of the spring, and insert a new bulb. Reinstall lens holder.
NOTE: Do not look directly into the flashlight beam.
Spare Bulb Storage (Figure 3)
To store a bulb, unscrew the lens holder and remove it. Inside the
body of the flashlight is the storage socket. To remove the bulb,
pull it up and out of the storage area. NOTE: Removing a pack
from the charger and immediately inserting it into the flashlight
may weaken bulb life.
The RBRC ™ Seal
The RBRC™ (Rechargeable Battery Recycling Corp
oration) Seal on the nickel-cadmium battery indicates
that the costs to recycle the battery at the end of its
useful life have already been paid by DeWalt. In
some areas, it is illegal to place spent nickel-
cadmium batteries in the trash or municipal solid
waste stream and the RBRC program provides an environmentally
conscious alternative.
RBRC in cooperation with D
EWALT and other battery users, has
established programs in the United States to facilitate the
collection of spent nickel-cadmium batteries. Help protect our
environment and conserve natural resources by returning the
spent nickel-cadmium battery to an authorized service center or to
your local retailer for recycling. You may also contact your local
recycling center for information on where to drop off the spent
battery.
Full Warranty
DEWALT heavy duty industrial tools are warranted for one year
from date of purchase. We will repair, without charge, any defects
due to faulty materials or workmanship. For warranty repair
information, call 1-800-4-D
EWALT. This warranty does not apply to
accessories or damage caused where repairs have been made or
attempted by others. This warranty gives you specific legal rights
and you may have other rights which vary in certain states or
provinces.
In addition to the warranty, D
EWALT tools are covered by our:
30 DAY NO RISK SATISFACTION GUARANTEE
If you are not completely satisfied with the performance of your
D
EWALT heavy duty industrial tool, simply return it to the
participating seller within 30 days for a full refund. Please return the
complete unit, transportation prepaid. Proof of purchase may be
required.
FREE WARNING LABEL REPLACEMENT: If your warning labels
become illegible or are missing, call 1-800-4-DEWALT for a free
replacement.
Français
Lampes de travail sans fil de 9,6, 12
et 14,4, 18 volts
DW902 (9,6 V), DW904 (12 V), DW906 (14,4 V)
DW908 (18 V)
– Une ampoule de rechange est rangée
dans la lampe derrière la lentille.
– Utiliser avec des ensembles de piles et
des chargeurs D
EWALT (vendus
séparément).
POUR TOUT RENSEIGNEMENT SUR L’OUTIL OU TOUT
AUTRE OUTIL DEWALT, COMPOSER SANS FRAIS LE :
1 800 4-DEWALT (1 800433-9258)
LIRE TOUTES LES DIRECTIVES.
Mesures de sécurité relatives aux
lampes de travail
1. AVERTISSEMENT : NE PAS UTILISER LA LAMPE DE
POCHE NI LE CHARGEUR PRÈS DE LIQUIDES
INFLAMMABLES NI DANS UN ENDROIT RENFERMANT
DES VAPEURS INFLAMMABLES OU EXPLOSIVES. DES
ÉTINCELLES DANS CES PRODUITS POURRAIENT
ENFLAMMER LES VAPEURS.
2. AVERTISSEMENT : La lentille et l’ampoule deviennent
brûlants pendant l’utilisation.
• Pendant l’utilisation ou immédiatement après s’être servi de la
lampe, ne pas la déposer à plat contre la surface de la lentille.
• Ne pas toucher à la lentille lorsque l’ampoule éclaire.
• Manipuler la lampe de travail avec soin à proximité de toute
surface inflammable.
• Lorsque l’ampoule a fonctionné, laisser refroidir la lampe de
travail pendant plusieurs minutes avant de remplacer
l’ampoule.
Importantes mesures de sécurité
relatives aux chargeurs
1.Avant d’utiliser le chargeur, lire toutes les directives et les
mises en garde qui se trouvent (1) sur le chargeur, (2) sur
l’ensemble de piles et (3) sur le produit utilisant l’ensemble de
piles.
2. DANGER : Les bornes de chargement sont sous une
tension de 120 volts. Ne pas y toucher avec des objets
conducteurs. Cela présente des risques de secousses
électriques ou d’électrocution.
3.Ne pas insérer un ensemble de piles cassé ou endommagé
dans le chargeur. Cela présente des risques de secousses
électriques ou d’électrocution.
4.Le chargeur et l’ensemble de piles sont conçus pour
fonctionner ensemble. NE PAS tenter de charger l’ensemble
de piles avec un autre chargeur que ceux mentionnés dans le
présent guide.
5.Protéger de la pluie ou de la neige.
6.Il vaut mieux tirer sur la fiche que sur le cordon pour
débrancher le chargeur afin de minimiser les risques de
dommages à la fiche et au cordon.
7.S’assurer que le cordon du chargeur est situé de sorte qu’on
POUR TOUT RENSEIGNEMENT SUR L’OUTIL OU TOUT AUTRE OUTIL DeWALT, COMPOSER SANS FRAIS LE :1 800 4-DEWALT (1 800 433-9258)
Page is loading ...
Page is loading ...
Page is loading ...
Page is loading ...
Page is loading ...
-
 1
1
-
 2
2
-
 3
3
-
 4
4
-
 5
5
-
 6
6
-
 7
7
-
 8
8


Ask a question and I''ll find the answer in the document
Finding information in a document is now easier with AI
in other languages
- français: DeWalt DW902 Manuel utilisateur
- español: DeWalt DW902 Manual de usuario
Related papers
Other documents
-
Klein Tools BAT20-12T165 User manual
-
-
-
-
 John Deere Home Safety Product UB12D User manual
-
 John Deere UB18D User manual
-
RIDGID R8694B User manual
-
Hasbro Color Glow Flashlight Operating instructions
-
Ryobi FL96 User manual
-

