Mr. Coffee NLS12 User manual
- Category
- Coffee making accessories
- Type
- User manual

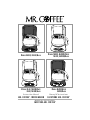
MODELS NLS12, NLS13/BLACK
MODELS NLX20, NLX20D/WHITE
NLX23, NLX23D/BLACK
M
ODELS NL12, NL12D/WHITE
NL13, NL13D/BLACK
M
ODELS NLX30/WHITE
NLX33/BLACK
Instruction Manual
MR. COFFEE® COFFEEMAKER
Manuel d’Instructions
CAFETIÈRE MR. COFFEE®
Manual de Instrucciones
CAFETERA MR. COFFEE®

2
IMPORTANT SAFEGUARDS
When using electrical appliances, basic safety precautions should always be followed to reduce
the risk of fire, electric shock and/or injury to persons, including the following:
1.
READ ALL INSTRUCTIONS BEFORE USING THE MACHINE.
2. Do not touch hot surfaces. Use handles or knobs.
3. To protect against electric shock, do not immerse cord, plugs or machine in water
or other liquids.
4. Close adult supervision is necessary when this appliance is used by or near children.
5. Unplug from outlet when Coffeemaker is not in use and before cleaning.
Allow to cool before putting on or taking off parts and before cleaning the appliance.
6. Do not operate any appliance with a damaged cord or plug or after the appliance malfunctions
or has been damaged in any manner. Return this appliance only to the nearest Authorized
Service Center for examination, repair or adjustment.
7.
The use of accessory attachments not recommended by Sunbeam may cause hazards or injuries.
8. Do not use outdoors. This Coffeemaker is for household use only.
9.
Do not let cord hang over edge of table or countertop or to touch hot surfaces.
10. Do not place this appliance on or near a hot gas or electric burner or in a heated oven.
11. To disconnect, remove plug from wall outlet.
12. Do not use appliance for other than its intended use.
13. Use on a hard, flat level surface only, to avoid interruption of air flow underneath the appliance.
14. DECANTER U
SE AND C
ARE
Breakage may occur if the following instructions are not followed:
Use only decanters specifically designed for
MR. COFFEE
®
models.
A.
This decanter is designed for use with your
MR. COFFEE
®
Coffeemaker
and therefore
must never be used on a rangetop or in any oven, INCLUDING A MICROWAVE.
B. Do not set a hot decanter on a wet or cold surface.
C. Do not use a cracked decanter or a decanter with a loose or weakened handle.
D. Do not clean the decanter with cleansers, steel wool pads or other abrasive materials.
E. Discard decanter immediately if it is ever boiled dry.
F. Avoid sharp blows, scratches or rough handling.
15. WARNING: To reduce the risk of fire or electric shock, do not remove any service
covers. No user serviceable parts inside. Repair should be done by authorized
personnel only. Opening the bottom service cover will void the warranty.
T
HIS
U
NIT
I
S FOR
H
OUSEHOLD
U
SE
O
NLY

3
S
PECIAL
C
ORD
S
ET
I
NSTRUCTIONS
1. A short power supply cord is provided to reduce the hazards resulting from becoming
entangled in or tripping over a longer cord.
2. An extension cord may be purchased and used if care is exercised in its use.
3. If an extension cord is used, the marked electrical rating of the extension cord must be
at least 10 amps and 120 volts. The resulting extended cord must be arranged so that
it will not drape over the countertop or tabletop where it can be pulled on by children
or tripped over accidentally.
This appliance has a polarized plug (one blade is wider than the other).
To reduce the risk of electric shock, this plug will fit in a polarized outlet only
one way. If the plug does not fit fully in the outlet, reverse the plug. If it still
does not fit, contact a qualified electrician. Do not modify the plug in any way.
I
F
S
ERVICE
I
S
R
EQUIRED
, D
O
N
OT
R
ETURN TO
Y
OUR
S
TORE
For Service, Call 1-800 MR COFFEE (1-800-672-6333)
8:30
A.M. to 5:00 P.M., Eastern Standard Time, Monday through Friday
T
O
A
SSIST
U
SIN
S
ERVING
Y
OU
, P
LEASE
H
AVE THE
M
ODEL
N
UMBER
(NL12, NL12D, NL13, NL13D, NLS12, NLS13, NLX20, NLX20D,
NLX23, NLX23D, NLX30 OR NLX33)
AND
D
ATE OF
P
URCHASE
A
VAILABLE
.
P
LEASE
D
O
N
OT
R
ETURN
T
HIS
A
PPLIANCE TO
Y
OUR
S
TORE
.
All repairs must be made by Mr. Coffee or by an Authorized Mr. Coffee Service Center.
Please call us for assistance or for the location of the nearest Authorized Mr. Coffee Service Center.
We welcome your questions, comments or suggestions.
Please include your complete name, address and telephone number
so we can reach you if necessary.
SUNBEAM APPLIANCE SERVICE STATION
Attention: Service Department
95 W.L. Runnels Industrial Drive
Hattiesburg, MS 39401
SAVE THESE INSTRUCTIONS

4
INTRODUCTION
C
ONGRATULATIONS
! You are the owner of a
M
R
. C
OFFEE
®
Coffeemaker.
Please read all
of the instructions in this manual carefully before you begin to use
this appliance.
Proper care and maintenance will ensure the long life of this appliance
and its trouble-free operation.
Save these instructions and refer to them often for cleaning
and care tips.
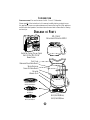
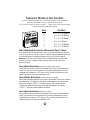
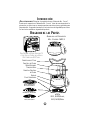
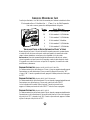
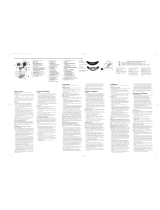
DIAGRAM OF
PARTS
MR. COFFEE
®
REPLACEMENT DECANTER: ND13
FOR
BETTER T
ASTING TEA AND COFFEE
USE 8-12 CUP
MR. COFFEE
®
BRAND FILTERS.
NL12, NL12D/W
HITE,
NL13, NL13D/B
LACK
NLX20, NLX20D/WHITE
NLX23, NLX23D/BLACK
Press
Hold
Hour
Min.
On
Auto
1-4
Clean
Warmer Temp
_
+
Select
Off
11:1:2020
NLX30/WHITE
NLX33/BLACK
NLS12, NLS13/BLACK
DUST
COVER
REMOVABLE BLACK BREW BASKET
WATER RESERVOIR
SWING
OUT B
REW BASKET
DECANTER
WARMER PLATE

OPERATION AND USE
BEFORE FIRST USE
Before using your Coffeemaker for the first time, wash decanter/lid and removable brew
basket (black) using a mild, non-abrasive detergent and water. Rinse each thoroughly.
Follow Steps 4 – 6 (Brewing Coffee) using water, to clean the inside.
SETTING CLOCK AND TIMER
(NLX20, NLX20D, NLX23, NLX23D)
NOTE: You do not have to set your clock before the Coffeemaker will operate.
Plug in the power cord, slide the control lever to the “on” position. The green
light will illuminate.
SETTING THE CLOCK
1. Turn the AUTO/OFF/ON switch to “OFF.”
2. Plug the power cord into your electrical outlet. The clock display will flash
until you set the time.
3. Alternately press and hold the “HOUR” and “MINUTE” buttons until you reach
the current time. The “PM” indicator light in the display will illuminate to
indicate PM time.
PRESETTING THE BREWING TIME
1. Press and hold the “BREW” button while setting the desired brew time with the
“HOUR” and “MINUTE” buttons. The “PM” indicator light in the display will
illuminate to indicate PM time.
BREWING AUTOMATICALLY AT THE PRESET TIME
1. Follow Steps 1 – 5 in the “BREWING” Section.
2. Press the PRESS/HOLD button. The “AUTO” indicator light should illuminate.
3. Brewing will begin at the preset time. The coffee will remain hot in
the decanter for 2 hours. To keep your coffee hot for an additional 2 hours,
press the “SELECT” button. The “ON”indicator light should illuminate.
5
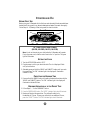
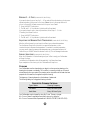
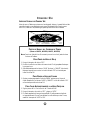
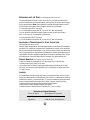
CLOCK DISPLAY
PM OFF
HOUR
MINUTE A
UTO/OFF INDICATOR BREW
SET SET ON SWITCH LIGHT BUTTON

6
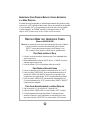
IMPORTANT: RESETTING AUTO BREW AT THE PRE-SET TIME
The programmable timer will not automatically brew the next day if left in the “AUTO”
position after its last use. This is a safety feature. If the “OFF” indicator light in the lower
right hand corner of the clock display is illuminated, reset “AUTO BREW” by turning the
control switch to “OFF”, then to “AUTO.”
(Models NLX20, NLX23, NLX20D, NLX23D Only)
SETTING CLOCK AND
T
IMER
(NLX30, NLX33)
N
OTE
: You do not have to set your clock before the Coffeemaker will operate.
Plug in the power cord, press SELECT once to turn the Coffeemaker on. The
“ON” light will illuminate and the clock will stop flashing, but it will not keep time.
SETTING THE CLOCK
1. Plug the power cord into your electrical outlet. The clock display will flash
until you set the time.
2. Alternately press and hold the “HOUR” and “MINUTE” buttons until you reach
the current time.
3. The “PM” indicator light in the display will illuminate to indicate PM time.
PRESETTING THE BREWING TIME
1. You must first set the clock to the correct time before setting the Auto brew.
2. Press the PRESS/HOLD button, then alternately press the HOUR
and MINUTE buttons to set the time you want the Coffeemaker
to start brewing. The Auto indicator light will flash during this time.
3. Press the PRESS/HOLD button again to turn off the flashing light.
If the Auto light is not flashing, pressing the HOUR or MINUTE buttons
will change the clock time.
BREWING AUTOMATICALLY AT THE PRESET TIME
1. Follow Steps 1 – 5 in the “Brewing” Section.
2. Press the PRESS/HOLD button. The “AUTO” indicator light should
illuminate.
3. Brewing will begin at the preset time. The coffee will remain hot in
the decanter for 2 hours. To keep your coffee hot for an additional 2 hours,
press the “SELECT” button. The “ON”indicator light should illuminate.

7
BREWING COFFEE
If the clock display is flashing, refer to Section “Setting the Clock” before continuing.
1. Open the swing-out brew basket to your left. Insert a MR. C
OFFEE
®
filter into the
removable black inner brew basket.
2. Add desired amount of coffee, referring to the Coffee Measurement Chart.
Shake lightly to level coffee.
3. Be sure the paper filter is centered before closing the brew basket.
4. Fill the decanter with cold water to desired capacity as marked on the side of the
decanter. (1cup = 5 oz).
5. Pour the water into the water reservoir. N
OTE: For easy and accurate filling, refer to
cup markings inside the reservoir. Place the empty decanter onto the warmer plate.
6. Turn your Coffeemaker switch to “ON”. When the coffee stops flowing, the brewing
cycle is complete.
7. Carefully remove the black inner brew basket and discard the used grounds and filter.
Rinse the black brew basket and replace. N
OTE: Remove decanter from the warming
plate before opening the swivel basket. This will prevent the drip stop valve from
catching on the decanter lid.
8. To make another pot of coffee, repeat Steps 1 – 7.
9. Turn your Coffeemaker off when the decanter is empty.
W
ARNING: To avoid risk of personal injury or damage to property as a result of overflow,
be sure the decanter is squarely centered under the brew basket during the
brewing cycle. Brewed coffee and grounds, both in brew basket and decanter,
are very hot. Handle with care to avoid scalding. If brew basket overflows,
or if brew basket fails to drain into decanter during brew cycle, do not open
or handle basket. Unplug Coffeemaker and wait for contents to cool
before handling.

8
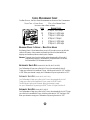
C
OFFEE
M
EASUREMENT
C
HART
FOR BEST RESULTS, USE DRIP GRIND RECOMMENDED FOR AUTOMATIC DRIP COFFEEMAKERS.
2 L
EVEL TBSP. = 1 LEVEL S
COOP 1 CUP
= 5 OZ. BREWED COFFEE
Use more or less coffee to suit taste.
CUPS GROUND COFFEE
12 11 Tbsp. or 5-1/2 Scoops
10 9 Tbsp. or 4-1/2 Scoops
8 7 Tbsp. or 3-1/2 Scoops
6 6 Tbsp. or 3 Scoops
4 5 Tbsp. or 2-1/2 Scoops
2 3 Tbsp. or 1-1/2 Scoops
B
REWING
P
AUSE
’
N
S
ERVE
– D
RIP
S
TOP
V
ALVE
Our Brewing Pause ’n Serve feature allows you up to 30 seconds to pour a cup while the
coffee is still brewing. It also prevents any remaining coffee in the brew basket from
dripping onto the warmer plate once brew cycle is complete.
W
ARNING
: To prevent injury from hot overflow, replace decanter within 30 seconds if
removed during brewing. If the decanter is not replaced within 30 seconds,
the filter basket will fill with water and overflow.
A
UTOMATIC
S
HUT
-O
FF
(Models NLX20, NLX20D, NLX23, NLX23D)
Your Coffeemaker will keep your coffee hot for 2 hours, then automatically shut off.
To keep your coffee hot for an additional 2 hours, slide the control switch to “OFF” and then
to “ON.” When your decanter is empty, turn Coffeemaker off by turning the switch to “OFF.”
AUTOMATIC SHUT-OFF (Models NLX30, NLX33 Only)
Your Coffeemaker will keep your coffee hot for 2 hours, then automatically shut off.
To keep your coffee hot for an additional 2 hours, press the SELECT button.
The ON Indicator Light should illuminate. When your decanter is empty,
turn your Coffeemaker off by pressing the SELECT button. All lights should be off.
AUTOMATIC SHUT-OFF (Models NLS12, NLS13)
Your Coffeemaker will keep your coffee hot for 2 hours, then automatically shut off. To keep
your coffee hot for an additional 2 hours, slide the control switch to “OFF” and then to “ON”.
When your decanter is empty, turn Coffeemaker off by turning the switch to “OFF”.

9
BREWING 1 – 4 CUPS (Models NLX30, NLX33 Only)
If you want to brew 4 cups or less, the 1 – 4 Cup mode will slow the brewing cycle to ensure
optimal saturation of the ground coffee beans.
N
OTE
:
Use only the proper amount of
ground coffee and fill the water reservoir with 4 cups or less of water.
1. Press the SELECT button twice.
2. The ON and 1 – 4 Cup Indicator Lights should be illuminated.
If you want to brew 4 cups or less at a preset time, follow Steps 1 – 3 in the
“Presetting Your Brewer” section.
1. Press the SELECT button twice.
2. The ON and 1 – 4 Cup Indicator Lights should be illuminated.
ADJUSTING THE WARMER PLATE TEMPERATURE (Models NLX30, NLX33 Only)
After the coffee is brewed, you can keep the coffee at your preferred temperature.
Turn the Warmer Temp knob clockwise to increase the temperature, or turn
counterclockwise to decrease the temperature. To maintain a constant temperature,
you may need to lower the warmer plate temperature as you decrease the amount of
coffee in the pot. DO NOT allow the decanter to boil dry. This will damage the decanter.
AUDIBLE
INDICATORS
(Models NLX30, NLX33 Only)
When the Coffeemaker is finished brewing and your coffee is ready, your Coffeemaker
will beep five times.
Just before the Coffeemaker shuts off automatically, it will beep three times.
Upon completion of the clean cycle, the Coffeemaker will beep once.
C
LEANING
Your Coffeemaker must be cleaned when you begin to notice excessive steaming or the
brewing time increases considerably. This condition is caused by a build-up of lime and
mineral deposits from your water. If the pumping action stops before all the water has been
pumped out of the machine, the appliance requires cleaning.
The frequency of cleaning depends on the hardness of water used.
The following table gives a suggested cleaning schedule.
S
UGGESTED
C
LEANING
I
NTERVAL
Type of Water Cleaning Frequency
Soft Water Every 80 Brew Cycles
Hard Water Every 40 Brew Cycles
Your Coffeemaker may be cleaned by using M
R. COFFEE
®
Cleaner or vinegar.
M
R
.C
OFFEE
Cleaner is available at many retail stores or by calling the
M
R
.C
OFFEE
Consumer Affairs Department at 1-800-MR COFFEE (1-800-672-6333).

10
CLEANING INSTRUCTIONS (Models NLX30, NLX33 Only)
Your NLX30/NLX33 Coffeemaker will notify you when cleaning is required. After one
minute into the brew cycle, the electronic controls will determine if the Coffeemaker needs
cleaning. If it does, the CLEAN Indicator Light will flash. If the CLEAN Indicator Light
flashes, clean the Coffeemaker before the next brew cycle. Failure to clean the Coffeemaker
when indicated could result in excessive steaming and increased brewing time. To clean,
follow Steps 1 – 4 in the “Cleaning” Section, then press the “SELECT” button three times.
When the cycle is complete, continue with Steps 6 – 8.
U
SING
M
R
. C
OFFEE
C
LEANER
Read caution statement on side panel of box before use.
CLEANING
U
SING
V
INEGAR
1. Pour 1 quart of undiluted white household vinegar into Coffeemaker.
2. Place a paper filter into the black brew basket and close the swivel basket.
3. Place the empty decanter on the warming plate. Turn the Coffeemaker to “ON.” When
three cups have flowed through, turn the Coffeemaker to “OFF.” Let stand for 1/2 hour.
4. After 1/2 hour, pour vinegar back into the Coffeemaker. Place the empty decanter
on the warming plate.
5. Turn Coffeemaker to “ON” and let all of the vinegar run to completion.
6. Discard the vinegar and paper filter.
7. To flush out all traces of vinegar, pour decanter full of tap water into Coffeemaker,
slide switch to “ON.” Allow it to cycle through.
8. Discard water and turn Coffeemaker off. Repeat Steps 7 through 8.
C
LEANING THE
D
ECANTER
DECANTER AND LID ARE TOP-RACK DISHWASHER SAFE
Hard water can leave a whitish mineral deposit inside the decanter. Coffee and tea discolor
these deposits, sometimes leaving a brownish stain inside the decanter. To remove these
stains, follow these easy steps.
1. Use a solution of equal parts white vinegar and hot water.
2. Let solution stand in decanter for about 20 minutes. Discard.
3.
Wash and rinse decanter thoroughly using soft cloth. Do not use harsh abrasive cleaners.
These may cause scratches and can lead to breakage.

11
1-YEAR LIMITED WARRANTY
Sunbeam Products, Inc. (“Sunbeam”) warrants that for a period of ONE year from the date of purchase,
this product will be free from defects in material and workmanship. Sunbeam, at its option, will repair or
replace this product or any component of the product found to be defective during this warranty period.
Replacement will be made with a new or remanufactured product or component. If the product is no
longer available, replacement may be made with a similar product of equal or greater value. This is your
exclusive warranty.
This warranty is valid for the original retail purchaser from the date of initial retail purchase and is not
transferable. Keep the original sales receipt. Proof of purchase is required to obtain warranty performance.
Sunbeam dealers, service centers or retail stores selling Sunbeam products do not have the right to alter,
modify or any way change the terms and conditions of this warranty.
This warranty does not cover normal wear of parts or damage resulting from any of the following:
negligent use or misuse of the product, use on improper voltage or current, use contrary to the operating
instructions, disassembly, repair or alteration by anyone other than Sunbeam or an Authorized Service
Center. Further, the warranty does not cover Acts of God, such as fire, flood, hurricanes and tornadoes.
Sunbeam shall not be liable for any incidental or consequential damages caused by the breach of any
express or implied warranty. Except to the extent prohibited by applicable law, any implied warranty of
merchantability or fitness for a particular purpose is limited in duration to the duration of the above
warranty. Some states, provinces or jurisdictions do not allow the exclusion or limitation of incidental or
consequential damages or limitations on how long an implied warranty lasts, so the above limitations of
exclusion may not apply to you. This warranty gives you specific legal rights, and you may also have
other rights that vary from state to state or province to province.
HOW TO OBTAIN WARRANTY SERVICE
Take the product to an Authorized Sunbeam Service Center. You can find the nearest Authorized Sunbeam
Service Center by calling
1 800 672-6333
. If a Service Center is not conveniently located, attach a
tag to the product that includes your name, address, daytime telephone number and description of the
problem. Include a copy of the original sales receipt. Carefully package the product and send either by
UPS or Parcel Post with shipping and insurance prepaid to:
For products purchased in the United States –
SUNBEAM APPLIANCE SERVICE STATION
Attention: Service Department
95 W.L. Runnels Industrial Drive
Hattiesburg, MS 39401
For products purchased in Canada –
SUNBEAM CANADA CORP., LTD.
c/o Service Tek
1351 Matheson Blvd. East, Units 5 & 6
Mississauga, ON L4W 2A1
DO NOT RETURN THIS PRODUCT TO THE PLACE OF PURCHASE.
If you have any questions regarding this warranty please call
1 800 672-6333.
Page is loading ...
Page is loading ...

14
INTRODUCTION
FÉLICITATIONS!
Vous possédez désormais une Cafetière MR. COFFEE
®
.
Veuillez lire attentivement toutesles instructions contenues dans cet ouvrage avant d’utiliser
cette machine. Un soin et un entretien corrects assureront une longue durée de vie à cet
appareil, ainsi que son fonctionnement sans ennuis. Conservez ces instructions et
consultez-les souvent pour des conseils en matière de nettoyage et d’entretien.
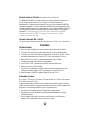
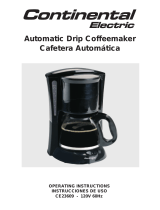
DIAGRAMME DES
PARTIES
C
ARAFES DE
R
ECHANGE
M
R
. C
OFFEE
: ND13
P
OUR DU
C
AFÉ ET DU
T
HÉ
DE
M
EILLEUR
G
OÛT
, U
TILISEZ LES
F
ILTRES
8-12
T
ASSES DE
M
ARQUE
M
R
. C
OFFEE
.
MODÈLES
NL12, NL12D/BLANC
NL13, NL13D/NOIR
COUVERCLE POUR LA POUSSIÈRE
PANIER-FILTRE AMOVIBLE NOIR
RÉSERVOIR D’EAU
PANIER À FILTRE PIVOTANT
CARAFE
PLAQUE RÉCHAUD
NLX20, NLX20D/B
LANC
NLX23, NLX23D/NOIR
Press
Hold
Hour
Min.
On
Auto
1-4
Clean
Warmer Temp
_
+
Select
Off
11:1:2020
NLX30/BLANC
NLX33/N
OIR
NLS12, NLS13/NOIR
Page is loading ...
Page is loading ...
Page is loading ...
Page is loading ...
Page is loading ...
Page is loading ...
Page is loading ...
Page is loading ...
Page is loading ...

24
I
NTRODUCCIÓN
¡F
ELICITACIONES
!
Usted es el propietario de una Cafetera de
M
R
. C
OFFEE
.
®
Gracias por la compra de su
Cafetera de
M
R
. C
OFFEE
.
®
Antes de usar este producto la
primera vez, por favor tome un momento para leer estas instrucciones y guárdelas para
futura referencia. Ponga particular atención a las Instrucciones de Seguridad que se ofrecen.
Por favor lea los estatutos en la garantía del producto.
DIAGRAMA DE LAS
PARTES
GARRAFA DE R
EPUESTO
MR. C
OFFEE: ND13
PARA
OBTENER UN
MEJOR S
ABOR DEL TÉ
Y
CAFÉ, USE LOS FILTROS DE LA MARCA
MR. COFFEE PARA 8-12 TAZAS.
M
ODELOS
NL12, NL12D/BLANCO,
NL13, NL13D/N
EGRO
CUBIERTA PARA EL POLVO
CANASTILLA DE COLADO
NEGRA REMOVIBLE
TANQUE DE
AGUA
CANASTILLA
GIRATORIA
DE
COLADO
GARRAFA
PLACA CALENTADORA
NLX20, NLX20D/B
LANCO
NLX23, NLX23D/NEGRO
Press
Hold
Hour
Min.
On
Auto
1-4
Clean
Warmer Temp
_
+
Select
Off
11:1:2020
NLX30/BLANCO, NLX33/NEGRO
NLS12, NLS13/NEGRO
Page is loading ...
Page is loading ...
Page is loading ...
Page is loading ...
Page is loading ...
Page is loading ...
Page is loading ...

©2000 Sunbeam Corporation or its affiliated companies. All rights reserved.
SUNBEAM
®
and MR. COFFEE
®
are registered trademarks of Sunbeam Corporation or its affiliated companies.
Distributed by Sunbeam Products, Inc., Boca Raton, Florida 33431, or an affiliated company.
©2000 Sunbeam Corporation ou de ses sociétés affiliées. Tous droits réservés.
SUNBEAM
®
et MR. COFFEE
®
sont marques deposées de Sunbeam Corporation ou de ses sociétés affiliées.
Distribué par Sunbeam Products, Inc., Boca Raton, Florida 33431, ou de une société affiliée.
©2000 Sunbeam Corporation o sus compañias afiliadas. Todos los derechos reservados.
SUNBEAM
®
e MR. COFFEE
®
son marcas registradas de Sunbeam Corporation o de sus compañias afiliadas.
Distribuido por Sunbeam Products, Inc., Boca Raton, Florida 33431, o de una compañía afiliada.
P.N.103434
-
 1
1
-
 2
2
-
 3
3
-
 4
4
-
 5
5
-
 6
6
-
 7
7
-
 8
8
-
 9
9
-
 10
10
-
 11
11
-
 12
12
-
 13
13
-
 14
14
-
 15
15
-
 16
16
-
 17
17
-
 18
18
-
 19
19
-
 20
20
-
 21
21
-
 22
22
-
 23
23
-
 24
24
-
 25
25
-
 26
26
-
 27
27
-
 28
28
-
 29
29
-
 30
30
-
 31
31
-
 32
32


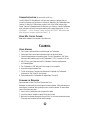
Mr. Coffee NLS12 User manual
- Category
- Coffee making accessories
- Type
- User manual
Ask a question and I''ll find the answer in the document
Finding information in a document is now easier with AI
in other languages
- français: Mr. Coffee NLS12 Manuel utilisateur
- español: Mr. Coffee NLS12 Manual de usuario
Related papers


Other documents
-
Bunn HB Quikstart Guide
-
Windmere WCM2022C User manual
-
Sunbeam 3257 User manual
-
Toastmaster RH12DSBCAN User manual
-
-
Hamilton Beach 49973 User manual
-
 Black and Decker Appliances ABD510 User guide
-
 Continental Electric CE23609 User manual
-
 Brentwood TS-217 User guide
-
 Mr Coffee Concepts TC83D User manual


