Page is loading ...

Global leaders in sleep and respiratory medicine www.resmed.com
Mirage Liberty™
FULL FACE MASK
User Guide
English • Deutsch • Français • Italiano • Español • Português • Nederlands
61848/2
07 04
MIRAGE LIBERTY
USER
EUR 1
61848
61848 cover.qxp 3/04/2007 3:11 PM Page 1

ResMed Ltd (Manufacturer) 1 Elizabeth Macarthur Drive Bella Vista NSW 2153 Australia
ResMed Corp (US Designated Agent) 14040 Danielson Street Poway CA 92064-6857 USA
ResMed (UK) Ltd (EU Authorized Representative) 65 Milton Park Abingdon Oxfordshire OX14 4RX UK
ResMed Offices Australia, Austria, Brazil, Finland, France, Germany, Hong Kong, Japan, Malaysia, Netherlands,
New Zealand, Norway, Singapore, Spain, Sweden, Switzerland, UK, USA
(see www.resmed.com for contact details).
Mirage Liberty Full Face Mask
Protected by patents: EP 1314445, HK 1057714, US 6412487, US 6581594, US 6796308, US 6823865, US 7021311.
Other patents pending.
Protected by design registrations: AU 312036, AU 312037, AU 312038, AU 312039, AU 312040, AU 312971, AU
312972, AU 312973, AU 312974, AU 312975, AU 312976, AU 312977, AU 312978, AU 312979, AU 312980, AU
312981, AU 312982, AU 312983, AU 312984, AU 313118, AU 313120, AU 313121, AU 313122, AU 313123, AU
313124, AU 313125. Others pending.
Mirage and Mirage Liberty are trademarks of ResMed Ltd and Mirage is registered in U.S. Patent and Trademark
Office.Velcro is a registered trademark of Velcro Industries B.V. STERRAD and CIDEX are trademarks of Johnson &
Johnson. Alconox is a trademark of Alconox Ltd. Neodisher Medizyme is a trademark of Chemische
Fabrik Dr Weigert.
© 2007 ResMed Ltd.
61848 cover.qxp 3/04/2007 3:11 PM Page 2

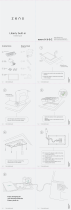
A
Mask parts / Maskenteile / Composants du masque / Parti della maschera / Piezas de la
mascarilla / Peças da máscara / Maskeronderdelen
M
i
r
a
g
e
L
i
b
e
r
t
y
™
Mask frame / Maskenrahmen /
Entourage rigide / Telaio della maschera /
Armazón de la mascarilla / Armação da
máscara / Maskerframe
Ports cap / Anschlusskappe / Bouchon
d'entrées / Coperchio delle prese / Tapón
de los puertos / Tampa das portas /
Poortafdichting
Valve / Ventil / Valve /
Valvola / Válvula /
Válvula / Klep
Exhaust vents / Luftauslassöffnungen /
Orifices de ventilation / Aperture per
l'esalazione / Orificios de ventilación /
Portas de exalação / Luchtopeningen
Upper straps / Obere Bänder / Sangles supérieures
/ Cinghie superiori / Correas superiores / Correias
superiores / Bovenste banden
Lower straps / Untere Bänder / Sangles
inférieures / Cinghie inferiori / Correas
inferiores / Correias inferiores / Onderste
banden
Lower clip / Unterer Clip / Clip
inférieur / Fermaglio inferiore /
Broche inferior / Clipe inferior /
Onderste klem
B
Fitting the mask / Anlegen der Maske / Mise en place du masque / Come indossare la maschera / Colocación de la mascarilla / Ajuste da máscara / Het masker opzetten
1
2
1 2
3 4 5
C
Disassembling for cleaning / Auseinanderbau zu Reinigungszwecken / Démontage pour le nettoyage / Smontaggio per la pulizia / Desmontaje para la limpieza / Desmontagem para limpeza / Demontage voor reiniging
3 4 5 6 7
© 2007 ResMed Ltd.
© 2007 ResMed Ltd.
Inlet tube / Einlassschlauch / Tuyau d'entrée /
Tubo d'ingresso / Tubo de entrada /
Tubo de entrada / Inlaatslang
Swivel / Drehadapter / Pièce pivotante / Giunto rotante /
Pieza giratoria / Peça giratória / Draaibare kop
Nasal pillows / Nasenpolster /
Coussins narinaires / Cuscinetti nasali /
Almohadillas nasales / Almofadas
nasais / Neuskussentjes
Valve clip / Ventilclip / Clip de la
valve / Fermaglio della valvola /
Traba de la válvula / Clipe da
válvula / Klepklem
Right upper clip / Rechter oberer Clip / Clip
supérieur droit / Fermaglio superiore destro /
Broche superior derecho / Clipe superior
direito / Rechter bovenste klem
Lower clip / Unterer Clip / Clip
inférieur / Fermaglio inferiore / Broche
inferior / Clipe inferior / Onderste
klem
Headgear parts / Kopfbandteile / Composants du harnais / Parti del copricapo / Piezas del
arnés / Peças do arnês / Onderdelen hoofdband
Left upper clip / Linker oberer
Clip / Clip supérieur gauche /
Fermaglio superiore sinistro /
Broche superior izquierdo /
Clipe superior esquerdo /
Linker bovenste klem
Valve flap / Ventillasche /
Clapet de la valve / Aletta
della valvola / Aleta de la
válvula / Aba da válvula /
Klepflap
Valve hinge / Ventilgelenk
/ Charnière de la valve /
Cardine della valvola /
Bisagra de la válvula /
Articulação da válvula /
Klepscharnier
1 8
Cushion alignment guide / Anleitung zur Ausrichtung des
Maskenkissens / Repère d'alignement de la bulle / Guida di
allineamento del cuscinetto / Guía para alineación de la
almohadilla / Guia de alinhamento da almofada /
Kussen uitlijngeleider
© 2007 ResMed Ltd.
2
Mask cushion / Maskenkissen / Bulle du masque / Cuscinetto
della maschera /
Almohadilla bucal /
Almofada da máscara /
Maskerkussen
Elbow / Kniestück /
Coude / Gomito /
Codo / Cotovelo /
Bocht
61848 illo sheets.qxp 12/04/2007 8:47 AM Page 1

English
1
Mirage Liberty™
FULL FACE MASK
Thank you for choosing ResMed’s Mirage Liberty. The Mirage Liberty is a full
face mask that combines nasal pillows and a mouth cushion, creating a mask
that is both unobtrusive and easy to use without compromising seal, stability
and comfort.
The mask incorporates vent holes and a built-in valve so that you can continue
to breathe fresh air if the airflow to your mask is impeded for any reason.
Intended Use
The Mirage Liberty channels airflow noninvasively to a patient from a positive
airway pressure device such as a continuous positive airway pressure (CPAP)
or bilevel system.
The Mirage Liberty is to be used by adult patients (>30 kg) for whom positive
airway pressure has been prescribed.
The Mirage Liberty is intended for single-patient re-use in the home
environment and multipatient re-use in the hospital/institutional environment.
Before Using the Mask
WARNING
• The Mirage Liberty must be used under qualified supervision with
patients who are unable to remove the mask by themselves. The mask
may not be suitable for those predisposed to aspiration.
• The elbow and valve assembly have specific safety functions. They
allow you to breathe fresh air if the airflow from your flow generator
to your mask is impeded. The mask should not be worn if the valve is
damaged as it will not be able to perform its safety function. The valve
should be replaced if it is damaged, distorted or torn.
• The vent holes must be kept clear.
• Follow all precautions when using supplemental oxygen.
61848r2.book Page 1 Tuesday, April 3, 2007 2:59 PM

2
•
Any supplemental oxygen flow must be turned off when the flow
generator is not operating, so that unused oxygen does not
accumulate within the flow generator enclosure and create a risk of
fire.
• At a fixed flow rate of supplemental oxygen flow, the inhaled oxygen
concentration will vary, depending on the pressure settings, patient
breathing pattern, mask, point of application and leak rate.
• The technical specifications of the mask and flow generator are
provided for your clinician to check that they are compatible. If used
outside specification or if used with incompatible devices, the seal and
comfort of the mask may not be effective, optimum therapy may not
be achieved, and leak, or variation in the rate of leak, may affect the
flow generator function.
• Discontinue using the Mirage Liberty if you have ANY adverse
reaction to the mask system, and consult your physician or sleep
therapist.
• Discontinue using the Mirage Liberty if you experience nasal irritation,
and consult your physician or sleep therapist.
• Refer to your flow generator manual for details on settings and
operational information.
Using the Mask
Select ‘Mir Full’ or ‘Full Face’ as the mask option when using the Mirage
Liberty with ResMed flow generators that have mask setting options.
Fitting the mask
The diagrams in section A on the illustrations sheet show how the parts of the
mask fit together.
The diagrams in section B show the suggested sequence for obtaining the
best fit and comfort in using your mask. Please follow these instructions
carefully.
1 Wash your face thoroughly before fitting the mask. It is recommended that
you do not apply moisturiser where the mask contacts your face as it can
affect the mask seal.
2 Place the headgear on your head, like you would a cap, and pull the mask
forward onto your face (B-1). Make sure that the headgear fits evenly on the
top of your head.
3 Fit the mask over your mouth. Insert the pillows so that they sit gently just
inside the entrance to your nostrils.
4 Push the lower headgear clips into the slots on the mask frame until they
click into place (B-2).
61848r2.book Page 2 Tuesday, April 3, 2007 2:59 PM

3
English
5 To tighten or loosen the headgear straps, peel the Velcro
®
tab off the
headgear and reposition it. Gently and evenly adjust the upper headgear
straps (B-3), then the lower straps (B-4). Alternate the adjustment of each
set of straps until they are comfortable and firm and so that the upper
headgear clips rest between your eye and your ear. The mask should gently
‘float’ on your face. Do not overtighten the headgear straps.
6 Connect one end of the main air tubing to your flow generator and the other
end to the swivel.
7 Connect the elbow to the mask frame, holding the sides of the elbow then
firmly pushing it onto the frame until it clicks into place (B-5). Rotate the
elbow to check that it rotates freely and does not separate from the frame.
8 Turn your flow generator on.
9 If you feel air leaks, you may need to adjust your headgear. Return to step 5
or check through the suggestions in “Optimising mask seal and comfort”
below.
Optimising mask seal and comfort
To receive effective therapy it is important to have the best seal possible
between your mask and your face. If you are experiencing leaks, please ensure
that you have followed the fitting instructions carefully. Carry out a quick check
after fitting your mask:
• Is the mouth cushion creased? Creases can allow air to leak out of the
mask.
• Have you cleaned your mask recently? Oils on the cushion and pillows can
affect the seal.
• Are the pillows correctly seated in your nostrils? Re-seat or adjust the
pillows to obtain a proper seal.
• Are your headgear straps overtightened? Try not to alter the upper headgear
straps once they have been tightened by your clinician.
• If you cannot establish a comfortable seal, do not overtighten the headgear.
Consult your clinician.
• Try another nasal pillow size.
If you cannot resolve any problems, look at the Troubleshooting section, or talk
to your clinician.
Removing the Mask
To remove the Mirage Liberty:
1 Detach the elbow by squeezing the elbow on both sides (C-1).
2 Unclip both of the lower headgear clips (C-2) and remove the mask.
61848r2.book Page 3 Tuesday, April 3, 2007 2:59 PM

4
Note: You can detach the elbow from the mask frame and leave the mask on
your face. You may prefer to do this when briefly stopping therapy, for
example to go to the bathroom.
Disassembling the Mask
See section C on the illustrations sheet.
1 Unclip the upper headgear clips from the frame (C-3).
2 Carefully pull the mouth cushion away from the frame (C-4).
3 Push the two nasal pillows down through the mouth cushion (C-5).
4 Remove the ports cap (C-6).
5 Detach the inlet tube assembly from the elbow.
Note: The swivel does not need to be disconnected from the inlet tube.
6 Detach the valve clip from the elbow (C-7).
7 Peel the valve from the valve clip (C-8).
Note: Do not pull on the valve flap, as this may cause it to tear.
Cleaning the Mask in the Home
Notes:
• The mask and headgear can only be cleaned by handwashing.
• The headgear may be washed without removing the headgear clips.
• Do not soak any components of the mask.
WARNING
• Do not use aromatic-based solutions or scented oils (eg, eucalyptus or
essential oils), bleach, alcohol or products that smell strongly (eg,
citrus) to clean any of the mask components. Residual vapours from
these solutions can be inhaled if not rinsed thoroughly. They may also
damage the mask, causing cracks.
• Do not iron the headgear as the material is heat sensitive and will be
damaged.
Daily/After Each Use
To optimise the mask seal, facial oils should be removed from the cushion and
pillows before use.
Handwash the mask by gently rubbing in warm (30°C) water using mild soap
or diluted dishwashing detergent.
Clean the walls of the nasal pillows, including the space between the walls, of
any debris using a small brush.
Do not twist the valve during cleaning as this may damage or tear the valve
membrane or hinge. Take care when handling the valve.
61848r2.book Page 4 Tuesday, April 3, 2007 2:59 PM

5
English
If the vent requires cleaning, use a soft bristle brush.
Rinse all components well with drinking quality water and allow them to air dry
out of direct sunlight.
Weekly
Handwash the headgear by gently rubbing in warm (30°C) water using mild
soap or diluted dishwashing detergent. Rinse the headgear well and allow it to
air dry out of direct sunlight.
Cleaning the Mask between Patients
The Mirage Liberty should be disinfected or sterilised when used between
patients.
Detailed disinfection and sterilisation instructions are available from the
ResMed website, www.resmed.com/masks/sterilization, and must be
consulted before multipatient use.
Reassembling the Mask
See section D on the illustrations sheet.
Before reassembling the mask, check that all components are clean and dry.
Check that the valve is not damaged, distorted or torn, and that none of the
other components are broken or cracked. Replace any parts that are damaged.
Flexible PVC contains elements that can be detrimental to the materials of the
mask. If flexible PVC tubing is used continuously, the attachment port should
be inspected for cracking. Replace any parts that are damaged.
Refer to “Ordering Information” for re-order numbers.
1 Attach the nasal pillows to the mouth cushion:
a Push the nasal pillows through the holes in the mouth cushion (D-1).
b Pull the nasal pillows up until the grooves at their base fully engage
around the mouth cushion holes (D-2).
c Check that the tabs on each pillow fit into the corresponding notches on
the cushion (D-3). Check that the seal between the pillows and cushion
is complete.
2 Attach the mouth cushion to the frame:
a Position the cushion alignment guide between the two nasal pillows and
line up the triangle symbols on the bottom of the mask frame with
those on the mouth cushion.
b Press the mouth cushion into the groove in the frame (D-4).
c Check that the mouth cushion is fully seated in the groove.
3 Insert the ports cap (D-5).
4 Clip the upper headgear clips onto the mask (D-6).
61848r2.book Page 5 Tuesday, April 3, 2007 2:59 PM

6
5 Assemble the elbow assembly:
a Push the tab of the valve up through the slot in the valve clip (D-7).
Ensure that the valve locks into the slot.
b Feed the flap of the valve through the slot in the elbow (D-8).
c Press the valve clip onto the elbow until you hear both sides click into
place (D-9).
6 Push the inlet tube assembly onto the elbow assembly.
Reassembling the Headgear
If taken apart, the headgear has five parts: headgear straps, left and right upper
headgear clips, and two lower clips.
1 Attach the upper headgear clips to the mask frame (D-6). The mask
incorporates lock-out features to ensure that each upper clip attaches to the
correct side of the mask frame.
2 Clip the lower headgear clips into the mask frame.
3 Lay out the headgear straps, label side down. The label is on the outer side
of the headgear. The internal side is smooth, to be comfortable against your
face.
4 Thread the top (short) straps through the upper headgear clips (E-1, E-2).
5 Thread the bottom (long) straps through the lower clips (E-1, E-2).
6 Check that the headgear is not twisted.
Storage
Ensure that the mask is thoroughly clean and dry before storing it for any
length of time. Store the mask in a cool dry place out of direct sunlight.
Disposal
The Mirage Liberty does not contain any hazardous substances and may be
disposed of with your normal household refuse.
61848r2.book Page 6 Tuesday, April 3, 2007 2:59 PM

7
English
Troubleshooting
Problem Possible reason Possible solution
Mask won’t seal properly or is
uncomfortable
Mouth cushion or pillows may
be dirty.
Clean mask according to
instructions in “Cleaning the
Mask in the Home”.
Mask may have been fitted
incorrectly.
Carefully follow instructions in
“Fitting the mask”.
Mask is incorrectly adjusted. Check headgear is not over-
tightened.
Mouth cushion is wrong size. Talk to your clinician.
Mouth cushion is skewed in
mask frame.
Check insertion of cushion.
Mouth cushion is misaligned or
creased on face.
Ensure cushion is properly
aligned and that there are no
creases in it: undo headgear clip,
check cushion and reposition the
mask on your face.
Mask pillows are the wrong size. Try another size or talk to your
clinician.
Mask pillows are not correctly
seated in your nostrils.
Re-seat pillows into nostrils.
Mask pillows are skewed in
cushion.
Check insertion of pillows.
Mask is assembled incorrectly. Reassemble mask.
Mask is too noisy Vents are blocked or partially
blocked.
Clean vents according to
instructions in “Cleaning the
Mask in the Home”.
Valve is misassembled. Reassemble valve.
Cushion is not properly inserted. Check insertion of cushion.
Mask is assembled incorrectly. Reassemble mask.
Valve is damaged, torn or
distorted.
Replace valve.
Pillows are not inserted correctly
into cushion.
Check insertion of pillows.
Mask is not sealing. Check and adjust mask as
necessary.
61848r2.book Page 7 Tuesday, April 3, 2007 2:59 PM

8
Technical Specifications
Note: The mask system does not contain latex, PVC or DEHP materials.
Pressure–Flow Curve
Note: As a result of manufacturing variations, the vent flow may vary from that
indicated in the graph.
Dead Space Information
Dead space is the empty volume of the mask up to the elbow.
The maximum dead space of the Mirage Liberty for all mask size combinations
is 151 mL.
Standards
CE designation in accordance with EC directive 93/42/EEC, class IIa.
ISO 14971, ISO 10993-1, ISO 17510-2, ISO 13485.
Therapy Pressure
4 to 20 cm H
2
O
Resistance
Drop in pressure measured (nominal)
at 50 L/min: 0.5 cm H
2
O
at 100 L/min: 1.6 cm H
2
O
Sound
The A-weighted sound power of the mask is 28 dBA.
Environmental Conditions
Operating temperature: +5°C to +40°C
Operating humidity: 10%–95% relative humidity non-condensing
Storage and transport temperature: -20°C to +60°C
Storage and transport humidity: 10%–95% relative humidity non-condensing
Vent Flow Rate (L/min)
Pressure
(cm H
2
O)
Flow
(± 6.0 L/min)
422
832
12 41
16 48
20 54
0.0
10.0
20.0
30.0
40.0
50.0
60.0
70.0
2 4 6 8 10 12 14 16 18 20 22 24 26 28 30
Mask Pressure (cm H
2
O)
61848r2.book Page 8 Tuesday, April 3, 2007 2:59 PM

9
English
Mask sizes
(excludes inlet tube and headgear)
Symbols
System and Packaging
User Guide
size width (mm) height (mm) depth (mm)
small 110 92 95
large 110 100 100
Caution, consult accompanying documents
Lot number
Part number/Product code
No latex
Humidity limitation
Temperature limitation
Manufacturer
Indicates a warning or caution and alerts you to a possible injury or explains
special measures for the safe and effective use of the device.
LOT
REF
61848r2.book Page 9 Tuesday, April 3, 2007 2:59 PM

10
Ordering Information
Europe 1 – English, German, French, Italian, Spanish, Portuguese, Dutch.
Consumer Warranty
ResMed acknowledges all consumer rights granted under the EU Directive
1999/44/EG and the respective national laws within the EU for products sold
within the European Union.
Ref. Item
System
61302 Mirage Liberty Full Face Mask, Small – Europe 1
61303 Mirage Liberty Full Face Mask, Large – Europe 1
61306 Mirage Liberty Full Face Mask, Small – France
61307 Mirage Liberty Full Face Mask, Large – France
61308 Mirage Liberty Full Face Mask, Small – UK
61309 Mirage Liberty Full Face Mask, Large – UK
Replacement parts
61330 Mouth cushion, Small (1 pk)
61331 Mouth cushion, Large (1 pk)
61333 Nasal pillows, Small (1 pk)
61334 Nasal pillows, Medium (1 pk)
61335 Nasal pillows, Large (1 pk)
61337 Mask frame, Small (1 pk)
61338 Mask frame, Large (1 pk)
61340 Elbow assembly (elbow, valve and clip) (1 pk)
61342 Valve and clip (1 pk)
61343 Valve and clip (10 pk)
60926 Inlet tube and swivel (1 pk)
60927 Inlet tube and swivel (10 pk)
61348 Headgear assembly, Small (1 pk)
61349 Headgear assembly, Standard (1 pk)
61352 Upper clips (2 pk)
61353 Lower clips (2 pk)
16570 Ports cap (2 pk)
16571 Ports cap (10 pk)
60014 Swivel (10 pk)
61848r2.book Page 10 Tuesday, April 3, 2007 2:59 PM

22
61848r2.book Page 22 Tuesday, April 3, 2007 2:59 PM

34
61848r2.book Page 34 Tuesday, April 3, 2007 2:59 PM

46
61848r2.book Page 46 Tuesday, April 3, 2007 2:59 PM

58
61848r2.book Page 58 Tuesday, April 3, 2007 2:59 PM

79
Nederlands
Bestelinformatie
Europa 1 – Engels, Duits, Frans, Italiaans, Spaans, Portugees, Nederlands.
Consumentengarantie
ResMed erkent alle consumentenrechten krachtens Europese Richtlijn 1999/
44/EG en de respectievelijke nationale wetten binnen de EU voor producten die
binnen de Europese Unie worden verkocht.
Product-
code
Artikel
Systeem
61302 Mirage Liberty Full Face Masker Small – Europa 1
61303 Mirage Liberty Full Face Masker Large – Europa 1
61306 Mirage Liberty Full Face Masker Small –
Frankrijk
61307 Mirage Liberty Full Face Masker Large –
Frankrijk
61308 Mirage Liberty Full Face Masker Small – Ver. Koninkrijk
61309 Mirage Liberty Full Face Masker Large – Ver. Koninkrijk
Vervangingsonderdelen
61330 Mondkussen Small (1 st)
61331 Mondkussen Large (1 st)
61333 Neuskussentjes Small (1 st)
61334 Neuskussentjes Medium (1 st)
61335 Neuskussentjes Large (1 st)
61337 Maskerframe Small (1 st)
61338 Maskerframe Large (1 st)
61340 Complete bocht (bocht, klep en klem) (1 st)
61342 Klep en klem (1 st)
61343 Klep en klem (10 st)
60926 Inlaatslang met draaibare kop (1 st)
60927 Inlaatslang met draaibare kop (10 st)
61348 Hoofdbandconstr. Small (1 st)
61349 Hoofdbandconstr. Standaard (1 st)
61352 Bovenste klemmen (2 st)
61353 Onderste klemmen (2 st)
16570 Poortafdichting (2 st)
16571 Poortafdichting (10 st)
60014 Draaibare kop (10 st)
61848r2.book Page 79 Tuesday, April 3, 2007 2:59 PM

80
61848r2.book Page 80 Tuesday, April 3, 2007 2:59 PM
/