
1
FEATURES ON NEW TOYOTA VEHICLE
Overview of instruments and controls
Instrument panel overview 2. . . . . . . . . . . . . . . . . . . . . . . . . . . . . . . . . . . .
Instrument cluster and multi−information display overview 4. . . . . . . .
Indicator symbols on the instrument panel and multi−information
display 5. . . . . . . . . . . . . . . . . . . . . . . . . . . . . . . . . . . . . . . . . . . . . . . . . . . . . .
SECTION 1– 1

2
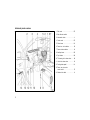
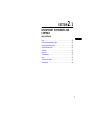
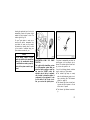
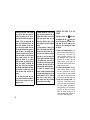
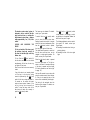
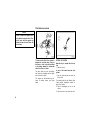
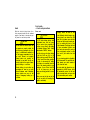
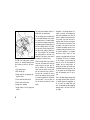
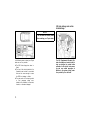
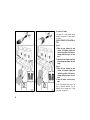
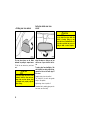
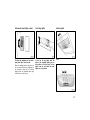
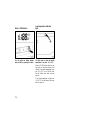
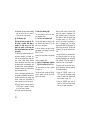
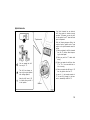
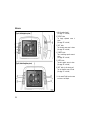
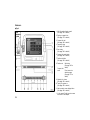
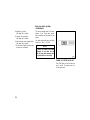
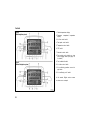
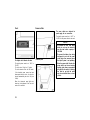
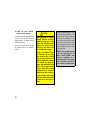
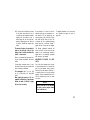
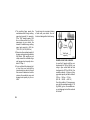
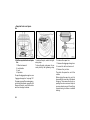
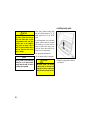
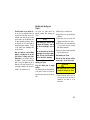
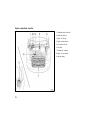
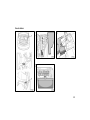
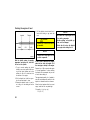
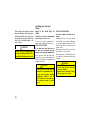
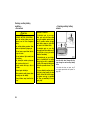
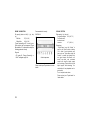
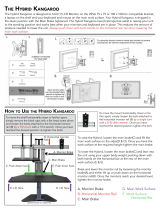
Instrument panel overview
1. Side vents 187. . . . . . . . . . . . . . . . . . . . . . .
2. Side defroster outlets
3. Instrument cluster 4. . . . . . . . . . . . . . . . . .
4. Center vents 187. . . . . . . . . . . . . . . . . . . . .
5. Glove boxes 191. . . . . . . . . . . . . . . . . . . . .
6. Power door lock switches 38. . . . . . . . .
7. Power window switches 40. . . . . . . . . . .
8. Auxiliary boxes 195. . . . . . . . . . . . . . . . . . .
9. Cup holders 196. . . . . . . . . . . . . . . . . . . . .
10. Tilt steering lock release lever 96. . . . .
11. Hood lock release lever 43. . . . . . . . . . .
12. Parking brake pedal 141. . . . . . . . . . . . . .
13. Power rear view mirror
control switch 97. . . . . . . . . . . . . . . . . . . . .
14. Window lock switch 41. . . . . . . . . . . . . . .
11p003d

3
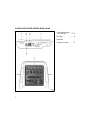
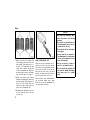
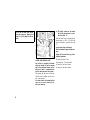
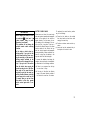
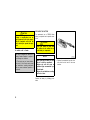
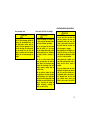
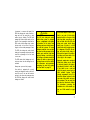
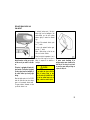
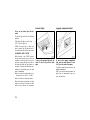
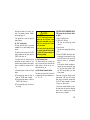
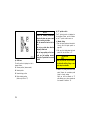
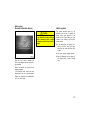
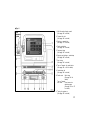
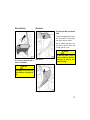
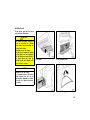
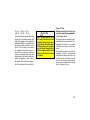
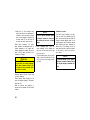
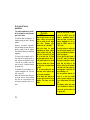
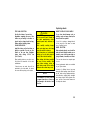
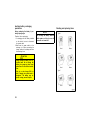
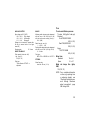
1. Headlight and turn signal
switches 102. . . . . . . . . . . . . . . . . . . . . . . . .
2. Wiper and washer switches 109. . . . . . .
3. “POWER” switch 130. . . . . . . . . . . . . . . . .
4. Clock 190. . . . . . . . . . . . . . . . . . . . . . . . . . . .
5. Multi−information display 146. . . . . . . . . .
6. Emergency flasher switch 106. . . . . . . . .
7. Trip meter reset button 115. . . . . . . . . . .
8. Km/h or MPH button 116. . . . . . . . . . . . .
9. Car audio 156. . . . . . . . . . . . . . . . . . . . . . . .
10. Power outlet 190. . . . . . . . . . . . . . . . . . . . .
11. “P” position switch 135. . . . . . . . . . . . . . .
12. Electronic shift lever
(R, N, D, B) 135. . . . . . . . . . . . . . . . . . . . .
13. Key slot 19. . . . . . . . . . . . . . . . . . . . . . . . . .
14. Cruise control switch 141. . . . . . . . . . . . .
15. Smart entry and start system
cancel switch 32. . . . . . . . . . . . . . . . . . . . .
16. Climate remote control
switches 186. . . . . . . . . . . . . . . . . . . . . . . . .
17. Instrument panel light control
dial 107. . . . . . . . . . . . . . . . . . . . . . . . . . . . . .
18. Audio remote control switches 174. . . .
11p001h


5
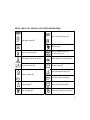
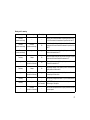
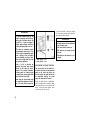
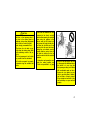
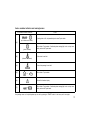
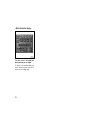
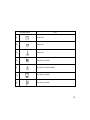
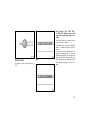
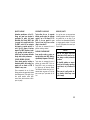
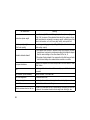
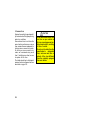
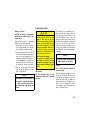
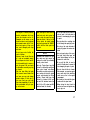
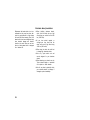
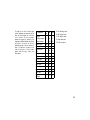
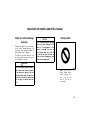
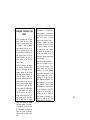
Indicator symbols on the instrument cluster and Multi−information display
or
and
Brake system warning lights
∗
1
Driver’s seat belt reminder light
∗
1
Front passenger’s seat belt reminder light
∗
1
Malfunction indicator lamp
∗
1
Low fuel level indicator light
∗
1
Open door warning light
∗
1
Master warning light
∗
1
Anti−lock brake system warning light
∗
1
SRS warning light
∗
1
Engine oil replacement reminder light
∗
1
(for vehicles sold in U.S.A.)
Vehicle stability control system warning light
∗
1
Discharge warning light
∗
2
High coolant temperature warning light
∗
2
Low engine oil pressure warning light
∗
2
Hybrid vehicle battery warning light
∗
2
Electric power steering system warning light
∗
2
or
(U.S.A)
(Canada)

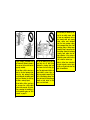
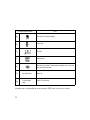
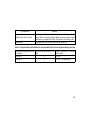
6
Hybrid vehicle immobilizer / Theft deterrent sys-
tem indicator light
Tail light indicator light
Shift position indicator light
∗
4
Driving ready light
Automatic air conditioner indicator light
Recirculate mode indicator light
Smart entry and start system warning light
∗
5
Windshield air flow indicator light
Slip indicator light
Rear window and outside rear view mirror defog-
gers indicator light
Low temperature indicator light
Headlight high beam indicator light
Headlight indicator light
Turn signal indicator lights
∗
1
: For details, see “Service reminder indicators and warning
buzzers— —Instrument cluster” on page 117.
∗
2
: For details, see “Service reminder indicators and warning
buzzers— —Multi−information display” on page 124.
∗
3
: If this light flashes, see “Cruise control” on page 141.
∗
4
: For details, see “Hybrid transaxle” on page 135.
∗
5
: For details, see “Smart entry and start system” on page 23.
Cruise control indicator light
∗
3
Hybrid system warning light
∗
2
Automatic head light leveling system
warning light
∗
2

7
FEATURES ON NEW TOYOTA VEHICLE
Toyota hybrid system
Toyota hybrid systemm 8. . . . . . . . . . . . . . . . . . . . . . . . . . . . . . . . . . . . . . .
Toyota hybrid system operating condition 8. . . . . . . . . . . . . . . . . . . . . . .
Starting your vehicle 11. . . . . . . . . . . . . . . . . . . . . . . . . . . . . . . . . . . . . . . . .
For efficient use of your vehicle 11. . . . . . . . . . . . . . . . . . . . . . . . . . . . . . .
Precautions for use 12. . . . . . . . . . . . . . . . . . . . . . . . . . . . . . . . . . . . . . . . . .
SECTION 1– 2

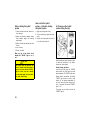
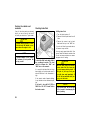
8
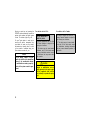
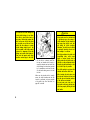
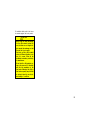
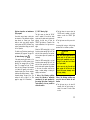
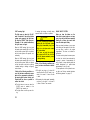
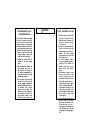
Toyota hybrid system combines a gaso-
line engine and electric motor power to
improve the fuel economy and minimize
the emissions as well as to provide
better power performance than the ordi-
nary gasoline−powered vehicles.
Depending on the driving condition, the
vehicle runs on the best combination of;
D Gasoline engine power
D Electric motor power generated by
the gasoline engine
D Electric motor power of the hybrid
vehicle battery
Furthermore, the energy is efficiently used
in the following ways:
D When stopping the vehicle, the gaso-
line engine is automatically stopped.
D When applying the brakes or decelerat-
ing, electricity is converted from the
turning force of the wheels and stored
in the hybrid vehicle battery. (This is
called regenerative brake.)
Since the battery is charged by the
gasoline engine as needed, it does not
require charging from an outside
source like an electric vehicle.
If you do not use the vehicle for a
long time (2 weeks or more), the hy-
brid vehicle battery and auxiliary battery
will discharge and their condition is li-
able to decline. Therefore, in order to
make up for discharging, charge them
once in every 2 weeks for about 30
minutes by starting the hybrid system
with all electrical components turned off.
Basic operations are described below. Be-
sides, Toyota hybrid system performs vari-
ous controls depending on the operating
condition: The “Energy Monitor” screen
tells you which power is used currently.
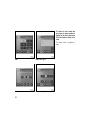
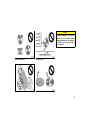
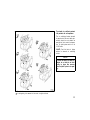
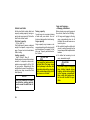
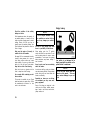
Toyota hybrid system
Toyota hybrid system
operating condition

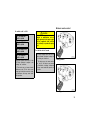
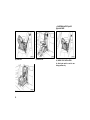
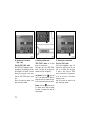
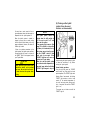
9
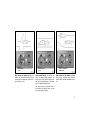
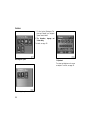
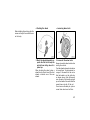
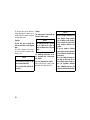
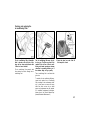
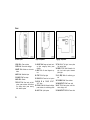
12p016c
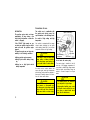
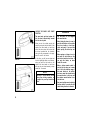
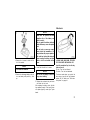
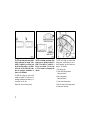
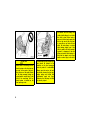
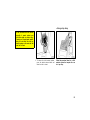
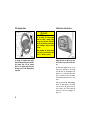
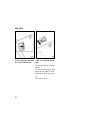
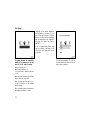
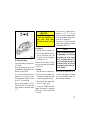
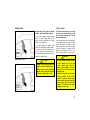
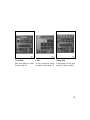
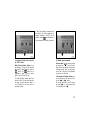
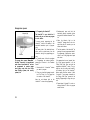
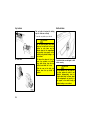
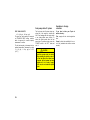
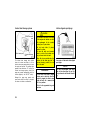
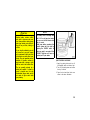
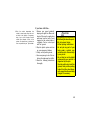
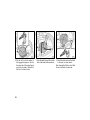
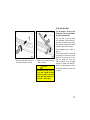
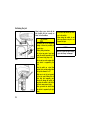
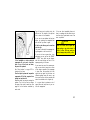
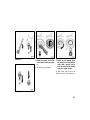
Electric power
in use
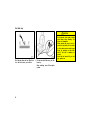
When starting or backing up, etc., the
vehicle runs on electric power from hybrid
vehicle battery, because the gasoline en-
gine efficiency is low.
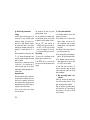
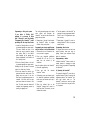
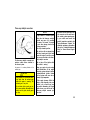
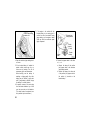
12p017c
Gasoline power
in use
During normal driving, the vehicle runs
mainly on gasoline power. However, the
electric motor, using electric power gener-
ated by the gasoline engine, can supple-
ment the gasoline engine power.
The vehicle controls the optimum ratio of
the gasoline and electric power to help
use energy more efficiently.
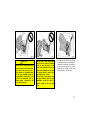
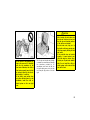
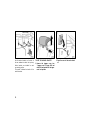
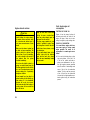
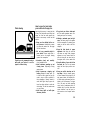
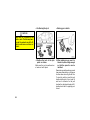
12p018c
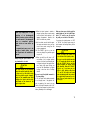
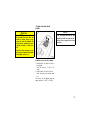
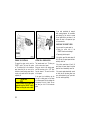
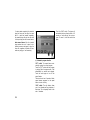
Electric and gasoline
power in use
When driving at full throttle, additional
electric power is applied from the hybrid
vehicle battery. Vehicle performance impro-
ves.

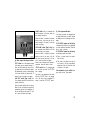
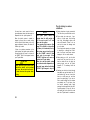
10
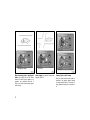
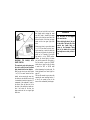
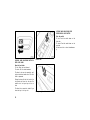
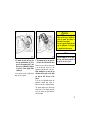
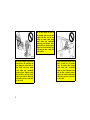
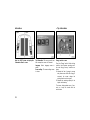
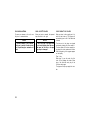
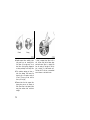
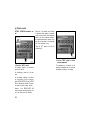
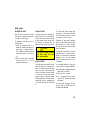
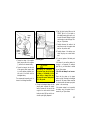
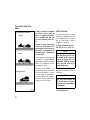
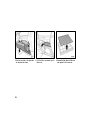
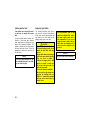
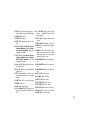
12p019c
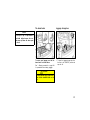
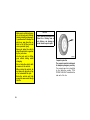
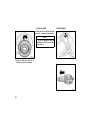
Storing electric power
When decreasing speed or applying the
brakes, the turning force of the wheels
makes the electric motor operate as a
generator and additional electricity is
stored in the hybrid vehicle battery (regen-
erative brake).
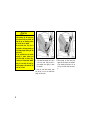
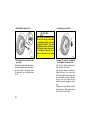
12p020c
Not in use
When stopping, the gasoline engine auto-
matically shuts off.
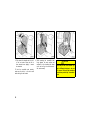
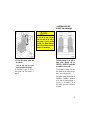
12p030b
Charging hybrid vehicle battery
When the hybrid vehicle battery power is
insufficient, the gasoline engine charges
the hybrid vehicle battery. The system al-
ways supplies electricity at a constant lev-
el.

11
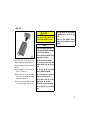
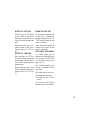
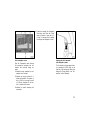
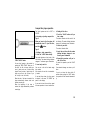
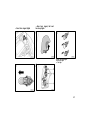
Your vehicle is equipped with push but-
ton start. The hybrid system will start
automatically by pressing the “POWER”
switch briefly with the brake pedal de-
pressed.
Without smart function
1. Insert the key.
2. Press the “POWER” switch briefly with
the brake pedal depressed.
With smart function
1. Carry the key with you.
2. Press the “POWER” switch briefly with
the brake pedal depressed.
The “READY” light flashes and stays on.
A beep sounds after a few seconds, and
the hybrid system will start. (If the ambi-
ent temperature is low such as during
winter, it may take time until the “READY”
light comes on.) You cannot start your
vehicle when the brake pedal is not de-
pressed. (For details, see “How to start
the hybrid system—” on page 230.)
The engine may not start even with the
“READY” light on.
Drive your vehicle with a smooth accel-
eration and deceleration.
D While driving, energy is recovered
through the regenerative brake as the
vehicle decelerates. However, for more
efficient use, do not accelerate or de-
celerate your vehicle more than neces-
sary.
D Avoid abrupt acceleration and decelera-
tion.
D The remaining capacity of the hybrid
vehicle battery can be confirmed on
the energy monitor screen of the multi−
information display. See “Information”
on page 150 for details. Gradual or
non−abrupt acceleration or deceleration
will more effectively use the benefits of
an electric motor without having to use
gasoline engine power.
When parking, be sure to put the hy-
brid transaxle in “P”. While driving, use
the hybrid transaxle in “D”.
D In “N”, the gasoline engine operates
but electricity cannot be generated. The
battery will be discharged requiring un-
necessary engine power to recharge.
D The hybrid system automatically re-
charges the hybrid vehicle battery
when the remaining battery power is
reduced. However, the charging is not
available if the hybrid transaxle is “N”.
Starting your vehicle
For efficient use of your
vehicle

12
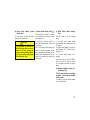
INFORMATION:
The gasoline engine starts and stops
automatically. (It stops during a low
load driving, deceleration or when the
vehicle is stopped.)
If the “READY” light remains on, you
can start your vehicle using the electric
motor even with the gasoline engine
stopped.
The gasoline engine may not stop auto-
matically in the following conditions:
z During gasoline engine warm−up
z During hybrid vehicle battery charg-
ing
z During low or high hybrid vehicle
battery temperature
The vehicle runs in combination with
the gasoline and electric power. Pay
special attention to the following items.
Be careful of high voltage and high
temperature.
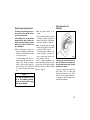
Your vehicle is equipped with the orange
colored cables connected to the hybrid
vehicle battery (about 200 V) and to other
components that are all high voltage.
CAUTION
Do not touch or come in contact with
orange cables or battery terminals.
Electric shock may cause serious in-
jury or death. Read all caution labels.
An electric motor, coolant radiator and
some other parts reach high temperature
while driving. Caution labels are applied to
these parts. Carefully observe the instruc-
tions on these caution labels.
CAUTION
Never remove or disassemble any
high voltage part, high voltage cables
(orange color) and their connectors.
It may cause death or serious injury.
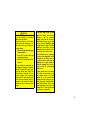
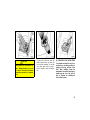
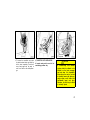
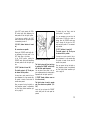
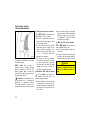
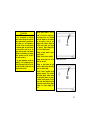
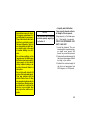
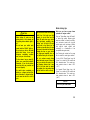
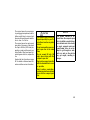
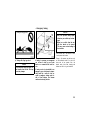
12p007d
Inverter unit
Hybrid vehicle battery
Service
plug
High volt-
age cables
Air conditioning
compressor
High voltage
cables
Do not touch the service plug.
The service plug is installed in the left
side trim of the luggage compartment. It
is provided to disable high voltage current
from the hybrid vehicle battery when the
vehicle is in need of repairs at a Toyota
dealer.
CAUTION
D The shaded parts in the illustration
are subjected to high voltage.
D Inappropriate handling may cause
an electric shock resulting in seri-
ous injury or death. Never touch
any item in shaded area.
Precautions for use

13
These high voltage parts or cables
consisting of an electromagnetic
shielding structure produce relatively
the same amount of electromagnetic
waves as conventional gasoline−
fueled vehicles or home electric ap-
pliances.
As unwanted noise may occur in the
reception of mobile radios, contact
your Toyota dealer for installation or
removal.
Always keep your hybrid vehicle’s driv-
ing characteristics in mind.
CAUTION
The driver should pay full attention
around the vehicle especially when it
is driven only by the electric motor
(with the gasoline engine stopped).
People in the immediate area might
misjudge the hybrid vehicle move-
ment based on the absence of the
regular engine noise.
D When the hybrid system is started or
stopped, you may hear a sound coming
from the hybrid vehicle battery in the
luggage compartment. However, this
does not indicate any trouble.
D As the vehicle runs with both the gaso-
line engine and electric motor, you may
hear a motor sound coming from the
engine compartment.
D If the “READY” light is on, you can
start even though the gasoline engine
may be off.
D When you shift the shift lever to “B”
and release it to its original position
and your foot from the accelerator ped-
al, engine braking will be applied. How-
ever, during high speed driving you
may feel that deceleration by engine
braking is less than that of ordinary
vehicle.
Be sure to put the hybrid transaxle in
“P” when parking.
In “N”, the hybrid vehicle battery assembly
is not charged, even if the gasoline en-
gine is operating. You cannot run your
vehicle if the hybrid transaxle is left in “N”
for a long time because the hybrid vehicle
battery assembly will be discharged.
When you leave your vehicle, apply the
parking brake to put the hybrid trans-
axle in “P” and be sure to carry the
key with you and lock all the doors.
If you leave the hybrid system in “ACC”
or “IG−ON”, the hybrid system may not
start because the auxiliary battery will be
discharged.
CAUTION
D When you leave your vehicle, be
sure to shut off the hybrid system.
D Be sure to put the hybrid transaxle
in “P” because the vehicle can start
with the “READY” light on and the
engine stopped (no engine sound
and vibration). When the “READY”
light is on, if you leave your ve-
hicle in shift position other than
“P” and “N”, the vehicle will creep
and start abruptly with the accelera-
tor pedal being depressed by mis-
take. This may cause death or seri-
ous injury.

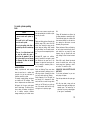
14
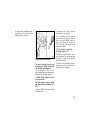
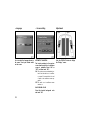
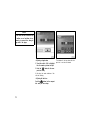
12p008d
When the multi−information display
shows this message, the master warn-
ing light
( ) comes on in the instru-
ment cluster. Read the message and
follow the instruction.
D When you leave your vehicle, or stop
or park for a while, put the hybrid
transaxle in “P”.
D Charging is necessary. In “N”, charging
will not be applied. The electric genera-
tor operates in “P”, “D” or “B”. If you
continue driving, put the hybrid trans-
axle in “D” or “B” and depress the
accelerator pedal. Do not leave the hy-
brid transaxle in “N”. When driving in
traffic jam, operate in “D”.
12P009c
Do not allow anyone to lean against the
side of the rear right seatback, nor put
any luggage or other obstructions on it.
D An air vent is provided on the side of
the rear right seatback to cool the hy-
brid vehicle battery. If this vent is cov-
ered, the hybrid vehicle battery will
overheat resulting in a reduction of the
output performance of the hybrid sys-
tem.
D The seat belt not properly set in the
guide on the top of the rear seat may
block the air vent. Be sure to pass the
seat belt through the guide properly.
D Do not wet or put foreign objects over
the air vent. Otherwise, the hybrid ve-
hicle battery may be adversely affected
and be damaged.
D You may hear a cooling fan noise from
the air vent.
For vehicle repairs or maintenance, be
sure to consult your Toyota dealer.
If your vehicle is beyond repair because
of accident or something, be sure to
consult your Toyota dealer.
As sealed Nickel−Metal hydride batteries
are used, be sure to consult your Toyota
dealer when disposing of your vehicle.

15
CAUTION
If you are involved in an accident,
follow these precautions.
D Move the vehicle to a safe place
and perform the followings to re-
duce the risk of high voltage elec-
tricity leakage.
D Depress the brake pedal and apply
the parking brake.
D Press the “P” position switch and
stop the hybrid system.
D If the key is inserted into key slot,
remove it.
D If your vehicle has experienced ma-
jor damage, you may get an electric
shock. To prevent this, never touch
the high voltage parts (hybrid ve-
hicle battery assembly, etc.) or
cables (orange color) connecting
these parts. If some exposed elec-
tric wires are protruding inside or
outside of the vehicle, an electric
shock may also occur. Never touch
them.
D If the fluid leaks or gets in some
part of the vehicle, never touch it
because it may be electrolyte
(strong alkali) from the hybrid ve-
hicle battery. If it gets on your skin
or eyes, wash off immediately with
a large amount of water, if possible,
with boric acid solution, and get
immediate medical attention in or-
der to help avoid serious injury.
D If a vehicle fire occurs, extinguish
it using a fire extinguisher for the
exclusive use on electric fires. As
a small amount of water may be
dangerous, use a large amount of
water, for example from a fire hy-
drant, or wait for a fire−fighting
team arrival.
D If your vehicle needs to be towed,
do it with the front wheels or all
four wheels raised. If the front
wheels are on the ground when
towing, the electric motor may con-
tinue to generate electricity which
could leak electricity. A fire could
occur depending on the degree of
damage. See “If your vehicle needs
to be towed” on page 254.

16

17
OPERATION OF INSTRUMENTS AND
CONTROLS
Keys and Doors
Keys 18. . . . . . . . . . . . . . . . . . . . . . . . . . . . . . . . . . . . . . . . . . . . . . . . . . . . . . .
Hybrid vehicle immobilizer system 20. . . . . . . . . . . . . . . . . . . . . . . . . . . . .
Smart entry and start system 23. . . . . . . . . . . . . . . . . . . . . . . . . . . . . . . . . .
Wireless remote control 33. . . . . . . . . . . . . . . . . . . . . . . . . . . . . . . . . . . . . .
Side doors 37. . . . . . . . . . . . . . . . . . . . . . . . . . . . . . . . . . . . . . . . . . . . . . . . .
Back door 39. . . . . . . . . . . . . . . . . . . . . . . . . . . . . . . . . . . . . . . . . . . . . . . . . . .
Power windows 40. . . . . . . . . . . . . . . . . . . . . . . . . . . . . . . . . . . . . . . . . . . . . .
Hood 43. . . . . . . . . . . . . . . . . . . . . . . . . . . . . . . . . . . . . . . . . . . . . . . . . . . . . . .
Theft deterrent system 44. . . . . . . . . . . . . . . . . . . . . . . . . . . . . . . . . . . . . . .
Fuel tank cap 46. . . . . . . . . . . . . . . . . . . . . . . . . . . . . . . . . . . . . . . . . . . . . . .
SECTION 2– 1

18
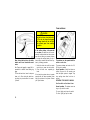
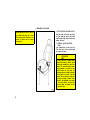
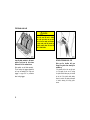
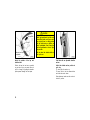
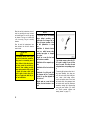
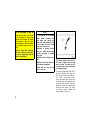
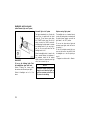
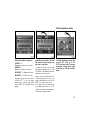
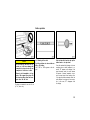
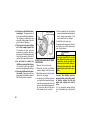
Keys—
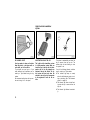
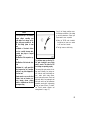
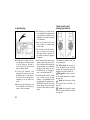
21p001a
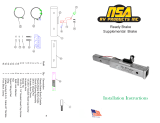
1. Master keys with silver ornament (Ve-
hicles equipped with smart entry and
start system)—These keys work in ev-
ery lock. Your Toyota dealer will need
one of them to make a new key with
a built−in transponder chip. Before you
use these keys, be sure to read “Smart
entry and start system” on page 23.
2. Master keys without silver ornament
(Vehicles not equipped with smart entry
and start system)—These keys work in
every lock. Your Toyota dealer will
need one of them to make a new key
with a built−in transponder chip.
3. Mechanical keys (attached to the mas-
ter key)—These key work for the driv-
er’s door only.
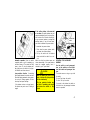
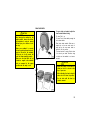
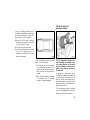
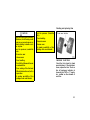
21P112
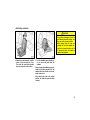
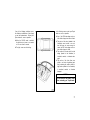
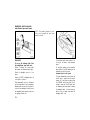
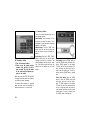
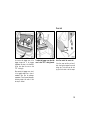
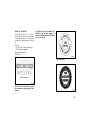
USING A MECHANICAL KEY
When you use the mechanical key in-
cluded on the side of the key, slide the
lock knob in the arrow direction and take
out the key as shown. To put the key
back, slide the lock knob in the arrow
direction and replace the key. Be sure to
put the key back when not in use.
Since the doors can be locked without a
key, you should always carry a spare
master key in case you accidentally lock
your keys inside the vehicle.
NOTICE
When using a key containing a trans-
ponder chip, observe the following
precautions:
z Do not affix any material that cuts
off electromagnetic waves (such as
a metal seal) on the key.
z Do not knock the key hard against
other objects.
z Do not leave the key exposed to
high temperatures for a long period,
such as on the dashboard or hood
under direct sunlight.
z Do not put the key in water or
wash it in an ultrasonic washer.
z Do not keep the key together with
the products emitting electromag-
netic waves such as a cellular
phone.

19
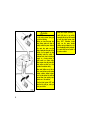
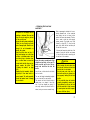
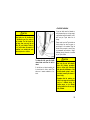
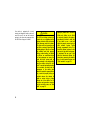
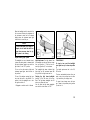
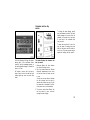
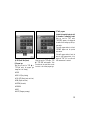
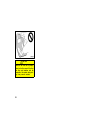
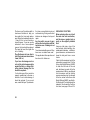
21p006a
Your vehicle keys and the key slot are
different shapes from conventional ones.
Keep the following in mind when operating
the key:
D When inserting the key, be sure to
push it in all the way.
D When pulling out the key, be careful
because it will be pushed out by the
spring and it might fly out.
D If the key cannot be pulled out, push
it in all the way again, then pull it out.
CAUTION
Do not put your finger into the key
slot. Your finger might be injured.
NOTICE
Observe the following instructions, or
the key mechanism might be damaged
and will not work properly.
z The key should be operated with a
clean hand and fingers.
z Do not insert the key forcibly.
z Do not insert any key other than
genuine formal keys into the key
slot.
z Do not pull out the key forcibly
when it cannot be removed.
z Do not put water, oil, foreign ob-
jects, etc. into the key slot.
z Do not insert a wet, oily or dam-
aged key into the key slot.
z Do not affix a sticker on the key.
z Do not insert the key in the wrong
way.
z Do not pull out the key ring when
removing the key out of the key
slot.
Should you find anything unusual,
contact your Toyota dealer as soon as
possible.
—Key slot

20
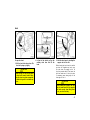
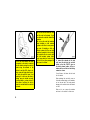
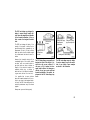
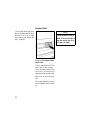
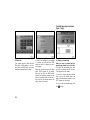
21p005a
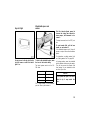
KEY NUMBER PLATE
Your key number is shown on the plate.
Keep the plate in a safe place such as
your wallet, not in the vehicle.
If you should lose your keys or if you
need additional keys, duplicates can be
made by a Toyota dealer using the key
number.
We recommend writing down the key num-
ber and storing it in a safe place.
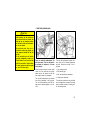
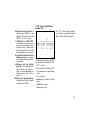
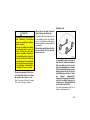
21p006a
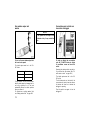
DEACTIVATION USING THE KEY
The hybrid vehicle immobilizer system
is a theft prevention system. When you
insert the key in the key slot, the trans-
ponder chip in the key transmits an
electronic code to the vehicle. The hy-
brid system will start only when the
electronic code in the chip corresponds
to the registered ID code for the ve-
hicle.
21p007b
The system is automatically set when the
key is removed from the key slot. The
indicator light will start flashing to show
the system is set.
If any of the following indicator conditions
occurs, contact your Toyota dealer.
D The indicator light stays on except
when the theft deterrent system is set-
ting or activating. (See “Theft deterrent
system” on page 44.)
D The indicator light does not start flash-
ing when the key is removed from the
key slot.
D The indicator light flashes inconsistent-
ly.
Hybrid vehicle immobilizer
system
Page is loading ...
Page is loading ...
Page is loading ...
Page is loading ...
Page is loading ...
Page is loading ...
Page is loading ...
Page is loading ...
Page is loading ...
Page is loading ...
Page is loading ...
Page is loading ...
Page is loading ...
Page is loading ...
Page is loading ...
Page is loading ...
Page is loading ...
Page is loading ...
Page is loading ...
Page is loading ...
Page is loading ...
Page is loading ...
Page is loading ...
Page is loading ...
Page is loading ...
Page is loading ...
Page is loading ...
Page is loading ...
Page is loading ...
Page is loading ...
Page is loading ...
Page is loading ...
Page is loading ...
Page is loading ...
Page is loading ...
Page is loading ...
Page is loading ...
Page is loading ...
Page is loading ...
Page is loading ...
Page is loading ...
Page is loading ...
Page is loading ...
Page is loading ...
Page is loading ...
Page is loading ...
Page is loading ...
Page is loading ...
Page is loading ...
Page is loading ...
Page is loading ...
Page is loading ...
Page is loading ...
Page is loading ...
Page is loading ...
Page is loading ...
Page is loading ...
Page is loading ...
Page is loading ...
Page is loading ...
Page is loading ...
Page is loading ...
Page is loading ...
Page is loading ...
Page is loading ...
Page is loading ...
Page is loading ...
Page is loading ...
Page is loading ...
Page is loading ...
Page is loading ...
Page is loading ...
Page is loading ...
Page is loading ...
Page is loading ...
Page is loading ...
Page is loading ...
Page is loading ...
Page is loading ...
Page is loading ...
Page is loading ...
Page is loading ...
Page is loading ...
Page is loading ...
Page is loading ...
Page is loading ...
Page is loading ...
Page is loading ...
Page is loading ...
Page is loading ...
Page is loading ...
Page is loading ...
Page is loading ...
Page is loading ...
Page is loading ...
Page is loading ...
Page is loading ...
Page is loading ...
Page is loading ...
Page is loading ...
Page is loading ...
Page is loading ...
Page is loading ...
Page is loading ...
Page is loading ...
Page is loading ...
Page is loading ...
Page is loading ...
Page is loading ...
Page is loading ...
Page is loading ...
Page is loading ...
Page is loading ...
Page is loading ...
Page is loading ...
Page is loading ...
Page is loading ...
Page is loading ...
Page is loading ...
Page is loading ...
Page is loading ...
Page is loading ...
Page is loading ...
Page is loading ...
Page is loading ...
Page is loading ...
Page is loading ...
Page is loading ...
Page is loading ...
Page is loading ...
Page is loading ...
Page is loading ...
Page is loading ...
Page is loading ...
Page is loading ...
Page is loading ...
Page is loading ...
Page is loading ...
Page is loading ...
Page is loading ...
Page is loading ...
Page is loading ...
Page is loading ...
Page is loading ...
Page is loading ...
Page is loading ...
Page is loading ...
Page is loading ...
Page is loading ...
Page is loading ...
Page is loading ...
Page is loading ...
Page is loading ...
Page is loading ...
Page is loading ...
Page is loading ...
Page is loading ...
Page is loading ...
Page is loading ...
Page is loading ...
Page is loading ...
Page is loading ...
Page is loading ...
Page is loading ...
Page is loading ...
Page is loading ...
Page is loading ...
Page is loading ...
Page is loading ...
Page is loading ...
Page is loading ...
Page is loading ...
Page is loading ...
Page is loading ...
Page is loading ...
Page is loading ...
Page is loading ...
Page is loading ...
Page is loading ...
Page is loading ...
Page is loading ...
Page is loading ...
Page is loading ...
Page is loading ...
Page is loading ...
Page is loading ...
Page is loading ...
Page is loading ...
Page is loading ...
Page is loading ...
Page is loading ...
Page is loading ...
Page is loading ...
Page is loading ...
Page is loading ...
Page is loading ...
Page is loading ...
Page is loading ...
Page is loading ...
Page is loading ...
Page is loading ...
Page is loading ...
Page is loading ...
Page is loading ...
Page is loading ...
Page is loading ...
Page is loading ...
Page is loading ...
Page is loading ...
Page is loading ...
Page is loading ...
Page is loading ...
Page is loading ...
Page is loading ...
Page is loading ...
Page is loading ...
Page is loading ...
Page is loading ...
Page is loading ...
Page is loading ...
Page is loading ...
Page is loading ...
Page is loading ...
Page is loading ...
Page is loading ...
Page is loading ...
Page is loading ...
Page is loading ...
Page is loading ...
Page is loading ...
Page is loading ...
Page is loading ...
Page is loading ...
Page is loading ...
Page is loading ...
Page is loading ...
Page is loading ...
Page is loading ...
Page is loading ...
Page is loading ...
Page is loading ...
Page is loading ...
Page is loading ...
Page is loading ...
Page is loading ...
Page is loading ...
Page is loading ...
Page is loading ...
Page is loading ...
Page is loading ...
Page is loading ...
Page is loading ...
Page is loading ...
Page is loading ...
Page is loading ...
Page is loading ...
Page is loading ...
Page is loading ...
Page is loading ...
Page is loading ...
Page is loading ...
Page is loading ...
Page is loading ...
Page is loading ...
Page is loading ...
Page is loading ...
Page is loading ...
Page is loading ...
Page is loading ...
Page is loading ...
Page is loading ...
Page is loading ...
Page is loading ...
Page is loading ...
Page is loading ...
Page is loading ...
Page is loading ...
Page is loading ...
Page is loading ...
Page is loading ...
Page is loading ...
Page is loading ...
Page is loading ...
Page is loading ...
Page is loading ...
Page is loading ...
Page is loading ...
Page is loading ...
Page is loading ...
Page is loading ...
Page is loading ...
Page is loading ...
Page is loading ...
Page is loading ...
Page is loading ...
Page is loading ...
Page is loading ...
Page is loading ...
Page is loading ...
Page is loading ...
Page is loading ...
Page is loading ...
Page is loading ...
Page is loading ...
Page is loading ...
Page is loading ...
Page is loading ...
Page is loading ...
Page is loading ...
Page is loading ...
Page is loading ...
Page is loading ...
Page is loading ...
-
 1
1
-
 2
2
-
 3
3
-
 4
4
-
 5
5
-
 6
6
-
 7
7
-
 8
8
-
 9
9
-
 10
10
-
 11
11
-
 12
12
-
 13
13
-
 14
14
-
 15
15
-
 16
16
-
 17
17
-
 18
18
-
 19
19
-
 20
20
-
 21
21
-
 22
22
-
 23
23
-
 24
24
-
 25
25
-
 26
26
-
 27
27
-
 28
28
-
 29
29
-
 30
30
-
 31
31
-
 32
32
-
 33
33
-
 34
34
-
 35
35
-
 36
36
-
 37
37
-
 38
38
-
 39
39
-
 40
40
-
 41
41
-
 42
42
-
 43
43
-
 44
44
-
 45
45
-
 46
46
-
 47
47
-
 48
48
-
 49
49
-
 50
50
-
 51
51
-
 52
52
-
 53
53
-
 54
54
-
 55
55
-
 56
56
-
 57
57
-
 58
58
-
 59
59
-
 60
60
-
 61
61
-
 62
62
-
 63
63
-
 64
64
-
 65
65
-
 66
66
-
 67
67
-
 68
68
-
 69
69
-
 70
70
-
 71
71
-
 72
72
-
 73
73
-
 74
74
-
 75
75
-
 76
76
-
 77
77
-
 78
78
-
 79
79
-
 80
80
-
 81
81
-
 82
82
-
 83
83
-
 84
84
-
 85
85
-
 86
86
-
 87
87
-
 88
88
-
 89
89
-
 90
90
-
 91
91
-
 92
92
-
 93
93
-
 94
94
-
 95
95
-
 96
96
-
 97
97
-
 98
98
-
 99
99
-
 100
100
-
 101
101
-
 102
102
-
 103
103
-
 104
104
-
 105
105
-
 106
106
-
 107
107
-
 108
108
-
 109
109
-
 110
110
-
 111
111
-
 112
112
-
 113
113
-
 114
114
-
 115
115
-
 116
116
-
 117
117
-
 118
118
-
 119
119
-
 120
120
-
 121
121
-
 122
122
-
 123
123
-
 124
124
-
 125
125
-
 126
126
-
 127
127
-
 128
128
-
 129
129
-
 130
130
-
 131
131
-
 132
132
-
 133
133
-
 134
134
-
 135
135
-
 136
136
-
 137
137
-
 138
138
-
 139
139
-
 140
140
-
 141
141
-
 142
142
-
 143
143
-
 144
144
-
 145
145
-
 146
146
-
 147
147
-
 148
148
-
 149
149
-
 150
150
-
 151
151
-
 152
152
-
 153
153
-
 154
154
-
 155
155
-
 156
156
-
 157
157
-
 158
158
-
 159
159
-
 160
160
-
 161
161
-
 162
162
-
 163
163
-
 164
164
-
 165
165
-
 166
166
-
 167
167
-
 168
168
-
 169
169
-
 170
170
-
 171
171
-
 172
172
-
 173
173
-
 174
174
-
 175
175
-
 176
176
-
 177
177
-
 178
178
-
 179
179
-
 180
180
-
 181
181
-
 182
182
-
 183
183
-
 184
184
-
 185
185
-
 186
186
-
 187
187
-
 188
188
-
 189
189
-
 190
190
-
 191
191
-
 192
192
-
 193
193
-
 194
194
-
 195
195
-
 196
196
-
 197
197
-
 198
198
-
 199
199
-
 200
200
-
 201
201
-
 202
202
-
 203
203
-
 204
204
-
 205
205
-
 206
206
-
 207
207
-
 208
208
-
 209
209
-
 210
210
-
 211
211
-
 212
212
-
 213
213
-
 214
214
-
 215
215
-
 216
216
-
 217
217
-
 218
218
-
 219
219
-
 220
220
-
 221
221
-
 222
222
-
 223
223
-
 224
224
-
 225
225
-
 226
226
-
 227
227
-
 228
228
-
 229
229
-
 230
230
-
 231
231
-
 232
232
-
 233
233
-
 234
234
-
 235
235
-
 236
236
-
 237
237
-
 238
238
-
 239
239
-
 240
240
-
 241
241
-
 242
242
-
 243
243
-
 244
244
-
 245
245
-
 246
246
-
 247
247
-
 248
248
-
 249
249
-
 250
250
-
 251
251
-
 252
252
-
 253
253
-
 254
254
-
 255
255
-
 256
256
-
 257
257
-
 258
258
-
 259
259
-
 260
260
-
 261
261
-
 262
262
-
 263
263
-
 264
264
-
 265
265
-
 266
266
-
 267
267
-
 268
268
-
 269
269
-
 270
270
-
 271
271
-
 272
272
-
 273
273
-
 274
274
-
 275
275
-
 276
276
-
 277
277
-
 278
278
-
 279
279
-
 280
280
-
 281
281
-
 282
282
-
 283
283
-
 284
284
-
 285
285
-
 286
286
-
 287
287
-
 288
288
-
 289
289
-
 290
290
-
 291
291
-
 292
292
-
 293
293
-
 294
294
-
 295
295
-
 296
296
-
 297
297
-
 298
298
-
 299
299
-
 300
300
-
 301
301
-
 302
302
-
 303
303
-
 304
304
-
 305
305
-
 306
306
-
 307
307
-
 308
308
-
 309
309
-
 310
310
-
 311
311
-
 312
312
-
 313
313
-
 314
314
-
 315
315
-
 316
316
-
 317
317
-
 318
318
-
 319
319
-
 320
320
-
 321
321
-
 322
322
-
 323
323
-
 324
324
-
 325
325
-
 326
326
-
 327
327
-
 328
328
-
 329
329
-
 330
330
-
 331
331
-
 332
332
-
 333
333


Toyota 2004 Prius Owner's manual
- Category
- Cars
- Type
- Owner's manual
Ask a question and I''ll find the answer in the document
Finding information in a document is now easier with AI
Related papers
-
Toyota 2005 Prius Owner's manual
-
-
Toyota 2007 Prius Owner's manual
-
-
-
-
-
Toyota Highlander HV Owner's manual
-
-
Other documents
-
BYD F3,F3-R Owner's manual
-
DK Digital PU-500 Owner's manual
-
SereneLife AZSLSFE14 User manual
-
-
Stalwart 65-EN-20 User manual
-
-
Nissan Rogue Hybrid User guide
-
United SFH-1179 Operating instructions
-
 Ergo Desktop ED-KH Operating instructions
-
 NSA RV Products RB-4000 Installation guide

