
Part 7
Checking battery condition—
—Precautions
161
DO-IT-YOURSELF
MAINTENANCE—
Chapter 7-3
Electrical components
Checking battery condition
Battery recharging precautions
Checking and replacing fuses
Adding washer fluid
Replacing light bulbs
BATTERY PRECAUTIONS
The battery produces flammable
and explosive hydrogen gas.
Do not cause a spark from the bat-
tery with tools.
Do not smoke or light a match near
the battery.
The electrolyte contains poisonous
and corrosive sulfuric acid.
Avoid contact with eyes, skin or
clothes.
Never ingest electrolyte.
Wear protective safety glasses
when working near the battery.
Keep children away from the bat-
tery.
EMERGENCY MEASURES
If electrolyte gets in your eyes,
flush your eyes with clean water
for at least 15 minutes and get im-
mediate medical attention. If pos-
sible, continue to apply water with
a sponge or cloth while en route to
the medical office.
If electrolyte gets on your skin,
thoroughly wash the contact area.
If you feel pain or burning, get
medical attention immediately.
CAUTION
!
If electrolyte gets on your clothes,
there is a possibility of its soaking
through to your skin, so immedi-
ately take off the exposed clothing
and follow the procedure above, if
necessary.
If you happen to swallow electro-
lyte, drink a large quantity of water
or milk. Follow with milk of mag-
nesia, beaten raw egg or vegetable
oil. Then go immediately for emer-
gency help.

162
Check the battery for corroded or
loose terminal connections, cracks, or
loose hold-down clamp.
a. If the battery is corroded, wash it off
with a solution of warm water and baking
soda. Coat the outside of the terminals
with grease to prevent further corrosion.
b. If the terminal connections are loose,
tighten their clamp nuts—but do not over-
tighten.
c. Tighten the hold-down clamp only
enough to keep the battery firmly in place.
Overtightening may damage the battery
case.
NOTICE
Be sure the engine and all acces-
sories are off before performing
maintenance.
When checking the battery, re-
move the ground cable from the
negative terminal (“-” mark) first
and reinstall it last.
Take care no solution gets into the
battery when washing it.
Be careful not to cause a short cir-
cuit with tools.
There are two types of batteries: main-
tenance type and non-maintenance
type.
A non-maintenance battery has “MAIN-
TENANCE FREE BATTERY” on its top. A
maintenance type battery does not have
such indication.
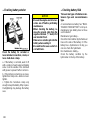
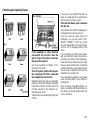
Maintenance type battery—
Check the fluid condition by the fluid level
lines on the side of the battery. Or if the
battery has a hydrometer on its top, you
can also check the hydrometer.
Non-maintenance battery—
Check the battery condition by the
hydrometer on the top of the battery.
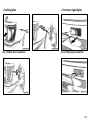
—Checking battery exterior —Checking battery fluid

163
CHECKING BY THE FLUID LEVEL
LINES (MAINTENANCE TYPE BAT-
TERY ONLY)
The fluid (electrolyte) level must be be-
tween the upper and lower lines.
When checking the fluid level, look at all
six cells, not just one or two.
If the level is lower than the lower line, add
distilled water. (See “ADDING DIS-
TILLED WATER”.)
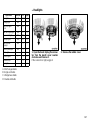
CHECKING BY THE HYDROMETER
Check the battery condition by the
hydrometer color.
Maintenance type battery
Hydrometer color
Condition
Type A Type B
Condition
GREEN BLUE Good
DARK WHITE
Charging necessary.
Have battery checked
by your Toyota dealer.
CLEAR or
LIGHT
YELLOW
RED Add distilled water*
*: See “ADDING DISTILLED WATER”.
Non-maintenance battery
Hydrometer color
Condition
Type A Type B
Condition
GREEN BLUE Good
DARK WHITE
Charging necessary.
Have battery checked
by your Toyota dealer.
CLEAR or
LIGHT
YELLOW
RED
Have battery checked
by your Toyota dealer.
NOTICE
Do not refill the battery with water.

164
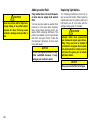
ADDING DISTILLED WATER (MAINTE-
NANCE TYPE BATTERY ONLY)
1. Remove the vent plugs.
2. Add distilled water to cells needing
fluid.
If the side of your battery is covered,
check the water level by looking down di-
rectly above the cell as illustrated above.
3. Retighten the vent plugs securely.
NOTICE
Do not overfill the cells. Excess
electrolyte could squirt out of the
battery during heavy charging,
causing corrosion or damage.
During recharging, the battery is pro-
ducing hydrogen gas.
Therefore, before recharging:
1. Maintenance type batteries—Remove
the vent plugs.
2. If recharging with the battery installed
on the vehicle, be sure to disconnect the
ground cable.
3. Be sure the power switch on the re-
charger is off when connecting the char-
ger cables to the battery and when dis-
connecting them.
Always charge the battery in an
unconfined area. Do not charge
the battery in a garage or closed
room where there is not sufficient
ventilation.
Non-maintenance batteries: Only
do a slow charge (5A or less).
Charging at a quicker rate is dan-
gerous. The battery may explode,
causing personal injuries.
Maintenance type batteries: Be
sure to remove the vent plugs be-
fore recharging.
CAUTION
!
NOTICE
Never recharge the battery while the
engine is running. Also, be sure all
accessories are turned off.
Battery recharging precautions

165
If the headlights or other electrical
components do not work, check the
fuses. If any of the fuses are blown,
they must be replaced.
See “Fuse locations” in Chapter 7-1 for
locations of the fuses.
Turn the ignition switch and inopera-
tive component off. Pull a suspected
fuse straight out and check it.
Determine which fuse may be causing the
problem. The lid of the fuse box shows the
name of the circuit for each fuse. See Part
8 of this manual for the functions con-
trolled by each circuit.
Type A fuses can be pulled out by the pull-
out tool.
If you are not sure whether the fuse has
blown, try replacing the suspected fuse
with one that you know is good.
If the fuse has blown, push a new fuse
into the clip.
Only install a fuse with the amperage rat-
ing designated on the fuse box lid.
If you do not have a spare fuse, in an
emergency you can pull out the “CIG”,
“RADIO”, “DOME” or “A/C” fuse, which
may be dispensable for normal driving,
and use it if its amperage rating is the
same.
If you cannot use one of the same amper-
age, use one that is lower, but as close as
possible to, the rating. If the amperage is
lower than that specified, the fuse might
blow out again but this does not indicate
anything wrong. Be sure to get the correct
fuse as soon as possible and return the
substitute to its original clip.
It is a good idea to purchase a set of spare
fuses and keep them in your vehicle for
emergencies.
If the new fuse immediately blows out,
there is a problem with the electrical sys-
tem. Have your Toyota dealer correct it as
soon as possible.
Checking and replacing fuses

166
Never use a fuse with a higher am-
perage rating, or any other object,
in place of a fuse. This may cause
extensive damage and possibly a
fire.
CAUTION
!
If any washer does not work, the wash-
er tank may be empty. Add washer
fluid.
You may use plain water as washer fluid.
However, in cold areas where tempera-
tures range below freezing point, use
washer fluid containing antifreeze. This
product is available at your Toyota dealer
and most auto parts stores. Follow the
manufacturer’s directions for how much
to mix with water.
NOTICE
Do not use engine antifreeze or any
other substitute because it may
damage your vehicle’s paint.
The following illustrations show how to
gain access to the bulbs. When replacing
a bulb make sure the ignition switch and
light switch are off. Use bulbs with the
wattage ratings given in the table.
Halogen bulbs have pressurized
gas inside and require special han-
dling. They can burst or shatter if
scratched or dropped. Hold a bulb
only by its plastic or metal case. Do
not touch the glass part of a bulb
with bare hands.
CAUTION
!
NOTICE
Only use a bulb of the listed type.
Adding washer fluid Replacing light bulbs—

167
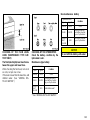
Light bulbs Bulb No. W Type
Headlights 9003 60/55 A
Parking lights 168 5 C
Front turn signal
lights
1156 27 B
Rear turn signal lights 1156 27 B
Stop and tail lights 1157 27/8 B
Back-up lights 1156 27 B
High mounted
stoplight
168 5 C
License plate lights 168 5 C
Interior light — 8 D
Personal lights — 5 D
Glovebox light — 5 C
Step lights — 5 C
A: HB2 halogen bulbs
B: Single end bulbs
C: Wedge base bulbs
D: Double end bulbs
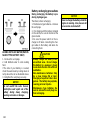
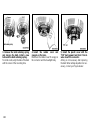
1. Open the hood. Unplug the connec-
tor. Turn the plastic cover counter-
clockwise and remove it.
If the connector is tight, wiggle it.
2. Remove the rubber cover.
—Headlights

168
3. Release the bulb retaining spring
and remove the bulb. Install a new
bulb and the bulb retaining spring.
To install a bulb, align the tabs of the bulb
with the cutout of the mounting hole.
4. Install the rubber cover and
snuggle on the boss.
Make sure the rubber cover fits snugly on
the connector and the headlight body.
5, Install the plastic cover with the
“ON” mark upward and turn it clock-
wise. Insert the connector.
Aiming is not necessary after replacing
the bulb. When aiming adjustment is nec-
essary, contact your Toyota dealer.

169
Use a Phillips-head screwdriver. Use a Phillips-head screwdriver.
—Parking lights —Front turn signal lights

170
Use a Phillips-head screwdriver. a: Rear turn signal light
b: Stop and tail light
c: Back- up light
Use a Phillips-head screwdriver.
—Rear turn signal, stop and
tail and back-up lights
—High mounted stoplight

171
—License plate lights

172
-
 1
1
-
 2
2
-
 3
3
-
 4
4
-
 5
5
-
 6
6
-
 7
7
-
 8
8
-
 9
9
-
 10
10
-
 11
11
-
 12
12


