
1
GB
www.whirlpool.eu
For model MWP 338 and MWP 339
Gebrauchsanweisung
Instrucciones para el uso

2
GB
16
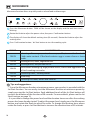
INSTALLATION
Installation
SAFETY
Important safety instructions
Trouble shooting guide
Precautions
ACCESSORIES AND MAINTENANCE
Accessories
Maintenance & Cleaning
CONTROL PANEL
Control Panel description
Display description
GENERAL USE
Stand-By mode
Start Protection / Child Lock
Pause or Stop cooking
Add / Stir / Turn food
Stop Turntable
Clock
COOKING FUNCTIONS
Jet Start
Microwave
Grill
Forced Air
Dual Crisp
Jet Defrost
6th Sense Jet Reheat
Combi ( Microwave + Grill )
Combi (Microwave + Forced Air )
Keep Warm
6th Sense Dual Steam
Dual Crisp Fry
Chef Menu
6th Sense Chef Menu
Auto Clean
Special Menu
ENVIRONMENTAL HINTS
Environmental Hints
Technical Specication
12
13
14
15
26
28
32
34
46
47
49
50
23
24
25
27
40
INDEX

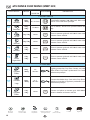
3
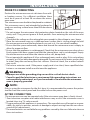
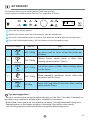
GB
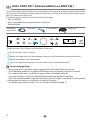
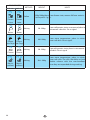
mm058
30cm
Not against the wall
Position the microwave oven at a distance from oth-
er heating sources. For sucient ventilation there
must be a space of at least 30 cm above the micro-
wave oven.
The microwave oven should not be placed in a cabinet.
This microwave oven is not intended to be placed or
used on a working surface lower than 850 mm above
the floor.
PRIOR TO CONNECTING
* Do not remove the microwave inlet protection plates located on the side of the oven
cavity wall. They prevent grease & food particles from entering the microwave inlet
channels.
* Check that the voltage on the rating plate corresponds to the voltage in your home.
* Place the microwave oven on a stable and even surface that is strong enough to hold
the microwave oven and the food utensils you put in it. Use care when handling.
* Ensure that the space underneath, above and around the microwave oven is empty to
allow for proper airflow.
* Ensure that the appliance is not damaged. Check that the microwave oven door closes
firmly against the door support and that the internal door seal is not damaged. Empty
the microwave oven and clean the interior with a soft, damp cloth.
* Do not operate this appliance if it has a damaged mains cord or plug, if it is not working
properly, or if it has been damaged or dropped. Do not immerse the mains cord or plug
in water. Keep the cord away from hot surfaces. Electrical shock, fire or other hazards
may result.
* Do not use extension cord: If the power supply cord is too short, have a qualified elec-
trician or serviceman install an outlet near the appliance.
* Improper use of the grounding plug can result in a risk of electric shock.
* Consult a qualified electrician or serviceman if the grounding instructions are
not completely understood, or if you have doubt as to whether the microwave
oven is properly grounded.
Prior to using the microwave for the rst time, it is recommended to remove the protec-
tive lm from the control panel and the cable tie from the power cord.
WARNING:
NOTE:
AFTER CONNECTING
The microwave oven can be operated only if the microwave oven door is rmly closed.
* Poor television reception and radio interference may result if the microwave oven is
located close to a TV, radio or aerial.
* The grounding of this appliance is compulsory. The manufacturer will accept no respon-
sibility for injury to persons, animals or damage to objects arising from the non-obser-
vance of this requirement.
* The manufacturers are not liable for any problems caused by the users failure to observe
these instructions.
INSTALLATION

4
GB
SAFETY
IMPORTANT SAFETY INSTRUCTIONS
Read Carefully And Keep For Future Reference
* If material inside / outside the microwave oven should ignite or smoke is emitted,
keep microwave oven door closed and turn the microwave oven off. Disconnect
the power or shut off power at the fuse or circuit breaker panel.
* Do not leave the microwave oven unattended, especially when using paper, plas-
tic or other combustible materials in the cooking process. Paper can char or burn
and some plastics can melt if used when heating foods.
* The appliance and its accessible parts become hot during use. Care should be
taken to avoid touching heating elments inside the microwave oven.
* Accessible parts may become hot during use. Children less than 8 years of age
shall be kept away unless continuously supervised.
* The microwave oven is intended for heating food and beverages. Drying of food
or clothing and heating of warming pads, slippers, sponges, damp cloth and sim-
ilar may lead to risk of injury, ignition or fire.
* This appliance can be used by children aged from 8 years and above and persons
with reduced physical, sensory or mental capabilities or lack of experience and
knowledge if they have been given supervision or instruction concerning use of
the appliance in a safe way and understand the hazards involved.
* Cleaning and user maintenance shall not be made by children unless they are
aged from 8 years and above and supervised. Children should be supervised to
ensure that they do not play with the appliance. Keep the appliance and its cord
out of reach of children less than 8 years.
* Do not use your microwave oven for cooking or reheating whole eggs with or
without shell since they may explode even after microwave heating has ended.
WARNING:
WARNING:
* If the door or door seals are damaged, the oven must not be operated until it has
been repaired by a competent person.
WARNING:
* It is hazardous for anyone other than a competent person to carry out any service
or repair operation that involves the removal of a cover which gives protection
against exposure to microwave energy.
WARNING:
* Liquids and other foods must not be heated in sealed containers since they are
liable to explode.
WARNING:
* When the appliance is operated in the combination mode, children should only
use the oven under adult supervision due to the temperatures generated.

5
GB
NOTE:
The appliances are not intended to be operated by means of an external timer or
separate remote-control system.
* Do not leave the microwave oven unattended if you are using a lot of fat or oil since they
can overheat and cause a fire!
* Do not heat, or use flammable materials in or near the microwave oven. Fumes can cre-
ate a fire hazard or explosion.
* Do not use your microwave oven for drying textiles, paper, spices, herbs, wood, flowers
or other combustible materials. Fire could result.
* Do not use corrosive chemicals or vapors in this appliance. This type of microwave oven
is specifically designed to heat or cook food. It is not designed for industrial or labora-
tory use.
* Do not hang or place heavy items on the door as this can damage the microwave oven
opening and hinges. The door handle should not be used for hanging things on.
TROUBLE SHOOTING GUIDE
If the microwave oven does not work, do not make a service call until you have
made the following checks:
* The Turntable and Turntable Support is in place.
* The Plug is properly inserted in the wall socket.
* The Door is properly closed.
* Check your Fuses and ensure that there is power available.
* Check that the microwave oven has ample ventilation.
* Wait for 10 minutes, then try to operate the microwave oven once more.
* Open and then close the door before you try again.
This is to avoid unnecessary calls for which you will be charged.
When calling for Service, please give the serial number and type number of the micro-
wave oven (see Service label).
Consult your warranty booklet for further advice.
If the mains cord needs replacing it should be replaced by the original mains cord, which is
available via our service organization. The mains cord must only be replaced by a trained
service technician.
NOTE:
WARNING:
* Do not remove any cover.
* Service only to be carried out by a trained service technician. It is hazardous for
WARNING:
* Do not use your microwave oven for heating anything in airtight sealed contain-
ers. The pressure increases and may cause damage when opening or may explode.
WARNING:
* The door seals and the door seal areas must be regularly inspected for damage. If
these areas are damaged the appliance should not be operated until it has been
repaired by a trained service technician.

6
GB
PRECAUTIONS
GENERAL
This appliance is intended to be used in household and similar applications such as:
* Staff kitchen areas in shops, offices and other working environments;
* Farm houses;
* By clients in hotels, motels and other residential environments;
* Bed and breakfast type environments.
No other use is permitted(e.g.heating rooms).
* The appliance should not be operated without food in the microwave oven when using
microwaves. Operation in this manner is likely to damage the appliance.
* The ventilation openings on the microwave oven must not be covered. Blocking the air
intake or exhaust vents may cause damage to the microwave oven and poor cooking
results.
* If you practice operating the microwave oven, put a glass of water inside. The water will
absorb the microwave energy and the microwave oven will not be damaged.
* Do not store or use this appliance outdoors.
* Do not use this product near a kitchen sink, in a wet basement, or near a swimming
pool, or similar.
* Do not use the cavity for any storage purposes.
* Remove wire twist-ties from paper or plastic bags before placing bag in the microwave
oven.
* Do not use your microwave oven for deep-frying, because the oil temperature cannot
be controlled.
* Use hot pads or microwave oven mitts to prevent burns, when touching containers,
microwave oven parts, and pan after cooking.
LIQUIDS
• e.g. beverages or water. Overheating the liquid beyond boiling point can occur
without evidence of bubbling. This could result in a sudden boil over of the hot
Liquid.
To prevent this possibility the following steps should be taken:
* Avoid using straight-sided, containers with narrow necks.
* Stir the liquid before placing the container in the microwave oven.
* After heating, allow standing for a short time, stirring again before carefully removing
the container from the microwave oven.
After heating baby food or liquids in a baby bottle or in a baby food jar, always stir
and check the temperature before serving. This will ensure that the heat is evenly
distributed and the risk of scalding or burns can be avoided.
Ensure the Lid and the Teat is removed before heating!
CAREFUL
NOTE:
anyone other than a trained person to carry out any service or repair operation,
Which involves the removal of any cover, which gives protection against expo-
sure to microwave energy.

7
GB
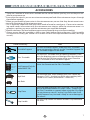
ACCESSORIES AND MAINTENANCE
ACCESSORIES
* There are a number of accessories available on the market. Before you buy, ensure they are suit-
able for microwave use.
* Ensure that the utensils you use are microwave oven proof and allow microwaves to pass through
them before cooking.
* When you put food and accessories in the microwave oven, ensure that they do not come in con-
tact with the interior of the microwave oven.
* This is especially important with accessories made of metal or metal parts. If accessories contain-
ing metal comes into contact with the microwave oven interior, while the microwave oven is in
operation, sparking can occur and the microwave oven could be damaged.
* Metallic containers for food and beverage are not allowed during microwave cooking.
* Always ensure that the turntable is able to turn freely before starting the oven. If the turntable
isn’t able to turn freely you should use a smaller vessel or the Stop turntable function (see Large
vessels).
Food Accessory Hint
Turntable Support
Use the Turntable Support under the Glass Turntable.
Never put any other utensils on the Turntable Support. Fit
the Turntable Support in the oven.
Glass Turntable
Use the Glass Turntable with all cooking methods. It col-
lects the dripping juices and food particles that otherwise
would stain and soil the interior of the oven. Place the
Glass Turntable on the Turntable Support.
Lid
Middle Container
Bottom
Upper Gr id
Lower Grid
Dual Steamer(Only for
model MWP 339)
Dual steam cook food with sensor controlling. Always
place the Steamer on the Glass Turntable.
High Rack
Low Rack
Use the High Rack when cooking with Grill Combi (Mi-
crowave + Grill ) . Use the Low Rack when cooking with
Forced Air or Combi ( Microwave + Forced Air ).
Crisp Plate
Place the food directly on the Crisp Plate. The Crisp Plate
may be preheated before use (max. 3 min.). Always use
the Glass Turntable as support when using the Crisp Plate.
Do not place any utensils on the Crisp Plate since it will
quickly become very hot and is likely to cause damage to
the utensil.
Crisp Handle
Use the Crisp Handle to remove the hot Crisp Plate from
the oven.

8
GB
* Failure to maintain the microwave oven in a clean condition could lead to deterioration
of the surface that could adversely affect the life of the appliance and possibly result in
a hazardous situation.
* Do not use metal scouring pads, abrasive cleansers, steel-wool pads, gritty washcloths,
etc. which can damage the control panel, and the interior and exterior microwave oven
surfaces. Use a cloth with a mild detergent or a paper towel with spray glass cleaner.
Apply spray glass cleaner to a paper towel.
* At regular intervals, especially if spill overs have occurred, remove the turntable, the
Turntable Support and wipe the base of the oven clean.
* Use a soft and damp cloth with mild detergent to clean the interior surfaces, front and
rear of the door and the door opening.
* Do not use steam cleaning appliances when cleaning your microwave oven.
* The oven should be cleaned regularly and any food deposits removed.
* Cleaning is the only maintenance normally required. It must be carried out with the
microwave oven disconnected.
* Do not spray directly on the microwave oven.
* This oven is designed to operate with the turntable in place.
* Do not operate the microwave oven when the turntable has been removed for cleaning.
* Do not allow grease or food particles to build up around the door. For stubborn stains,
boil a cup of water in the oven for 2 or 3 minutes. Steam will soften the marks.
* Adding some lemon juice to a cup of water, placing this on the turntable and boiling for
a few minutes can eliminate odors inside the oven.
* The Grill element does not need cleaning since the intense heat will burn off any splash-
es, but the ceiling beneath it may need regular cleaning. This should be done with a soft
and damp cloth with mild detergent.
* If the Grill is not used regularly, it should be run for 10 minutes a month to burn off any
splashes, in order to reduce the risk of fire.
MAINTENANCE & CLEANING
CAREFUL CLEANING:
* The Crisp Plate should be cleaned in mild, detergent water. Heavily soiled areas can be
cleaned with a scouring cloth and a mild cleanser.
* Always let the Crisp Plate cool off before cleaning.
* Do not immerse or rinse with water while the Crisp Plate is hot. Quick cooling may dam-
age it.
* Do not use steel-wool pads. This will scratch the surface.
DISHWASHER SAFE:
.
Turntable Support
.
Wire Rack
.
Crisp Handle
.
Glass Turntable
.
Steam Accessory
NOTE:
* It might happen that some evaporation/condensation occurs during cooking cycles.
This is not impacting cooking results, since does not depend on quality/craftsmanship
issues.

9
GB
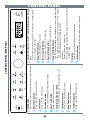
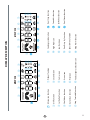
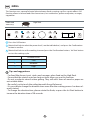
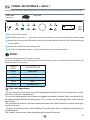
CONTROL PANEL
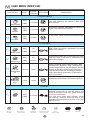
CONTROL PANEL (MWP 338)
Stop button
Press to stop or reset any of the microwave oven functions.
Microwave button
Use to select the Microwave function.
Grill button
Use to select the Grill function.
Forced Air button
Use to select Forced Air (with preheat) function.
Dual Crisp button
Use to select Dual Crisp function.
Confirmation button/ Knob
Use to Conrm the selection / Use to adjust the value.
Chef Menu button
Use to access the automatic recipes.
Auto Clean button
Use to select Auto Clean function.
Jet Defrost button
Use to select Auto Defrost function.
Combi ( Microwave + Grill ) / Combi ( Microwave + Forced
Air )
Use to select Combi ( Microwave + Grill ) function or Combi ( Micro-
wave + Forced Air ) function.
Keep Warm button
Use to select Keep Warm function.
Dual Crisp Fry button
Use to select the Dual Crisp Fry function.
Special Menu button
Use to access the convenient special functions.
Stop Turntable button
* Use this function when you needed to use very large vessels
that could not turn freely in the microwave oven. It works
only with the following cooking functions:
•ForcedAir
•Combi(Microwave+ForcedAir)
* Press and hold this button for 3 seconds to access the clock
setting mode.
Display
The display will show the operation information.
Jet Start button
Use to select Microwave function with Max. power rapidly.
1
2
3
4
5
6
7
8
9
10
11
13
14
15
16
12

10
GB
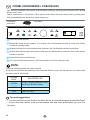
CONTROL PANEL (MWP 339)
Stop button
Press to stop or reset any of the microwave oven functions.
Microwave button
Use to select the Microwave function.
Grill button
Use to select the Grill function.
Forced Air button
Use to select Forced Air (with preheat) function.
Dual Crisp button
Use to select Dual Crisp function and Auto Crisp Fry function.
Confirmation button/ Knob
Use to Conrm the selection / Use to adjust the value.
Chef Menu button
Use to access the automatic recipes.
Auto Clean button
Use to select Auto Clean function.
Jet Reheat button
Use to select Sensor Reheat function.
Jet Defrost button
Use to select Auto Defrost function.
Combi ( Microwave + Grill ) / Combi ( Microwave + Forced Air )
Use to select Combi ( Microwave + Grill ) function or Combi ( Micro-
wave + Forced Air ) function.
Dual Steam button
Use to select the Dual Steam function.
Special Menu button
Use to access the convenient special functions.
Stop Turntable button
* Use this function when you needed to use very large vessels that
could not turn freely in the microwave oven. It works only with
the following cooking functions:
•ForcedAir
•Combi(Microwave+ForcedAir)
* Press and hold this button for 3 seconds to access the clock set-
ting mode.
Display
The display will show the operation information.
Jet Start button
Use to select Microwave function with Max. power rapidly.
1
2
3
4
5
6
7
8
9
10
11
12
13
14
15
16

11
GB
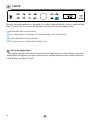
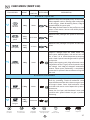
DISPLAY DESCRIPTION
MWP 338
MWP 339
Preheat function
Seconds icon
Celsius icon
Grams icon
Watt icon
Food category selection icon
Microwave function
Grill function
Jet Defrost function
Chef Menu function
Auto Clean function
Stop Turntable function
High Rack icon
Low Rack icon
Dual Crisp Fry function
Special Menu function
Cooking cycle duration
Keep Warm function
Dual Crisp function
Forced Air function
Jet Reheat function
Dual Steam function

12
GB
i
* If the user does not interact with the product for 15 minutes, the microwave oven enters
Stand-by mode. Press any button to exit.
START PROTECTION / CHILD LOCK
PAUSE OR STOP COOKING
STANDBY MODE
* This automatic safety function is activated one minute after the oven has returned to
“stand-by mode”.
* When the safety function is active the door must opened and closed in order to start
the cooking, otherwise the display will show:
To pause cooking:
• The cooking can be paused to check, add or turn or stir the food by opening the door.
The setting will be maintained for 5 minutes.
To continue cooking:
• Close the door and press the Jet Start button. The cooking is resumed from where it was
paused.
If you don’t want to continue cooking you can:
• Remove the food, close the door and press the Stop button.
When the cooking is finished:
• A beep will signal once a minute for 10 minutes when the cooking is finished , this is nor-
mal behaviour intended for cooling the product.
• Depending on the product, any or all of the following may continue during this cooling
cycle: fan, internal lamp, turntable rotation. If desired, simply press the STOP button or
open the door to cancel the signal and stop the cooling time.
• Please note that reducing or stopping this programmed cooling cycle will not have a neg-
ative impact on the functioning of the product.
i
ADD / STIR / TURN FOOD
• Depending on the selected function, it could be needed to add / stir / turn food dur-
ing cooking. In these cases the oven will pause cooking and it will ask you to perform the
needed action.
• When required, you should:
* Open the door.
* Add or Stir or Turn the food (depending on the required action).
* Close the door and restart by pressing Jet Start button.
• Notes: if the door is not opened within 2 minutes from the request to Stir or Turn the
food, the microwave oven will continue the cooking process (in this case the nal result
may not be the optimal one).
• If the door is not opened within 2 minutes since the request to Add some food, the oven
will go in Stand-by.

13
GB
STOP TURNTABLE
• To get the best possible results, the Glass Turntable has to rotate while cooking.
• Anyhow, in case you need to use very large vessels that could not turn freely in the oven,
it is possible to stop the rotation of the Glass Turntable using the Stop Turntable function.
• This function works only with the following cooking functions:
* Forced Air
* Combi ( Microwave + Forced Air )

14
GB
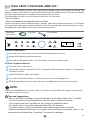
CLOCK
The rst time the appliance is plugged in (or after a power failure), or press and hold the
Stop TT button for 3 seconds, the product will enter the clock setting mode.
Rotate the Knob to set the hours.
Press the Jet Start / OK button. The minute numbers will start blinking.
Rotate the Knob to set the minutes.
Press the Jet Start / OK button. The clock is set.
1
2
3
4
• During the setting of the clock, if you press the Stop button or if the setting is not com-
pleted after a long time, the oven will exit from setting mode and the setting will be in-
valid, display will show “12:00”.
Tips and suggestions:

15
GB
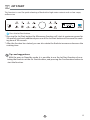
JET START
This function is used for quick reheating of food with a high water content such as clear soups,
coee or tea.
Press the Jet Start button.
* Pressing the Jet Start button the Microwave function will start at maximum power for
30 seconds, and each additional pressure of the Jet Start button will increase the cook-
ing time of 30 seconds.
* After the function has started, you can also rotate the Knob to increase or decrease the
cooking time.
• With the oven in Stand-by mode, it is possible to use the Jet Start function also ro-
tating the Knob to set the Jet Start duration, and pressing the Confirmation button to
start the function.
Tips and suggestions:
1

16
GB
MICROWAVE
Microwave function allows to quickly cook or reheat food and beverages.
Press the Microwave button. 750W will be shown on the display and the watt icon starts
blinking.
Rotate the Knob to adjust the power value, then press Conrmation button.
The display will show the default cooking time (30 seconds). Rotate the Knob to adjust the
cooking time.
Press Confirmation button / Jet Start button to start the cooking cycle.
1
2
3
4
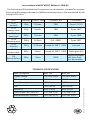
POWER SUGGESTED USE
900 W
Reheating of beverages, water, clear soups, coee, tea or other food with
a high water content. If the food contains egg or cream choose a lower
power.
750 W Cooking of fish, meat, vegetables etc.
650 W Cooking dishes, not possible to stir.
500 W
More careful cooking e.g. high protein sauces, cheese and egg dishes and
to finish cooking casseroles.
350 W Simmering stews, melting butter.
160 W Defrosting.
90 W Softening ice cream, butter and cheeses.
• To use the Microwave function at maximum power, your product is provided with the
Jet Start function. You can easily start the Microwave function at maximum power by
simply pressing the Jet Start button. Each additional touch of the Jet Start button will
increase the duration of the function of 30 seconds. For more details, please see the Jet
Start function on page 15.
• It is possible to change the power level and the duration time even after the cooking
process has been already started. To adjust the power level, simply press the Microwave
button, and rotate the Knob to adjust the value. To change the duration time, please
rotate the knob, or press Jet Start button to increase the duration time of 30 seconds.
Tips and suggestions:

17
GB
GRILL
This function uses a powerful metal tube to brown foods, creating a grill or a gratin eect. Grill
function allows to brown foods like cheese toast, hot sandwiches, potato croquettes, sausages,
vegetables.
Dedicated
accessory:
High Rack
Press the Grill button.
Rotate the Knob to select the power level ( see the table below ) and press the Conrmation
button to conrm.
Rotate the Knob to set the cooking time and press the Conrmation button / Jet Statr button
to start the cooking cycle.
1
2
3
POWER LEVEL
•1
Low
•2
Medium
•3
High
• For food like cheese, toast, steaks and sausages, place food on the High Rack.
• Ensure that the utensils used are heat resistant when you use this function.
• Do not use plastic utensils when grilling. They will melt. Items of wood or paper are
not suitable either.
• Be careful, not to touch the ceiling beneath the grill element.
• It is possible to change the duration time even after the cooking process has been al-
ready started.
• To change the duration time, please rotate the Knob, or press the Jet Start button to
increase the duration time of 30 seconds.
Tips and suggestions:

18
GB
FORCED AIR
• Use the Low Rack to put food on to allow the air to circulate properly around the food.
• Ensure that the utensils used are oven proof when you use this function.
• You can use the Crisp Plate as a Baking Plate when you bake small items like cookies
and muffins. Place the plate on the Low Rack.
Tips and suggestions:
This function allows you to obtain oven-baked dishes. Using a powerful heat element and fan, the
cooking cycle is just like that of a traditional oven. Use this function to cook meringues, pastry,
cakes, soués, poultry and roast meats.
The cooking process will be preceded by a preheating phase of the oven in order to achieve the
best possible cooking results.
Dedicated
accessories:
Low Rack
Press the Forced Air button.
Rotate the Knob to set the preheat temperature, press the Conrmation button to conrm.
Before the temperature has been reached, the preheat temperature can be adjusted between
40 to 200℃ by pressing the FC button and rotating the Knob.
When the temperature has been reached, a beep will signal and ask to add food for next
cooking cycle.
After adding the food, rotate the Knob to set the time.
Press the Conrmation button/ Jet Start button to start the cooking cycle. .
Once the cooking process has been started:
* To increase or decrease the cooking time: Rotate the Knob, or press Jet Start button to
increase the cooking time of 30 seconds.
NOTE:
1
2
3
4

19
GB
• Ensure that the Crisp Plate is correctly placed in the middle of the Glass Turntable.
• The oven and the Crisp Plate become very hot when using this function.
• Do not place the hot Crisp Plate on any surface susceptible to heat.
• Be careful, not to touch the ceiling beneath the Grill element.
• Use oven mittens or the Crisp Handle when removing the hot Crisp Plate.
• Before cooking food that does not require a long cooking time (pizza, cakes...), we
recommend to preheat the Crisp plate 2-3 minutes in advance.
Tips and suggestions:
DUAL CRISP FOR MODEL MWP 338
This exclusive Whirlpool function allows for perfectly golden brown results both on the top and
bottom surfaces of the food. Using both Microwave and Grill cooking, the Crisp Plate will rapidly
reach the right temperature and begin to brown and crisp the food.
The following accessories must be used with the Dual Crisp function:
* the Crisp Plate
* the Crisp Handle to manage the hot Crisp Plate
Use this function to reheat and cook pizzas, quiches, and other dough based food. It is also good
for frying bacon and eggs, sausages, potatoes, french fries, hamburgers and other meats etc. with-
out adding oil (or by adding only a very limited quantity of oil).
Dedicated
accessories:
Crisp Plate Crisp Handle
Press the Dual Crisp button, press the Conrmation button to conrm.
Rotate the Knob to set the cooking time.
Press the Conrmation button / Jet start button to start the cooking cycle.
1
2
3
Please use the dedicated Crisp Plate. Other Crisp Plates on the market will not give the correct re-
sult when using this function.
NOTE:
For Dual Crisp function:
Press the Dual Crisp button.
Rotate the Knob to select P2 for Dual Crisp Bread Defrost function and press Conrmation
button to conrm.
Rotate the Knob to adjust the weight.
Press the Conrmation button / Jet Start button to start the cooking cycle.
When preheating is done the oven will ask you to add food, turn when oven prompts.
1
2
3
For Dual Crisp Bread Defrost:
4
5

20
GB
DUAL CRISP FOR MODEL MWP 339
This exclusive Whirlpool function allows for perfectly golden brown results both on the top and
bottom surfaces of the food. Using both Microwave and Grill cooking, the Crisp Plate will rapidly
reach the right temperature and begin to brown and crisp the food.
The following accessories must be used with the Dual Crisp function:
* the Crisp Plate
* the Crisp Handle to manage the hot Crisp Plate
* the High Rack (When cook with the Dual Crisp Fry function
Use this function to reheat and cook pizzas, quiches, and other dough based food. It is also good
for frying bacon and eggs, sausages, potatoes, french fries, hamburgers and other meats etc. with-
out adding oil (or by adding only a very limited quantity of oil).
Dedicated
accessories:
Crisp Plate Crisp Handle
Press the Dual Crisp button, press the Conrmation button to conrm.
Rotate the Knob to set the cooking time.
Press the Conrmation button / Jet start button to start the cooking cycle.
1
2
3
Please use the dedicated Crisp Plate. Other Crisp Plates on the market will not give the correct re-
sult when using this function.
NOTE:
For Dual Crisp function:
Press the Dual Crisp button.
Rotate the Knob to select P2 for Dual Crisp Bread Defrost function and press Conrmation
button to conrm.
Rotate the Knob to adjust the weight.
Press the Conrmation button / Jet Start button to start the cooking cycle.
When preheating is done the oven will ask you to add food, turn when oven prompts.
1
2
3
For Dual Crisp Bread Defrost:
4
5
High Rack(Only
available on Dual
Crisp Fry recipe)
Press the Dual Crisp button.
Rotate the Knob to select the Dual Crisp Fry recipes(P3-P9), and press the Conrmation but-
ton to conrm.
Rotate the Knob to adjust the weight.
Press the Conrmation button / Jet Start button to start the cooking cycle.
1
2
3
For Dual Crisp Fry:
4
Page is loading ...
Page is loading ...
Page is loading ...
Page is loading ...
Page is loading ...
Page is loading ...
Page is loading ...
Page is loading ...
Page is loading ...
Page is loading ...
Page is loading ...
Page is loading ...
Page is loading ...
Page is loading ...
Page is loading ...
Page is loading ...
Page is loading ...
Page is loading ...
Page is loading ...
Page is loading ...
Page is loading ...
Page is loading ...
Page is loading ...
Page is loading ...
Page is loading ...
Page is loading ...
Page is loading ...
Page is loading ...
Page is loading ...
Page is loading ...
-
 1
1
-
 2
2
-
 3
3
-
 4
4
-
 5
5
-
 6
6
-
 7
7
-
 8
8
-
 9
9
-
 10
10
-
 11
11
-
 12
12
-
 13
13
-
 14
14
-
 15
15
-
 16
16
-
 17
17
-
 18
18
-
 19
19
-
 20
20
-
 21
21
-
 22
22
-
 23
23
-
 24
24
-
 25
25
-
 26
26
-
 27
27
-
 28
28
-
 29
29
-
 30
30
-
 31
31
-
 32
32
-
 33
33
-
 34
34
-
 35
35
-
 36
36
-
 37
37
-
 38
38
-
 39
39
-
 40
40
-
 41
41
-
 42
42
-
 43
43
-
 44
44
-
 45
45
-
 46
46
-
 47
47
-
 48
48
-
 49
49
-
 50
50


Ask a question and I''ll find the answer in the document
Finding information in a document is now easier with AI
Related papers
-
Whirlpool MWP 3391 SB User guide
-
-
Whirlpool MWP 337 B User guide
-
-
KitchenAid KMCM 3800 User guide
-
Whirlpool JT 369 WH User guide
-
Whirlpool JT359 REAL INOX User manual
-
Whirlpool GT 286 WH Owner's manual
-
-
Whirlpool WMF201G User guide
Other documents
-
Indesit MWI120SX Owner's manual
-
Hotpoint MWH 33343 B UK User guide
-
IKEA MWN 400 S User guide
-
-
HOTPOINT/ARISTON MF20G IX H User guide
-
Franke FMY 45 MW XS BR SA Daily Reference Guide
-
Franke FMY 45 MW XS Daily Reference Guide
-
-
-