Philips AZ1836B User manual

Category
Home audio sets
Type
User manual

Philips AZ1836B allows you to listen to your favorite music from discs, USB, or radio. Enjoy MP3-CD or WMA playback, copy files to an external USB device, program up to 20 tracks, and select various play modes like repeat or shuffle.

Philips AZ1836B allows you to listen to your favorite music from discs, USB, or radio. Enjoy MP3-CD or WMA playback, copy files to an external USB device, program up to 20 tracks, and select various play modes like repeat or shuffle.

AZ1836
AZ1836
MP3-CD Soundmachine
B
User Manual
Manual del usario
Manual do usuário
Printed in China JH-0633
W
CLASS 1
LASER PRODUCT
AZ1836
AZ1836B
Meet Philips at the Internet
http://www.philips.com
ifu_az1836_latam_eng 2006.8.23 11:38 AM Page 1
MODE
ALBUM
PROG
CD USB
DEL REC
1
3
5
9
2
4
7
6
8
0
6 x R14 • UM-2 • C-CELLS
9
0
!
@
$
%
1
2
6
4
#
^
3
A
C
M
A
IN
S
~
P
H
O
N
E
S
5
7
8
1
X
2
9
3
6
7
4
5
0
!
8
ifu_az1836_latam_eng 2006.8.23 11:38 AM Page 2
A
1
3
2
C
R
2
0
2
5
L
I
T
H
I
U
M
B
C
R
2
0
2
5
L
I
T
H
I
U
M
USB mass
storage device
USB cable
Removing the insulation plastic tab
@
#
Supplied accessories
AC power cord
– Remote control
Top and front panels (See 1)
1
Source selector: CD/USB, FM, MW, OFF
selects CD/MP3-CD (or USB mode), or
radio
switches off the set
2
2;
starts or pauses disc/USB playback
∞§
For disc
/ USB play:
skips to the beginning of a current/
previous/ later track
fast searches backwards and forwards
within a track
9
stops disc/USB playback;
erases a program
PROG programs tracks and reviews the
program
3 Display
shows disc/USB play functions
4 ALBUM
+/-
For MP3-CD/ WMA/USB play: select
albums
5 USB REC
copy one file or all files of a disc
to an external portable USB
storage device/MP3 player
6
iR
infrared sensor for remote control
7
CD/USB – enters disc or USB mode
8
MODE – selects different play modes:
e.g. REPEAT or SHUFFLE (random order)
9 OPEN•CLOSE – opens/ closes the CD
door
0
TUNING
– tunes to radio stations
!
VOLUME
adjusts volume level
@ USB port connects an external USB mass
storage device
Back panel (See 1)
# Telescopic antenna improves FM
reception
$ p 3.5 mm stereo headphone socket
Helpful hints: The speakers will be muted
when headphones are connected to the set.
% AC~ MAINS inlet for power cord
^ Battery door open to insert 6 x 1.5V
R-14/ UM2/ C-cells
& Voltage selector – adjust to match the
local voltage 110/220V.
Remote control (See 1)
1 CD – enters disc mode
2 USB – enters disc or USB mode
3 MODE – selects different play modes: e.g.
REPEAT or SHUFFLE
(random order)
4 PROG – programs tracks and reviews the
program
5
9
– stops disc/USB playback;
– erases a program
6
2;
– starts/ pauses CD/USB playback
7 ∞§
For disc
/ USB play:
– fast searches back and forward
– skips to the beginning of a current track/
previous/ later track
8 ALBUM +/-
For MP3-CD/USB play: selects albums
9 DEL deletes one file or all files stored on
the external USB device
0 REC
copy one file or all files of a disc to an
external portable USB storage
device/MP3 player
Power Supply
Whenever convenient, use the power supply
cord if you want to conserve battery life.
Make sure you remove the plug from the set
and wall outlet before inserting batteries.
English Controls / Power Suppy
ifu_az1836_latam_eng 2006.8.23 11:38 AM Page 3
Batteries
Main set (See 1)
• Insert 6 batteries, type R-14, UM2 or C-
cells (not included, preferably alkaline) with
the correct polarity.
Remote control
Important!
Before using the remote control, remove
the insulation plastic tab as shown
in figure @.
If the remote control does not function
correctly or the operating range is
reduced, replace the battery with a new
(CR2025) type battery
1 Press and hold the latch (A) in the direction
as shown in figure @.
2 Simultaneously, pull the battery tray (B) out.
3 Replace a new battery, and fully insert the
battery tray back to the original position.
Incorrect use of batteries can cause elec-
trolyte leakage and will corrode the compart-
ment or cause the batteries to burst:
Do not mix battery types: e.g. alkaline with
carbon zinc. Only use batteries of the same
type for the set.
When inserting new batteries, do not try to
mix old batteries with the new ones.
Remove the batteries if the set is not to be
used for a long time.
Batteries contain chemical substances, so
they should be disposed of properly.
Using AC power
1 Check if the power/mains voltage, as shown
on the type plate located on the
bottom of the set, corresponds to your
local power supply. If it does not, consult your
dealer or service center.
2 If your set is equipped with a voltage
selector, adjust the selector so that it match-
es with the local power supply.
3 Connect the power cord to the
AC~ MAINS inlet and the wall socket.The
set is now ready for use.
4 To switch the set off completely, withdraw the
power cord from the wall socket.
5 Install the unit near the AC outlet and where
the AC power plug can be easily reached.
Disconnect the power cord from the wall
socket to protect your set during heavy thun-
derstorms. Children could seriously injure
themselves as the free end of the cable may
still be live if only the connector is removed
from the MAINS socket at the back of the
unit.
The type plate is located on the
bottom of the set.
Auto power saving
When the source selector is adjusted to
CD/USB and the set is in the PAUSE
position for 5
minutes, the set will be auto
switched to the stop position to save power.
When the source selector is adjusted to
CD/USB and the set is in the STOP position
for 15
minutes, the set will be auto switched
to sleep (standby )mode.To wake it up,
press
2;
.
Helpful hints:
–To avoid unnecessary energy consumption,
always adjust the source selector to OFF
after using the set.
CAUTION
Use of controls or adjustments or
performance of procedures other
than herein may result in unsafe
operation.
Power Supply
Basic functions
Switching on/off the set
1 To switch on, adjust the source selector to
CD/USB, FM or MW as desired.
2 To switch off, adjust the source selector to
OFF.
Adjusting volume
Adjust the volume with the VOLUME
control.
Radio reception
1 Push the source selector to FM or MW.
2 Tu r n TUNING to tune in a radio station.
3 To switch off the radio, adjust the source
selector to OFF.
Helpful hints:
To improve reception
For FM, extend, incline and turn the
telescopic antenna. Reduce its length if the
signal is too strong.
For MW, uses a built-in antenna. Direct this
antenna by turning the whole set.
About MP3
The music compression technology MP3
(MPEG1 Audio Layer 3) significantly reduce
the digital data of an audio CD while
maintaining CD quality sound.
Getting MP3 files: you can either download
legal music files from the internet to your
computer hard disc, or create such files by
converting audio CD files in your computer
through appropriate encoder software.
(128kbps bit rate or higher is recommended
for MP3 files.)
Creating a MP3 CD: burn the music files
from your computer hard disc on a CDR or
CDRW using your CD burner.
Helpful hints:
– Make sure that the file names of the MP3 files
end with .mp3 or .wma.
– Number of albums: maximum 500
– Number of tracks: maximum 1000
The length of file names affects the number of
tracks for playback.With shorter file names,
more files can be burned on a disc.
Playing a disc
This player plays Audio Discs including CD-R/
CD-RW, MP3 CD and WMA. Do not try to
play a CD-ROM, CD-I, CDV,VCD, DVD or
computer CD.
IMPORTANT!
CDs encoded with copyright protection
technologies by some record companies may
be unplayable by this product.
DRM-protected WMA disc is not supported.
1 Adjust the source selector to CD/USB.
Display shows - - - (see 2), or - - - with
“USB” (see 3)
Basic Function/ Radio MP3-CD/ CD Player
ifu_az1836_latam_eng 2006.8.23 11:38 AM Page 4
2 Press CD/USB to enter CD mode if USB is
displayed.
Display will show --- (See 2).
3 Open the disc door.
4 Insert a disc with the printed side facing up
and press the disc door gently to close.
Display:The total number of tracks
appears.
The disc scanning of MP3-CD may run
longer than audio CD.
5 Press
2;
to start playback.
Display:
2
and the current track number.
For MP3-CD/ WMA only:
The current track number XXX“ and
album number ALB XXX“ will be
displayed interchangeably (See 45).
6 To pause playback press
2;
.
Display:
2
and the current track number
flash.
7 Press
2;
again to resume playback.
8 To stop playback, press
9
.
Helpful hints:
The disc playback will also stop when:
–you open the disc compartment door;
–you select FM, AM or OFF position;
the disc has reached the end of the playback.
Selecting a different track
Press or § once or repeatedly until the
desired track number appears in the display.
For MP3-CD/WMA: First press
ALBUM
+/- once or more to find your
album.
In the pause/stop position, press 2; to start
playback.
Finding a passage within a
track
1 During playback, press and hold down
or §
.
The disc is played at high speed and low
volume.
2 When you recognize the passage you want,
release
or §
.
Normal playback resumes.
Programming tracks
You may store up to 20 tracks in the desired
sequence. If you like, store any track more
than once.
1 In the stop position, press PROG to start
programming.
Display shows P01 indicating the start of
the program. PROG flashes. (See 6)
2 Press
or
§
to select your desired track
number.
For MP3-CD/WMA: First press
ALBUM
+/- once or more to find your album.
3 Press PROG to store the desired track.
Display shows P02, indicating the next
program location available.
4 Repeat steps 2 to 3 to select and store all
desired tracks.
5 Press
2;
to play the program.
To review your program
In the stop position, press and hold PROG 3
seconds.
The display shows all the stored tracks in
sequence.
Helpful hints:
Display shows P01 if no track is
programmed.
If you try to store more than 20 tracks, no
track can be stored and the display will show
FUL.
MP3-CD/ CD Player
MP3-CD/ CD Player USB Connection
To erase a program
You can erase a program by:
– pressing
9
(twice during playback or once
in the stop position);
– selecting FM, MW or OFF position;
– opening the disc door.
Display: PROG disappears.
Selecting different play
modes (See 7)
You can select and change the various play
modes before or during playback, and
combine play modes with PROG.
REP – plays the current track continuously.
REP ALL – plays the entire disc/program
continuously.
SHUF – plays all tracks in random order.
1 To select play modes, press MODE once or
more.
2 Press 2; to start playback if in the stop
position.
3 To select normal playback, press MODE
repeatedly until the various modes are no
longer displayed.
You can also press 9 to cancel your play
modes.
Using USB connectivity
AZ1836 is fitted with a USB port in the front
panel, offering a plug and play feature which
allows you to play, from your AZ1836, digital
music and spoken contents stored on a USB
mass storage device.
Using a USB mass storage device, you can
also enjoy all the features offered by AZ1836
which are explained and instructed in the
sections of disc operation.
Compatible USB mass storage devices
With the AZ1836, you can use
USB flash memory (USB 2.0 or USB 1.1)
– USB flash player (USB 2.0 or USB 1.1)
• USB device which requires driver
installation under Windows XP is not
supported.
Note:
In some USB flash players (or memory
devices), the stored contents are recorded
using copyright protection technology. Such
protected contents will be unplayable on any
other devices (such as AZ1836 device).
Supported formats:
USB or memory file format FAT12, FAT16,
FAT32 (sector size: 512 - 4096 bytes)
MP3 bit rate (data rate): 32-320 kbps and
variable bit rate
WMA v9 or earlier
Directory nesting up to a maximum of 8
levels
Number of albums: maximum 500
Number of tracks: maximum 1000
ID3 tag v2.0 or later
File name in Uicode UTF8 (maximum
length: 128 bytes
The system will not play or support
the following:
• Empty albums: an empty album is an album
that does not contain MP3/WMA files, and
will not be shown in the display.
ifu_az1836_latam_eng 2006.8.23 11:38 AM Page 5
USB Connection
• Non-supported file formats are skipped.
This means that e.g.: Word documents .doc
or MP3 files with extension. dlf are ignored
and will not be played.
AAC, WAV, PCM. NTFS audio files
• DRM protected WMA files
WMA files in Lossless format
Playing a USB mass storage device
1 Make sure that your AZ1836 is being
powered by AC mains or specified batteries.
2 Adjust the source selector to CD/USB.
Display shows - - - (see 2), or - - - with
USB (see 3)
3 Press CD/USB to enter USB mode if USB is
NOT displayed.
Display will show USB (see 2).
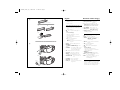
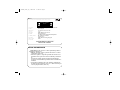
4 As shown in figure # , plug a compatible
USB mass storage device to AZ1836’s USB
port marked . If needed, use a suitable
USB cable to connect between the device
and AZ1836’s USB port.
The device will automatically power on.
If the device is not powered on, turn on the
power manually, then re-connnect it.
AZ1836’s display shows USB and the total
number of playable audio files (Max.
displayed track number is 1000) stored on
the device.
5 Press
2; on your AZ1836 to start play.
AZ1836’s display will show USB and share
the display information illustrated in the
disc operation.
Helpful hints:
– Make sure that file names of MP3 files end
with .mp3. and the file names of WMA files end
with .wma.
– For DRM protected WMA files, use Windows
Media Player 10 (or later) for conversion. Visit
www.microsoft.com for details about Windows
Media Player and WM DRM (Windows Media
Digital Rights Management).
– For USB device playing, if the display shows
"OL", it means that the USB device is electrically
overloading AZ1836.You need to change a USB
device.
CD Ripping - Recording disc
files to a USB device
AZ1836 allows you to copy the music files or
spoken contents of a disc to the external
USB device.You can record one track, the
whole disc or even selected tracks through
the Program function.
1 Adjust the source selector to CD/USB.
2 Insert a disc (audio CD or MP3 or WMA). If
desired, program the disc.
3 Press CD/USB to enter CD mode if USB is
displayed.
4 Plug a USB mass storage device.
To r ecord one
5a Select the track you want to record.
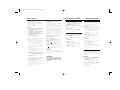
5b
Press once or repeatedly USB REC (or REC
on the remote) until ONE appears, flashing.
Disc playback will start automactially from
the beginning of the selected track.
REC is displayed, and ONE will flash 2
seconds then disappear (see 8).
To r ecord all
5a Press repeatedly USB REC (or REC on the
remote) until
ALL appears, flashing.
Disc playback will start automactially from
the beginning.
REC and ALL are displayed, and ALL will
flash 2 seconds then disappear (see 9).
6 To stop recording, first press 9, then unplug
the USB device.
In the record-one mode, the playback will
auto go to the stop position after one
track/file comes to an end.
During MP3 and WMA recording, make sure
the playback of the file you want to record is
wholly completed before manually stop
recording. Or any part of the file will not be
recorded.
During recording, if the memory of the USB
device runs out, playback will not continue.
USB Connection
Recorded files managing
In your USB device, a folder named_PHILIPS
will be automatically created to manage all
the recorded audio files.
Under _PHILIPS folder, sub-folders starting
from F001, F002, F003... will also be created
to store the files recorded at different
recording intervals (such as changing disc,
re-plugging the USB device).
The recorded file(s) will be stored in either
.mp3 format (for CDDA music or MP3 file),
or .wma format (for WMA file).
For MP3 and WMA file, the file name will be
directly copied as recorded file name. For
CDDA music file, the file name will be
changed to F001T001, F001T002....
Helpful hints:
– In recording mode (even the USB device is
unplugged from the set), selections of
track/album, play modes (repeat and shuffle
modes) are not available.
– Copyright-protected CD will not be recorded.
– DRM-protected WMA is not supported.
– Do not directly unplug the USB device to
stop recording for a possible loss of some of
the recorded contents.
– For some USB device of low speed, the
playback may go with muted sound for some
seconds which will depend on the capability of
the low-speed USB device.
– During recording, if "Prt" is displayed, it means
that the disc/file being played is either copy-
right-protected CDDA disc or DRM-protected
WMA file. Such disc/file will not be recorded.
You need to change CD, or skip track(s).
– During recording, if the display shows
2-second-flashing "Err", then "tr", it means that
the file being played is invalid (un-recordable).
You need to skip track(s).
– During recording, if the display shows
2-second-flashing "Err", then "dup", it means
that the file being played has been previously
recorded due to the same file name as the
previously recorded one. You need to skip track.
Or you need to switch off and on again the set,
a new sub-folder will be created to record it.
Deleting audio files/album
on a USB device
1 Adjust the source selector to CD/USB.
2 Press CD/USB to enter USB mode if USB
is NOT displayed.
3 Plug a USB mass storage device.
4 Select the track you want to delete before
or during playback.
In the stop position, you may select
an album to delete.
5 Briefly press DEL on the remote.
DEL is displayed, flashing (see 0).
6 To delete it, press DEL again.
The playback of the USB device will
come to the stop position.
7 To not to delete, wait until flashing DEL
disappears after 4 seconds of flashing, or
just press 9.
Helpful hints:
– For some MP3 players, AZ1836 will read it
as only one folder which will wrap up all the
audio files on the player regardless of more
than one folder on that player.
AZ1836 may not be able to delete a file
/albume stored on some MP3 players.
The making of unauthorized copies of
copy-protected material, including com-
puter programmes, files, broadcasts and
sound recordings, may be an infringe-
ment of copyrights and constitute a
criminal offence.This equipment should
not be used for such purposes.
ifu_az1836_latam_eng 2006.8.23 11:38 AM Page 6
Safety information
Place the set on a hard, flat and stable surface
so that the system does not tilt.
Do not expose the set, batteries, CDs to
humidity, rain, sand or excessive heat caused
by heating equipment or direct sunlight.
The apparatus shall not be exposed to
dripping or splashing.
Adequate ventilation with a minimum gap of
15 cm between the ventilation holes and sur-
rounding surfaces is necessary to prevent
heat build-up.
The ventilation should not be impeded by
covering the ventilation openings with items,
such as newspapers, table-cloths, curtains, etc..
No objects filled with liquids, such as vases,
shall be placed on the apparatus.
No naked flame sources, such as lighted can-
dles, should be placed on the apparatus.
The mechanical parts of the set contain
self-lubricating bearings and must not be oiled
or lubricated.
•To clean the set, use a dry cloth. Do not use
any cleaning agents containing alcohol,
ammonia, benzene or abrasives as these may
harm the housing.
CD player and CD handling
If the CD player cannot read CDs correctly,
use a cleaning CD to clean the lens before
taking the set to repair.
The lens of the CD player should never be
touched!
Sudden changes in the surrounding
temperature can cause condensation on the
lens of your CD player. Playing a CD is then
not possible. Do not attempt to clean the
lens but leave the set in a warm environment
until the moisture evaporates.
•Always close the CD door to avoid dust on
the lens.
•To clean the CD, wipe in a straight line from
the center towards the edge using a soft,
lint-free cloth. Do not use cleaning agents as
they may damage the disc.
Never write on a CD or attach any stickers
to it.
Safety & Maintenance
(See !)
Environmental information
All unnecessary packaging material has been omitted.The packaging can be easily separated
into three materials: cardboard, polystyrene and plastic.
Your set consists of materials which can be recycled if disassembled by a
specialized company. Please observe the local regulations regarding the
disposal of packaging, dead batteries and old equipment.
No sound/ power
Volume not adjusted
Adjust the VOLUME
Power cord not securely connected
Connect the AC power cord properly
Batteries dead/ incorrectly inserted
Insert (fresh) batteries correctly
Disc contains non-audio files
Insert a suitable disc or press
or §
once or
more skip to an audio track, instead of the data
files.
Display does not function properly/No
reaction to operation of any of the
controls
Electrostatic discharge
Switch off and unplug the set. Reconnect after a
few seconds.
no indication
It is set in the USB mode.
Press CD/USB to select CD mode.
No disc inserted
Insert a suitable disc
Disc badly scratched or dirty
Replace/clean CD (See Maintenance)
CD-R(W) is blank or the disc is not finalized.
Use a finalized CD-R(W)
Laser lens steam up
•Wait until lens has cleared.
Note:
Make sure the CD is not encoded with
Copyright protection technologies, as some
do not conform to the Compact
Disc standard.
The disc skips tracks
Disc damaged or dirty
Replace or clean disc
Shuffle or program is active
Switch off shuffle/program
Sound skips during MP3 playback
MP3 file made at compression level exceeding
320kbps
Use a lower compression level to record CD
tracks into MP3 format
Disc damaged or dirty
Replace or clean disc.
Note:
DRM-protected WMA disc is not supported.
The USB device doesn’t play on my
AZ1836
It is not set in the USB mode.
Press CD/USB to select USB mode.
The device is not securely connected to AZ1836’s
USB port.
Re-connect the device, and make sure that the
device is powered on.
The device is not supported by AZ1836, or the audio
file format stored on the device is not supported by
AZ1836.
Use a compatible device/ playable audio file
format.
The disc file cannot be recorded to the
USB device
You stop recording when the MP3 or WMA file you
want to record is still playing.
Select record-one mode to record, or stop
recording only when the playback of MP3 or
WMA file is wholly completed.
The memory of the USB device runs out.
Delete some unwanted files on the USB device to
free some memory, or use another USB device of
sufficient free memory to record.
The name of a MP3 or WMA file on the disc is
identical to the one of a file on the USB device.
Change to a different name for the file on the
USB device.
Troubleshooting
If a fault occurs, first check the points listed below before taking the set for repair.
If you are unable to remedy a problem by following these hints, consult your dealer or service centre.
WARNING: Do not open the set as there is a risk of electric shock. Under no cir-
cumstances should you try to repair the set yourself, as this will inval-
idate the guarantee.
ifu_az1836_latam_eng 2006.8.23 11:38 AM Page 7
Mexico
Es necesario que lea cuidadosamente su instructivo de manejo.
Descripción: Radio MW/FM con reproductor de CD/CD-MP3
Modelo: AZ 1836(B)/55
Alimentación: 110–127/220–240 V; ~50–60 Hz
Consumo: 14 W
Importador: Philips Mexicana, S.A. de C.V.
Domicilio: Av. La palma No. 6
Col. San Fernando la Herradura, Huixquilucan
Localidad y Telefono: Edo. de M
é
xico C.P. 52784
Tel. 52 69 90 00
Exportador: Philips Electronics Hong Kong Ltd.
País de Origen: China
Nº de Serie: ______________________________________
LEA CUIDADOSAMENTE ESTE INSTRUCTIVO
ANTES DE USAR SU APARATO.
No abrir, riesgo de choque eléctrico
Verifique que el voltaje de alimentación
sea el requerido para su aparato
ATENCIÓN
Para evitar el riesgo de choque eléctrico, no quite la tapa.
En caso de requerir servicio, dirijase al personal calificado.
PRECAUCIÓN - ADVERTENCIA
AVISO IMPORTANTE
Philips Mexicana, S.A. de C.V. no se hace responsable por daños o
desperfectos causados por:
Maltrato, descuido o mal uso, presencia de insectos o roedores
(cucarachas, ratones etc.).
– Cuando el aparato no haya sido operarado de acuerdo con el
instructivo del uso, fuera de los valores nominales y tolerancias
de
las tensiones (voltaje), frecuencia (ciclaje) de alimentación
eléctrica y las características que deben reunir las instalaciones
auxiliares.
– Por fenómenos naturales tales como: temblores, inundaciones,
incendios, descargas eléctricas, rayos etc. o delitos causados por
terceros (choques asaltos, riñas, etc.).
ifu_az1836_latam_eng 2006.8.23 11:38 AM Page 8
  • Page 1 1
  • Page 2 2
  • Page 3 3
  • Page 4 4
  • Page 5 5
  • Page 6 6
  • Page 7 7
  • Page 8 8

Philips AZ1836B User manual

Category
Home audio sets
Type
User manual

Philips AZ1836B allows you to listen to your favorite music from discs, USB, or radio. Enjoy MP3-CD or WMA playback, copy files to an external USB device, program up to 20 tracks, and select various play modes like repeat or shuffle.

Ask a question and I''ll find the answer in the document

Finding information in a document is now easier with AI