PureAire PUREAIR1500 Owner's manual
- Category
- Air purifiers
- Type
- Owner's manual
This manual is also suitable for

Owner’s Manual
1500

2
Welcome
Thank you for your purchase of the pureAir 1500. This air purifier has
been designed to provide you a cleaner living space with years of
low maintenance operation.
Please read through the usage and service instructions outlined in this
owner’s manual before operating the unit.
Table of Contents
Product Contents
Warnings ............................................... 3
Diagrams .............................................4 - 5
Getting Started .......................................... 6
Settings ................................................ 7
Disassembly/Assembly ................................. 8 - 9
Cleaning ........................................... 10 - 11
Maintenance .......................................... 12
Troubleshooting ........................................ 13
Specifications .......................................... 14
Warranty Information .....................................15
1 pureAir 1500 Unit 1 Owner’s Manual
1 Power Cord 1 DC Adapter
1 Remote with Battery

3
Do not operate this unit unless it is completely assembled.
Eye damage may result from directly viewing the light
produced by the lamp inside this unit for a continuous
and extended period of time.
Do not block the ventilation or filters.
Do not use Away Mode in an occupied space.
The unit should be powered OFF and the POWER CORD
disconnected whenever cleaning or servicing.
There are no user-serviceable parts inside the unit.
This unit is not intended for outdoor use.
Warnings

4
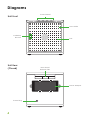
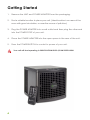
Diagrams
Unit Front
Power Plug
Ionization
Brushes
Fan
Front Grille
Power Adapter
Control Panel
Rear Panel
Release Tab
Unit Rear
(Closed)

5
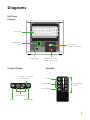
Diagrams
PURIFICATION
POWER
AWAY
MODE
0
1
2
3
FAN
AWAY MODE
FAN
POWER
Control Panel Remote
Power
Power Plug Purification Plate
Power Connector
Purification
Plate
PCO Cell
Purification Level
LED Indicator
Purification
Level
PCO Cell
Power Connector
Fan Speed
Fan Speed
Away ModePower
Away Mode
Unit Rear
(Open)

6
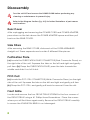
Getting Started
1. Remove the UNIT and POWER ADAPTER from the packaging.
2. Find a suitable location to place your unit. (Ideal location is an area of the
room with good circulation, or near the source of pollution.)
3. Plug the POWER ADAPTER into a wall outlet and then plug the other end
into the POWER PORT of your unit.
4. Place the POWER ADAPTER into the open space in the rear of the unit.
5. Press the POWER BUTTON to control to power of your unit.
Your unit will start operating in PURIFICATION LEVEL 0/FAN SPEED HIGH.

7
There are multiple ways to change the output of your unit. If you need the
unit to be quieter, change the Fan Speed, if you need a larger or smaller
area covered, change the Purification Level, and if you need a tough odor
removed, use Away Mode.
Fan Speed
Three fan speeds are available (Low, Medium, High) and are adjusted with
the FAN UP/DOWN buttons on both the machine’s CONTROL PANEL as well
as with the REMOTE.
Purification Level
Purification level is controlled on the REMOTE and adjusts the output of
Activated Oxygen (O
3
). Four levels are available and will be signified by
varying colors on the CONTROL PANEL.
LEVEL 0 (0 - 250ft
2
): LED is OFF.
(Level 0 uses only PCO and Ionizaition Technology.)
LEVEL 1 (250 - 500ft
2
): LED is GREEN
LEVEL 2 (500 - 1000ft
2
): LED is YELLOW
LEVEL 3 (1000 - 1500ft
2
): LED is RED
Away Mode
Away Mode is used to treat the toughest odors in your space with higher
levels of Activated Oxygen and Ionization. To activate, press the AWAY
MODE BUTTON on the CONTROL PANEL or REMOTE.
Away Mode is active for 2 Hours before reverting back to previous settings.
Settings
DO NOT use Away Mode in an occupied space. Prolonged exposure to
Activated Oxygen may result in temporary respiratory or eye irritation.

8
Disassembly
Rear Cover
After unplugging and removing the POWER CORD and POWER ADAPTER,
press down on the tab above the POWER ADAPTER space and then pull
back on the REAR COVER.
Side Filters
After removing the REAR COVER, slide each of the FILTER ASSEMBLIES
straight out. These separate and contain 3 different filter pieces.
Purification Plate
(a) Locate the PURIFICATION PLATE CONNECTOR (Red Connector Piece) on
the right side of the unit. Squeeze the tabs on the left and right and gently
pull free. (b) Grasp the PURIFICATION PLATE, press the tabs towards the
middle and slide it out of its slot.
PCO Cell
(a) Locate the PCO CELL CONNECTOR (White Connector Piece) on the right
side of the unit. Squeeze the tabs on the left and right and gently pull free.
(b) Grasp the PCO CELL, and gently pull back to remove it from the slot.
Front Grille
Locate and remove the four FRONT GRILLE SCREWS in the four corners of
the FRONT GRILLE using a #1 Phillips Head Screwdriver. Place the screws
where you will find them again easily. Remove the FRONT GRILLE carefully
to ensure the IONIZATION BRUSH is not damaged.
Turn the unit OFF and remove the POWER CORD before performing any
cleaning or maintenance to prevent injury.
Refer to the Diagram Section (Pg. 4-5) for further illustrations of part names
and locations.

9
Assembly
Front Grille
Replace the FRONT GRILLE and the four FRONT GRILLE SCREWS using a
Phillips Head Screwdriver. Be careful to not over-tighten the screws or
damage the IONIZATION BRUSH.
PCO Cell
(a) Slide the PCO CELL back into the upper slot with the warning at the
top, facing out. (b) Plug the PCO CELL CONNECTOR back into the WHITE
CONNECTOR SLOT.
Purification Plate
(a) Slide the PURIFICATION PLATE back into the small slot with the larger silver
side facing to the left. (b) Plug the PURIFICATION PLATE CONNECTOR back
into the RED CONNECTOR SLOT.
Side Filters
Ensure that the FILTER ASSEMBLIES are snapped together correctly, then
replace the SIDE FILTERS in each of the side slots with the rounded edges
facing outwards.
Rear Cover
Place the REAR COVER bottom edge into the hinge slot then push forwards
until the tab clicks.
Power Cord
Insert the POWER ADAPTER into the rear slot and then replace the POWER
CORD in the POWER PORT.
All parts must be properly installed before operating the unit. Failure to do so
may damage the unit.

10
Cleaning
For proper operation, the unit should be cleaned at least once per month.
Unit Exterior
Wipe down the exterior with a damp cloth or use compressed air or a
vacuum cleaner to remove dust. A non-abrasive cleaner may be used on
the surfaces of the exterior.
Filter Assembly
Clean water or compressed air may be passed through the entire filter
assemblies or the individual parts when disassembled. To disassemble the
FILTER ASSEMBLIES grasp the sides of the rim and carefully separate the back
piece from the housing. The three filters [mesh, foam, honeycomb] can
then be removed and cleaned separately. If using water you must allow the
filters to fully dry before reassembly. When reassembling, the HONEYCOMB
FILTER goes in first, then the FOAM FILTER, and finally the thin MESH FILTER.
Then simply reattach the rear piece to the housing.
Turn the unit OFF and remove the POWER CORD before performing any
cleaning or maintenance to prevent injury.
Review the Disassembly and Assembly Section (Pg. 8-9) before performing
and cleaning and maintenance to prevent damage to the unit.

11
Cleaning
Unit Interior
Using a damp cloth, a clear alcohol based cleaner, or compressed air/
vacuum cleaner carefully clean the walls and components inside of the
unit, after completing the DISASSEMBLY procedures.
PCO Cell
Using compressed air or a vacuum blow/suck the dust out of the PCO Cell.
Do not use any liquid to clean the PCO Cell.
Purification Plate
The Purification Plate only needs cleaning every 3 months, unless it is used in
a harsh environment (Smoking Area, Kitchen, Pet Area).
Using a 50/50 mix of warm water and clear ammonia, soak the
PURIFICATION PLATE from 1-8 hours. Using a soft-bristle brush, scrub the metal
center. Rinse thoroughly and allow to dry completely before reinstalling.
All parts must be properly installed before operating the unit. Failure to do so
may damage the unit.

12
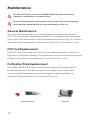
Maintenance
General Maintenance
Your unit should need little to no maintenance, besides an occasional
PCO Cell or Purification Plate Replacement, but sometimes problems arise.
If you can’t find a resolution in the Troubleshooting Section (Pg. 13) contact
GreenTech Environmental for further instructions. (www.GreenTechEnv.com)
PCO Cell Replacement
The PCO CELL does wear out and should be replaced yearly to ensure a
high level of efficient cleaning. A replacement can be bought through your
Dealer or GreenTech Environmental. (www.GreenTechEnv.com)
Purification Plate Replacement
The PURIFICATION PLATE does not wear out as often and will only need to
be replaced every 2-3 years of constant use; earlier if you have a harsh
environment. A replacement can be bought through your Dealer or
GreenTech Environmental. (www.GreenTechEnv.com)
Turn the unit OFF and remove the POWER CORD before performing any
cleaning or maintenance to prevent injury.
Review the Disassembly and Assembly Section (Pg. 8-9) before performing
and cleaning and maintenance to prevent damage to the unit.
Purication Plate PCO Cell

13
Troubleshooting
Unit Fails to Turn On
1. Check to make sure that the POWER PLUG, POWER CORD, and POWER ADAPTER
are all properly connected.
2. Verify that the POWER BUTTON has been activated on the CONTROL PANEL
If further problems persist, contact GreenTech Environmental (www.GreenTechEnv.com)
for further instructions or replacement.
Unit is Operating in High or Away Mode, but no Noticeable
Purification is Being Produced
1. Ensure that the PURIFICATION PLATE is clean and that its CONNECTOR is fully inserted.
2. View the unit operating in a dark room through the FRONT GRILLE. The PURIFICATION
PLATE should have a dim purple glow.
If further problems persist, contact GreenTech Environmental (www.GreenTechEnv.com)
for further instructions or replacement.
The Purification Plate Generates an Electrical Arc,
Arcing Noise, or Burning Odor
The PURIFICATION PLATE is damaged and must be replaced. Contact GreenTech
Environmental for replacement. (www.GreenTechEnv.com)
The PCO Cell is Not Lighting Up
1. Ensure that the PCO CELL CONNECTOR is properly inserted into its slot.
If further problems persist, contact GreenTech Environmental (www.GreenTechEnv.com)
for further instructions or replacement.
Ionization Needle Creates an Electrical Arc
The IONIZATION NEEDLE needs to be cleaned. Be sure to complete all of the cleaning
procedures in the Cleaning Section (Pg. 10-11) every 30 days.
Fan Does Not Operate Properly
1. Try adjusting the FAN SPEED using the CONTROL PANEL or REMOTE CONTROL.
2. Remove the FRONT GRILLE and ensure there are no obstructions to the movement
of the FAN. Clean it thoroughly and also clean the mount that it sits on.
If further problems persist, contact GreenTech Environmental (www.GreenTechEnv.com)
for further instructions or replacement.

14
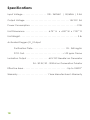
Specifications
Input Voltage .................. 100 - 240VAC | 50/60Hz | 2.5A
Output Voltage ..................................15V DC 3A
Power Consumption .....................................21W
Unit Dimensions ...................6.75’’ H x 6.50” W x 7.00’” D
Unit Weight ............................................ 3 lb
Activated Oxygen (O
3
) Output
Purification Plate ......................... 25 - 360 mg/hr
PCO Cell ..............................< .02 ppm Ozone
Ionization Output .................6 KV DC Needle Ion Generator
24 - 30 KV, 20 - 30 Khz Ion Generation Pulsator
Effective Area .................................. Up to 1500 ft
2
Warranty .......................1 Year Manufacturer’s Warranty

15
Warranty Information
Your pureAir 1500 Air Purier is warranted to be free from all defects in material and
workmanship in normal household use for a period of 1 Year from date of purchase.
The warranty is granted only to the original purchaser and members of his or her
immediate household. The warranty is subject to the following provisions. Any
damages or malfunctions caused by negligence, abuse, or use not in accordance
with the Owner’s Manual are not covered by this warranty. Likewise, any defects or
damages caused by unauthorized service are not covered. GreenTech Environmental
will, at its option, repair or replace a defective Air Purier that is covered by this
warranty. As a matter of warranty policy, GreenTech Environmental will not refund the
customer’s purchase price. To obtain warranty service you must return the defective
Air Purier along with proof of purchase to the pureAir Authorized Warranty Station. All
transportation charges on parts, or units, submitted under this Warranty shall be borne
by purchaser. Unless this Warranty is expressly renewed or extended by GreenTech
Environmental, any repaired or replaced part of unit shall be warranted to the original
purchaser only for the length of the unexpired portion of the original warranty.
FURTHER LIMITATIONS AND EXCLUSIONS ARE AS FOLLOWS:
Any warranty that may be implied in connection with your purchase or use of the Air
Purier, including any warranty of merchantability or any warranty for Fitness For A
Particular Purpose is limited to the duration of this warranty. Some states do not allow
limitations on how long an implied warranty lasts, so the above limitations may not
apply to you.
Your relief for the breach of this warranty is limited to the relief expressly provided
above. In no event shall GreenTech Environmental be liable for any consequential
or incidental damages you may incur in connection with your purchase or use of
the Air Purier. Some states do not allow the exclusion or limitation of incidental or
consequential damages, so the above limitation or exclusion may not apply to you.
This warranty gives you specic legal rights, and you may also have other rights which
vary from state to state.
REGISTRATION
Please register your new pureAir product within 10 days of purchase by visiting:
www.GreenTechEnv.com/Warranty

www.GreenTechEnv.com
-
 1
1
-
 2
2
-
 3
3
-
 4
4
-
 5
5
-
 6
6
-
 7
7
-
 8
8
-
 9
9
-
 10
10
-
 11
11
-
 12
12
-
 13
13
-
 14
14
-
 15
15
-
 16
16


PureAire PUREAIR1500 Owner's manual
- Category
- Air purifiers
- Type
- Owner's manual
- This manual is also suitable for
Ask a question and I''ll find the answer in the document
Finding information in a document is now easier with AI
Other documents
-
 GreenTech Environmental PUREAIR500 User manual
-
GreenTech PUREAIR3000GT User manual
-
GreenTech Environmental PUREAIR50 User manual
-
-
 dr. Mercola Pure & Clear PC-AP2000 Owner's manual
-
-
-
 GreenTech Environmental pureAir MOTION - Black Pearl User manual
-
Sharper Image pureAir FRIDGE Owner's manual
-


