Panasonic RRUS551 - IC RECORDER Operating Instructions Manual
- Category
- MP3/MP4 players
- Type
- Operating Instructions Manual
This manual is also suitable for

VQT2M17
H1209TY0
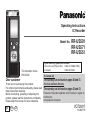
Operating Instructions
IC Recorder
Dear customer
Thank you for purchasing this product.
For optimum performance and safety, please read
these instructions carefully.
Before connecting, operating or adjusting this
product, please read the instructions completely.
Please keep this manual for future reference.
PP
RR-US591
RR-US571
RR-US551
Model No.
If you have any questions contact
In the U.S.A. and Puerto Rico: 1-800-211-PANA (7262)
In Canada: 1-800-561-5505
En Cf
For Canada only
The warranty can be found on pages 40 and 41.
For U.S.A. and Puerto Rico only
The warranty can be found on pages 42 and 43.
Please return the product registration card (if included), or register via
the Internet at:
www.panasonic.com/register
The illustration shows
RR-US591.

VQT2M17
2
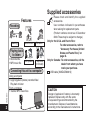
Please check and identify the supplied
accessories.
Use numbers indicated in parentheses
when asking for replacement parts.
(Product numbers correct as of December
2009. These may be subject to change.)
Only for the U.S.A. and Puerto Rico:
To order accessories, refer to
“Accessory Purchases (United
States and Puerto Rico)” on
page 43.
Only for Canada: To order accessories, call the
dealer from whom you have
made your purchase.
1 USB cable [K2KZ4CB00012]
Supplied accessories
Features
Recording
Meeting
Lesson/Lecture
Dictation
with speaker
or earphones
(not included)
• Recorded file
• MP3 music file
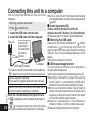
Connecting this unit to a computer
Using a computer
• Copy/Organize (Delete) recorded files/
Play back to listen
From a computer
• Transfer MP3 music files
Playing back
to listen
CAUTION
Danger of explosion if battery is incorrectly
replaced. Replace only with the same
or equivalent type recommended by the
manufacturer. Dispose of used batteries
according to the manufacturer’s instructions.

VQT2M17
3
Preparation
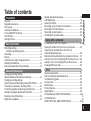
Features ...........................................................................2
Supplied accessories ....................................................... 2
Part names ....................................................................... 4
Inserting the batteries ....................................................... 5
Turning ON/OFF the Power .............................................. 6
Hold function ..................................................................... 6
Setting the time ................................................................. 7
Basic Operations
Recording settings ............................................................ 8
Switching recording position ........................................ 8
Recording ......................................................................... 9
Playing ............................................................................ 10
Listening to the audio using earphones .......................... 11
Deleting recorded fi les .................................................... 12
Locking recorded fi les (File protection) ........................... 13
Advanced Operations
Changing recording settings
(Monaural/Stereo, Microphone sensitivity) ..................... 14
Changing recording settings
(Zoom microphone/Recording mode (XP/LP/SLP)) ....... 15
Preventing unnecessary recording (VAS) ....................... 16
Confi rming possible (remaining) recording time ............. 16
Setting the playback speed control function ................... 17
Reducing noise (EQ setting) ........................................... 18
Slight return playback ..................................................... 18
Repeat play/Successive play .......................................... 19
A-B Repeat play ............................................................. 19
Security functions ........................................................... 20
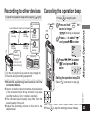
Recording using an external microphone ....................... 22
Recording from other devices ......................................... 22
Recording to other devices ............................................. 23
Canceling the operation beep ......................................... 23
Using with a computer
Connecting this unit to a computer ................................. 24
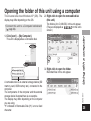
Opening the folder of this unit using a computer ............ 25
Importing the recorded fi les in this unit to a
computer/Organizing fi les ............................................... 26
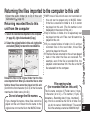
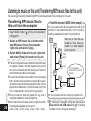
Returning the fi les imported to the computer to this unit
.... 27
Listening to music on this unit (Transferring MP3 music fi les to this unit)
... 28
Listening to music on this unit (Playing MP3 music fi les on this unit)
....... 29
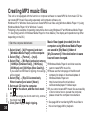
Creating MP3 music fi les ................................................ 30
Other
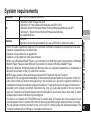
System requirements ...................................................... 31
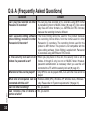
Q & A (Frequently Asked Questions) .............................. 32
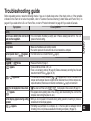
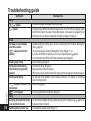
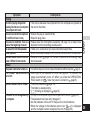
Troubleshooting guide ....................................................33
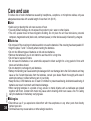
Care and use .................................................................. 36
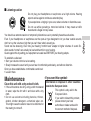
Maintenance ................................................................... 37
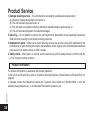
Product Service .............................................................. 38
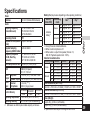
Specifi cations ................................................................. 39
Limited Warranty (ONLY FOR CANADA) ........................40
Limited Warranty
(ONLY FOR U.S.A. AND PUERTO RICO) ...................... 42
Table of contents
Preparation

VQT2M17
4
ԁ
Ԃ
ԃ
′
″
‴
Ԅ
„
‟
†
‡
•
‣
․
‥
ӹ
Ӻ
ӻ
Ӽ
ӽ
Ӿ
ӿ
Ԁ
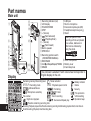
„ Recording indicator (red)
‟ LCD display
† FOLDER/SPEED
‡ STOP
• + (Volume)
‣
u
(Fast backward)
․
q
/
g
(Play/Stop/Enter)
‥ – (Volume)
…
i
(Fast forward)
‧ Built-in speaker
OPR/HOLD
Recording position switch
(ZOOM/WIDE/MANUAL)
REC/PAUSE
•
A-B (A-B repeat/Repeat)/
−
MENU
ERASE
USB jack
Built-in microphone
Ԃ
External microphone jack (MIC)
‰ Headphone/earphone jack (
W
)
‱ Stand
When you perform zoom
recording with the unit placed
on a surface, stable zoom
effect can be obtained by
using the stand.
stand
′ Zoom microphone
″ġBattery cover
‴ġHand strap hole
Remaining memory/Recording level
: Recording mode
XPLPSLP
: Monaural/Stereo
: Microphone sensitivity
File number
:
Slight return playback
: Possible remaining recording time
Recording (Playback) elapsed time/Possible remaining recording time/Remaining playback time/Current time etc.
Clock/Recording (Playback) time/Recording date
: Noise reduction
: Playback speed control
SPEED
: Formatting
: Folder
: Zoom recording
: Successive/Repeat play
ALL
: Battery indicator
: Delete
: Security
: File protection
: VAS recording
: Operation beep
Main unit
Display
Part names
The enclosed Canadian French label sheet corresponds to
English display on the unit.

VQT2M17
5
Blinking
The remaining battery display shown below is
displayed while recording or playing.
* If the batteries run out, “
” blinks. Replace the
batteries as soon as possible.
* Remove the batteries from the unit if you will not
use it f
or a long period of time.
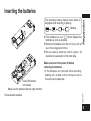
* Please replace batteries within approx. 30
seconds for preservation of the clock data.
Make sure to turn the power off before
removing the batteries.
• If the batteries are removed while recording,
deleting, etc., all data on this unit may be lost or
this unit may be destroyed.
Inserting the batteries
2 AAA LR03 batteries
(not included)
Make sure the batteries face the right direction.
1
3
2
* Use alkaline batteries.
Preparation

VQT2M17
6
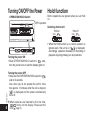
Turning ON/OFF the Power
Hold function
OPERATION/HOLD Switch
OPR
HOLD
Button operations are ignored when you set Hold
on.
Switching Hold on/off
Hold on
OPR
HOLD
Hold off
OPR
HOLD
• When the Hold function is on, button operation is
ignored even if the unit is on (“ ” is displayed).
Accordingly, operation mistakes (i.e. Recording or
playback stopping midway) can be prevented.
OPR: operation
Turning the power ON
• Slide OPERATION/HOLD switch to
OPR
side,
then the power turns on and the display lights on.
Turning the power OFF
• Slide and hold OPERATION/HOLD switch to
OPR
side for 2 seconds.
Also, when you do not operate the unit for more
than approx. 15 minutes while the unit is stopped,
“ ” is displayed and the power automatically
turns off.
* When batteries are inserted for the first time,
“ ”
blinks on the display. Please set the
time (
➜
page 7).

VQT2M17
7
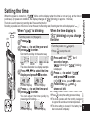
When the power is turned on, “ ” blinks on the display when the time is not set (e.g. at the time of
purchase). (In power-on condition, the display changes to “ ” (blinking) in approx. 1 minute.)
The clock is used for preserving recording date. Please set the time first.
Recording is possible even if the clock is not set. However, the Recording date, Recording start time will be displayed as “ ”.
When the time display is
“
” (blinking) or you change
the time
*
Press
STOP
to stop the setting process midway.
*
The clock operates with the monthly loss/gain
of approx. 60 seconds at normal temperature.
*
The time setting is cleared, if the battery has
been consumed completely.
When “ ” is blinking
• Turn the power on (
➜
page 6).
• Press
STOP
to stop the unit.
Press +, – to set the year and
press
q
/
g
to enter.
Set month and day in the same way.
2
Ye a r Month Day
Press
u
,
i
to select the time
display and press
q
/
g
to enter.
3
12-hour display24-hour display
Press +, – to set the time and
press
q
/
g
to enter.
You can adjust the time quickly by
pressing and holding +, –.
4
• Turn the power on (
➜
page 6).
12-hour display24-hour display
Press and hold
•
A-B
/
MENU
for 1
second or longer
.
“ ” (blinking) or “ ” (blinking)
is displayed.
Press +, – to select “ ”
and press
q
/
g
to enter.
If “ ” blinks, press
q
/
g
to enter.
Follow step
2
,
3
and
4
shown at left.
Setting the time
Press
q
/
g
.
1
The above illustration is a display example.
1
2
3
STOP
•
A-B
/
MENU
Preparation

VQT2M17
8
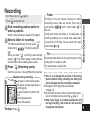
This unit has 4 recording setting items related to
recording quality. Using different combinations of
recording settings, you can adjust audio quality
according to recording situations.
Recording
setting item
Setting contents and
display
Recording
mode
(
➜
page 15)
High-quality :
:
Long recording :
Switching
Monaural/
Stereo
(
➜
page 14)
Monaural :
Stereo :
Microphone
sensitivity
(
➜
page 14)
High :
Normal :
Low :
Zoom
microphone
(
➜
page 15)
Zoom microphone ON
:
Zoom microphone OFF
: No display
The total possible recording time (
➜
page
39) changes according to the combination
of the recording mode and Stereo/Monaural.
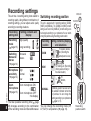
Switching recording position
This unit is equipped with 3 recording positions: [ZOOM],
[WIDE] and [MANUAL]. The [ZOOM] and [WIDE] content
settings are fixed while [MANUAL] content settings can
be changed according to your preference. You can switch
among the positions using Recording position switch.
Recording
position
Setting contents (display)
and situations
ZOOM
For lessons, lectures,
etc. (Recording the
aimed person’s voice).
WIDE
For meetings, etc. (Recording
offering a sense of being in
the actual situation).
MANUAL
✽
For
dictation,
etc.
✽
[MANUAL] position has been set to
be suitable for dictation at the time
of purchase. You can change the
setting according to your preference
(
➜
pages 14, 15).
You can change the recording mode (XP,
LP, SLP) in all positions (
➜
page 15).
Recording settings
Recording
position switch
STOP
MANUAL WIDE ZOOM
MANUAL WIDE ZOOM
REC/PAUSE
FOLDER/SPEED

VQT2M17
9
The display changes depending on
recording levels.
In stereo Top side: ch-L/Bottom side:
ch-R
Recording elapsed time
(Blinks while paused.)
To stop:
Press
STOP
.
1
• Turn the power on (
➜
page 6).
• Press
STOP
to stop the unit.
*
Even if you change the position of Recording
position switch during recording, the setting will
not be changed until the recording is complete.
*
Change the recording mode as necessary
(
➜
page 15).
*
Do not block the holes of the zoom microphone and
built-in microphone during recording (
➜
page 4).
*
Note if your finger or an object touches this unit
during recording, the noise will be recorded
through the microphone.
Light stays on. (Blinks while paused.)
Display during recording
Recording
[Folder] for this unit means locations in which
recording (music) files are stored. There are 4
audio folders “
” and 1 music folder “ ” in
this unit.
Using each folder according to the purposes of
recording enables you to search files easily later.
A maximum of 99 files can be saved into each
audio folder
to .
Folder
Recorded audio data from the starting point to the
ending point is saved as a file.
The saved data is called a file.
File
Slide recording position switch to
select a position.
Switch modes according to situations (
➜
page 8).
Select a folder for recording.
The folder is switched each time you press
FOLDER/SPEED
.
Select among “
” (The factory setting is
“ ”).
When you select “ ”, recording is automatically
saved in “ ” (If the folder already contains 99 files,
the next folder with recordable space is used).
Press
REC/PAUSE
(Recording starts).
Each time you press Pause Recording resumes
2
3
Basic Operations

VQT2M17
10
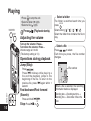
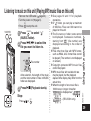
• Press
STOP
to stop the unit.
• Select a folder (
➜
right).
• Select a file (
➜
right).
Press
q
/
g
(Playback starts).
Adjusting the volume
Turn up the volume: Press +.
Turn down the volume: Press –.
Volume range is 0 to 20.
(The factory setting is 13.)
Operations during playback
Jump (Skip):
Press
u
,
i
.
Press
u
midway while playing a
file and the playback jumps to the
beginning of the file. To return to the
previous file, press
u
again within 1
second.
Fast backward/Fast forward
(Search):
Press and hold
u
,
i
.
Stop:
Press
q
/
g
or
STOP
.
Playing
The folder is switched each time you
press
FOLDER/SPEED
.
Select among “
”, “ ”, “ ”, “ ”, “ ”.
Select the folder that contains the file to
play.
Select a folder
Press
u
,
i
to select.
Each time you press, the file number
changes.
Select a fi le
File number
1
When a file is selected, the recording
information below is displayed.
Recording date
→
Recording start time
→
Recording time
→
Total number of files in the
folder
STOP
FOLDER/SPEED

VQT2M17
11
Insert
securely.
Listening to the audio
during playback
The audio during playback comes from
the speaker. Listening may be difficult in
noisy places due to the speaker output.
In that case, connect stereo earphones
(not included).
*
The built-in speaker is turned off when
earphones are connected.
Built-in
speaker
Press and hold
FOLDER/SPEED
for 1 second or longer
during playback.
The remaining time of the file
being played is displayed for
approx. 3 seconds.
Remaining
playback time
Connect stereo earphones (not included).
Plug type: ø 3.5 mm (1/8") stereo mini plug
Listening to the audio using earphones
Confi rming the
remaining time
Monitoring the recording
progress
Adjusting the volume:
You can adjust the volume by pressing
+, –, but the recording level is not
affected.
*
The remaining playback time
for the last approx. 3 seconds
of file is not displayed.
Basic Operations

VQT2M17
12
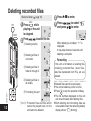
Press
ERASE
while
playing or the unit
is stopped.
Press
u
,
i
to select “ ”
and press
q
/
g
to enter.
When deleting is complete, “ ” is
displayed.
It may take dozens of seconds until
deleting is complete.
1 4
• Select a folder (
➜
page 10).
* Deleted files cannot be recovered.
* You cannot delete a portion of a file.
* Press
STOP
to stop the operation midway.
* The file numbers displayed on this unit
are moved forward after deleting files.
* Both deleting and formatting data are
not available when the remaining battery
display shows “ ” (blinking).
Press
q
/
g
to enter.
3
Press
u
,
i
to select the file.
Ӳ Deleting all files in
one folder
ӳ Deleting all files in
folder A through D
Ӵ Deleting all files in
all folders
ӱ Deleting one file
ӵ Formatting this unit
2
ӱ to Ӵ : Protected files and files which
cannot be played back on this
unit cannot be deleted.
Deleting recorded files
If the unit is formatted, all existing files
including protected files, music files,
data files transferred from PCs, etc. are
deleted.
Formatting
STOP
ERASE

VQT2M17
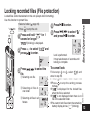
13
Press and hold
•
A-B
/
MENU
for 1
second or longer.
“ ” (blinking) is displayed.
1
Locked files cannot be deleted on this unit (except when formatting).
Use this function to protect files.
• Select a folder (
➜
page 10).
• Press
STOP
to stop the unit.
Press
u
,
i
to select “ ”
and press
q
/
g
to enter.
Lock is performed.
It may take dozens of seconds until
locking is complete.
5
To cancel lock:
Follow step
1
to
4
, select “
” and
enter in step
5
.
* Press
STOP
to stop the setting process
midway.
* “
” is displayed for the locked files
when the file is selected.
* “ ” is not displayed when there is no
file in the selected folder.
* You cannot lock files when the remaining
battery display shows “ ” (blinking).
Press
q
/
g
to enter.
4
Press +, – to select “ ” and
press
q
/
g
to enter.
Press
u
,
i
to select the
file.
ӱ Selecting one file
Ӳ Selecting all files in
one folder
ӳ Selecting all files in all
folders
2
3
Locking recorded files (File protection)
STOP
•
A-B
/
MENU
Basic Operations

VQT2M17
14
• Set the Recording position switch to
[MANUAL] (
➜
page 8).
• Press
STOP
to stop the unit.
Press and hold
•
A-B
/
MENU
for 1
second or longer.
“ ” (blinking) is displayed.
Press
u
,
i
to select “ ”
or “
” and press
q
/
g
to enter.
Press +, – to select “ ”
and press
q
/
g
to enter.
Stereo
Monaural
1
2
3
Switching Monaural/Stereo
* Press
STOP
to stop the setting process midway.
* If “
” is selected and entered while “ ” is on (
➜
page 15), “ ” turns off.
(“ ” disappears.)
1
Press and hold
•
A-B
/
MENU
for 1
second or longer.
“ ” (blinking) is displayed.
Changing microphone sensitivity
Press +, – to select “ ” and
press
q
/
g
to enter.
2
Press
u
,
i
to select
microphone sensitivity and
press
q
/
g
to enter.
3
Low Normal High
Changing recording settings (Monaural/Stereo, Microphone sensitivity)
• Set the Recording position switch to
[MANUAL] (
➜
page 8).
• Press
STOP
to stop the unit.
S
T
O
P
MANUAL WIDE ZOOM
•
A-B
/
MENU
Recording
position switch

VQT2M17
15
*
Press
STOP
to stop the setting process midway.
*
When “ ” is set (
➜
page 14), you cannot set the zoom
microphone and “ ” is not displayed on the menu screen.
*
The zoom function does not work as long as a device is connected to the
external microphone jack even if the zoom is set to ON on this unit.
*
When you perform zoom recording with the unit placed on a
desk, etc., we recommend putting up the stand (
➜
page 4).
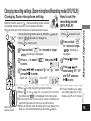
Press
u
,
i
to select “ ” or “ ” and
press
q
/
g
to enter.
Press
+, –
to select “ ” and press
q
/
g
to enter.
Zoom ON Zoom OFF
Changing Zoom microphone setting
Press and hold
•
A-B
/
MENU
for 1 second or longer.
“ ” (blinking) is displayed.
1
2
3
•
Set the Recording position switch to [MANUAL] (
➜
page 8).
• Set to “ ” (Monaural) (
➜
page 14).
• Press
STOP
to stop the unit.
Changing recording settings (Zoom microphone/Recording mode (XP/LP/SLP))
When the zoom is set to “ ”, the surrounding sound volume
is lowered, and the sound in front is clearly recorded.
When recording with zoom microphone, the audio becomes monaural.
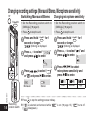
Press and hold
•
A-B
/
MENU
for 1 second or longer.
“ ” (blinking) is
displayed.
Press
q
/
g
to enter.
Press
u
,
i
to
select among “XP”, “LP”
and “SLP” and press
q
/
g
to enter.
How to set the
recording mode
(XP/LP/SLP)
• Press
STOP
to stop the unit.
* If noise bothers you when
recording/pla
ying in SLP
mode, use XP or LP mode.
1
2
3
STOP
MANUAL WIDE ZOOM
•
A-B
/
MENU
Recording
position switch
Advanced Operations

VQT2M17
16
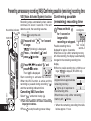
VAS (Voice Activated System) function
Recording stops automatically when silence
continues for about 3 seconds. If the unit
detects sound, the recording resumes.
Start recording to activate this function.
When the VAS function is active and the
recording is paused during recording, “ ”
and the recording indicator blink.
Canceling VAS function:
Select “ ” and enter in step
3
.
* T
urn the function off when recording
important matters.
*
Press
STOP
to stop the setting process midway.
1
2
3
Press +, –
to select “ ” and
press
q
/
g
to enter.
Press and hold
•
A-B
/
MENU
for 1 second
or longer.
“ ” (blinking) is displayed.
Confirming possible
(remaining) recording time
Press and hold
FOLDER/SPEED
for 1 second or
longer while
recording or stopped.
Possible recording time is
displayed for approx. 3 seconds.
When there is only a little
∗
remaining memory
left while recording, the display is automatically
changed to the remaining recording time
display.
*
When the possible recording time is 1000 hours or
longer, “ ” is displayed. (RR-US591 only)
• Press
STOP
to stop the unit.
Preventing unnecessary recording (VAS)/Confirming possible (remaining) recording time
Possible
recording time
The “ ” display while
stopped shows approximate
remaining memory.
“ ” lights up in response to
the remaining time.
When there is only a little
∗
remaining
memory left, “ ” blinks.
∗ When the remaining recording time falls
below approx. 1 hour.
Press
u
,
i
to select “ ” and
press
q
/
g
to enter.
Then “ ” is displayed.
hour minute
second
1
STOP
•
A-B
/
MENU
FOLDER/SPEED
Recording indicator

VQT2M17
17
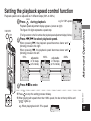
1
2
Press
FOLDER/SPEED
during playback.
Playback speed adjustment display appears. (screen at right)
The figure of 2 digits represents a speed step.
(
The figure returns to the file number after playback speed adjustment display finishes.)
Press
u
,
i
to select playback speed.
When pressing
i
, the playback speed becomes faster and “ ”
(blinking) moves to the right.
When pressing
u
, the playback speed becomes slower and “ ”
(blinking) moves to the left.
*
Press
STOP
to stop the setting process midway.
* When playing with speed other than 100% speed, the bar at the top blinks and
“
SPEED
” lights up.
3
Press
q
/
g
to enter.
e.g. When playing back with 75% speed
Playback speed can be adjusted at 21 different steps (50% to 200%).
50% 100% 200%
Setting the playback speed control function
e.g. for 100% speed
adjustable
in 10 steps
(at 5% intervals)
adjustable
in 10 steps
(at 10% intervals)
STOP
FOLDER/SPEED
Advanced Operations

VQT2M17
18
Press
u
,
i
to select “ ” “ ”
or “
” “ ”and press
q
/
g
to enter.
Reducing noise (EQ setting)
This function makes it easier to hear sounds during playback.
You cannot make this setting when “ ” is selected.
1
2
Setting Slight Return Playback
Slight Return Playback function: When
u
is pressed
during playback, the play point reverses about 5
seconds, and playback resumes from the point.
Press and hold
•
A-B
/
MENU
for 1 second or
longer
during playback.
EQ setting display appears.
Reducing noise (EQ setting)/Slight return playback
Canceling Noise reduction (EQ setting):
Select “ ” and enter in step
2
.
2
3
Press
u
,
i
to select “ ”
and press
q
/
g
to enter.
Then “ ” is displayed.
Press
+, –
to select “ ” and
press
q
/
g
to enter.
1
Press and hold
•
A-B
/
MENU
for 1 second
or longer.
“ ” (blinking) is displayed.
*
Press
STOP
to stop the setting process midway.
* When EQ is set to On, human voice can be heard more easily. However, components
of other sound ranges are reduced.
* Slight return playback cannot be done during A-B Repeat play (
➜
page 19).
• Press
STOP
to stop the unit.
Canceling Slight return playback:
Select “ ” and enter in step
3
.
When
“ ”
is selected, high range noise is reduced.
When
“ ”
is selected, both high range noise and
low range noise are reduced.
After setting, “ ” is displayed while playing.
STOP
•
A-B
/
MENU

VQT2M17
19
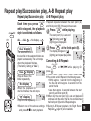
Each time you press
•
A-B
/
MENU
while stopped, the playback
style is switched as follows.
Repeat play/Successive play
ALL → ALL → No display →
“ALL” display
The selected file until
the last file in the selected folder are
played successively. The unit stops
when the playback finishes.
(The factory setting is “ALL”.)
“ALL ” display
Plays all files in the
folder repeatedly.
The display changes to “ ”
(lighting) and repeat play starts.
Canceling A-B Repeat:
Press
•
A-B
/
MENU
or
u
,
i
while playing. Or
press
STOP
.
Press
•
A-B
/
MENU
while playing.
1
A-B Repeat play
Playback repeats between the start point (A)
and finish point (B) if those points are set.
*
You cannot set A-B Repeat in the following cases;
•
Within approx. 1 second from the beginning of
the file and within approx. 2 seconds from the
end of the file
•
Less than approx. 2 seconds between the start
point (A) and finish point (B)
*
When only the start point (A) is set and playback
continues until the end of the file, the end becomes
the finish point (B) and A-B Repeat begins.
*
During A-B Repeat playback, the Slight Return
Playback (
➜
page 18) is not available.
The start point (A) is set and
“ ” (blinking) and “ ”
(lighting) are displayed.
Repeat play/Successive play, A-B Repeat play
No display
When the playback for
one file finishes, the unit stops.
“ ” display
Plays one file repeatedly.
* Select one of the above settings
and, press
q
/
g
to star
t playback.
Press
•
A-B
/
MENU
at the finish point (B).
2
STOP
•
A-B
/
MENU
Advanced Operations

VQT2M17
20
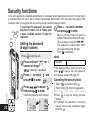
If you forget the password, you cannot
play files in folder A to D. Please write
it down in MEMO section (
➜
right) for
reference.
Setting the password
(4-digit number)
Press +, – to select “ ” and
press
q
/
g
to enter.
Press
u
,
i
to select “
”
and press
q
/
g
to enter.
Enters the password entry display.
1
2
3
• Press
STOP
to stop the unit.
Press and hold
•
A-B
/
MENU
for 1
second or longer.
“ ” (blinking) is displayed.
Press +, – to select a number
and press
q
/
g
to enter.
Move to the next digit and select a
number. Repeat this until the 4th digit.
(You can select a digit with
u
,
i
.)
The password is determined when
you finish entering the 4th digit.
Then “
” is displayed.
4
MEMO
Password
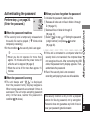
If the password has been set and you
press
q
/
g
to play a file, the password
entry display appears (
➜
page 21).
Canceling the security lock:
„ Select “ ” and enter in step
3
.
‟ P
erform step
4
. (Enter the password.)
* Press
STOP
to stop the setting process
midway.
*
To change the password, cancel the
security lock and set a password again
from step
1
.
Security functions
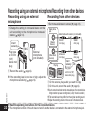
If you set a password, password authentication is necessary when playing back this unit or connecting to
a computer. When the unit is lost or stolen, the recorded data stored in this unit cannot be played or the
computer does not recognize this unit as long as the password does not match.
STOP
•
A-B
/
MENU
Page is loading ...
Page is loading ...
Page is loading ...
Page is loading ...
Page is loading ...
Page is loading ...
Page is loading ...
Page is loading ...
Page is loading ...
Page is loading ...
Page is loading ...
Page is loading ...
Page is loading ...
Page is loading ...
Page is loading ...
Page is loading ...
Page is loading ...
Page is loading ...
Page is loading ...
Page is loading ...
Page is loading ...
Page is loading ...
Page is loading ...
Page is loading ...
-
 1
1
-
 2
2
-
 3
3
-
 4
4
-
 5
5
-
 6
6
-
 7
7
-
 8
8
-
 9
9
-
 10
10
-
 11
11
-
 12
12
-
 13
13
-
 14
14
-
 15
15
-
 16
16
-
 17
17
-
 18
18
-
 19
19
-
 20
20
-
 21
21
-
 22
22
-
 23
23
-
 24
24
-
 25
25
-
 26
26
-
 27
27
-
 28
28
-
 29
29
-
 30
30
-
 31
31
-
 32
32
-
 33
33
-
 34
34
-
 35
35
-
 36
36
-
 37
37
-
 38
38
-
 39
39
-
 40
40
-
 41
41
-
 42
42
-
 43
43
-
 44
44


Panasonic RRUS551 - IC RECORDER Operating Instructions Manual
- Category
- MP3/MP4 players
- Type
- Operating Instructions Manual
- This manual is also suitable for
Ask a question and I''ll find the answer in the document
Finding information in a document is now easier with AI
Related papers
-
Panasonic H1208TY0 User manual
-
Panasonic RR-US300 Owner's manual
-
-
Panasonic RR-US950 User manual
-
-
-
-
-
-