Page is loading ...

1
Care and Use
Instructions
12 Cup
Automatic
Coffee Maker
Created Exclusively
For
Gevalia (Logo)
CM-22 Series

2
1. READ ALL INSTRUCTIONS BEFORE OPERATING OR USING THIS APPLIANCE.
2. Do not touch hot surfaces.
3. To protect against electrical shock, do not place cord, plugs, or appliance in water or other
liquids.
4. Close supervision is necessary when any appliance is used by or near children.
5. Unplug from outlet when not in use and before cleaning. Allow to cool before putting on or
taking off parts, and before cleaning the appliance.
6. Do not operate any appliance with a damaged cord or plug, after the appliance malfunctions,
or has been damaged in any manner. Return appliance to our authorized service facility for
examination, repair, or adjustment. See warranty for service.
7. The use of an accessory not recommended by the appliance manufacturer may result in fire,
electric shock or personal injury.
8. Do not use outdoors.
9. Do not let cord hang over edge of table or counter, or touch hot surfaces.
10. Do not place on or near a hot gas or electric burner or in a heated oven.
11. Do not move entire unit when appliance is ON or when carafe contains hot liquids or has just
finished brewing. Wait until the Coffee Maker has cooled down.
12. Prior to connecting or disconnecting the plug from the wall outlet, turn the unit “OFF” by pushing
the ON/OFF button once. (The Indicator Light encircling the ON/OFF button will not be
illuminated.)
13. Do not use appliance for other than intended use.
14. WARNING: To reduce the risk of fire or electric shock, do not remove bottom cover. No user-
serviceable parts are inside. Repair should be done by authorized personnel only.
15. Do not remove the Filter Basket during the brew cycle or while the Carafe is in place.
16. Scalding may occur if the Filter Basket is removed or the Water Reservoir Cover is lifted during
the brewing cycle.
17. Always use cold filtered or bottled water for best results. Warm water or other liquids could cause
damage to the Coffee Maker.
18. If the supply cord is damaged, it must be replaced by the manufacturer.
Short Cord Instructions
A short power-supply cord is provided to reduce the risks of becoming entangled in or tripping over a
longer cord. Extension cords are available and may be used if care is exercised in their use. If an
extension cord is used, the marked electrical rating of the extension cord should be at least as great as
the electrical rating of the appliance, and the cord should be arranged so it will not drape over the
counter top or table top where it can be pulled on by children or tripped over unintentionally.
This appliance has a polarized plug (one blade is wider than the other). To reduce the risk of electric
shock, the plug is intended to fit into a polarized outlet only one way. If the plug does not fit fully
IMPORTANT SAFEGUARDS
When using electrical appliances, basic safety precautions should always be
followed to reduce the risk of fire, electric shock, and/or injury to
persons including the following:

3
into the outlet, reverse the plug. If it still does not fit, contact a qualified electrician. Do not attempt to
modify the plug in any way.
If the appliance is of the grounded type, the extension cord should be a grounded – type 3 – wire
cord.
GLASS CARAFE PRECAUTIONS:
To avoid damage of, or injury from the Carafe, please follow these instructions.
1. The glass Carafe is designed for use with this appliance only. It must never be used in any other
drip-type Coffee Maker, on a range top, or in a microwave oven.
2. Never clean inside of Carafe with a hard implement, scouring pad or other abrasive cleaners.
Scratches in the glass can eventually cause the glass Carafe to break.
3. Never stir inside the Carafe with a spoon or other utensils.
4. Does not use a cracked glass Carafe or a Carafe having a loose or weakened handle. If the glass
Carafe should break, do not consume beverage.
5. Never use ice cubes in the Carafe, or place the Carafe in the refrigerator.
6. Never drink directly from Carafe. Always check beverages for broken glass before drinking.
7. Do not use by or near children. This product is not intended for use by children.
8. Do not tilt or overturn the Carafe, as liquids may flow out.
9. When carrying the Carafe, always use the handle.
10. Do not set the hot Carafe on a cool or wet surface.
DESCRIPTION OF PARTS
Control Panel
MIN Use this button to display the correct minute when setting the time.
HOUR Use this button to display the correct hour when setting the time.
AUTO ON
Indicator Light

4
& Button This button is used to initiate the programmed pre-set brew time .You may also cancel the pre-set
brew time by pressing this button as well.
ON/OFF
Indicator Light
& Button Press this button to turn the unit ON and start the brewing process .You can also turn the unit
OFF by pressing this button when the brewing cycle is complete .The red Indicator Light
encircling the ON/OFF button will illuminate when the Coffee Maker is ON.
PROGRAM Use this button to program your Coffee Maker to start brewing at a specified time. The green
Indicator Light encircling the AUTO ON button will illuminate when the Coffee Maker has been
programmed.
SAVE THESE INSTRUCTIONS
HOW TO USE THE AUTOMATIC 12 CUP COFFEE MAKER
Before first use:
Before the first use it is suggested that you clean your new Coffee Maker. Simply run through 2 brew
cycles as described below in the „PREPARATION FOR USE‟ section without using coffee or a
coffee filter. In addition, before first use, the unit should be wiped down with a clean damp cloth. The
Carafe, Carafe Lid and Filter Basket should be washed in warm, soapy water and rinsed thoroughly.
PREPARATION FOR USE – Manual Operation
1. Place the Coffee Maker on a hard, flat surface. With the Coffee Maker turned off, plug the
unit into a 120V outlet.
2. Fill the Carafe with fresh, cold water (preferably bottled or filtered water). Open the “Swing
Up” Reservoir Cover and pour the water into the Water Reservoir. The number of cups is
shown by the Water Level Indicator. Pour to the desired number of cups. Do not exceed the
maximum fill line on the indicator. We do not recommend making less than 4 cups.
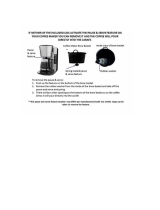
Recommendation: When poring into the Water Reservoir, rest the spout of the Carafe on the side
of the Coffee Maker as pictured below and pour slowly.
OPERATING NOTICE
To avoid Filter Basket overflow during brewing:
1. Make sure the Filter Basket is fully inserted into the Coffee Maker.
2. Ensure the Carafe is correctly inserted in the Coffee Maker with the Lid properly
positioned to activate the Pause & Serve mechanism.
3. Place only one filter paper into the basket; insure the sides of the paper filter are not
folded and are pushed up against the wall of the Filter Basket.
After the brewing is completed, there may still be some HOT liquid in the Filter Basket.
Allow to drain completely before removing the Filter Basket carefully. Do not move the
Coffee Maker immediately after operation.

5
Notes:
There is a drip hole on the back of the Water Reservoir to prevent exceeding the
capacity of the Coffee Maker. If you add too much water, it will drip out from the
back of the unit (This is normal if you exceed the max fill line and the unit is not
leaking).
The amount of brewed coffee will be less than the water placed in the Coffee
Maker since about 10% is absorbed by the coffee grounds and the filter.
Place the Carafe with the Lid properly positioned in the Coffee Maker making sure
it is fully seated on the Warming Plate. This will activate the Pause & Serve
mechanism.
CAUTION: To avoid Filter Basket overflow, the Carafe must fit securely into the Coffee
Maker with the Lid on. If not properly positioned on the Warming Plate, hot water or hot
coffee could overflow from the Filter Basket.
3. Remove the Filter Basket by firmly grasping the center handle and pulling it towards you
until it separates from the Coffee Maker. Placing it on a flat surface in the upright position,
insert a Gevalia #4 cone filter into the Filter Basket, folding the seamed edges to insure a snug
fit in the basket. Use a fresh filter for each carafe of coffee brewed.

6
4. Add Gevalia coffee using the measuring scoop provided. Brew Gevalia coffee with the coffee
water ratio you normally use when you prepare ground coffee. If you prefer strong coffee, we
recommend the following European method, which produces a rich, full-bodied flavor. Use
one level Gevalia scoop for each cup (6 fluid ounces) or 10 level scoops per full pot (12 cups)
of coffee. Experiment with the amount of coffee used in order to adjust the flavor to your
taste. Do not exceed 12 level scoops of coffee.
5. Once you have finished placing the filter and the coffee into the Filter Basket, slide the Filter
Basket back into the Coffee Maker by aligning the edges on the right and left sides of the
Filter Basket with the rails of the Coffee Maker and gently push it into place.
6. Close the Water Reservoir Cover.
7. With the Water Reservoir Cover firmly closed and the Carafe securely in place, press the
ON/OFF button once. The red Indicator Light encircling the ON/OFF button will illuminate
to indicate the brew cycle has started.
CAUTION:
1. Never remove the Filter Basket or open the Water Reservoir Cover during the
brewing cycle; as hot steam could cause injury. If water/coffee is not draining from
the Filter Basket after several seconds with the Carafe properly in place on the
Warming Plate, IMMEDIATELY unplug the unit and wait 10 minutes before
opening and checking the Filter Basket.
2. Do not remove the Filter Basket while the Carafe is in place. Always remove the
Carafe first.

7
8. When the brewing process is completed and the Water Level Indicator is empty, there will
still be hot liquid in the Filter Basket. Wait a few minutes for the rest of the liquid to drip
through the coffee into the carafe.
9. After coffee grounds have cooled, remove the Carafe from the Coffee Maker and carefully
slide out the Filter Basket by grasping the center handle and slowly pulling it towards you
until it separates from the Coffee Maker. Discard the used coffee filter and grounds. Replace
the Filter Basket and return the Carafe to the Warming Plate.
CAUTION: When removing the Filter Basket, the Filter Basket may be heavy due to
saturated coffee grounds.
CAUTION: The Coffee Maker becomes very hot during the brew cycle. Please handle
with extreme care.
10. The Warming Plate will continue to operate for up to two hours after the brew cycle has been
completed, as long as the red Indicator Light encircling the ON/OFF button is illuminated.
11. Always switch the Coffee Maker to OFF when the Carafe is empty or you no longer want to
keep the coffee hot. The Coffee Maker will shut off automatically after 2 hours. When the
Coffee Maker is OFF, the red Indicator Light encircling the ON/OFF button will no longer be
illuminated.
12. If two (2) or more pots of coffee are to be made in succession, it is recommended that the
Coffee Maker be allowed to cool for 10 minutes between each brewed pot. The Filter Basket
should also be rinsed out after each brew cycle.

8
PROGRAMMING YOUR COFFEE MAKER – Automatic Operation
SETTING THE CLOCK
1. You may set the clock any time before or after brewing. The time on the clock must be set
prior to programming the Coffee Maker.
2. Press the HOUR and then the MIN buttons to set the current time. Press and hold the buttons
to scroll through numbers quickly. When the number displayed approaches the desired
setting, press and release the button to advance one digit at a time. Make sure the AM/PM
indicator is set properly.
Note: AM is indicated in the upper left hand corner of the LED digital clock/display and PM
in the lower left hand corner.
SETTING THE AUTO BREW START TIME
1. In order to use the Auto Brew feature, you must first set the clock. Please see instruction
above for setting the clock.
2. To set the desired Auto Brew start time, first press the PROGRAM button. The word
PROGRAM will begin flashing on the LED digital clock/display to indicate an Auto Brew
start time is being set.
3. Set the time you want the coffee to begin brewing by using the Hour and Min buttons,
following the same directions for setting the clock. Make sure the AM/PM indicator is set
properly.
Note: After setting the Auto Brew start time, the PROGRAM indicator will automatically
stop flashing after a few seconds and the display will return to the current time.
4. To confirm your Auto Brew start time, simply press the PROGRAM button and the pre-set
time will be displayed for a few seconds on the LCD digital clock/display. The PROGRAM
indicator will continue to flash while confirming the pre-set Auto Brew time. It will
automatically return to the current time after a few seconds.
5. After setting the Auto Brew start time, prepare the coffee following the directions in
preparation for use.
6. Press the AUTO ON button. The green Indicator Light encircling the button will illuminate
and the word AUTO will be displayed in the upper right hand corner of the LCD digital
clock/display.
7. Your Coffee Maker will automatically begin brewing at the pre-set time. When the brew
cycle begins, the green Indicator Light encircling the AUTO ON button will go out and the
red Indicator Light encircling the ON/OFF button will illuminate to indicate the Coffee Maker
is in operation.

9
8. To re-set the Auto Brew time to the same pre-set time for the next day, simply press the
AUTO ON button. The green Indicator Light encircling the button will illuminate and the
word AUTO will again be displayed in the upper right hand corner of the LCD digital
clock/display.
PAUSE & SERVE
Allows you to interrupt the brewing cycle and pour a cup of coffee before the entire Carafe is
finished brewing.
CAUTION: While this will temporarily stop the coffee from dripping into the Carafe, it
does not stop the brewing cycle. After serving, the Carafe should be immediately returned
to the Warming Plate to prevent the Filter Basket from overflowing. Make sure the Carafe
and Filter Basket are positioned firmly against the back of the Coffee Maker.
NOTE: While the pause and serve is a convenient way to pour a cup of coffee mid-cycle, we
recommend you wait until the completion of the brew cycle as the strength and flavor of coffee
poured mid-cycle will vary from the finished brew.
CLEANING YOUR COFFEE MAKER
1. Always unplug the Coffee Maker and allow the unit to cool before cleaning.
2. Wash the Carafe/Carafe Lid and removable Filter Basket in hot, sudsy water. DO NOT place
any parts of your Coffee Maker in the dishwasher.
3. Never use harsh or abrasive cleansers on any part of your Coffee Maker. To clean, simply
wipe off with a soft, damp cloth. The Warming Plate may be wiped with a clean, damp cloth
when necessary. For hard to remove stains, use a plastic mesh pad or cloth dampened in
vinegar.
IMPORTANT: Never immerse the Warming Plate or main housing in water or any other
liquid. Do not try to clean the inside of the Water Reservoir with a cloth, as this will leave a
residue of lint and may clog your Coffee Maker. Just rinse with cold water periodically.
DECALCIFYING YOUR COFFEE MAKER
Calcium build-up frequently occurs in drip Coffee Makers. This build-up is normal and is
caused by minerals commonly found in drinking water. Periodically, your Coffee Maker will
need cleaning to remove calcium or mineral deposits that may form. You will know when
your unit will need decalcifying when you notice an obvious slow down in brewing time. We
recommend decalcifying your unit with Gevalia Cleancaf® Cleaner & Descaler or a solution
of white vinegar and cold water. Nontoxic, biodegradable and odorless Cleancaf® is a quick
and easy way to keep Coffee Makers clean, fresh and odor free. Use bi-monthly to remove or
prevent oil residue and mineral buildup. You can order Cleancaf® by calling 1-800-
GEVALIA (1-800-438-2542) or visiting us at www.gevalia.com.

10
A solution of two tablespoons of white vinegar to one Carafe (60 ounces) of cold water also
works. Pour this solution into the Water Reservoir, and follow your normal operating
instructions, without a paper filter or any coffee in the Filter Basket. When the brew cycle is
finished, empty the Carafe and rinse with water. Refill the Water Reservoir with cold water
only and repeat the brew cycle with water only. Refill the Water Reservoir again with cold
water and repeat the brew cycle a second time using only water. This will rinse out any
remaining vinegar solution.
FOR SERVICE:
Call the Gevalia Kaffe Import Service at 1-800-438-2542 for further information on repair or
replacement of your defective Coffee Maker.
Gevalia Kaffe is only available through the Gevalia Kaffe Import Service.
To place an order or obtain additional information, call us toll free at:
1-800-GEVALIA (1-800-438-2542)
NOTE: To facilitate service and better answer your questions, please have the model number
of your Gevalia Coffee Maker and the date code of manufacture available, when calling .This
model information can be located by looking at the bottom of your coffee maker for the word:
„MODEL‟.
The date code information is located either on the bottom of your Coffee Maker as a 4-digit
code and on the blades of your electrical plug. On the blades of your electrical plug, the date
code is the 4-digit number that follows a letter „S‟.
Printed in China
CM2205 V.1.0
LIMITED WARRANTY
Global Marketing Corp. warrants this appliance shall be free from
defects in materials and workmanship under normal home use for a
period of one year from the date of purchase or receipt. During that
period, defects will be repaired or the product will be replaced at the
manufacturer‟s option without charge. This warranty does not cover
damage or failure which results from alteration, accident, misuse,
abuse, neglect, commercial use, or improper maintenance as
published in our use and care book. Incidental or consequential
damages are not covered by this guarantee. This guarantee expressly
excludes glass and thermal carafes broken by accident or misuse.
However, replacement carafes can easily be ordered by calling
Gevalia Kaffe Import Service at 1-800-438-2542. This warranty gives
you specific legal rights, and you may also have other rights which
vary from state to state.
/