Page is loading ...

78305, 79064
A DIVISION OR SUBSIDIARY OF DOUGLAS DYNAMICS, L.L.C.
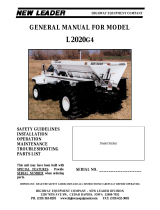
PARTS LIST
78305 12V Spinner Drive Service Kit
Item Part Qty Description
1782831Spinner Shaft
2 93100 1 Motor 12V DC 1/3 hp
3 78297 1 Chute Motor Base Plate
4 93101 1 10-Tooth Cogged Belt Pulley
5 78287 1 Chute Motor Cover
6 78270 1 1/4" Well Nut Fasteners Kit*
7782851Gear Belt
8782981Idler Kit
9 68511 2 10-32 Hex Locknut GB SS
10 95227 2 #10 Flat Washer, Type A SS
11 48954 1 1/4-20 x 1-3/4 Set Screw SS
SS = Stainless Steel G = Grade
* Lock washers from kit not used in this application.
79064 24V Spinner Drive Service Kit
Item Part Qty Description
1782831Spinner Shaft
2 96270 1 Motor 24V DC 1/3 hp
3 78297 1 Chute Motor Base Plate
4 93101 1 10-Tooth Cogged Belt Pulley
5 78287 1 Chute Motor Cover
6 78270 1 1/4" Well Nut Fasteners Kit*
7782851Gear Belt
8782981Idler Kit
9 68511 2 10-32 Hex Locknut GB SS
10 95227 2 #10 Flat Washer, Type A SS
11 48954 1 1/4-20 x 1-3/4 Set Screw SS
SS = Stainless Steel G = Grade
* Lock washers from kit not used in this application.
Spinner Drive Service Kit
Poly Hopper Spreaders
November 15, 2012
Lit. No. 94597, Rev. 01
1
2
6
7
8
9
10
11
3
4
5

78305, 79064
Lit. No. 94597, Rev. 01 2 November 15, 2012
INSTALLATION INSTRUCTIONS
Park the vehicle on a smooth, level, hard surface,
such as concrete. Turn the vehicle ignition to the
"OFF" position and remove the key.
Disassemble Spinner Drive
1. Remove and retain the two 3/8" x 1" cap screws,
3/8" fl at washers and 3/8" lock washers securing
the chute motor cover. Remove and discard
the 3/8" x 1-1/4" carriage bolt, 3/8" fl at washer,
3/8" lock washer and 3/8" nut. Remove and retain
the wiring grommet. Remove and discard the
chute motor cover.
2. Loosen the 2 set screws securing the spinner
shaft on the bottom bearing of the chute assembly.
3. Remove and retain the 2 remaining 3/8" x 1" cap
screws, 3/8" fl at washers and 3/8" lock washers
from the chute motor base plate.
4. Lift the spinner drive unit out of the chute body
and place it on a secure work surface.
Retain
Washers
for 1" Cap
Screws
3/8" x 1-1/4" Carriage
Bolt
Chute Motor
Base Plate
Chute Motor
Cover
Retain
Grommet
Retain 3/8" x 1" Cap
Screws
Nut & Washers
for 1-1/4" Carriage
Bolt
CAUTION
Read this document before installing the
spinner drive service kit.
CAUTION
Use standard methods and practices when
attaching spreader and installing accessories,
including proper personal protective safety
equipment.
CAUTION
Disconnect electric power at spreader
electrical wiring harness connection and tag
out if required before servicing or performing
maintenance.

78305, 79064
Lit. No. 94597, Rev. 01 3 November 15, 2012
5. Loosen the four 3/8" x 1-1/4" carriage bolts,
3/8" nuts and 3/8" lock washers securing the
motor tension plate and slide the motor toward the
spinner shaft.
6. Drop the gear belt to the spinner disc.
7. Remove and discard the motor tension plate
hardware, motor tension plate, motor and
10-tooth pulley.
8. Loosen the 2 set screws on the top bearing and
separate the chute motor base plate from the
spinner shaft assembly.
9. Remove the two 3/8" x 1-1/4" square carriage
bolts securing the top bearing to the chute motor
base plate. Retain the fasteners and the bearing.
Discard the chute motor base plate.
10. Remove and retain the 5/16" x 2-1/4" cap screw
and 5/16" nut securing the spinner disc to the
shaft. Remove and retain the spinner disc. Discard
the gear belt.
11. Remove the jam nut and set screw from the
40-tooth pulley. Remove the pulley from the
spinner shaft. Retain the pulley. Discard the
spinner shaft, jam nut and set screw.
3/8" Lock
Washers
3/8" Nuts
10-Tooth
Pulley
3/8" x 1-1/4"
Carriage Bolts
Motor
Motor
Tension Plate
Chute Motor
Base Plate
Retain Top Bearing
and Fasteners
Retain 3/8" x 1-1/4"
Carriage Bolts
Spinner Shaft
Gear Belt
Set Screw and
Jam Nut
Retain 40-Tooth
Pulley
Retain 5/16" x 2-1/4" Cap
Screw and Nut
Retain
Spinner Disc

78305, 79064
Lit. No. 94597, Rev. 01 4 November 15, 2012
4. Slide the 10-tooth pulley up until the bottom is
fl ush with the end of the motor shaft. Tighten the
set screw on the fl at of the motor shaft.
5. Install the idler kit components:
a. Mount the idler pulley to the idler arm using
the supplied 3/8" x 1-3/4" cap screw, 3/8" lock
washer and 3/8" nut, making sure that the cap
screw head is on the top.
b. Mount the idler arm to the replacement chute
motor base plate using the two 3/8" washers,
5/16" x 1-1/8" shoulder bolt and 5/16" locknut.
Ensure that the idler arm can pivot freely.
c. Install the spring between the idler arm and
the chute motor base plate.
Install Replacement Components
1. Install the spinner disc on the replacement spinner
shaft using the retained 5/16" x 2-1/4" cap screw
and 5/16" nut.
2. Mount the top bearing on the bottom side of the
replacement chute motor base plate using the
retained 3/8" x 1-1/4" square carriage bolts, lock
washers and nuts.
3. Center the replacement 10-tooth pulley, sleeve
up, below the motor mount bracket. Position the
replacement motor on the motor mount bracket,
making sure to slide the pulley onto the motor
shaft. Secure the motor using the supplied
#10 washers and lock nuts.
3/8" x 1-1/4"
Carriage Bolts
Chute Motor
Base Plate
3/8" Nuts
3/8" Lock Washers
Top Bearing
Motor Mount
Bracket
Locknuts
#10 Washers
Motor
10-Tooth Pulley
5/16" Locknut
3/8" Lock
Washer
3/8" Nut
3/8" Washers
Spring
Idler Pulley
Idler Arm
3/8" x 1-3/4" Cap Screw
5/16" x 1-1/8"
Shoulder Bolt

78305, 79064
Lit. No. 94597, Rev. 01 5 November 15, 2012
13. Position the replacement chute motor cover over
the unit and mark the mounting hole locations on
the back wall of the chute.
14. Remove the cover and drill two 3/8" diameter
holes through the chute wall. Install the
1/4" well nuts from the well nut fasteners kit into
the drilled holes.
15. Replace the chute motor cover and secure it with
the 1/4" x 1-1/2" cap screws and 1/4" fl at washers
from the well nut fasteners kit into the well nuts.
16. Feed the wires through the retained wiring
grommet and slide the grommet into the slot on
the chute motor cover.
6. Slide the spinner shaft assembly into the bottom
bearing on the chute assembly.
7. Slide the chute motor base plate onto the spinner
shaft and set it into place in the chute.
8. Secure the chute motor base plate to the chute
with the 4 retained 3/8" x 1" cap screws, 3/8" fl at
washers and 3/8" spring lock washers.
9. Apply medium-strength threadlocker to the
supplied 1/4" x 1-3/4" set screw and use it to
reinstall the 40-tooth pulley.
10. Tighten the set screws on the upper and lower
bearings.
11. Confi rm the alignment of the 10-tooth pulley
with the 40-tooth pulley. Adjust the height of the
10-tooth pulley if necessary.
12. Stretch the idler arm out of the way and install the
supplied gear belt.
Wiring Grommet
1/4" Washers
1/4" x 1-1/2"
Cap Screws 1/4" Well
Nuts
Mark position for
drilled mounting
hole (both sides).
Chute Motor
Cover

78305, 79064
Lit. No. 94597, Rev. 01 6 November 15, 2012
Copyright © 2012 Douglas Dynamics, L.L.C. All rights reserved. This material may not be reproduced or copied, in whole or in part, in any
printed, mechanical, electronic, fi lm or other distribution and storage media, without the written consent of the company. Authorization to
photocopy items for internal or personal use by the company's outlets or spreader owner is granted.
The company reserves the right under its product improvement policy to change construction or design details and furnish equipment when
so altered without reference to illustrations or specifi cations used. This equipment manufacturer or the vehicle manufacturer may require or
recommend optional equipment for spreaders. Do not exceed vehicle ratings with a spreader. The company offers a limited warranty for all
spreaders and accessories. See separately printed page for this important information.
Printed in U.S.A.
/