ekwb EK-Quantum Velocity D-RGB Mounting Plate Installation guide
- Type
- Installation guide

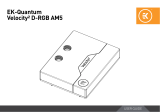
INSTALLATION MANUAL
EKQuantum
Velocity RGB/D-RGB Mounting Plate

- 2 -
This product is intended for installation by expert users only. Please
consult with a qualified technician. Improper installation may result
in damage to your equipment. EK Water Blocks assumes no liability
whatsoever, expressed or implied, for the use of these products or their
installation. The following instructions are subject to change without
notice. Please, read the manual carefully before beginning with the
installation process.


- 4 -
STEP 1
REPLACING THE MOUNTING PLATE AND RGB/D-RGB LED
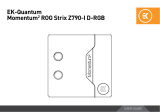
STEP 1
Unscrew the four (4) screws from the backside of the CPU water
block using the Phillips head screwdriver. Store the screws for later
use.
STEP 2
After the removal of screws, take off the Copper base and the
Mounting plate with preinstalled LED from the CPU water block.
Please store the Copper base for later use.
Mounting plate
STEP 2
M4 X 14
7991DIN Screw
Copper base
LED
connector

- 5 -
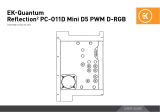
STEP 3
Take the Mounting plate and preinstalled LED from the box and
carefully attach them to the CPU water block. Make sure that screws-
holes are aligned.
Pay special attention to the insert orientation relative to the copper
base and water block top!
STEP 4
Before reassembly of the water block, it is crucial that the preformed
gasket (o-ring) is placed into the gap between the mounting plate
and the water block top.
Screw the four (4) screws back in but don’t overdo it with the force.
M4 X 14 7991DIN Screw
STEP 3
STEP 4
Mounting plate
LED
connector
Jet insert
Copper base

- 6 -
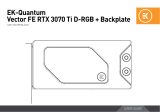
CONNECTING THE RGB LED STRIP
4-Pin RGB Connector
STEP 1
Plug the 4-pin connector from water block’s and fan’s RGB LED light
to the RGB HEADER on the motherboard. The LED will work if the pin
layout on the header is as follows: +12V G R B.
Please ensure that the arrow indicated on the connector
is plugged into the +12V line as indicated on your
motherboard.
Failure to do so, will damage your motherboard or LED strip.
STEP 1
RGB Header

- 7 -
CONNECTING THE D-RGB LED STRIP
Plug the 3-pin connector from the water block’s D-RGB LED light in
the D-RGB HEADER on the motherboard. The LED will work if the pin
layout on the header is as follows: +5V, Digital.
Please ensure that the arrow indicated on the connector is
plugged into the +5V line as indicated on your motherboard.
If you put LED Diode to the 12V RGB HEADER you can
damage the LEDs.
D-RGB Header
RGB Header
3-Pin D-RGB Connector
STEP 1

For assistance please contact:
http://support.ekwb.com/
EKWB d.o.o.
Pod lipami 18
1218 Komenda
Slovenia - EU
EKWaterBlocks
@EKWaterBlocks
ekwaterblocks
ekwaterblocks
EKWBofficial
SUPPORT AND SERVICE
SOCIAL MEDIA
-
 1
1
-
 2
2
-
 3
3
-
 4
4
-
 5
5
-
 6
6
-
 7
7
-
 8
8


ekwb EK-Quantum Velocity D-RGB Mounting Plate Installation guide
- Type
- Installation guide
Ask a question and I''ll find the answer in the document
Finding information in a document is now easier with AI
Related papers
-
 ekwb EK-Quantum Velocity² D-RGB Installation guide
-
 ekwb EK-Quantum Velocity² D-RGB Installation guide
-
 ekwb EK-Quantum Momentum² ROG Strix Z790-I D-RGB Installation guide
-
 ekwb EK-Quantum Momentum² ROG Maximus Z790 Extreme D-RGB Installation guide
-
ekwb sTRX4 EK-Quantum magnitude CPU WATER BLOCK User manual
-
 ekwb EK-Mana MSI MAG Z690 TORPEDO EK X D-RGB Installation guide
-
 ekwb EK-Quantum Reflection² PC-O11D Mini D5 PWM D-RGB – Plexi Installation guide
-
 ekwb EK-Quantum Vector FE RTX 3070 Ti D-RGB Installation guide
-
 ekwb EK-Quantum Vector² Strix/TUF RTX 3090 Ti D-RGB ABP Set -Nickel + Plexi Installation guide
-
ekwb Velocity-AMD User guide


