
Operating instructions
for the W 1930i
Washing Machine
To prevent accidents and reduce
the risk of damaging the machine,
ö
read the Operating Manual
before installing or using
the machine. M.-Nr. 04 612 680

Contents
Guide to the machine. . . . . . . . . . . . . . . . . . . . . . . . . . . . . . . . . . . . . . . . . . . . . . . 3
Warning and Safety instructions . . . . . . . . . . . . . . . . . . . . . . . . . . . . . . . . . . . . . 5
Preparation for use
Help protect our environment . . . . . . . . . . . . . . . . . . . . . . . . . . . . . . . . . . . . . . . . . 6
Operating Instructions
Economical usage . . . . . . . . . . . . . . . . . . . . . . . . . . . . . . . . . . . . . . . . . . . . . . . . . . 7
Preparing the Laundry . . . . . . . . . . . . . . . . . . . . . . . . . . . . . . . . . . . . . . . . . . . . . . . 8
End of Program . . . . . . . . . . . . . . . . . . . . . . . . . . . . . . . . . . . . . . . . . . . . . . . . . . . 10
Changing the program sequence . . . . . . . . . . . . . . . . . . . . . . . . . . . . . . . . . . . . . 11
Adding detergent. . . . . . . . . . . . . . . . . . . . . . . . . . . . . . . . . . . . . . . . . . . . . . . . . . 12
Adding fabric softener or starch . . . . . . . . . . . . . . . . . . . . . . . . . . . . . . . . . . . . . . 13
Program selection . . . . . . . . . . . . . . . . . . . . . . . . . . . . . . . . . . . . . . . . . . . . . . . . . 14
Program sequence. . . . . . . . . . . . . . . . . . . . . . . . . . . . . . . . . . . . . . . . . . . . . . . . . 16
Textile care symbols. . . . . . . . . . . . . . . . . . . . . . . . . . . . . . . . . . . . . . . . . . . . . . . . 18
Additional options . . . . . . . . . . . . . . . . . . . . . . . . . . . . . . . . . . . . . . . . . . . . . . . . . 19
Delay start/Time remaining indicator . . . . . . . . . . . . . . . . . . . . . . . . . . . . . . . . . . . 20
User-Maintenance Instructions
Cleaning and Care. . . . . . . . . . . . . . . . . . . . . . . . . . . . . . . . . . . . . . . . . . . . . . . . . 21
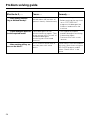
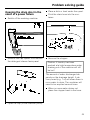
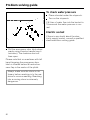
Problem solving guide . . . . . . . . . . . . . . . . . . . . . . . . . . . . . . . . . . . . . . . . . . . . . . 25
After-sales service . . . . . . . . . . . . . . . . . . . . . . . . . . . . . . . . . . . . . . . . . . . . . . . . . 31
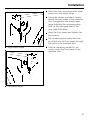
Installation Instructions
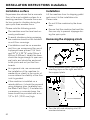
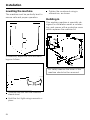
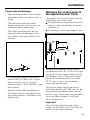
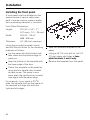
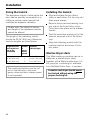
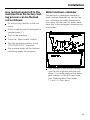
Installation . . . . . . . . . . . . . . . . . . . . . . . . . . . . . . . . . . . . . . . . . . . . . . . . . . . . . . . 32
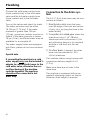
Plumbing . . . . . . . . . . . . . . . . . . . . . . . . . . . . . . . . . . . . . . . . . . . . . . . . . . . . . . . . 40
Electrical connection . . . . . . . . . . . . . . . . . . . . . . . . . . . . . . . . . . . . . . . . . . . . . . . 41
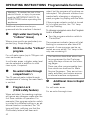
Programmable functions . . . . . . . . . . . . . . . . . . . . . . . . . . . . . . . . . . . . . . . . . . . . 42
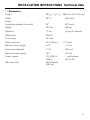
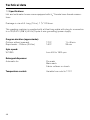
Technical data. . . . . . . . . . . . . . . . . . . . . . . . . . . . . . . . . . . . . . . . . . . . . . . . . . . . 47
Contents
2

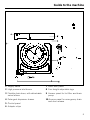
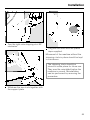
Guide to the machine
1 Supply cable
2 High pressure inlet hoses
3 Flexible drain hose, with detachable
swivel elbow
4 Detergent dispenser drawer
5 Control panel
6 Adapter strips
7 Inner door panel
8 Four height adjustable legs
9 Access panel for lint filter and drain
pump
10 Access panel for emergency drain
and door release
Guide to the machine
3

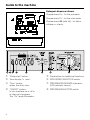
Guide to the machine
b “Delay start” button.
c Time display “h mins”.
d “Door” button;
opens the drum door.
e “ON/OFF” button;
to turn machine on or off or
to interrupt a program.
The “On” lamp illuminates.
Detergent dispenser drawer
Compartment i - for the pre-wash.
Compartment j - for the main wash.
Compartment
p (with lid) - for fabric
softener or starch.
f Pushbuttons for additional functions.
g SPIN SPEED SELECTOR switch.
h PROGRAM SEQUENCE indicators
(LED indicator lamps).
i PROGRAM SELECTOR switch.
Guide to the machine
4

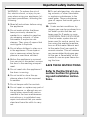
Important safety instructions
WARNING – To reduce the risk of
fire, electric shock, or injury to per-
sons when using your appliance, fol-
low basic precautions, including the
following:
1. Read all instructions before using
the appliance.
2. Do not wash articles that have
been previously cleaned in,
washed in or soaked in gasoline,
dry-cleaning solvents, or other
flammable or explosive sub-
stances. They give off vapors that
could ignite or explode.
3. Do not allow children to play on or
in the appliance. Close supervi-
sion is necessary when the ap-
pliance is used near children.
4. Before the appliance is removed
from service or discarded, remove
the door to the washing compart-
ment.
5. Do not reach into the appliance if
the drum is moving.
6. Do not install or store this ap-
pliance where it will be exposed
to weather.
7. Do not tamper with the controls.
8. Do not repair or replace any part of
the appliance, or attempt any ser-
vicing unless specifically recom-
mended in the user-maintenance
instructions or in published user-
repair instructions that you under-
stand and have the skills to carry
out.
9. Do not add gasoline, dry-clean-
ing solvents, or other flammable
or explosive substances to the
wash water. These substances
give off vapors that could ignite or
explode.
10. Under certain conditions, hy-
drogen gas may be produced in a
hot water system that has not
been used for 2 weeks or more.
HYDROGEN GAS IS EXPLOSIVE.
If the hot water system has not
been used for such a period, be-
fore using the washing machine,
turn on all hot water faucets and
let the water flow from each for
several minutes. This will release
any accumulated hydrogen gas.
As the gas is flammable, do not
smoke or use an open flame dur-
ing this time.
SAVE THESE INSTRUCTIONS
Refer to the Electrical Con-
nection Section for ground-
ing and installation instruc-
tions.
Important safety instructions
5

OPERATING INSTRUCTIONS Help protect our environment
Warning - To reduce the risk of fire,
electric shock, or injury to persons,
read the IMPORTANT SAFETY IN-
STRUCTIONS before operating this
appliance.
Disposal of the packing
material
The transport and protective packing is
mostly manufactured from the following
recycled or recyclable materials:
– corrugated paper/cardboard
– polystyrene - CFC-free
– polystyrene foil (transparent)
– Untreated wood
– Polypropylene (PP) strapping
Rather than throwing these materials
away, please take them to your com-
munity recycling center.
Disposal of your old machine
Old machines contain materials which
can be recycled. Please contact your
recycling center or scrap merchant be-
fore disposing of the appliance, and
render the machine inoperative as per
the “Warning and Safety Instructions”
OPERATING INSTRUCTIONS Help protect our environment
6

Economical usage
The key to good wash results is finding
the correct combination of detergent
and temperature, and then allowing the
washing machine to optimize their
usage through its programming. Pro-
gram lengths can vary for this reason.
With the “Hydromatic” system, the
drum can revolve at various speeds.
Faster and slower agitation speeds,
along with pauses for soaking, com-
bine to ensure excellent results.
The automatic load control feature en-
sures the correct water level for the
type of fabric and load being washed
(even though it may appear as if there
is too little water in the drum!).
Because of the accurately balanced
drum and special sound insulation, ma-
chine noise is minimal while operating.
The fully electronic controls offer a com-
bination of simple operation with many
optional features. For instance, since a
main wash generally gives good results
for a normal load, the pre-wash cycle
has been made a user selectable op-
tion, saving time,water and energy over
older full cycle machines.
Economy
For optimum economical usage, re-
member the following tips:
– The automatic load control feature
will adjust the water level for loads
up to 11 lbs (5 kg). Washing with the
maximum load specified for each
program uses water and energy to
the best advantage.
– Use only the correct amount of deter-
gent required for the water hardness
in your area. Miele recommends the
use of powder detergents, as their
characteristics allow them to perform
better in this machine than liquid
detergents.
If the wash is not heavily stained, select
a lower temperature than indicated on
the wash care label.
Economical usage
7

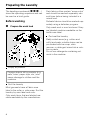
Preparing the Laundry
The headings numbered (
1,2,3,...)
show the operating sequence and can
be used as a brief guide.
Before washing
1 Prepare the wash load
Empty all pockets.
Foreign objects left in pockets (e.g.
nails, coins, paper clips, etc.) can
cause damage to clothes and the
machine.
Sort the laundry
Most garments have a Fabric care
label in the collar or side seam. Sort the
laundry by care label and color.
Only wash items that are labeled ma-
chine washable by the manufacturer.
Dark fabrics often contain “excess dye”
and should be washed separately sev-
eral times before being included in a
mixed load.
Delicate fabrics should be washed sep-
arately using a delicates program.
Only wash wool or wool mixtures if they
are labeled machine washable on the
textile care label.
Pre-treat the laundry
Badly soiled areas (e.g. collars and
cuffs) and water soluble stains can be
pre-treated with bar soap, stain
remover, or detergent mixed into a solu-
tion or paste.
Do not use detergents containing sol-
vents in the machine.
Preparing the Laundry
8

Preparing the Laundry
2 Press the “Door” button to open
the door
3 Load the machine
Unfold the laundry and place it in the
drum. For best results we recommend
washing mixed loads consisting of both
large and small items. This improves
the washing effectiveness and helps
distribute the load evenly to keep the
machine stable and reduce noise dur-
ing spinning.
Recommended load sizes are noted
below:
COTTONS . . . . . . . . . . 11.0 lbs (5.0 kg)
PERMANENT PRESS. . 4.5 lbs (2.5 kg)
FINE/DELICATES . . . . . 2.0 lbs (1.0 kg)
WOOLENS. . . . . . . . . . . 2.0 lbs (1.0 kg)
FINE RINSE. . . . . . . . . 11.0 lbs (5.0 kg)
With curtains: Remove lead weights
and strips.
Woolens and knitted garments should
be turned inside out if recommended
by the manufacturer.
3 Close the machine door
Make sure there are no clothes caught
between the drum door and seal.
4 Add detergent
See section “Adding detergent” for de-
tails.
To start a program
1 Turn the program selector
to Finish / Start
2 Press the “ON/OFF” button
3 Press any additional option
buttons desired
(See the “Delay start” section if this fea-
ture is desired.)
4 Select spin cycle speed
5 Turn the program selector to the
desired program
The program selector can be turned to
the left or the right.
Preparing the Laundry
9

End of Program
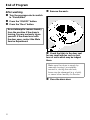
After washing
1 Turn the program selector switch
to “Finish/Start”
2 Press the “ON/OFF” button.
3 Press the “Door” button.
Do not attempt to remove laundry
from the machine if the drum is
turning. You may seriously injure
yourself. If the drum turns with
the door open, contact the Miele
Service Department.
4 Remove the wash.
5 Check the folds in the door seal
for any small articles such as but-
tons or nails which may be lodged
there.
Make sure the drum is empty by
manually turning it completely
around or, during the next use,
items may be damaged (e.g. shrink)
or cause other laundry to discolor.
6 Close the drum door.
End of Program
10

Changing the program sequence
To cancel a program:
Turn the program selector to “Fin-
ish/Start”.
To interrupt a program:
Press the “ON/OFF” buttton.
To continue the program, turn the ma-
chine back on.
To change an incorrectly selected
program:
Turn the program selector switch to
“Finish/Start”.
When only the “On” lamp is lit, a new
program can be selected.
To change a program which has been
“locked” using the Child Safety feature,
see the “Programmable functions” sec-
tion.
To omit a program stage:
A program stage must first be reached
to be omitted:
Turn the program selector to
“Finish/Start”
As soon as the program sequence indi-
cator lamp for the stage you wish starts
flashing:
Turn the program selector switch to
the desired program.
Changing the program sequence
11

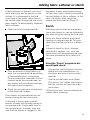
Adding detergent
Powder detergent should be added to
compartment j (main wash) and com-
partment i (pre wash, if necessary) at
the beginning of each wash cycle. Due
to the Miele “Eco-System”,
1
/3 to
1
/2 the
manufacturer’s recommended amount
of detergent is generally sufficient for
excellent wash results.
Do not use chlorine bleach!
Water is taken in through compartment
j during the main wash. If your water
is extremely hard (above 400 ppm cal-
cium carbonate)
and the capacity of
compartment j is insufficient for the
amount of detergent needed, a Service
Technician can reprogram the machine
so that water and detergent can also
be taken in through compartment i.
For small loads:
– Gradually reduce the amount of
detergent used with each small load.
– Check the wash results and the con-
dition of the laundry.
– If the laundry is not clean or if it is
gray or hard to the touch, add
slightly more detergent the next time
you use the machine.
It is important to add the cor-
rect amount of detergent, be-
cause...
...too little detergent can result in:
– gray laundry
– grease/stains not being removed
– lime deposits on the heater elements
and drum (in hard water areas).
...too much detergent can result in:
– excessive foam
– low level of agitation
– poor cleaning and rinsing results.
Water Softeners
If you wish to use a water softener to
cut down on detergent usage in hard
water areas:
– add the amount of detergent necess-
ary for a soft water area.
– Add the specified amount of water
softener per the manufacturers re-
commendation.
Always add the detergent first, in com-
partments i and j followed by the
softener, to ensure that both are
properly dispensed.
Adding detergent
12

Adding fabric softener or starch
If fabric softener is desired, it will work
more effectively and be gentler on the
clothes if it is dispensed in the final
rinse cycle of the wash, rather than in
the tumble dryer through the use of sof-
tener sheets. To automatically dispense
fabric softener:
Open the lid of compartment p.
Pour an amount of liquid fabric sof-
tener into compartment p according
to the manufacturer’s instructions.
Do not exceed the maximum fill level
marked inside the compartment, as
any excess will prematurely activate
the siphon and be wasted.
Close the compartment lid and push
in the dispenser drawer.
The softener will automatically be dis-
pensed during the last rinse cycle.
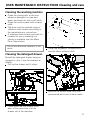
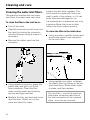
At the end of the program a small
amount of water will normally remain in
compartment p. A high water level in
this compartment, however, may indi-
cate that the siphon is clogged or the
dispenser drawer was opened during
the last rinse cycle, thereby interrupting
the distribution of fabric softener. In this
case, the siphon tube should be
cleaned as described on Page 21.
Starch
Starching can be done as a separate
cycle (see below) or can be included in
any wash program during the final rinse.
Never mix fabric softener and starch
together in compartment p. This can
cause the overflow system to malfunc-
tion.
If starch is used for shirts, blouses,
table cloths, napkins, etc., pour the
liquid starch into compartment p (use
the same procedure as for fabric sof-
tener).
Using the “Starch” program to dis-
pense liquid starch.
– Prepare the starch solution in accor-
dance with the manufacturer’s in-
structions and pour it into compart-
ment p.
– Use the normal water level (Water
Plus button “out”) when starching so
that the solution will have the maxi-
mum effect.
“Without final spin” can be selected to
reduce fabric creasing.
Adding fabric softener or starch
13

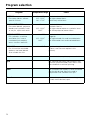
Program selection
Program Temperature range Fabric
COTTONS
For cotton fabrics without
special finishes.
85 - 105°F
105 - 120°F
140 - 170°F
For dark colored items.
For light colored items.
Exclusively white items.
PERMANENT PRESS
For cotton blends, polyester
blends and synthetics such
as acrylic, nylon and ramie.
85°
105 - 120°F
140°F
For dark fabrics which are a blend or 100%
synthetic fabrics.
For light colored cotton or synthetic items.
For white polyester/cotton items.
FINE/DELICATES
For synthetics, machine
washable silks, lace or
crocheted (non-woolen)
items, curtains and knits.
cold - 85°F
105 - 120°F
140°F
For dark colored silks and all synthetic items
(lingerie).
For light colored silks and lace tablecloths.
For white cotton lace and crocheted items.
WOOLENS
For all machine washable
woolens and wool blends.
Also suitable for silks.
cold - 105°F For all colors of wool and silk.
(There is no Pre-wash option in this
proram).
Starch cold For tablecloths, napkins, aprons and shirts.
Spin For spinning wet items not washed in the
machine (hand washed). Such items must
be suitable for machine spinning.
Drain For use when the laundry is to be removed
wet for drip drying. Normally used in
conjunction with “Without final spin”.
Fine rinse For hand washed items that can be gently
rinsed, and if desired, spun.
Program selection
14

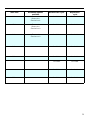
max. load Additional options
available
Normal wash cycle Rapid wash
cycle
11 lbs Pre-wash
Water plus
Gentle wash
Available Available
4.5 lbs Pre-wash
Water plus
Gentle wash
Available Available
2 lbs Pre-wash
Gentle wash
Available Available
2 lbs Available Available
11 lbs Available Available
Available Available
Available Available
11 lbs Available Available
15

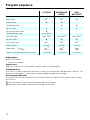
Program sequence
COTTONS PERMANENT
PRESS
FINE/
DELICATES
Pre-wash Selectable
(1)
Selectable
(1)
Selectable
(1)
Main wash ß
(1)
ß
(1)
ß
Interim rinse ßß–
Graduated rinse –
ßß
No. of rinses 4 3 3
Rinse and interim spin
ß ––
Graduated spin rpm max. 900
(3)
––
Final spin rpm max. 1600 max. 900
(3)
max. 600
(3)
Rinse & hold ßßß
Anti-crease spin ß
(2)
ß
(2)
ß
(2)
Wash rhythm normal normal normal
Water level – wash
– rinse
low
(1)
low
(1)
low
(1)
high
high
high
Approx. running time (Normal cycle) 1h 49 min 1 h 12 min 1h 00 min
Explanations:
ß Cycle included
– Cycle not included
Interim rinse:
Additional water flows into the drum, and the suds is cooled slightly.
Graduated rinse:
The suds is cooled at the end of the wash cycle by incoming water, and drained in intervals. This
minimizes the danger of creasing by avoiding sudden temperature changes.
(1) Increased water level:
The water level can be increased from the normal level to a higher level by pressing the “Water
plus” button.
(2) The “Gentle wash” option can also be selected in this program.
(3) Maximum spin speed is automatically set by the machine.
Program sequence
16

WOOLENS Starch Spin Fine rinse
–
ß ––
ß –––
––––
––––
3––2
––––
––––
max. 900
(3)
max. 1600 max. 1600 max. 900(3)
ßß– ß
– ß ––
Woolens normal – –
low
high
low
–
–
–
–
high
47 min – – –
Graduated spin:
The speed is gradually increased, until the final spin speed is reached.
Final spin:
The maximum spin speed is held constant for a fixed period of time.
In the program PERMANENT PRESS, WOOLENS and Fine rinse the spin speed is automatically
limited to 900 rpm and in the FINE/DELICATES program to 600 rpm, even if the selector has been
set to a higher speed. A lower speed can also be selected.
Woolens:
Wool is susceptible to damage when it is wet. Agitation times during the program are shorter,
and the drum rotates slower.
“Without final spin”:
At the end of the final rinse the wash remains suspended in water if the SPIN SPEED SETTING is
set to “Without final spin”. This helps reduce creasing if the laundry will not be removed immedi-
ately at the end of the cycle.
17

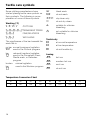
Textile care symbols
Some clothing manufactures have
started placing textile care symbols on
their products. The following is an ex-
planation of some of these symbols.
Washing (°C)
987 COTTONS
4321 PERMANENT PRESS
21 FINE/DELICATES
a@ WOOLLENS
The significance of the bar beneath the
wash tub is:
no bar normal (maximum) agitation
e used in the Cottons program
bar reduced (medium) agitation,
f used in the Permanent Press,
Gentle wash, or Delicates
program.
broken minimal agitation
bar used in the Woolens program
g
Temperature Conversion Chart
°C
30 40 50 60 65 70 75
°F
85 105 120 140 150 160 170
/ Hand wash
h do not wash
ABC dry clean only
D do not dry clean
y suitable for chlorine
bleaching
z not suitable for chlorine
bleaching
Tumble dry
q at normal temperature
r at low temperature
s do not tumble dry
Ironing
I hot iron
H medium hot iron
G cool iron
J do not iron
Textile care symbols
18

Additional options
By selecting one or more pushbutton
functions, basic programs can be tai-
lored to the type of laundry being
washed.
When the “Door” button is pressed, all
the other buttons spring out, and the
additional options are cancelled.
“Pre-wash”
Use for heavily soiled or stained
laundry items.
Available in the “COTTONS”, “PER-
MANENT PRESS” and “DELICATES”
programs.
Add the reguired amount of detergent
to compatment i.
“Water plus”
This increases the normal water level to
a slightly higher level:
For particularly delicate fabrics in ad-
dition to the “Gentle wash” option,
In hard water areas, if more water is
required for dispensing the deter-
gent,
In softwater areas to enhance wash-
ing and rinsing results.
For people who are skin sensitive to
detergents.
The “Water plus” option is available in
the following programs:
The wash and rinse cycles for COT-
TONS.
The wash cycle for PERMANENT
PRESS.
“Gentle wash”
For gentle washing of slightly soiled
laundry items, or delicate fabrics
which tend to pill.
Drum movement is reduced by half.
Available in the “COTTONS”, “PERMA-
NENT PRESS” and “FINE DELICATES”
programs.
“Rapid wash”
Offers a quick wash cycle (approx.
37 minutes)
Can be used with or without a pre-
wash.
To operate:
1 Push in the ON/OFF button to turn on
the machine.
2 Push in the Pre-wash button if desired.
3 Push in the Rapid wash button. No-
tice the thick grey ring surrounding
the button. This grey ring corre-
sponds to the grey ring surrounding
the COTTONS, PERMANENT
PRESS, DELICATES and WOOLENS
programs on the Selector switch.
Choose the desired program and the
machine will start.
Additional options
19

Delay start/Time remaining indicator
Time display “H:min”
The Time display has a dual function.
The Delayed start is activated by
pressing the button, or;
It shows the time remaining in the
wash program.
Delay Start
If the “Delay start” lamp is blinking, the
start of the program can be delayed up
to 9 hours and 30 minutes.
Entering the start delay:
– Press the button to the left of the
“Delay start” lamp as many times as
necessary until the desired delay
time appears. Each time the button
is pressed, the time of delay will in-
crease by 30 minutes.
Select the program
– The display will begin counting the
delayed time backwards in one
minute increments.The “Delay start”
lamp will remain lit.
Program start
– When the delay time reaches zero,
the “Time remaining” lamp illumi-
nates, and the “Delay start” lamp
goes out. The duration of the se-
lected program will be shown on the
display.
Deleting the start delay
– When the display reaches “9 h 30
min”, press the button to the left of
the “Delay start” lamp and the start
delay will be deleted.
Remaining time
The remaining time for program com-
pletion is shown in hours and minutes
as soon as:
– A program is selected.
– The time delay reaches zero.
The display counts backwards in 1
minute increments.
Delay start/Time remaining indicator
20
Page is loading ...
Page is loading ...
Page is loading ...
Page is loading ...
Page is loading ...
Page is loading ...
Page is loading ...
Page is loading ...
Page is loading ...
Page is loading ...
Page is loading ...
Page is loading ...
Page is loading ...
Page is loading ...
Page is loading ...
Page is loading ...
Page is loading ...
Page is loading ...
Page is loading ...
Page is loading ...
Page is loading ...
Page is loading ...
Page is loading ...
Page is loading ...
Page is loading ...
Page is loading ...
Page is loading ...
Page is loading ...
Page is loading ...
Page is loading ...
Page is loading ...
Page is loading ...
-
 1
1
-
 2
2
-
 3
3
-
 4
4
-
 5
5
-
 6
6
-
 7
7
-
 8
8
-
 9
9
-
 10
10
-
 11
11
-
 12
12
-
 13
13
-
 14
14
-
 15
15
-
 16
16
-
 17
17
-
 18
18
-
 19
19
-
 20
20
-
 21
21
-
 22
22
-
 23
23
-
 24
24
-
 25
25
-
 26
26
-
 27
27
-
 28
28
-
 29
29
-
 30
30
-
 31
31
-
 32
32
-
 33
33
-
 34
34
-
 35
35
-
 36
36
-
 37
37
-
 38
38
-
 39
39
-
 40
40
-
 41
41
-
 42
42
-
 43
43
-
 44
44
-
 45
45
-
 46
46
-
 47
47
-
 48
48
-
 49
49
-
 50
50
-
 51
51
-
 52
52


Miele W 1930 WASHING MACHINE - OPERATING User manual
- Category
- Washing machines
- Type
- User manual
Ask a question and I''ll find the answer in the document
Finding information in a document is now easier with AI
Related papers
-
Miele W 1930 WASHING MACHINE - OPERATING User manual
-
-
-
-
Miele PW 5065 User manual
-
-
-
-
-
Other documents
-
Simply Conserve L13DL56AP-30K-1 Installation guide
-
Bosch WAE20060UC/18 Owner's manual
-
AEG LAV41250 User manual
-
LG Washer W1119 User manual
-
-
Asko W6221-QSG Owner's manual
-
Electrolux EWT113 User manual
-
Moffat washing machine Instructions For Use Manual
-
-
Indesit ISDG429 Freestanding Spin Dryer User manual