Toro Greensmaster 1018 Mower User manual
- Category
- Lawnmowers
- Type
- User manual

FormNo.3441-558RevA
Greensmaster
®
1018,1021,or
1026Mower
ModelNo.04820—SerialNo.400000000andUp
ModelNo.04830—SerialNo.400000000andUp
ModelNo.04840—SerialNo.400000000andUp
Registeratwww.Toro.com.
OriginalInstructions(EN)
*3441-558*

ThisproductcomplieswithallrelevantEuropean
directives;fordetails,pleaseseetheseparateproduct
specicDeclarationofConformity(DOC)sheet.
ItisaviolationofCaliforniaPublicResourceCode
Section4442or4443touseoroperatetheengineon
anyforest-covered,brush-covered,orgrass-covered
landunlesstheengineisequippedwithaspark
arrester,asdenedinSection4442,maintainedin
effectiveworkingorder,ortheengineisconstructed,
equipped,andmaintainedforthepreventionofre.
Theenclosedengineowner'smanualissupplied
forinformationregardingtheUSEnvironmental
ProtectionAgency(EPA)andtheCaliforniaEmission
ControlRegulationofemissionsystems,maintenance,
andwarranty.Replacementsmaybeorderedthrough
theenginemanufacturer.
Operatingthismachine1,500m(5,000ft)above
sealevelrequiresahigh-altitudejet.Refertoyour
Hondaengineowner’smanual.
WARNING
CALIFORNIA
Proposition65Warning
Theengineexhaustfromthisproduct
containschemicalsknowntotheStateof
Californiatocausecancer,birthdefects,
orotherreproductiveharm.
Useofthisproductmaycauseexposure
tochemicalsknowntotheStateof
Californiatocausecancer,birthdefects,
orotherreproductiveharm.
Introduction
Thismachineisawalk-behind,reel-bladelawnmower
intendedtobeusedbyprofessional,hiredoperators
incommercialapplications.Itisprimarilydesigned
forcuttinggrassonwell-maintainedturf.Usingthis
productforpurposesotherthanitsintendedusecould
provedangeroustoyouandbystanders.
Readthisinformationcarefullytolearnhowtooperate
andmaintainyourproductproperlyandtoavoid
injuryandproductdamage.Youareresponsiblefor
operatingtheproductproperlyandsafely.
Visitwww.Toro.comforproductsafetyandoperation
trainingmaterials,accessoryinformation,helpnding
adealer,ortoregisteryourproduct.
Wheneveryouneedservice,genuineToroparts,or
additionalinformation,contactanAuthorizedService
DealerorToroCustomerServiceandhavethemodel
andserialnumbersofyourproductready.Figure1
identiesthelocationofthemodelandserialnumbers
ontheproduct.Writethenumbersinthespace
provided.
Important:Withyourmobiledevice,youcan
scantheQRcode(ifequipped)ontheserial
numberdecaltoaccesswarranty,parts,andother
productinformation.
g271512
Figure1
1.Modelandserialnumberlocation
ModelNo.
SerialNo.
Thismanualidentiespotentialhazardsandhas
safetymessagesidentiedbythesafety-alertsymbol
(Figure2),whichsignalsahazardthatmaycause
seriousinjuryordeathifyoudonotfollowthe
recommendedprecautions.
g000502
Figure2
Safety-alertsymbol
Thismanualuses2wordstohighlightinformation.
Importantcallsattentiontospecialmechanical
©2020—TheToro®Company
8111LyndaleAvenueSouth
Bloomington,MN55420
2
Contactusatwww.Toro.com.
PrintedintheUSA
AllRightsReserved

informationandNoteemphasizesgeneralinformation
worthyofspecialattention.
Contents
Safety.......................................................................4
GeneralSafety...................................................4
SafetyandInstructionalDecals..........................4
Setup........................................................................6
1AdjustingandInstallingtheCutting
Unit.................................................................6
2InstallingtheTransport-WheelShaft................8
3InstallingtheTransportWheels........................8
4InstallingtheGrassBasket..............................9
5AdjustingtheEngineSpeed.............................9
ProductOverview...................................................10
Controls...........................................................10
Specications..................................................13
Attachments/Accessories.................................13
BeforeOperation.................................................13
BeforeOperationSafety...................................13
PerformingDailyMaintenance..........................14
CheckingtheEngine-OilLevel..........................14
FuelSpecications...........................................14
FillingtheFuelTank..........................................14
AdjustingtheClipRate.....................................15
AdjustingtheReelSpeed.................................15
AdjustingtheTraction-DrumPosition................15
AdjustingtheHandleHeight.............................16
TransportingtheMachinetoaJob
Site................................................................16
RemovingtheTransportWheels.......................16
UsingtheChokeLever.....................................17
OpeningandClosingtheFuel-Shutoff
Valve.............................................................17
DuringOperation.................................................17
DuringOperationSafety...................................17
StartingtheEngine...........................................18
OperatingTips..................................................19
ShuttingOfftheEngine.....................................20
AfterOperation....................................................20
AfterOperationSafety......................................20
OperatingtheControlsafterMowing.................20
TransportingtheMachine.................................20
InstallingtheTransportWheels.........................21
EngagingorDisengagingthe
Transmission................................................21
Maintenance...........................................................22
MaintenanceSafety..........................................22
RecommendedMaintenanceSchedule(s)...........22
DailyMaintenanceChecklist.............................23
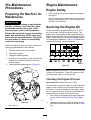
Pre-MaintenanceProcedures..............................24
PreparingtheMachineforMaintenance............24
EngineMaintenance...........................................24
EngineSafety...................................................24
ServicingtheEngineOil....................................24
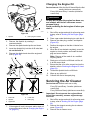
ServicingtheAirCleaner..................................25
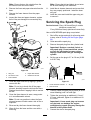
ServicingtheSparkPlug...................................26
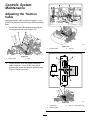
ControlsSystemMaintenance.............................27
AdjustingtheTractionCable.............................27
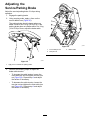
AdjustingtheService/ParkingBrake.................28
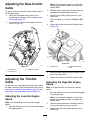
AdjustingtheReel-ControlCable......................29
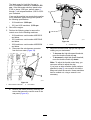
AdjustingtheThrottleCable..............................29
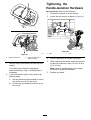
TighteningtheHandle-Isolation
Hardware......................................................31
CuttingUnitMaintenance.....................................32
BladeSafety.....................................................32
InstallingtheCuttingUnit..................................32
RemovingtheCuttingUnit................................34
BacklappingtheCuttingUnit.............................35
Storage...................................................................35
StorageSafety..................................................35
StoringtheMachine..........................................35
3

Safety
Thismachinehasbeendesignedinaccordancewith
ENISO5395andANSIB71.4-2017.
GeneralSafety
Thisproductiscapableofamputatinghandsandfeet
andofthrowingobjects.
•Readandunderstandthecontentsofthis
Operator’sManualbeforestartingthemachine.
•Useyourfullattentionwhileoperatingthe
machine.Donotengageinanyactivitythat
causesdistractions;otherwise,injuryorproperty
damagemayoccur.
•Donotputyourhandsorfeetnearmoving
componentsofthemachine.
•Donotoperatethemachinewithoutallguards
andothersafetyprotectivedevicesinplaceand
functioningproperlyonthemachine.
•Keepbystandersandchildrenoutoftheoperating
area.Neverallowchildrentooperatethemachine.
•Shutofftheengine,removethekey(ifequipped),
andwaitforallmovementtostopbeforeyouleave
theoperator’sposition.Allowthemachinetocool
beforeadjusting,servicing,cleaning,orstoringit.
Improperlyusingormaintainingthismachinecan
resultininjury.Toreducethepotentialforinjury,
complywiththesesafetyinstructionsandalways
payattentiontothesafety-alertsymbol
,which
meansCaution,Warning,orDanger—personalsafety
instruction.Failuretocomplywiththeseinstructions
mayresultinpersonalinjuryordeath.
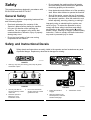
SafetyandInstructionalDecals
Safetydecalsandinstructionsareeasilyvisibletotheoperatorandarelocatednearanyarea
ofpotentialdanger.Replaceanydecalthatisdamagedormissing.
decal120-9570
120-9570
1.Warning—stayawayfrommovingparts,keepallguards
andshieldsinplace.
decal130-8322
130-8322
1.Useonlyfuelwithan
alcoholcontentbyvolume
under10%.
3.Donotusefuelwithan
alcoholcontentbyvolume
greaterthan10%.
2.ReadtheOperator's
Manualformore
informationonfuel.
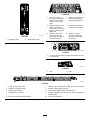
decal133-8062
133-8062
decal138-1644
138-1644
1.Rotatethehandleto
engage.
3.Transmissioncontrol
2.Withthemachineinthe
Neutralposition,rotatethe
handletodisengage.
4

decal138-1589
138-1589
1.Engagethereels.2.Disengagethereels.
decal138-2138
138-2138
1.Poisonousfumesor
toxicgases,asphyxiation
hazard—donotrunthe
engineinanenclosed
space.
4.Warning—disconnectthe
sparkplugwirebefore
performingmaintenance.
2.Explosionhazard—shut
offtheenginebefore
addingfuel;nore,open
ames,orsmokingwhen
addingfuel.
5.Hotsurfacehazard—do
nottouchthehotsurface.
3.Warning—shutoffthe
engineandclosethe
fuelshutoffvalvebefore
leavingthemachine.
6.Attention—readthe
Operator’sManualfor
informationaboutlling
thefueltank.
decal138-5533
138-5533
1.Tractioncontrol—pressthetractioncontroldownthenpull
ittothehandle.
decal138-5534
138-5534
1.Slow
2.Fast
decal138-5532
138-5532
1.Pulluptoreleasethebrake.6.Warning—donotoperatethismachineunlessyouaretrained.
2.Pulldowntoapplythebrake.7.Warning—wearhearingprotection.
3.Parkingbrake—locked8.Thrownobjecthazard—keepbystandersaway.
4.Parkingbrake—unlocked
9.Warning—stayawayfrommovingparts;keepallguardsand
shieldsinplace.
5.Warning—readtheOperator’sManual.
10.Donottowthemachine.
5

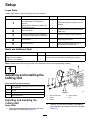
Setup
LooseParts
Usethechartbelowtoverifythatallpartshavebeenshipped.
ProcedureDescription
Qty.
Use
Cuttingunit(orderseparately;contact
yourauthorizedTorodistributor)
1
Coupler
1
Spring(Model04830and04840only)
1
1
Socket-headscrew
4
Adjustandinstallthecuttingunittothe
machine.
2
Leftwheelshaft
1
Installthetransport-wheelshaft(Model
04840only).
3
TransportWheelKit(orderseparately;
contactyourauthorizedTorodistributor)
1
Installthetransportwheels(optional).
4
Grassbasket
1Installthegrassbasket.
5
Nopartsrequired
–
Adjusttheenginespeed(forusein
CE-compliantcountriesonly).
MediaandAdditionalParts
Description
Qty.
Use
Operator'sManual
1
EngineOwner'sManual
1
CerticateofCompliance
1
Readorviewtheitemsbeforeoperatingthemachine.
Note:Determinetheleftandrightsidesofthemachinefromthenormaloperatingposition.
1
AdjustingandInstallingthe
CuttingUnit
Partsneededforthisprocedure:
1
Cuttingunit(orderseparately;contactyourauthorized
Torodistributor)
1
Coupler
1
Spring(Model04830and04840only)
4
Socket-headscrew
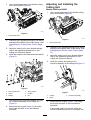
AdjustingandInstallingthe
CuttingUnit
Model04820
1.Removethehardwarethatsecuresthereel-drive
assemblytothesideplate(Figure3).
g333187
Figure3
1.Socket-headscrew4.Springwasher
2.Spacer
5.Nut
3.Washer
2.Removethereel-driveassembly,atwashers,
springwashers,andspacersfromthesideplate
(Figure3).
6

3.Use4socket-headscrewstoinstallthecutting
unittothemachine(Figure4).
g333153
Figure4
1.Socket-headscrew
4.Determineyourappropriateheight-of-cutsetting
andadjustthetractiondrumtothissetting;refer
toAdjustingtheTraction-DrumPosition(page
15).
5.Adjustthecuttingunittoyourdesiredsettings;
refertotheadjustmentproceduresinyour
cuttingunitOperator’sManual.
6.Installthecouplertothetransmissiondriveshaft
(Figure5).
g333165
Figure5
1.Socket-headscrew4.Springwasher
2.Spacer5.Coupler
3.Washer6.Nut
7.Usethepreviouslyremovedhardwaretoinstall
thereel-driveassemblytothecuttingunit
(Figure5).
8.Ensurethatthecoupler(Figure5)caneasily
moveback-and-forthonthetransmission
driveshaft.
AdjustingandInstallingthe
CuttingUnit
Models04830and04840
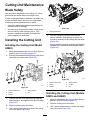
1.Use4socket-headscrewstoinstallthecutting
unittothemachine(Figure6).
g333212
Figure6
1.Socket-headscrew
2.Determineyourappropriateheight-of-cutsetting
andadjustthetractiondrumtothissetting;refer
toAdjustingtheTraction-DrumPosition(page
15).
3.Adjustthecuttingunittoyourdesiredsettings;
refertotheadjustmentproceduresinyour
cuttingunitOperator’sManual.
4.Installthecouplerandspringtothe
reel-drive-assemblyofthecuttingunit(Figure7).
g333213
Figure7
1.Coupler
3.Reel-driveassembly
2.Spring
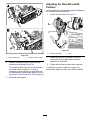
5.Ensurethatthecoupler(Figure7)caneasily
moveback-and-forthonthetransmission
driveshaft.
Ifthecouplercannotbemoved,adjustthe
reel-drive-assemblypositionortheengineand
7

transmissionalignment;refertoAdjustingthe
Reel-DriveshaftPosition(page33).
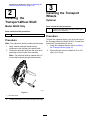
2
Installingthe
Transport-WheelShaft
Model04840Only
Partsneededforthisprocedure:
1
Leftwheelshaft
Procedure
Note:Theright-wheelshaftisinstalledatthefactory.
1.Applymedium-strengththread-locking
compoundtothethreadsofthewheelshaft.
2.Threadtheleft-wheelshaftintothedrumdrive
assemblyontheleftsideofthemachine.
Note:Theleft-wheelshaftismarkedwitha“L”
ontheshaftendandhasright-handthreads.
g330266
Figure8
1.Leftwheelshaft
3.Torquetheshaftto54to68N∙m(40to50ft-lb).
3
InstallingtheTransport
Wheels
Optional
Partsneededforthisprocedure:
1
TransportWheelKit(orderseparately;contactyour
authorizedT orodistributor)
Procedure
Toinstallthetransportwheels,youmustrstacquire
theTransportWheelKit(Model04123).Contactyour
authorizedTorodistributorforthiskit.
1.Installthetransportwheels;refertoInstalling
theTransportWheels(page21).
2.Ensurethatthetiresareinatedto83to103
kPa(12to15psi).
8

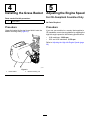
4
InstallingtheGrassBasket
Partsneededforthisprocedure:
1
Grassbasket
Procedure
Graspthebasketbythetoplipandslideitontothe
basketmountingrods(Figure9).
g278331
Figure9
1.Grassbasket
2.Basketmountingrod
5
AdjustingtheEngineSpeed
ForCE-CompliantCountriesOnly
NoPartsRequired
Procedure
Ifyouuseyourmachineinacountrythatcompliesto
CEstandards,meetnoiseregulationsbyadjustingthe
high-idleenginespeedtothefollowingspecications:
•1018machines:3,000rpm
•1021and1026machines:3,150rpm
RefertoAdjustingtheHigh-IdleEngineSpeed(page
29).
9

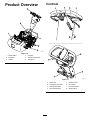
ProductOverview
g274957
Figure10
1.Grassbasket
4.Fueltank
2.Kickstand5.Transport-wheelaxle
3.Handle
6.Cuttingunit
Controls
g271082
Figure11
1.Clutchbail
5.Throttlecontrol
2.Cutting-unit-drivelever
6.Hourmeter
3.Parking-brakelatch
7.Lift-assisthandle
4.Service-brakelever8.On/Offswitch
10

ClutchBail
Usetheclutchbail(Figure11)toengageordisengage
thetractiondrive.
•Engagethetractiondrive:Pullupandholdthe
bartothehandle.
•Disengagethetractiondrive:Releasethebar.
ThrottleControl
Usethethrottlecontrol(Figure11)toadjustthe
enginespeed.
•Increasetheenginespeed:Rotatethelever
down.
•Decreasetheenginespeed:Rotatetheleverup.
On/OffSwitch
Theswitch(Figure11)allowsyoutostartorshutoff
theengine.
•Starttheengine:Pushdownontheupperpart
oftheswitch.
•Shutofftheengine:Pushdownonthelowerpart
oftheswitch.
Service-BrakeLever
Usetheservicebrake(Figure11)tosloworstopthe
machine.Pullthelevertowardthehandletoengage
theservicebrake.
Parking-BrakeLatch
Usetheparking-brakelatch(Figure11)toengagethe
parkingbrakewhileyouareawayfromthemachine.
•Engagetheparkingbrake:Engageandholdthe
service-brakeleverandrotatetheparking-brake
latchtowardyou.
•Disengagetheparkingbrake:Pullthe
service-brakelevertowardthehandle.
Cutting-Unit-DriveLever
Usethecutting-unit-drivelever(Figure11)toengage
ordisengagethecuttingunitwhiletheclutchbailis
engaged.
•Engagethecuttingunit:Movetheleverdown.
•Disengagethecuttingunit:Movetheleverup.
HourMeter
Thehourmeter(Figure11)recordsthetotalnumber
ofhoursthattheenginehasbeenrunning.Referto
themeterforschedulingregularmaintenance.
Lift-AssistHandle
Usethelift-assisthandle(Figure11)tohelpwith
adjustingthehandleheightorraiseandlowerthe
kickstand.
Handle-HeightAdjuster
Usethehandle-heightadjuster(Figure12)tomove
thehandleheighttoacomfortableoperatingposition.
Pullupontheadjusterandusethelift-assisthandle
toraiseorlowerthehandleheight.
g271081
Figure12
1.Handle-heightadjuster
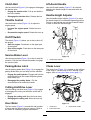
ChokeLever
Thechokelever(Figure13)islocatedontheleftfront
oftheengine.Usethelevertoaidinstartingacold
engine;refertoUsingtheChokeLever(page17).
g265059
Figure13
1.Chokelever
3.Recoil-starterhandle
2.Fuel-shutoffvalve
11

Fuel-ShutoffValve
Thefuel-shutoffvalveislocatedonthesideofthe
enginebelowthechokecontrol(Figure13).
Note:Closethefuel-shutoffvalvewhenthemachine
isnotusedforafewdays,duringtransporttoand
fromthejobsite,orwhenthemachineisparked
insideabuilding;refertoOpeningandClosingthe
Fuel-ShutoffValve(page17).
Recoil-StarterHandle
Pulltherecoil-starterhandle(Figure13)tostartthe
engine.
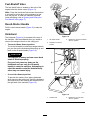
Kickstand
Thekickstand(Figure14)ismountedtotherearof
themachine.Usethekickstandwhenyouinstallor
removethetransportwheelsorthecuttingunit.
•TRANSPORT-WHEEL-SERVICEposition:
Tousethekickstandtoinstallthetransportwheels,
putyourfootonthekickstandwhilepullingupand
backonthelift-assisthandle(Figure14).
CAUTION
Themachineisheavyandcancauseback
strainifliftedimproperly.
Putyourfootpressuredownonthe
kickstandanduseonlythelift-assist
handletoraisethemachine.Attemptingto
raisethemachineontothekickstandany
otherwaycancauseinjury.
•CUTTING-UNIT-SERVICEposition:
Topreventthemachinefromtippingbackward
whenremovingthecuttingunit,lowerthekickstand
andinsertapinorboltthroughthechassisholeon
therightsideofthemachine(Figure15).
g273507
Figure14
1.Lift-assisthandle
3.Kickstand—TRANSPORT-WHEEL
SERVICEposition
2.Kickstand—STORAGE
position
g278594
Figure15
1.Chassishole2.Kickstand—CUTTING-UNIT
SERVICEposition
12

Specications
Model04820Model04830Model04840
Width
84cm(33
inches)
91cm(36
inches)
104cm(41
inches)
Dryweight*95kg(210lb)
100kg(220
lb)
107kg(235
lb)
Widthofcut
46cm(18
inches)
53cm(21
inches)
66cm(26
inches)
Heightofcut
Dependentontraction-drumposition[referto
AdjustingtheTraction-DrumPosition(page
15)]anduseofHighHeight-of-CutKit.
Clip
Dependentonreelspeedandreel-drive-pulley
position;refertoAdjustingtheClip
Rate(page15).
Engine
speed
Lowidle:1,900±100rpm;Highidle:
3,450±100rpm
Mowing
speed
3.2km/h(2mph)to5.6km/h(3.5mph)
Transport
speed
8.5km/h(5.3mph)
*Tractionunitonly.RefertothecuttingunitOperator’s
Manualfortheweightofeachcuttingunit.
Attachments/Accessories
AselectionofT oroapprovedattachmentsand
accessoriesisavailableforusewiththemachine
toenhanceandexpanditscapabilities.Contact
yourAuthorizedServiceDealerorauthorizedT oro
distributororgotowww.T oro.comforalistofall
approvedattachmentsandaccessories.
Toensureoptimumperformanceandcontinuedsafety
certicationofthemachine,useonlygenuineToro
replacementpartsandaccessories.Replacement
partsandaccessoriesmadebyothermanufacturers
couldbedangerous,andsuchusecouldvoidthe
productwarranty.
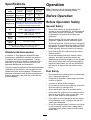
Operation
Note:Determinetheleftandrightsidesofthe
machinefromthenormaloperatingposition.
BeforeOperation
BeforeOperationSafety
GeneralSafety
•Neverallowchildrenoruntrainedpeopleto
operateorservicethemachine.Localregulations
mayrestricttheageoftheoperator.Theowner
isresponsiblefortrainingalloperatorsand
mechanics.
•Becomefamiliarwiththesafeoperationofthe
equipment,operatorcontrols,andsafetysigns.
•Shutoffthemachine,removethekey(ifequipped),
andwaitforallmovementtostopbeforeyouleave
theoperator’sposition.Allowthemachinetocool
beforeadjusting,servicing,cleaning,orstoringit.
•Knowhowtostopthemachineandshutoffthe
machinequickly.
•Checkthatoperator-presencecontrols,safety
switches,andsafetyprotectivedevicesare
attachedandfunctioningproperly.Donotoperate
themachineunlesstheyarefunctioningproperly.
•Inspecttheareawhereyouwillusethemachine
andremoveallobjectsthatthemachinecould
throw.
FuelSafety
•Useextremecareinhandlingfuel.Itisammable
anditsvaporsareexplosive.
•Extinguishallcigarettes,cigars,pipes,andother
sourcesofignition.
•Useonlyanapprovedfuelcontainer.
•Donotremovethefuelcaporaddfueltothetank
whiletheengineisrunningorhot.
•Donotaddordrainfuelinanenclosedspace.
•Donotstorethemachineorfuelcontainerwhere
thereisanopename,spark,orpilotlight,such
asonawaterheaterorotherappliance.
•Ifyouspillfuel,donotattempttostarttheengine;
avoidcreatingasourceofignitionuntilthefuel
vaporshavedissipated.
•Donotllcontainersinsideavehicleoronatruck
ortrailerbedwithaplasticliner.Alwaysplace
containersontheground,awayfromthevehicle
beforelling.
13

•Removeequipmentfromthetruckortrailerand
refuelitontheground.Ifthisisnotpossible,refuel
suchequipmentwithaportablecontainerrather
thanfromafuel-dispensernozzle.
•Keepthenozzleincontactwiththerimofthefuel
tankorcontaineroperatingatalltimesuntilfueling
iscomplete.
PerformingDaily
Maintenance
Performthedailymaintenanceprocedures;referto
DailyMaintenanceChecklist(page23).
CheckingtheEngine-Oil
Level
Checktheengine-oillevelbeforeeachuseorevery
8operatinghours,refertoCheckingtheEngine-Oil
Level(page24).
FuelSpecications
Fueltankcapacity:2.0L(0.59USgallons)
Recommendedfuel:Unleadedgasolinewithan
octaneratingof87orhigher((R+M)/2ratingmethod)
Ethanol:Gasolinewithupto10%ethanol(gasohol)
or15%MTBE(methyltertiarybutylether)byvolume
isacceptable.EthanolandMTBEarenotthesame.
Gasolinewith15%ethanol(E15)byvolumeisnot
approvedforuse.
•Neverusegasolinethatcontainsmorethan
10%ethanolbyvolume,suchasE15(contains
15%ethanol),E20(contains20%ethanol),orE85
(containsupto85%ethanol).
•Donotusegasolinecontainingmethanol.
•Donotstorefueleitherinthefueltankorfuel
containersoverthewinterunlessyouuseafuel
stabilizer.
•Donotaddoiltogasoline.
•Forbestresults,useonlyclean,fresh(lessthan
30daysold)fuel.
•Usingunapprovedgasolinemaycause
performanceproblemsand/orenginedamage,
whichmaynotbecoveredunderthewarranty.
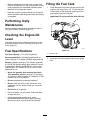
FillingtheFuelTank
1.Cleanaroundthefuel-tankcapandremovethe
capfromthetank(Figure16).Fillthefueltank
tothebottomofthetank-neckopening;referto
yourengineOperator’sManual.
Important:Donotoverllthetankwithfuel.
g265976
Figure16
1.Fuel-tankcap
2.Installthefuel-tankcapandwipeupanyspilled
fuel.
14

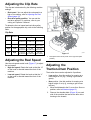
AdjustingtheClipRate
Thecliprateisdeterminedbythefollowingmachine
settings:
•Reelspeed:Youcanadjustthereelspeedtoa
highorlowsetting;refertoAdjustingtheReel
Speed(page15).
•Reel-drive-pulleyposition:Youcansetthe
reel-drivepulleysin2positions;refertoyour
cuttingunitOperator’sManual.
Todeterminethereelspeedandreel-drive-pulley
positionfortheappropriateclip,refertothefollowing
table:
ClipRate
CuttingUnit
Reel
Speed
Belt
Position
8-blade11-blade14-blade
LowLow7.3mm
(0.286inch)
5.3mm
(0.208inch)
4.2mm
(0.164inch)
LowHigh6.1mm
(0.241inch)
4.4mm
(0.175inch)
3.5mm
(0.137inch)
HighLow5.9mm
(0.233inch)
4.3mm
(0.169inch)
3.4mm
(0.133inch)
HighHigh5.0mm
(0.196inch)
3.6mm
(0.142inch)
2.8mm
(0.112inch)
AdjustingtheReelSpeed
Usethereel-speed-controlknob(Figure17)toadjust
thereelspeed.
•Highreelspeed:Rotatetheknobsothatthe“H”
ontheknobisdirectedtowardthefrontofthe
machine.
•Lowreelspeed:Rotatetheknobsothatthe“L”
ontheknobisdirectedtowardthefrontofthe
machine.
g275053
Figure17
1.Reel-speed-controlknob(showninthehigh-reel-speed
position)
Adjustingthe
Traction-DrumPosition
Thetractiondrumcanbeadjustedto2positions:
•LOWposition:Usethispositionformowingata
lowerheightofcut(e.g.,mowingagolf-course
green).
•HIGHposition:Usethispositionformowingata
higherheightofcut(e.g.,mowingagolf-course
teebox).
1.MovethekickstandtotheCUTTING-UNITSERVICE
position;refertoKickstand(page12).
2.Removetheshoulderbolts(Figure18)oneach
sideofthemachinethatsecurethedrumdrive
housingtothechassis.
15

g277026
Figure18
Leftsideofthemachineshown
1.Insertshoulderbolthere
fortheLOWposition.
3.Shoulderbolt
2.Insertshoulderbolthere
fortheHIGHposition.
3.Aligntheholesinthechassiswiththeholesin
thedrivehousing.
4.Usethepreviouslyremovedshoulderboltsto
securethedrivehousingtothechassis(Figure
18).
5.MovethekickstandtotheSTORAGEposition;
refertoKickstand(page12).
AdjustingtheHandle
Height
Usethehandle-heightadjustertoadjustthehandle
heighttoacomfortableoperatingposition;referto
Handle-HeightAdjuster(page11).
TransportingtheMachine
toaJobSite
TransportingtheMachineUsing
TransportWheels
Usethetransportwheelstotransportthemachinea
shorterdistance.
1.Installthetransportwheels;refertoInstalling
theTransportWheels(page21).
2.Ensurethatthetractionandreel-drivecontrols
areintheNEUTRALposition.
3.Starttheengine;refertoStartingtheEngine
(page18).
4.SetthethrottlecontroltoSLOW,tipthefrontof
themachineup,graduallyengagethetraction
drive,andslowlyincreasetheenginespeed.
5.Adjustthethrottletooperatethemoweratthe
desiredgroundspeedandtransportthemachine
tothedesireddestination.
TransportingtheMachineUsinga
Trailer
Useatrailertotransportthemachineaconsiderable
distance.Usecautionwhileloadingandunloadingthe
machineontothetrailer.
1.Carefullydrivethemachineontothetrailer.
2.Shutofftheengine,engagetheparkingbrake,
andturnthefuelvalvetotheOFFposition.
3.Useafull-widthrampforloadingthemachine
intoatrailerortruck.
4.Securelyfastenthemachinetothetrailer.
Note:YoucanusetheToroTransProtrailerto
transportthemachine.Forinstructionsonloadingthe
trailer,refertoyourtrailerOperator’sManual.
Important:Donotruntheenginewhile
transportingitonatrailerbecausedamagecan
occurtothemachine.
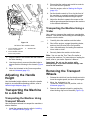
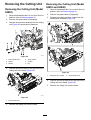
RemovingtheTransport
Wheels
1.Releasetheclutchbail,usethethrottlecontrolto
lowertheenginespeed,andshutofftheengine.
2.Movethekickstandtothe
TRANSPORT-WHEEL-SERVICEposition;referto
Kickstand(page12).
3.Removethetransportwheelsbypushingthe
wheel-lockingclipsoutoftheaxles(Figure19).
16

g274946
Figure19
1.Axle2.Wheel-lockingclip
4.Carefullylowerthemachineoffofthekickstand
bypushingforwardslowlyorbyliftingthelower
handlesupport,allowingthekickstandtospring
backtotheSTORAGEposition;refertoKickstand
(page12).
UsingtheChokeLever
Usethechokelevertoaidinstartingacoldengine.
MovethelevertotheCHOKEpositionwhenstartinga
coldengine.Aftertheenginestarts,movethelever
totheRUNposition.
g273508
Figure20
1.Chokelever—CHOKE
position
2.Chokelever—RUN
position
OpeningandClosingthe
Fuel-ShutoffValve
Controlfuelowtotheenginewiththefuel-shutoff
valveasfollows:
•Toopenthefuelvalve,turnthefuel-shutofflever
towardtherecoilstarterhandle(Figure21).
•Toshutthefuelvalve,turnthefuel-shutofflever
awayfromtherecoilstarterhandle(Figure21).
g273576
Figure21
1.Fuel-shutoff
lever—CLOSEDposition
2.Fuel-shutofflever—OPEN
position
DuringOperation
DuringOperationSafety
GeneralSafety
•Theowner/operatorcanpreventandisresponsible
foraccidentsthatmaycausepersonalinjuryor
propertydamage.
•Wearappropriateclothing,includingeye
protection;longpants;substantial,slip-resistant
footwear;andhearingprotection.Tiebacklong
hairanddonotwearlooseclothingorloose
jewelry.
•Donotoperatethemachinewhileill,tired,or
undertheinuenceofalcoholordrugs.
•Useyourfullattentionwhileoperatingthe
machine.Donotengageinanyactivitythat
causesdistractions;otherwise,injuryorproperty
damagemayoccur.
•Beforeyoustartthemachine,ensurethatalldrives
areinneutral,theparkingbrakeisengaged,and
youareintheoperatingposition.
17

•Keepbystandersandchildrenoutoftheoperating
area.Ifco-workersmustbepresent,usecaution
andensurethatthegrassbasketisinstalledon
themachine.
•Operatethemachineonlyingoodvisibilitytoavoid
holesorhiddenhazards.
•Donotoperatethemachinewhenthereistherisk
oflightning.
•Usecarewhenmowingonwetgrass.Poorfooting
couldcauseaslip-and-fallaccident.
•Keepyourhandsandfeetawayfromthecutting
unit.
•Lookbehindanddownbeforebackinguptobe
sureofaclearpath.
•Usecarewhenapproachingblindcorners,shrubs,
trees,orotherobjectsthatmayobscureyour
vision.
•Stopthecuttingunitwheneveryouarenotmowing.
•Disengagethedrivetothecuttingunitandshutoff
themachinebeforeadjustingtheheightofcut.
•Neverrunanengineinanareawhereexhaust
gassesareenclosed.
•Neverleavearunningmachineunattended.
•Beforeyouleavetheoperator’sposition,dothe
following:
–Parkthemachineonalevelsurface.
–Disengagethecuttingunit(s).
–Engagetheparkingbrake.
–Shutoffthemachineandremovethekey(if
equipped).
–Waitforallmovementtostop.
•Shutoffthemachinebeforeemptyingthebasket.
•Donottouchtheengine,mufer,orexhaustpipe
whiletheengineisrunningorsoonafterithas
shutoffbecausetheseareascouldbehotenough
tocauseburns.
•Shutoffthemachineanddisengagethedriveto
thecuttingunitinthefollowingsituations:
–Beforefueling
–Beforeclearingblockages
–Beforeremovingthegrassbasket
–Beforechecking,cleaning,ormaintainingthe
cuttingunit
–Afterstrikingaforeignobjectorifanabnormal
vibrationoccurs.Inspectthecuttingunitfor
damageandmakerepairsbeforestartingand
operatingthemachine
–Beforeleavingtheoperatingposition
•Useonlyaccessoriesandattachmentsapproved
byTheToro®Company.
SlopeSafety
•Slopesareamajorfactorrelatedtolossofcontrol
androlloveraccidents,whichcanresultinsevere
injuryordeath.Youareresponsibleforsafeslope
operation.Operatingthemachineonanyslope
requiresextracaution.Beforeusingthemachine
onaslope,dothefollowing:
–Reviewandunderstandtheslopeinstructions
inthemanualandonthemachine.
–Evaluatethesiteconditionsofthedayto
determineiftheslopeissafeformachine
operation.Usecommonsenseandgood
judgmentwhenperformingthisevaluation.
Changesintheterrain,suchasmoisture,can
quicklyaffecttheoperationofthemachineon
aslope.
•Operateacrossslopes,neverupanddown.Avoid
operationonexcessivelysteeporwetslopes.
Poorfootingcouldcauseaslip-and-fallaccident.
•Identifyhazardsatthebaseoftheslope.Do
notoperatethemachineneardrop-offs,ditches,
embankments,water,orotherhazards.The
machinecouldsuddenlyrolloverifawheelgoes
overtheedgeortheedgecollapses.Keepasafe
distancebetweenthemachineandanyhazard.
Useahandheldtooltooperateintheseareas.
•Avoidstarting,stopping,orturningthemachineon
slopes.Avoidmakingsuddenchangesinspeedor
direction;turnslowlyandgradually.
•Donotoperateamachineunderanyconditions
wheretraction,steering,orstabilityisinquestion.
Beawarethatoperatingthemachineonwetgrass,
acrossslopes,ordownhillmaycausethemachine
tolosetraction.Lossoftractiontothedrivemay
resultinslidingandalossofbrakingandsteering.
Themachinecanslideevenifyoustopthedrive.
•Removeormarkobstaclessuchasditches,holes,
ruts,bumps,rocks,orotherhiddenhazards.Tall
grasscanhideobstacles.Uneventerraincould
overturnthemachine.
•Ifyoulosecontrolofthemachine,stepawayfrom
thedirectionoftravelofthemachine.
•Alwayskeepthemachineingearwhengoing
downslopes.Donotcoastdownhill(applicable
onlytogear-driveunits).
StartingtheEngine
Note:Forillustrationsanddescriptionsofthecontrols
referencedinthissection,refertoControls(page10).
Note:Ensurethatthespark-plugwireisinstalledon
thesparkplug.
1.Ensurethatthetraction-driveleverisinthe
NEUTRALposition.
18

2.Ensurethatthefuel-shutoffvalveisopen;refer
toOpeningandClosingtheFuel-ShutoffValve
(page17)
3.MovetheOn/OffswitchtotheONposition.
4.Usethethrottlecontroltoincreasetheengine
speed.
5.Movethechokeleverhalfwaybetweenthe
CHOKEandRUNpositionswhenstartingacold
engine;refertoUsingtheChokeLever(page
17)
Note:Thechokemaynotberequiredwhen
startingawarmengine.
6.Pulltherecoil-starthandleoutuntilpositive
engagementresults,thenpullitvigorouslyto
starttheengine.
Important:Donotpulltherecoilropetoits
limitorletgoofthestarterhandlewhenthe
ropeispulledout;theropemaybreakorthe
recoilassemblymaybedamaged.
7.MovethechokelevertotheRUNpositionasthe
enginewarmsup.
OperatingTips
Important:Grassclippingsactasalubricant
whenmowing.Operatingthecuttingunit
excessivelywithoutgrassclippingscandamage
thecuttingunit.
•Mowthegreensinastraightback-and-forth
directionacrossthegreen.
•Avoidcircularmowingorturningthemachineon
thegreensareastopreventscufng.
•Turnthemachineoffthegreenbyraisingthe
cuttingreel(pushingthehandledown)and
performingatear-shapedturnonthetractiondrum
(Figure22).
g271799
Figure22
•Mowatanormalwalkingpace.Fastspeedssaves
littletimeandresultsinaninferiormowingjob.
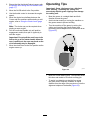
•Toassistinmaintainingastraightlineacross
thegreenandtokeepthemachineanequal
distancefromtheedgeofthepreviouscut,usethe
alignmentstripesonthebasket(Figure23).
19

g272991
Figure23
1.Alignmentstripes
OperatingtheMachineinLow
LightConditions
UsetheLEDLightKitwhenyouoperatethemachine
inlowlightconditions.ContactyourauthorizedToro
distributorforthiskit.
Important:Donotuseotherlightsystemswith
thismachine,astheywillnotoperateproperly
withtheengineACoutput.
OperatingtheControlswhile
Mowing
1.Starttheengine,setthethrottletoareduced
speed,pushdownonthehandletoraisethe
cuttingunit,andengagethetractiondriveto
transportthemachineontothecollarofthe
green.
2.Stopthemachineonthecollar.
3.Usethecutting-unit-drivelevertoengagethe
cuttingunit,increasethethrottlespeeduntil
themachineistravelingatthedesiredground
speed,engagethetractiondrivetomovethe
machineontothegreen,lowerthecuttingunitto
theground,andbeginmowing.
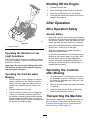
ShuttingOfftheEngine
1.Releasetheclutchbail.
2.MovethethrottlecontroltotheSLOWposition.
3.MovetheOn/OffswitchtotheOFFposition.
4.Closethefuel-shutoffvalvebeforeyoustoreor
transportthemachine
AfterOperation
AfterOperationSafety
GeneralSafety
•Shutoffthemachine,removethekey(ifequipped),
andwaitforallmovementtostopbeforeyouleave
theoperator’sposition.Allowthemachinetocool
beforeadjusting,servicing,cleaning,orstoringit.
•Cleangrassanddebrisfromthemachinetohelp
preventres.Cleanupoilorfuelspills.
•Allowthemachinetocoolbeforestoringthe
machineinanyenclosure.
•Donotstorethemachineorfuelcontainerwhere
thereisanopename,spark,orpilotlight,such
asonawaterheateroronotherappliances.
•Reducethethrottlesettingbeforeshuttingoff
theengineandturnoffthefuel-shutoffvalve(if
equipped)aftermowing.
OperatingtheControls
afterMowing
1.Drivethemachineoffofthegreen,pushdown
onthehandletoraisethecuttingunit,release
theclutchbail,disengagethecuttingunit,and
shutofftheengine.
2.Removethegrassbasketandemptythebasket
ofclippings.
3.Installthegrassbasketonthemachineand
transportthemachinetostorage.
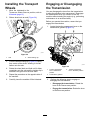
TransportingtheMachine
Aftermowing,transportthemachineawayfromthe
jobsite;refertoTransportingtheMachineUsing
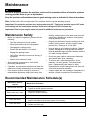
TransportWheels(page16)orTransportingthe
MachineUsingaTrailer(page16).
20
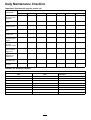
Page is loading ...
Page is loading ...
Page is loading ...
Page is loading ...
Page is loading ...
Page is loading ...
Page is loading ...
Page is loading ...
Page is loading ...
Page is loading ...
Page is loading ...
Page is loading ...
Page is loading ...
Page is loading ...
Page is loading ...
Page is loading ...
Page is loading ...
Page is loading ...
Page is loading ...
Page is loading ...
-
 1
1
-
 2
2
-
 3
3
-
 4
4
-
 5
5
-
 6
6
-
 7
7
-
 8
8
-
 9
9
-
 10
10
-
 11
11
-
 12
12
-
 13
13
-
 14
14
-
 15
15
-
 16
16
-
 17
17
-
 18
18
-
 19
19
-
 20
20
-
 21
21
-
 22
22
-
 23
23
-
 24
24
-
 25
25
-
 26
26
-
 27
27
-
 28
28
-
 29
29
-
 30
30
-
 31
31
-
 32
32
-
 33
33
-
 34
34
-
 35
35
-
 36
36
-
 37
37
-
 38
38
-
 39
39
-
 40
40


Toro Greensmaster 1018 Mower User manual
- Category
- Lawnmowers
- Type
- User manual
Ask a question and I''ll find the answer in the document
Finding information in a document is now easier with AI
Related papers
-
Toro 23522 User manual
-
Toro Brush Cutter User manual
-
-
-
-
-
-
-
-
Other documents
-
 Spigen 556CS20043 User manual
-
Ransomes 62281, 62282, 62283, 62284, 62285 Owner's manual
-
-
-
-
-
-
-
-
