Brandt IF-LIGHT40S Owner's manual
- Category
- Hobs
- Type
- Owner's manual
This manual is also suitable for
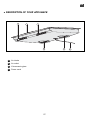
The Brandt IF-LIGHT40S is a versatile induction hob with four cooking zones that offers precise temperature control and a variety of features to make cooking easier. With its sleek design and easy-to-use controls, the IF-LIGHT40S is a great choice for any kitchen. The hob's induction technology heats cookware quickly and evenly, so you can spend less time waiting for your food to cook. The four cooking zones provide plenty of space for multiple pots and pans, and the hob's touch controls make it easy to adjust the temperature settings.
The Brandt IF-LIGHT40S is a versatile induction hob with four cooking zones that offers precise temperature control and a variety of features to make cooking easier. With its sleek design and easy-to-use controls, the IF-LIGHT40S is a great choice for any kitchen. The hob's induction technology heats cookware quickly and evenly, so you can spend less time waiting for your food to cook. The four cooking zones provide plenty of space for multiple pots and pans, and the hob's touch controls make it easy to adjust the temperature settings.


-
 1
1
-
 2
2
-
 3
3
-
 4
4
-
 5
5
-
 6
6
-
 7
7
-
 8
8
-
 9
9
-
 10
10
-
 11
11
-
 12
12
-
 13
13
-
 14
14


Brandt IF-LIGHT40S Owner's manual
- Category
- Hobs
- Type
- Owner's manual
- This manual is also suitable for
The Brandt IF-LIGHT40S is a versatile induction hob with four cooking zones that offers precise temperature control and a variety of features to make cooking easier. With its sleek design and easy-to-use controls, the IF-LIGHT40S is a great choice for any kitchen. The hob's induction technology heats cookware quickly and evenly, so you can spend less time waiting for your food to cook. The four cooking zones provide plenty of space for multiple pots and pans, and the hob's touch controls make it easy to adjust the temperature settings.
Ask a question and I''ll find the answer in the document
Finding information in a document is now easier with AI
Related papers
-
Groupe Brandt I-200TAX Owner's manual
-
-
-
Groupe Brandt TI712WT1 Owner's manual
-
Groupe Brandt TI1000B Owner's manual
-
Brandt TI1082B User manual
-
-
-
Groupe Brandt TI312BT2 Owner's manual
-
Other documents
-
-
Caple C871i User manual
-
Groupe Brandt IKMT610SI Owner's manual
-
-
-
-
Groupe Brandt IFF-4X Owner's manual
-
Asko HI1832 User guide
-
Fagor IFF3 Series Manual To Installation And Use
-
 De Dietrich DTI1568DG Owner's manual
