Canon 1200S Owner's manual

Category
Copiers
Type
Owner's manual

This manual is also suitable for

User’s Guide
ScanGear Toolbox CS 2.2
for CanoScan Color Image Scanners
for Windows
English
2
Table of Contents
About ScanGear Toolbox CS ........................................................................... 4
Installing ScanGear Toolbox ............................................................................. 5
System Requirements ................................................................................. 5
Installing/Uninstalling ................................................................................. 5
Starting ScanGear Toolbox.......................................................................... 9
Closing ScanGear Toolbox ........................................................................ 12
Settings for Each Function ............................................................................. 13
Linkable Drivers and Programs .................................................................. 13
Tab Settings.............................................................................................. 15
Easy Acquire ................................................................................................. 22
What is Easy Acquire? .............................................................................. 22
How to specify Easy Acquire? ................................................................... 22
Scanning Procedures ................................................................................ 23
Appendices ................................................................................................... 24
ScanGear Toolbox CS Settings Categories/ Settings Chart ....................... 24
Index ............................................................................................................ 26
3
Regarding screen shots
In this manual, most screen shots are taken with Windows Millennium Edition. When you use other Windows,
different screens may appear from this manual.
Trademarks
Microsoft and Windows are trademarks or registered trademarks of Microsoft Corporation in the United States and
other countries.
Other names and products listed in this publication are the trademarks or registered trademarks of the respective
companies.
4
About ScanGear Toolbox CS
ScanGear Toolbox CS (and thereafter ScanGear Toolbox) is a stand-alone utility
program that provides a simple way to use a scanner to scan and send images
to fax programs, attach to an e-mail message or copy them directly to printers.
ScanGear Toolbox can also scan an image, automatically start a program and
send the scanned image to that program with the click of a single button.
5
Installing ScanGear Toolbox
System Requirements
OS:
Windows Millennium Edition (Me), Windows 98, Windows 2000 Professional
Installing/Uninstalling
The descriptions here for the installation are those with using the CanoScan
Setup Utility CD-ROM bundled with the scanner.
When you obtain the ScanGear Toolbox through the download service, refer to
the documents with the service.
With Windows 2000 Professional, ensure that you log on as an
Administrator to install/uninstall the software.
Before installing ScanGear Toolbox, the scanner driver and the
printer driver are reccommended to install.
6
Installing
As described in the Getting Started Guide provided with the
scanner, if ScanGear Toolbox is already installed, the following
procedures below are not required.
1. Place the CanoScan Setup Utility CD-ROM in the drive.
2. Click the [Install the Software] button in the CD-ROM’s menu window.
3. The Install window will display. In this window, install ScanGear Toolbox CS
and other application software (PhotoStudio 2000, OmniPage Pro)
simultaneously.
4. Click the [Start Installation] button. Follow the on-screen instructions to
proceed with the installation. After installation, ScanGear Toolbox CS will
automatically be added to the Windows Start menu.
7
Uninstalling
Uninstalling from the start menu
Click the Windows [Start] button on the
taskbar and select [Programs], [Canon
ScanGear Toolbox CS 2.2] and [Uninstall
Canon ScanGear Toolbox CS 2.2] to uninstall
the software.
Uninstalling with Add/Remove Programs Properties
1. Click the Windows [Start] button on the
taskbar and select [Settings], [Control
Panel] to open the Control Panel.
2. Select Add/Remove Programs.
8
3. Select [Canon ScanGear Toolbox CS 2.2]
from the list and click the [Add/Remove]
button (Windows Me/98 and so on) or
[Change/Remove] button (Windows
2000 Professional). Follow the on-screen
instructions to complete the procedure.
9
Starting ScanGear Toolbox
Click the Windows [Start] button on the taskbar
and select [Programs], [Canon ScanGear
Toolbox CS 2.2] and [Canon ScanGear Toolbox
CS 2.2].
The ScanGear Toolbox toolbar will be displayed.
ScanGear Toolbox Toolbar
10
Using the ScanGear Toolbox Toolbar
Click the button on the toolbar to use the function.
The conditions to make buttons visible as above and to use the function are as
following;
Fax: a fax modem is connected to the PC and a fax software is installed.
Mail: an MAPI (p.13) compatible mail software is installed.
Copy: a printer is connected to the PC and an appropriate driver is installed.
Custom(1-3): When all the software programs are installed using the CanoScan
Setup Utility CD-ROM, the bundled application software will be registered.
You can change the size of the Toolbar with Prefs Tab settings
(P. 2 1 ).
Fax
Scans the image and
sends it to the Fax
software.
Mail
Scans the image
and attaches it to
the mail message.
Copy
Scans the image
and outputs it to
the printer.
Save
Scans the image
and saves it as a
file.
Custom(1-3)
Scans the image and
sends it to the
application software.
Settings
Displays the seting
tabs. (P. 15)
Help
Displays the
Help.
11
Click here to display the setting tab.
Click here to display ScanGear Toolbox version
information.
Click here to close ScanGear Toolbox.
Using the Shortcut Icon
When you start ScanGear Toollbox, the ScanGear Toolbox shortcut
icon
is displayed in the right part of the taskbar.
1. Left-Click on Shortcut Icon
Left-clicking the shortcut icon presents the pop-up menu
shown here. Click on any item to start the associated
function.
2. Double Left-Click on Shortcut Icon
Double-clicking the shortcut icon with the left mouse button
shows the ScanGear Toolbox toolbar on the desktop.
3. Right-Click on Shortcut Icon
Right-clicking the shortcut icon presents the pop-up menu shown here.
12
Closing ScanGear Toolbox
Closing the Toolbar
Click the
close box at the upper right of the toolbar to close it. Only the
toolbar will close.
ScanGear Toolbox continues to run even after the toolbar is closed
by the above method.
Closing ScanGear Toolbox
Right-click the shortcut icon (
) on the Windows taskbar and select [Exit
Canon ScanGear Toolbox CS] from the pop-up menu. ScanGear Toolbox will
close. The toolbar will also close at the same time if it was displayed.
13
Settings for Each Function
Linkable Drivers and Programs
The drivers and programs linked to the fax, copy and mail buttons can be
changed. In addition, the three custom buttons can be linked to other drivers
or programs, which must meet the following criteria.
Faxing
The fax button can be linked to printer drivers and faxing softwares such as
Microsoft Outlook 98 or Microsoft Outlook 2000.
Mail
Mail programs must be MAPI compatible to be linked to ScanGear Toolbox CS.
This button can be linked to mailing softwares such as Microsoft Outlook or
Microsoft Exchange.
MAPI(Messaing Application Programming Interface) is the industry
standard interface for e-mail programs.
14
Copying
The copy button can be linked to printer drivers that appear in the [Printers]
folder, found by clicking the Windows [Start] button and selecting [Settings]
and [Printers]. If two or more printers are connected to your computer,
ScanGear Toolbox can switch between them. Both local and network printers
can be linked to ScanGear Toolbox.
Custom Buttons 1-3
TWAIN-compatible programs can be linked to the three customizable buttons
in ScanGear Toolbox. With this feature, an image can be scanned, the program
started and the scanned image loaded into the program with a single click of a
button.
When you make installations using CanoScan Setup Utility CD-ROM,
the application softwares installed simultaneously are automatically
registered to the ScanGear Toolbox toolbar (Custom 1 to 3).
15
ScanGear Toolbox Toolbar
Setting Tabs
Tab Settings
Clicking the [Settings] button opens the Canon ScanGear Toolbox Settings
window, which features a tab for each button. These tabs are used to specify
the button settings, such as the driver or program to which it is linked. The
tabs can also be used to adjust settings for scanned images when Easy Acquire
(P. 2 2 ) is on.
16
Fax Settings Tab
• Show this button on Toolbar
Place a check in this box to display the button for this function
on the ScanGear Toolbox toolbar.
• Button links
Click the arrow of the [Link to:] list box. Select [System default]
to register the printer driver “Set as Default” for your computer.
• Save images
Place a check in this box to save the scanned image to a file in
addition to sending it to the fax driver. The save folder, and
root filename and numbering options can be set when a check
is present in this box.
• Settings for Easy Acquire
Place a check in the box to turn Easy Acquire on. And specify
the settings (image type, image quality, paper size (scan area))
used when Easy Acquire is turned on from the lists. Custom
Setting is performed for the paper size. See ScanGear Toolbox
CS Settings Categories/Settings Chart (P. 2 4 ) for a list of the
options for these settings.
Setting Tabs of ScanGear Toolbox
17
Mail Settings Tab
• Show this button on Toolbar
Place a check in this box to display the button for this function on
the ScanGear Toolbox toolbar.
• Button links
Click the arrow of the [Link to:] list box and select [System default]
to register the default MAPI mail program for your computer.
• Application can open multiple images
Place a check in this box if the application can open more than
two images. When an ADF is equipped, the application opens
more than two images at a time. When no ADF is equipped, this
check is invalid.
• Save images
Place a check in this box to save the scanned image to a file in
addition to sending it to the mail program. The save folder, root
filename and numbering options, and file format can be set
when a check is present in this box.
• Settings for Easy Acquire
Place a check in the box to turn Easy Acquire on. And specify the
settings (image type, image quality, paper size (scan area)) used
when Easy Acquire is turned on from the lists. Custom Setting is
performed for the paper size. See ScanGear Toolbox CS Settings
Categories/Settings Chart (P. 2 4 ) for a list of the options for these
settings.
18
Copy Settings Tab
• Multiple copies
Place a check in this box to specify the number of copies when
copying. When this check is on, [Number of copies] dialog will
be displayed while copying, specify the number of copies to
print.
• Show this button on Toolbar
Place a check in this box to display the button for this function
on the ScanGear Toolbox toolbar.
• Button links
Click the arrow of the [Link to:] list box. Select [System default]
to register the printer driver “Set as Default” for your computer.
• Settings for Easy Acquire
Place a check in the box to turn Easy Acquire on. And specify
the settings (image type, image quality, paper size (scan area))
used when Easy Acquire is turned on from the lists. Custom
Setting is performed for the paper size. See ScanGear Toolbox
CS Settings Categories/Settings Chart (P. 2 4 ) for a list of the
options for these settings.
19
Save Settings Tab
• Show this button on Toolbar
Place a check in this box to display the button for this function
on the ScanGear Toolbox CS toolbar.
• Image file
The save folder, root filename and numbering options, and file
format can be set in this section.
• Settings for Easy Acquire
Place a check in the box to turn Easy Acquire on. And specify
the settings (image type, image quality, paper size (scan area))
used when Easy Acquire is turned on from the lists. Custom
Setting is performed for the paper size. See ScanGear Toolbox
CS Settings Categories/Settings Chart (P. 2 4 ) for a list of the
options for these settings.
20
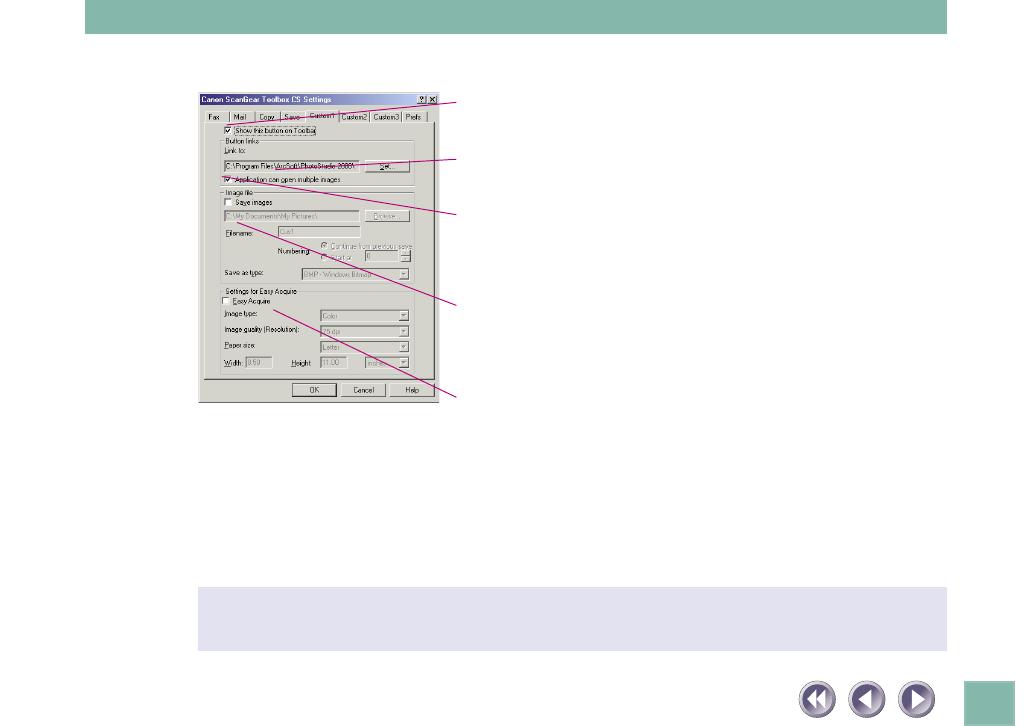
Custom (1, 2, 3) Settings Tab
• Show this button on Toolbar
Place a check in this box to display the button for this function on
the ScanGear Toolbox toolbar.
• Button links
The application software installed from CanoScan Setup Utilitiy
CD-ROM are registered in Custom 1 and 2. You can add or change
to another application.
• Application can open multiple images
Place a check in this box if the application can open more than
two images. When an ADF is equipped, the application opens
more than two images at a time. When no ADF is equipped, this
check is invalid.
• Save images
Place a check in this box to save the scanned image to a file in
addition to sending it to the registered program. The save folder,
root filename and numbering options, and file format can be set
when a check is present in this box.
• Settings for Easy Acquire
Place a check in the box to turn Easy Acquire on. And specify the
settings (image type, image quality, paper size (scan area)) used
when Easy Acquire is turned on from the lists. Custom Setting is
performed for the paper size. See ScanGear Toolbox CS Settings
Categories/Settings Chart (P.24) for a list of the options for these
settings.
When registering an OCR program that does not support color data, set the [Image
type:] setting in the Settings for Easy Acquire section to [Black and White].
  • Page 1 1
  • Page 2 2
  • Page 3 3
  • Page 4 4
  • Page 5 5
  • Page 6 6
  • Page 7 7
  • Page 8 8
  • Page 9 9
  • Page 10 10
  • Page 11 11
  • Page 12 12
  • Page 13 13
  • Page 14 14
  • Page 15 15
  • Page 16 16
  • Page 17 17
  • Page 18 18
  • Page 19 19
  • Page 20 20
  • Page 21 21
  • Page 22 22
  • Page 23 23
  • Page 24 24
  • Page 25 25
  • Page 26 26
  • Page 27 27

Canon 1200S Owner's manual

Category
Copiers
Type
Owner's manual
This manual is also suitable for

Ask a question and I''ll find the answer in the document

Finding information in a document is now easier with AI