Page is loading ...

Product # 6311
VANTAGE PRO
®
UPDATER
User’s Guide
Vantage Pro Updater Overview
The Vantage Pro Updater allows you to update the firmware in a Vantage con-
sole via the expansion port used by the WeatherLink data logger. The Updater
can be powered by a 5 Volt Vantage Pro AC-power adapter or a 9V battery. One
9V battery should provide over 20 hours of operation.
Section 1: Using the VP Updater
Updating the Vantage Pro Console Firmware
These are the basic steps involved in using the Updater to reprogram the firm-
ware in a Vantage Pro console.
1. If you are using WeatherLink software with your Vantage Pro weather sta-
tion, be sure to download the weather data into your computer before
beginning this procedure.
2. Press the [DONE] key and the down arrow [-] key on your VP console to
enter setup mode. This will preserve the time and other settings on your
console.
3. Remove power from the console by unplugging the AC wall adapter and
removing the batteries.
4. If a WeatherLink data logger is installed, remove it from the console.
5. Turn the VP Updater on. The Status LED should be GREEN. If it shows
another color, see the Status LED Summary Table.
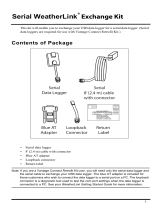
6. Insert the Link Program Adapter (See Figure 2) into the console expansion
port. See Figure 1 for location of port. It’s the same port used by the Weath-
erLink data logger.
7. Press the Updater Start Button. The LED should start flashing YELLOW.
8. When Updater is done programming, the LED will turn GREEN and you
will hear 1 beep. A RED or YELLOW LED indicates a problem. See the Sta-
tus LED Summary Table and the Troubleshooting Notes for more informa-
tion.
9. Unplug the Updater from the Console.
10. If you have a WeatherLink data logger, plug it into the console.
11. Restart the console by replacing the batteries and/or connecting the AC
wall adapter.
12. Check the release notes for the version of firmware you just installed. You
may have additional steps to perform in order to complete the update.

Page 2 Vantage Pro® Updater
Status LED Summary Table
Troubleshooting Notes
On power up the Updater will beep twice and sequence the colors of the LED.
When the LED is GREEN it is ready to use. The first beep indicates the processor
is running. The second beep means it can talk to the flash memory where the
firmware image to be loaded is stored.
• If you do not hear a beep after powering up, the battery is dead or some-
thing is wrong with the Updater.
• If you do hear a beep after powering up, but the LED is left off showing no
color, the Updater has detected a low battery condition.
• If, after pressing the Start button the LED does not change to flashing YEL-
LOW but instead beeps twice and goes to RED, the Updater cannot talk to
the console. Check connections and press Start again.
• If firmware has been updated correctly, the status LED turns GREEN.
• If a target flash page does not verify, the status LED will turn solid RED.
• If the fuse bits do not program correctly, the status LED will be solid YEL-
LOW.
• If the console did not program correctly, you can push the Start button to
try to program it again.
• If the firmware fails the verification, the status LED will start flashing RED.
You can push the Start button to leave this state and go to the GREEN state.
Note: The Vantage Pro Updater sends diagnostic messages through its serial port that may be
helpful if the operator is puzzled about what is going on. These messages can be viewed in
PROCOMM or HYPERTERMINAL.
LED Color Updater Status Additional Info
Solid Green The Updater is ready. If after programming, it means
everything programmed ok.
Solid Yellow The fuse bits did not program cor-
rectly.
Solid Red The target flash did not program
correctly.
If just after the Start button is
pushed, the Updater is not talking
to the target at all.
No Color The battery is low.
Flashing Yellow Target flash pages for firmware
are being programmed or veri-
fied.
Flashing Red The firmware update failed verifi-
cation.
If the condition repeats, the Up-
dater flash memory may be cor-
rupt. Reload the firmware into the
VP Updater.

Page 3
Vantage Pro Console
Data Logger Battery Cove
r
Expansion Port
Figure 1. Data Logger and Console
ON/OFF
Switch
#6311
Vantage Pro
®
Updater
START
ON
Status
Light
Start
Button
Link
Program
Adapter
Serial
Port
F
igure 2. Vantage Pro Updater

Product Numbers: 6311
Davis Instruments Part Number: 7395.310
Vantage Pro Updater User’s Guide
Rev A Manual (4/24/2002)
Copyright ©2002 Davis Instruments Corp. All rights reserved.
3465 Diablo Avenue, Hayward, CA 94545-2778 U.S.A.
510-732-9229 • Fax: 510-732-9188
E-mail: [email protected] • www.davisnet.com
Section 2: Advanced Operations
Updating the Updater Overview
The Updater software (updater.exe) allows you to load new versions of firm-
ware into the VP Updater. The firmware image is stored in a file named flash.bin
and can be downloaded from the Support section of our website: www.davis-
net.com.
A PC is required to install new versions of firmware on the VP Updater. The
installation is done through a serial port at 19,200 using the Updater software
provided by Davis.
Using Updater Software to Update the Updater
1. Make sure the flash.bin file is in the Updater software directory before you
start the program.
2. Connect the included serial cable to the Updater’s serial port (see Fig. 2).
The other end of the cable connects to the serial port on your computer
using the included serial port adapter.
3. Turn the VP Updater ON using the ON switch (see Figure 2).
4. Start the Updater software.
5. The software should detect the VP Updater on one of your serial ports.
Note: If the Updater Software doesn’t detect the VP Updater, check all the connections and
make sure battery is good or check that the AC-power adapter is connected and receiv-
ing power.
6. When the software asks, "LOAD NEW FIRMWARE TO UPDATER? (Y or N)":
• Press “Y” to update the firmware in the Updater.
• You can press “N” to cancel the operation.
7. The program will load the new firmware into the VP Updater and double
check that the firmware loaded correctly.
8. Type 'Q' to quite the program. You can then close the window.
Contacting Davis Instruments
(510) 732-7814 Technical Support, Monday – Friday, 7:00 a.m. – 5:30 p.m. Pacific Time.
(510) 670-0589 Fax to Customer Service or Tech Support.
www.davisnet.com Davis Instruments’ website. Check out the Weather Support section.
suppor[email protected]m E-mail to Technical Support.
/