
Black
Cyan
Magenta
Yellow
Code: 909 AVR IM
Date: 101220 Edition: 09 Op: DCR
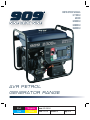
INSTRUCTION MANUAL
G1100KU
A2300
G2300KU
G3800KU
G6000KU
AVR PETROL
GENERAT O R R A N G E

CONTE N TS
Warranty Power Tools
For full details please visit us at www.909.com
Warranty 2
Introduction 3
Environmental protection 3
Scope of product 3
Description of symbols 3
Specifications 4
Safety instructions 5
Risk of electrocution and fire 7
Risk of fire 8
Risk of injury and property damage when transporting generator 9
Risk of breathing – inhalation hazard 9
Risk of unsafe operation 9
Risk of hot surfaces 10
Risk of moving parts 10
Risk from lifting 10
Additional safety rules for generators 11
Unpacking 11
Know your product 12
Automatic voltage regulator (AVR) 13
What can I use these generators for? 13
Preparing the generator 14
Checking the engine fuel 14
Checking the engine oil 15
Battery start connection (electric start models only) 15
Starting the engine with key start (electric start models) 16
Starting the engine manually 17
Stopping the engine 17
Connecting apparatus to the generator 17
AC circuit breaker 18
Safety switch tripping 18
To use the appliance outlet 18
To use the battery charging outlet 19
To charge a battery 19
To use the USB power outlet 20
To use the DC appliance outlet or USB without the generator being operated 21
DC overload cut out 21
Carbon build up 22
Generator maintenance 22
Periodic maintenance 23
Storage 24
Spark plugs 24
Engine oil replacement 24
Air filter 24
Petrol tank filter 25
Tap extension fuel filter 25
Cleaning 26
Repairs 26
Troubleshooting 27
2

3
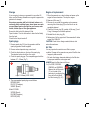
Scope of product
These products are suited for home use, camping and job
site applications.
Typical applications are, power tools, non electronic
appliances plus DC applications like recharging lead acid car
batteries and operating 12V appliances to a rating of 60W
(5A). These generators are also fitted with USB power outlet
which are suitable for appliances up to a max current draw
of 1 amp 5W.
Note: These generators are not suitable for sensitive
electronic equipment like computers, televisions,
caravans etc.
It is highly recommended to have a surge protector
connected to the generator.
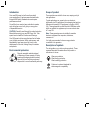
Description of symbols
The rating plate on your tool may show symbols. These
represent important information about the product or
instructions on its use.
Wear eye protection.
Wear hearing protection.
Wear breathing protection.
Conforms to relevant standards for
electromagnetic compatibility.
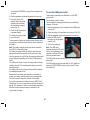
Introduction
Your new 909 power tool will more than satisfy
your expectations. It has been manufactured under
stringent 909 Quality Standards to meet superior
performance criteria.
You will find your new tool easy and safe to operate,
and, with proper care, it will give you many years
of dependable service.
CAUTION. Carefully read through this entire Instruction
Manual before using your new 909 Power Tool. Take
special care to heed the Cautions and Warnings.
Your 909 power tool has many features that will make
your job faster and easier. Safety, performance, and
dependability have been given top priority in the
development of this tool, making it easy to maintain
and operate.
Environmental protection
Recycle unwanted materials instead
of disposing of them as waste. All tools,
hoses and packaging should be sorted,
taken to the local recycling centre and
disposed of in an environmentally safe way
.

4
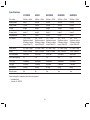
Specifications
G1100KU A2300 G2300KU G3800KU G6000KU
AC output: 240Vac ~ 50Hz 240Vac ~ 50Hz 240Vac ~ 50Hz 240Vac ~ 50Hz 240Vac ~ 50Hz
Rated power: 900W 2000W 2000W 3200W 5000W
Peak power: 1100W 2300W 2300W 3800W 6000W
Phase: Single Single Single Single Single
Power factor: coso| =1 coso| =1 coso| =1 coso| =1 coso| =1
Displacement: 87cc 163cc 163cc 270cc 389cc
DC output: 12V – 14.2V 12V – 14.2V 12V – 14.2V 12V – 14.2V 12V – 14.2V
Appliance output Appliance output Appliance output Appliance output Appliance output
& battery charge & battery charge & battery charge & battery charge & battery charge
output. Max 5 A output. Max 5 A output. Max 5 A output. Max 5 A output. Max 5 A
USB output: 5V, Max 1 Amp 5V, Max 1 Amp 5V, Max 1 Amp 5V, Max 1 Amp 5V, Max 1 Amp
Motor: 2.4HP, 4 stroke 5.5HP, 4 stroke 5.5HP, 4 stroke 9HP, 4 stroke 13HP, 4 stroke
No load speed: 3000 min
-1
3000 min
-1
3000 min
-1
3000 min
-1
3000 min
-1
Fuel tank capacity: 6L 15L 15L 25L 25L
Fuel type: Unleaded Unleaded Unleaded Unleaded Unleaded
Oil type: 4 Stroke 4 Stroke 4 Stroke 4 Stroke 4 Stroke
Net weight: 25.5kg 38.5kg 38.5kg 67kg 80kg
Electric start: No No Yes Yes Yes
Items required for operation which are not supplied:
• Unleaded fuel
• 4 stroke oil. SAE 30

5
Safety instructions
WARNING. Read and understand all instructions.
Failure to follow all instructions listed below may result in
electric shock, fire and/or serious injury. The term “power
tool” in all of the warnings below refers to your mains-
operated (corded) power tool or battery-operated (cordless)
power tool.
Save these instructions
Work area
• Keep work area clean and well lit. Cluttered and dark
areas invite accidents.
• Do not operate power tools in explosive atmospheres,
such as in the presence of flammable liquids, gases,
or dust. Power tools create sparks which may ignite the
dust or fumes.
• Keep children and bystanders away while operating a
power tool. Distractions can cause you to lose control.
Electrical safety
• Power tool plugs must match the outlet. Never modify
the plug in any way. Do not use any adapter plugs with
earthed (grounded) power tools. Unmodified plugs and
matching outlets will reduce risk of electric shock.
• Avoid body contact with earthed or grounded
surfaces such as pipes, radiators, ranges and
refrigerators. There is an increased risk of electric shock
if your body is earthed or grounded.
• Do not expose power tools to rain or wet conditions.
Water entering a power tool will increase the risk of
electric shock.
• Do not abuse the cord. Never use the cord for carrying,
pulling or unplugging the power tool. Keep cord away
from heat, oil, sharp edges or moving parts. Damaged or
entangled cords increase the risk of electric shock.
• When operating a power tool outdoors, use an
outdoor extension cord suitable for outdoor use.
Use of a cord suitable for outdoor use reduces the risk of
electric shock.
Personal safety
• Stay alert, watch what you are doing and use
common sense when operating a power tool.
Do not use a power tool while you are tired or under the
influence of drugs, alcohol, or medication. A moment
of inattention while operating power tools may result in
serious personal injury.
• Use safety equipment. Always wear eye protection.
Safety equipment such as a dust mask, non-skid
safety shoes, hard hat, or hearing protection used for
appropriate conditions will reduce personal injuries.
• Avoid accidental starting. Ensure the switch is in the
off-position before plugging in. Carrying power tools with
your finger on the switch or plugging in power tools that
have the switch on invites accidents.
• Remove any adjusting key or wrench before turning
the tool on. A wrench or a key that is left attached to a
rotating part of the power tool may result in personal injury.
• Do not overreach. Keep proper footing and balance at
all times. This enables better control of the power tool in
unexpected situations.
• Dress properly. Do not wear loose clothing or jewellery.
Keep your hair, clothing and gloves away from moving
parts. Loose clothes, jewellery or long hair can be caught
in moving parts.
• If devices are provided for the connection of dust
extraction and collection facilities ensure that these
are connected and properly used. Use of these devices
can reduce dust-related hazards.
Power tool use and care
• Do not force the power tool. Use the correct power tool
for your application. The correct power tool will do the job
better and safer at the rate for which it was designed.
• Do not use the power tool if the switch does not turn
it on and off. Any power tool that cannot be controlled
with the switch is dangerous and must be repaired.

6
• Disconnect the plug from the power source before
making any adjustments, changing accessories, or
storing power tools. Such preventive safety measures
reduce the risk of starting the power tool accidentally.
• Store idle power tools out of the reach of children and
do not allow persons unfamiliar with the power tool
or these instructions to operate the power tool. Power
tools are dangerous in the hands of untrained users.
• Maintain power tools. Check for misalignment or
binding of moving parts, breakage of parts and any other
condition that may affect the power tool’s operation. If
damaged, have the power tool repaired before use. Many
accidents are caused by poorly maintained power tools.
• Keep cutting tools sharp and clean. Properly
maintained cutting tools with sharp cutting edges are less
likely to bind and are easier to control.
• Use the power tool, accessories and tool bits etc.,
in accordance with these instructions and in the
manner intended for the particular type of power
tool, taking into account the working conditions
and the work to be performed. Use of the power tool
for operations different from intended could result in a
hazardous situation.
Service
• Have your power tool serviced by a qualified repair
personnel using only identical replacement parts.
This will ensure that the safety of the power tool is
maintained.

7
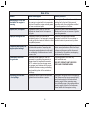
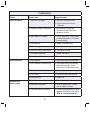
Risk of electrocution and fire
Hazard What could happen How to prevent it
Improper storage of extension cord.
Extension cord can come into contact
with hot engine parts resulting in
damage. Using a damaged extension
cord can result in electrocution or
death.
Remove extension cord from the
generator and store separately away
from generator.
Operation of generator in rain, wet,
icy, or flooded conditions.
Water is an excellent conductor of
electricity! Water which comes in
contact with electrically charged
components can transmit electricity
to the frame and other surfaces,
resulting in electrical shock to anyone
contacting them.
Operate generator in a clean, dry, well
ventilated area. Make sure hands are
dry before touching unit.
Placing generator on or against
highly conductive surface, such as a
steel walkway or metal roof.
Accidental leakage of electrical current
could charge conductive surfaces in
contact with the generator.
Place generator on low conductivity
surface such as a concrete slab.
ALWAYS operate generator a
minimum of 2 meters from any
conductive surface.
Use of worn, damaged or
ungrounded extension cords.
Contact with worn or damaged
extension cords could result in
electrocution.
Use of ungrounded cordsets could
prevent operation of circuit breakers
and result in electrical shock.
Inspect extension cords before use and
replace with new cord if required.
Always use a cordset having a
grounding wire with an appropriate
grounding plug. DO NOT use an
ungrounded plug.
Operation of unit when damaged,
or with guards or panels removed.
Attempting to use the unit when it
has been damaged, or when it is not
functioning normally could result in fire
or electrocution.
Removal of guarding could expose
electrically charged components and
result in electrocution.
Do not operate generator with
mechanical or electrical problem.
Have unit repaired by an Authorised
Service Centre.
Do not operate generator with
protective guarding removed.

8
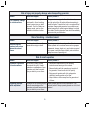
Risk of fire
Hazard What could happen How to prevent it
Attempting to fill the fuel
tank while the engine is
running.
Fuel and fuel vapours can become ignited
by coming in contact with hot components
such as the muffler, engine exhaust gases,
or from an electrical spark.
Turn engine off and allow it to cool before
adding fuel to the tank. Equip area of
operation with a fire extinguisher certified
to handle gasoline or fuel fires.
Sparks, fire, hot objects
Cigarettes, sparks, fires, or other hot
objects can cause fuel or fuel vapours
to ignite.
Add fuel to tank in well ventilated area.
Make sure there are no sources of ignition
near the generator.
Improper storage of fuel
Improperly stored fuel could lead to
accidental ignition. Fuel improperly secured
could get into the hands of children or other
unqualified persons.
Store fuel in an approved container
designed to hold fuel. Store container in
secure location to prevent use by others.
Tampering with factory set
engine speed settings.
Engine speed has been factory set to
provide safe operation. Tampering with
the engine speed adjustment could result
in overheating of attachments and could
cause a fire.
Never attempt to “speed-up” the engine to
obtain more performance. Both the output
voltage and frequency will be thrown out
of standard by this practice, endangering
attachments and the user.
Inadequate ventilation
for generator
Materials placed against or near the
generator or operating the generator in
areas where the temperature exceeds
40°C. ambient (such as storage rooms
or garages) can interfere with its proper
ventilation features causing overheating
and possible ignition of the materials or
buildings.
Operate generator in a clean, dry,
well ventilated area.
DO NOT OPERATE UNIT INDOORS
OR IN ANY CONFINED AREA.
Overfilling the fuel tank
– fuel spillage.
Spilled fuel and its vapours can become
ignited from hot surfaces or sparks.
Use care in filling the tank to avoid spilling
fuel. Make sure fuel cap is secured tightly
and check engine for fuel leaks before
starting engine. Move generator away
from refuelling area or any spillage before
starting engine. Allow for fuel expansion.
Never refuel with the engine running.

9
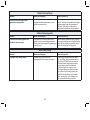
Risk of injury and property damage when transporting generator
Hazard What could happen How to prevent it
Fire, inhalation, damage
to vehicle surfaces
Fuel or oil can leak or spill and
could result in fire or breathing
hazard, serious injury or death
can result. Fuel or oil leaks can
damage carpet, paint or other
surfaces in vehicles or trailers.
The generator is equipped with a fuel drain valve,
turn the valve to the off position before transporting to
avoid fuel leaks. Transport fuel only in an approved fuel
container. Always place generator on a protective mat
when transporting to protect against damage to vehicle
from leaks. Remove generator from vehicle immediately
upon arrival at your destination.
Risk of breathing – inhalation hazard
Hazard What could happen How to prevent it
Gasoline engines
produce toxic carbon
monoxide exhaust
fumes.
Breathing exhaust fumes will
cause serious injury or death.
Operate generator in clean, dry, well ventilated area.
Never operate unit in enclosed areas such as garages,
basements, storage, sheds, or in any location occupied
by humans or animals. Keep children, pets and others
away from area of operating unit.
Risk of unsafe operation
Hazard What could happen How to prevent it
Operation of generator
in careless manner.
All sources of energy include
the potential for injury. Unsafe
operation or maintenance of your
generator could lead to serious
injury or death to you or others.
• Review and understand all of the operating
instructions and warnings in this manual.
• Become familiar with the operation and controls of
the generator. Know how to shut it off quickly.
• Equip area of operation with a fire extinguisher
certified to handle gasoline or fuel fires.
• Keep children or others away from the generator at
all times.
Operating generator
while suspended
Generator will not operate properly
and will cause damage to the
generator and could cause serious
injury or death to you or others.
Never operate generator while suspended or in an
unlevel position. Always operate generate on a flat, level
surface.

10
Risk of hot surfaces
Hazard What could happen How to prevent it
Contact with hot engine and
generator components.
Contact with hot surfaces, such as
engines exhaust components, could
result in serious burns.
During operation, touch only the
control surfaces of the generator. Keep
children away from the generator at
all times. They may not be able to
recognize the hazards of this product.
Risk of moving parts
Hazard What could happen How to prevent it
Contact with moving parts can
result in serious injury.
The generator contains parts which
rotate at high speed during operation.
These parts are covered by guarding to
prevent injury.
Never operate generator with guarding
or cover plates removed. Avoid wearing
loose fitting clothing or jewellery which
could be caught by moving parts.
Risk from lifting
Hazard What could happen How to prevent it
Lifting a very heavy object.
Serious injury can result from
attempting to lift too heavy an object.
When lifting, always keep the object
you are lifting near the vertical axis of
your body. DO NOT use you back to
lift heavy loads. Both people should
crouch down, grab the underside
of unit and use your legs to carry
the weight. Keep the object as near
the centre of your body’s gravity as
possible. Avoid twisting your bodies
when carrying the unit; instead, turn
your whole body using your feet.

11
Additional safety rules for generators
• Do not operate in a hazardous location. Such areas
include where there is a risk of explosion of petrol fumes,
leaking gas or explosive dust.
• Do not operate in a confined area. Exhaust gases,
smoke or fumes could reach dangerous concentrations.
• The output of this generator is potentially lethal.
The
generator should not be connected to a fixed electrical
installation except by an appropriately licensed person.
• Protect your generator. This generator is NOT
WEATHERPROOF and should not be exposed to direct
sunlight, high ambient temperature and damp, wet or
high humidity conditions.
• Do not smoke while refuelling. This is potentially
dangerous as it may ignite the fuel and cause an explosion.
• Take care not to spill fuel. When refuelling the generator
ensure that the motor has been switched off. Prevent the
spilling of fuel as this may also ignite with the hot motor.
Never refuel whilst the engine running.
• Be careful where you store the generator. Store the
generator in a dry area away from inflammable liquids.
• Keep your distance. The generator emits exhaust
fumes. As a safety precaution do not stand close to the
unit whilst it is in operation. Ensure bystanders also keep
their distance.
• Ensure the generator has oil. Before commencing
the generator, ensure that the unit has been filled with
SAE#30 4 stroke oil.
• Never fill fuel tank indoors. Never fill fuel tank when
engine is running or hot. Do not smoke when filling
fuel tank.
• Never refuel when the generator is running. Switch the
generator to the off position prior to removing the fuel cap
and refuelling.
• Engine speed has been factory set to provide safe
operation. Tampering with the engine speed adjustment
could result in overheating of attachments and could
cause a fire. Never attempt to “speed-up” the engine to
obtain more performance. Both the output voltage and
frequency will be thrown out of standard by this practice,
endangering attachments and the user.
You MUST unplug any load from the generator before
starting and stopping to prevent permanent damage to
any appliances.
WARNING
• Persons who are fitted with a heart pacemaker,
or similar medical conditions should take care when
using this device, even the extra low voltage of the battery
charging output should not be handled by a person with
medical conditions as or similar to the above.
Unpacking
Due to modern mass production techniques, it is unlikely
that your 909 generator is faulty or that a part is missing.
If you find anything wrong, do not operate the tool until the
parts have been replaced or the fault has been rectified.
Failure to do so could result in serious personal injury.

12
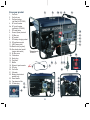
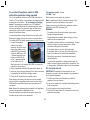
Know your product
1. Fuel tank
2. Fuel tank cap
3. Fuel level gauge
(not fitted on G1100KU)
4. AC circuit breaker
4a. AC circuit breaker
(as fitted to G1100KU)
5. DC reset button
6. Ground (frame) terminal
7. Oil filler cap
8. AC sockets
9. DC battery charging socket
10. DC appliance socket
11. USB power outlet
12a. Electric start (key start)
12b. Non electric start model
(engine start switch)
13. Air filter cover
14. Choke lever
15. Spark plug
16. Fuel drain
17. Muffler
18. Exhaust / spark arrestor
19. DC plug
20. Fuel valve
21. Voltmeter
22. Battery (electric start
models only)
23. Recoil starter
24. Tap extension filter
25. Oil drain plug
2 31
* Pictured model
G2300KU
7
8
10
12b
12a
20
13
14
15
25
17
18
11
4
5
9
6
16
19
21
22
23
24
25
4a

13
Automatic voltage regulator (AVR)
These generators have been equipped with AVR technology
which provides automatic voltage regulated power for a
continuous uninterrupted stable power supply.
The AVR maintains a regulated AC output and reacts
substantially quicker to rapid surges in voltage, therefore,
reducing the possibility of damage to the generator and
attached equipment.
However, it is strongly suggested to use a surge protector
on the output of the generator.
These generators are also not recommended to be used on
electronic or sensitive equipment like computers, televisions
and similar devices. This also includes caravans which have
built in electronic inverter equipment.
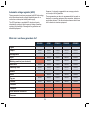
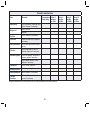
G1100KU A2300 G2300KU G3800KU G6000KU
Lights
900W 2000W 2000W 3200W 5000W
Pumps
400W 1000W 1000W 1800W 3000W
Refridgerators
400W 1000W 1000W 1500W 3000W
Dryer
1800W 1800W 2600W 4000W
Washing machine (non electronic)
1800W 1800W 2600W 4000W
Hand tools
500W 1400W 1400W 2400W 4000W
Stationary tools
500W 1200W 1200W 2000W 3000W
Heaters
900W 2000W 2000W 3200W 5000W
Kettle
2000W 2000W 3200W 5000W
Fry pan
900W 2000W 2000W 3200W 5000W
Toasters
900W 2000W 2000W 3200W 5000W
Televison
Computer
Other sensitive electronics
Caravans
What can I use these generators for?

14
G1100KU
• Lights
• Small pumps up to 400W
• Small refrigerators (Non electronic)
• Power tools up to 600W
• Heaters up to 900W
G2300KU & A2300
• All of the above
• Pumps up to 1000W
• Large refrigerators up to 1000W
• Hand tools up to 1500W
• Stationary tools up to 1200W
• Heaters up to 2000W
• Household NON electronic appliances up to 2000W,
ie. kettles, toasters
G3800KU
• All of the above
• Pumps up to 1800W (could be higher depending
on the motor)
• Hand tools up to 2400W
• Stationary tools up to 1800W (could be higher
depending on motor)
• Small welders
• Heaters up to 3200W
• House hold NON electronic appliances up to 3200W:
kettles, toasters, frypan, cookers, ovens
G6000KU
• All of the above
• Pumps up to 3000W
• Multiple hand tools up to 4000W total
• Stationary tools up to 2400W, (could be higher
depending on the motor)
• Household NON electronic appliances up to 5000W:
kettles, toasters, frypan, cookers, ovens
All of the above generators are not recommended for use
on sensitive electronic equipment including LCD / plasma
televisions, computers, microwaves etc, and including
caravans which have internal inverter controls.
It is also recommended to use a surge protector on the
outlets of the generators.
Preparing the generator
It is important to check the generator before you commence
operating the unit.
IMPORTANT. Ensure that the engine is fully filled with oil.
When leaving the factory, this generator has NO OIL in
the engine.
Note. The engine will not start if the generator has no oil
or low oil.
Checking the engine fuel
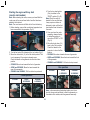
1. Switch off engine by moving the ignition switch (12a or
12b) to the ‘off’ or ‘O’ position.
2. Check the fuel level by viewing the fuel level gauge (3)
or removing the fuel cap (2) to check.
3. If the fuel is low, remove the fuel cap (2) by turning
anticlockwise.
4. Check to ensure the fuel filter screen is inside the fuel
filter neck.
5. Pour the unleaded fuel from an approved fuel container into
the fuel tank (1). Because fuel expands, DO NOT FILL to
the lip of the tank. Max. fill is to the top of the fuel filter rim.
6. Replace fuel cap (2) and turn clockwise to lock.
WARNING.
• Do not refill fuel tank (1) while engine is running or is hot.
• Check to ensure that the fuel drain (16) has been
tightened and that fuel is not leaking.
• Be careful not to admit dust, dirt, water or other foreign
objects into the fuel.
• Wipe off spilt fuel thoroughly before starting engine.
• Ensure you DO NOT fuel the generator in close proximity
to any open flames, lit cigarettes, or hot objects.
• The generator should also be located in an open area
with fresh air and NOT in a confined area.

15
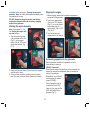
Checking the engine oil
The motor of this generator is not filled with oil when unpacked.
Prior to starting the motor ensure the crank case is filled with
SAE #30 4 stroke oil.
Damage to the motor is not covered under warranty if the
motor is run with insufficient oil.
1. Before checking or refilling oil, be sure the generator is
put on a stable and level surface, ensuring the engine has
been switched OFF.
2. Remove the oil filler cap (7) by rotating the cap anti-
clockwise and inspect to see the oil level.
3. Always fill the motor with
oil to the point where the
oil is just overflowing
from the filling neck.
Do Not start the
generator when the oil is
near the low level mark.
Check and fill before
each use.
Note. Do not screw in the oil filler cap (7) when checking
oil level, simply insert and pull the cap straight out.
4. If the oil is contaminated or has discoloured, ensure you
change the oil. Refer to the ‘Engine oil replacement’
section for instructions.
Note. This motor is fitted with a low oil sensor. If the oil level
is too low the motor will stop operating or the motor will
not start. It is advised to check the oil level each time the
generator is used.
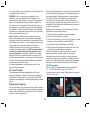
Battery start connection
(electric start models only)
When unpacked, this generator is not fully connected to the
starting battery (22) and will require the negative wire to be
connected to the battery as follows.
1. Check the Red positive wire is connected to the battery
terminal and the insulating cover is fully pulled over the
terminal.
2. Remove the nut and bolt from the negative terminal.
3. Refit the bolt through the negative terminal and with the
insulation cap pulled bag on the black wire, fit the eyelet
of the black negative wire on the bolt through the negative
terminal.
4. Fit the nut on the bolt
through the negative
terminal and secure firmly.
Recheck the connections
ensuring the red wire has
been fitted to the + terminal
in the factory and the
black wire which has just
been connected is to the
- terminal.
5. Refit the insulation cover on
the black wire to completely
cover the terminal. Also
recheck the red termination
and ensure the cover is
fully fitted.
Note. The charge from the
battery will vary and may
not be sufficient to start the
generator. If this is the case,
start the generator manually
as descried in the section,
“Starting the generator
manually”. The battery will
charge while the generator is
operating.
Oil filler cap (oil gauge)
Upper level
Low level
A
B
C
D

16
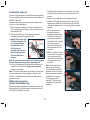
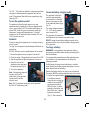
Starting the engine with key start
(electric start models)
Note. Before starting the motor, ensure you have filled the
crank case to the correct level with oil and fuel has been
added to the fuel tank.
Note. The crank case is not filled with oil from the factory.
1. Before starting, ensure that no electrical apparatus has
been connected to the generator (Fig. E).
2.
Turn the fuel valve (20) clockwise to the ‘on’ position (Fig. F).
3. Move the choke lever (14) to the full choke position. This
is not necessary if the engine is already warm.
Check the labels on the generator to show the choke
position.
• G1100KU Move lever towards the front of generator.
• A2300 and G2300KU, Move the lever towards the
rear of the generator.
• G3800KU and G6000KU, Pull the choke loop outward.
4. Turn the key start ignition
(12a) clockwise to the
‘START’ position (Fig. G).
Note. When the motor is
started for the very first time,
it may require a number of
attempts to start until the fuel
has travelled from the tank to
the motor.
5. Once you hear the motor
operating, release the key
to allow the position to
move from ‘START’ to ‘ON’
(Fig. H).
6. Move the choke lever (14)
back to the ‘Run’ position.
Check the labels on the
generator to show the Run
position.
• G1100KU Move lever towards the rear of generator.
• A2300 and G2300KU, Move the lever towards the front
of the generator.
• G3800KU and G6000KU, Pull the choke loop inward.
Note, in the case where the starting battery is at a low
level of charge and insufficient to start the generator on
the electric start models, start the generator manually
Run position
G1100KU A2300
& G2300KU
G3800KU
& G6000KU
G
H
F
E
Choke position
G1100KU A2300
& G2300KU
G3800KU
& G6000KU

17
as detailed in the next section, “Starting the generator
manually”. Note, the battery will charge automatically when
the generator is running.
DO NOT attempt to charge the electric start battery
mounted on the generator with the battery charging
output of the generator.
Starting the engine manually
Note. Follow steps 1 to 3 of
the ‘Starting the engine with
key start’ section.
4. Turn the key start ignition
(12a) clockwise to the ‘ON’
(Fig. I1), or the engine
switch (12b) to ‘ON’ for non
electric start models (Fig.
I2, I3).
5. Slowly pull the recoil starter (23) until you feel it engage
and then pull it briskly.
6. Once you hear the motor operating, move the choke
lever (14) back to the run position (refer point 6 above).
Stopping the engine
1. Before stopping, ensure that no electrical apparatus is
connected to the generator.
2. Turn the key start ignition
(12a) to the ‘OFF’ position
(Fig. J1), or on non electric
start models push the
engine switch (12b) to ‘OFF’
(Fig. J2, J3)
.
3. Turn the fuel lever anti
clockwise to the ‘off’ position.
Connecting apparatus to the generator
Start the generator and allow the generator to run for
a few minutes to warm up.
240V AC Connection
Check the total rating of the appliance to be connected and
ensure the rating of the appliance/s does not exceed the
rating of the generator.
Where fitted, turn off the AC
circuit breaker (all models
except G1100KU).
Check the appliance to be
connected is turned ‘OFF’.
Insert the 3 pin plug into the
240V outlet socket of the
generator (Fig. K).
J3
J2
K
J1
I1
I3
I2

18
The circuit breaker can be switched to the ON position and
the appliance then turned on.
WARNING. Prior to connecting any appliance to the
generator, check the rating label of the appliance. The
generator has a rated value and is shown on the generator
label, so if the appliance being connected is higher than
the rated value on the generator, the protective cut out on
the generator may operate to prevent over load damage to
the generator. The generator will withstand short operation
and spikes up to the peak value as shown on the generator
label, or the generator may stop.
Note. Motorised products will require more energy upon
start up and products which are rated below the generator
rating may not start if the starting current is excessive. Some
motorized product require 2 - 2.5 the appliance rating to start.
It should also be very clearly understood that output
voltage fluctuations will occur when various loads are
connected and disconnected. It is NOT recommended to
connect any sensitive electronic equipment to these
types of generators. Computers, televisions, and stereo
equipment can be very sensitive to the input supply and
could be damaged if used in conjunction with this generator.
This also includes caravans where electronic equipment is
incorporated as part of the wiring.
It is always suggested to use a surge protector on the
output of these generators.
AC circuit breaker
These generators have been equipped with an AC circuit
breaker (4),
designed to assist in preventing overloading of
the generator, cutting supply in the case of a some failed
appliances and assisting to protect people against an electric
shock.
Safety switch tripping
If the circuit breaker (4) has tripped and cuts off the power, it
may be due to substantial overloading. Marginal overloading
may not switch off the circuit breaker (4), but it will shorten
the service life of the generator.
Be sure that all appliances are in good working order before
connecting them to the generator. If an appliance begins to
operate abnormally, becomes sluggish, or stops suddenly,
turn “OFF” both the circuit breaker (4) (not applicable
to G1100KU as the safety switch cannot be turned off
manually) and or the generator engine switch (12a or 12b)
immediately. Then disconnect the appliance and examine it
for signs of malfunction.
Resetting the circuit breaker (4) should restore the power
and should be conducted as follows:
1. Unplug all electrical apparatus from the generator.
2. Let the circuit breaker (4) cool down.
3. Lift the circuit breaker (4) up to the “ON” position, or press
the button in the case of the model G1100KU.
4. Commence to start your generator accordingly.
5. When re connecting appliances, reduce the load to that
which previously overloaded the generator.
If the circuit breaker (4) does not reset due to a faulty
electrical appliance or wiring, switch off and unplug
the appliance which may be faulty. Any faulty electrical
appliances will need to be repaired by a suitably qualified
person. If the safety switch does not reset after unplugging
the appliance, call a licensed electrician to find the fault.
12V DC Connection
The DC output on these generators is fully regulated to
12 – 14.2V DC with a Max. output of 5A (Fig. L).
In addition there is also a power USB outlet with a rating of
1 amp at 5V (Fig. M).
ML

19
The 12V – 14V outlets are suitable to charge most size lead
acid type car batteries while the appliance outlet will run
most 12V appliances fitted with the car cigarette type plug,
rated up to 5A.
To use the appliance outlet
The appliance outlet will provide power to run most
appliances which plug directly into the car cigarette socket
up to a current rating of 5A. This includes spot lights up to
around 55W, small car type air compressors, small type
blowers and some small refrigerators etc. The output
voltage from the DC appliance outlet is between 12V and
14.2V, the same as a car.
WARNINGS
Check the rating of the appliance prior to inserting the plug
into the socket.
The plug from the appliance should always be fitted with an
internal fuse.
DO NOT attempt to insert a cigarette lighter into the socket.
1. Ensure the appliance to be connected is turned off.
2. Check the rating of the appliance is not above 5A or 60W.
3. Start the generator and allo
w the generator to warm up.
4. Open the cover on the
appliance socket and insert
the appliance plug (Fig. N).
5. Turn on the appliance.
Note. If the appliance does not
operate, check the DC
reset button on the generator
control panel. Press the
button to reset.
Note. The 12V appliance socket can also be used with
the 240V AC outlets being used.
To use the battery charging outlet
The generator is fitted with
a socket outlet specifically
for connection to a lead acid
battery for charging and also
for an additional power supply
(Fig. O).
The output voltage is between
12 – 14.2V with a maximum
output current of 5A.
The generator will charge lead
acid batteries of various sizes, from small to large.
DO NOT charge the electric start battery mounted on the
generator with the out put from the battery charging socket
of the generator.
To charge a battery
WARNINGS. It is suggested to wear protective clothing,
gloves and eye protection when handling and working with
lead acid batteries.
For operators with pacemakers or similar medical devices
and conditions, it is recommended not to attempt the
following procedure.
Do Not attempt to charge a lead acid battery in confined
areas. Ensure the charging process takes place in an area
where there is fresh air circulating.
Remove the battery from the car, boat or any other device.
The battery MUST be totally isolated from any other circuitry.
1. Connect the supplied cables
to the battery terminals.
Using the colour coding, the
clamps on the cable MUST
be connected as follows.
RED clip to the + Positive
terminal on the battery, and
Black Clip to the – negative
terminal on the battery
(Fig. P). After connection
O
P
N

20
to the battery, RECHECK to ensure the connections are
as above.
2. Start the generator and allow
the generator to warm up.
3. Insert the plug on the
opposite end of the cable
connected to the battery
into the battery charging
socket (Fig. Q).
4. Check the DC reset button
is pressed inward.
The battery charging process
is now under way.
To disconnect the battery on charge, remove the plug from
the generator socket and disconnect the cable clamps from
the battery.
Note. The battery charging socket can also be used with
the 240V AC outlets being used.
The battery charging socket can also be used when the
appliance socket is being used, but the maximum output
from the generator is only 5A thus the charging performance
may be reduced, depending on the load for the appliance
outlet.
The battery will charge at a rate of 5 amps until the charge
voltage is around 13.6 volts where the charge current will
start and reduce.
The battery will not over charge and can be left connected
for extended periods of time.
Remember, if the battery was originally in a low level of
charge, the battery will take many hours to recharge fully.
The time frame will depend on the size of the battery.
As a guide, a standard car battery of around 480CCA will
take approx. 6 hours to charge from a low level of charge to
approx. 80% charged. To start a car the battery may require
less than this time frame and again it depends on the
original state of charge.
To use the USB power outlet
These range of generators are fitted with a 5 Volt USB
power outlet.
The maximum output is 1 amp.
This is suitable for charging mobile phones, small battery
chargers, I Pods etc.
1. Ensure the appliance to be connected to the USB socket
is turned off.
2. Check the rating of the appliance is not above 1A or 5W.
3. Start the generator and allow
the generator to warm up.
4. Insert the USB plug into
the socket on the generator
panel (Fig. R).
5. Turn on the appliance.
Note. The USB outlet
operates through the DC reset
button. If the appliance is not
operating, check the DC reset
button is pressed inward.
The USB outlet can be used while the 240V AC outlets are
being used.
The USB outlet can also be used while the 12V outlets are
being used, PROVIDED the total current on the DC does
not exceed 5A.
R
Q
Page is loading ...
Page is loading ...
Page is loading ...
Page is loading ...
Page is loading ...
Page is loading ...
Page is loading ...
Page is loading ...
Page is loading ...
-
 1
1
-
 2
2
-
 3
3
-
 4
4
-
 5
5
-
 6
6
-
 7
7
-
 8
8
-
 9
9
-
 10
10
-
 11
11
-
 12
12
-
 13
13
-
 14
14
-
 15
15
-
 16
16
-
 17
17
-
 18
18
-
 19
19
-
 20
20
-
 21
21
-
 22
22
-
 23
23
-
 24
24
-
 25
25
-
 26
26
-
 27
27
-
 28
28
-
 29
29


909 G1100KU User manual
- Category
- Power generators
- Type
- User manual
Ask a question and I''ll find the answer in the document
Finding information in a document is now easier with AI
Related papers
Other documents
-
FXA PD 2500I User manual
-
Global Machinery Company GEN2300ES User manual
-
Ryobi RG-2100I Owner's Operating Manual
-
-
-
SVA VR-3200W User manual
-
-
-
-
Parkside PGI 1200 A1 Operating And Safety Instructions, Translation Of Original Operating Manual