Page is loading ...

Inbetriebnahme
Mit dem EHEIM Ansauger (Best.-Nr. 4003540), dem EHEIM Installa-
tionsSET 1 (siehe G1, Best.-Nr. 4004300) oder durch Ansaugen an der
Druckseite den Wasserkreislauf herstellen, bis der Filter von selbst voll-
fließt. Anschließend Druckschlauch mit Düsenrohr verbinden und Filter
über den Netzstecker einschalten. (Ein Anlaufgeräusch der Pumpe von
0,5 -3 Sek. ist normal.) Verschluss-Stopfen am Düsenrohr erst anbrin-
gen, wenn sich keine Luftblasen mehr im Wasserstrom befinden .
Pflege und Wartung
H/I Netzstecker ziehen und Pumpenkopf abnehmen. Verriegelung am Pum-
penkopf lösen und Pumpenteile entsprechend der Zeichnung heraus-
nehmen. Kühlkanal-Einsatz I mit Schraubenzieher ausheben. Alle Teile
mit EHEIM Reinigungsbürste für Pumpenkammer (Best.-Nr. 4009550)
reinigen. Anschließend in gleicher Reihenfolge wieder zusammensetzen.
Hinweis: Die kompletten Schlauchverbindungen in regelmäßigen Ab-
ständen auf korrekten Sitz prüfen.
Achtung: Achse im Lagerkörper – und der darauf aufgesetzte Pumpen-
flügel – müssen absolut leichtgängig sein, damit die Pumpe einwand-
frei anläuft.
IMPORTANT SAFETY INSTRUCTIONS
WARNING – To guard against injury, basic safety precautions should be
observed, including the following.
a) READ AND FOLLOW ALL SAFETY INSTRUCTIONS.
b) DANGER – To avoid possible electric shock, special care should be taken
since water is employed in the use of aquarium equipment. For each of the
following situations, do not attempt repairs by yourself; return the ap-
pliance to an authorized service facility for service or discard the appliance.
1) If the appliance falls into the water,
DON’T reach for it! First unplug
it and then retrieve it. If electrical components of the appliance get wet,
unplug the appliance immediately. (Non-immersible equipment only)
2) If the appliance shows any sign of abnormal water leakage, im-
mediately unplug it from the power source. (Immersible equipment only).
3) Carefully examine the appliance after installation. It should not be
plugged in if there is water on parts not intended to be wet.
INSTRUCTIONS 2213
Installation
C Deckel von Filtereinsatz aufsetzen, durch Rechtsdrehung arretieren und
in den Filtertopf stellen. Pumpenkopf aufsetzen und darauf achten, dass
der Dichtungsring korrekt in seiner Führung liegt. Klippse schließen.
D Filter unter dem Aquarium – zumindest aber unterhalb des Wasserspie-
gels platzieren.
E / F Düsenrohr gemäß Zeichnung A oder B montieren.
G Ansaugrohr und Filterkorb zusammenstecken (Bild A), mit 2 Saugern
an der Beckenwand befestigen und Schlauchverbindungen zum Filter
herstellen: Saugseite am unteren Einlaufstutzen, Druckseite am Pum-
penkopf. Schläuche mit der Überwurfmutter sichern (Bild K).

c) Close supervision is necessary when any appliance is used by or near children.
d) To avoid injury, do not contact moving parts or hot parts such as heaters,
reflectors, lamp bulbs, and the like.
e) Always unplug an appliance from an outlet when not in use, before putting
on or taking off parts, and before cleaning. Never yank cord to pull plug
from outlet. Grasp the plug and pull to disconnect.
f) Do not use an appliance for other than intended use. The use of at-
tachments not recommended or sold by the appliance manufacturer may
cause an unsafe condition.
g) Do not install or store the appliances where it will be exposed to the
weather or to temperatures below freezing.
h) Make sure an appliance mounted on a tank is securely installed before
operating it.
i) Read and observe all the important notices on the appliance.
j) If an extension cord is necessary, a cord with a proper rating should be
used. A cord rated for less amperes or watts than the appliance rating may
overheat. Care should be taken to arrange the cord so that it will not be
tripped over or pulled.
k) This appliance has a polarized plug (one blade is wider than the other). As
a safety feature, this plug will fit in a polarized outlet only one way. If the
plug does not fit fully in the outlet, reverse the plug. If it still does not fit,
contact a qualified electrician. Never use with an extension cord unless
plug can be fully inserted. Do not attempt to defeat this safety feature.
Exception: This instruction may be omitted for an appliance that is not
provided with a polarized attachment plug.
l)
”SAVE THESE INSTRUCTIONS”.
AQUARIUM
TANK
POWER
SUPPLY
CORD
DRIP
LOOP
APPLIANCE
4) Do not operate any appliance if it has a damaged cord or plug, or if it
is malfunctioning or has been dropped or damaged in any manner.
5) To avoid the possibility of the appliance plug or receptacle getting wet,
position aquarium stand and tank to one side of a wall-mounted re-
ceptacle to prevent water from dripping onto the receptacle or plug.
A ”drip-loop”, shown in the figure below, should be arranged by the user
for each cord connecting an aquarium appliance to a receptacle. The
”drip-loop” is that part of the cord below the level of the receptacle, or
the connector if an extension cord is used, to prevent water traveling
along the cord and coming in contact with the receptacle.
If the plug or socket does get wet,
DON’T unplug the cord. Disconnect
the fuse or circuit breaker that supplies power to the appliance. Then
unplug and examine for presence of water in the receptacle.

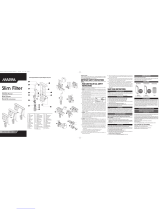
External filter 2213
Function
A
Pump head
filter canister
pressure side hose connection
suction side hose connection
filter media container
suction
pipe
strainer
suction cups with clips
outlet pipe.
B Extract the filter media container with the handle and open the lid by
turning it anti-clockwise.
B1 Model with filter pads: Rinse all filter pads under running water and
insert them into the filter media container according to the drawing:
5 coarse filter pads blue (order no. 2616131 / 3 pcs.), 1 fine fil-
ter pad white (order no. 2616135 / 3 pcs.), and 1 carbon filter pad
black (order no. 2628130 / 3 pcs.) as a top layer. The carbon filter pad
adsorbs possible dissolved harmful substances after newly installing
the filter. After a working time of approx. two weeks, the carbon filter
pad should be removed.
B2 Model with filter media: Fill the filter media container in the following
order: approx. 3-5 cm EHEIM MECH, 1 coarse filter pad blue
(order no. 2616131 / 2 pcs.), EHEIM SUBSTRATpro or SUBSTRAT,
1 fine filter pad white (order no. 2616135/3 pcs.), 1 carbon filter
pad black (order no. 2628130 / 3 pcs.). Afterwards rinse filter media
container under running water to remove residues.
b
c
a
b
d
e
c
a
English
Many thanks
for purchasing your new EHEIM classic external filter. It gives you optimum
performance with excellent reliability and great effectiveness.
Safety instructions
geprüfte
Sicherheit
Only for use in rooms.
All electrical equipment in the water must be disconnected from the
mains during care and maintenance work.
The connecting line of this device can not be replaced. When the line is
damaged, the device must no longer be used. Contact your specialist
dealer or your EHEIM service centre.
This equipment is not intended for use by persons (including children)
with limited physical, sensory or mental abilities or for persons with no
experience or knowledge unless they are supervised by a person respon-
sible for safety or unless they have received from such a person instruc-
tions on how to use the equipment.
Children should be supervised to ensure that they do not play with the
equipment.
Do not dispose of this product as normal household waste. Take it to your
local refuse collection site.
The product is qualified in accordance with the respective national re-
gulations and guidelines and meets EC standards.

Putting into operation
There are 3 ways to prime the filter. 1) With the starter bulb (order no.
4003540), 2) with the Universal Installation Kit 1 (see G1, order no.
4004300) or 3) by sucking the hose on the pressure side. Connect the
pressure side hose to the spray bar while the filter fills with water. The
pump can be switched on when water has filled the filter, and for a
short time while trapped air is exhausted from the filter media a slight
noise from the pump will be heard (this is normal). Fit the plug into the
end of the spray bar after all the air bubbles have disappeared.
Important: When the filter media need cleaning or changing and the fil-
ter is taken away from the aquarium, please note the following points
1) The filter must have no water in it when reconnecting to the aquarium.
2) The pressure hose to the spray bar must be drained of water and the
tap (if fitted) left open.
3) After connections are made the tap on the suction side can be opened
(it holds the syphon). Water will flow into the filter expelling all air out
of the spray bar, eliminating air locks and ensuring a perfect prime.
Servicing and maintenance
H/I Pull out mains plug. Release locking piece on pump head and remove
pump parts as per drawing. Lift out cooling channel insert (I) with
screwdriver. Clean all parts and then reassemble in the reverse order.
Note: All hose connections must be checked at regular intervals for
correct fitting.
Attention: The impeller blades must rotate free on the impeller, and the
impeller must spin freely on the ceramic shaft, so that the pump starts
without trouble.
Installation
C Fit the lid of the filter media container, close it by turning clockwise and
place into the filter canister. Put on the pump head and examine the o-
ring for correct fitting. Close the clips.
D Place filter underneath aquarium – it must be below water level.
E / F Fit outlet pipe as per drawing A or B.
G Assemble suction pipe and strainer and attach to side of aquarium with
2 suction cups and fit hose connections to filter: suction side on bot-
tom intake nozzle, pressure side on pump head. Fasten hoses with
clamping nut (drawing K).
Français
Mercy beaucoup
pour l’achat de votre nouveau filtre extérieur EHEIM classic. Il offre d’excel-
lentes performances avec une fiabilité et une efficacité maximales.
Consignes de sécurité
Usage intérieur exclusivement.
Avant d’effectuer des travaux d’entretien ou de maintenance, déconnec-
tez du réseau tous les appareils installés dans l’eau.
/