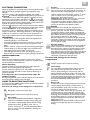
Whirlpool ARC7559 IX AQUA Program Chart
- Category
- Fridge-freezers
- Type
- Program Chart
This manual is also suitable for

PRODUCT SHEET
GB
Your new appliance is a combined ventilated, No-Frost fridge-
freezer exclusively for domestic use. Whirlpool Total-no-frost
fridge freezers circulate chilled air around the storage areas,
reducing humidity to prevent the formation of ice, thereby
completely eliminating the need for defrosting. Frozen items
don't stick to the walls, labelling stays legible and storage space
remains neat and clear. No-Frost's temperature control helps
keep food fresher for longer. In combination with “6th Sense”,
not only does it control the sensor, but directs the cooling power
exactly where it is needed, optimising energy efficiency
.
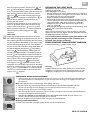
A. Refrigerator Compartment
1. Shelves / Shelf area (removable)
2. Multi-flow cold air system
2a. Multi-flow cold air vent
2b. Light bulbs
2c. Light cover
2d. Air intake area
3. Cooler compartment (temperature lower than in the
refrigerator compartment)
4. Reservoir shelf (not removable)
5. Rating plate
6. Separator (depending on the model)
7. Door trays
12. Antibacterial filter grille
13. Crisper
13a.Crisper divider
B. Freezer Compartment
8. Upper basket (freezing zone)
9. Ice tray
10. Shelves (depending on the model)
11. Storage basket for frozen food items
14. The freezer door trays (for pizza or other frozen food with
short storage time)
C. Water dispenser and LCD display
Note: The direction of door opening cannot be changed for
this appliance.
Note: The number and type of shelves and configuration of
accessories may vary, depending on the model.
Do not place food in a way that obstructs the air intake
area (2d) and the air flow outlets (2a).
Note: Refrigerator/freezer accessories are not suitable for
washing in a dishwasher.
The anti-bacterial filter ensures a higher level of hygiene in
your refrigerator through continuously purifying the circulating
air of bacteria. Remove it from the box found in the crisper
drawer (item 13) and insert into the grille (item 12).
Replace the filter every 6 months.
1. Remove the filter and dispose it as a whole (grate box +
insert).
2. Replace the filter with the new ones.
3. The replacement procedure is attached to the filter.
Our After-sales Service can supply this type of filter.
CONTROL PANEL DESCRIPTION
Compartments ON / OFF, menu, selection and
confirmation buttons
1. Refrigerator compartment Stand-by - fridge button
2. Menu button
3. Appliance ON/OFF button
4. Selected compartment temperature increase button “+”
5. Confirmation button
6. Selected compartment temperature decrease button “-”
7. Water paddle.
Functions and settings symbols
1. Functions and settings for the refrigerator compartment
2. Appliance, alarm and malfunction symbols
3. Functions and settings for the freezer compartment.
Switching on the appliance: Press the “On-Off” button
Switching off the appliance: Press the “On-Off” button again
Adjusting the temperature: To change the temperature inside
the refrigerator or freezer compartment, press the Menu button
until the refrigerator or freezer temperature symbol turns on
(symbol flashes).
Then adjust the temperature by pressing the +/- buttons and
confirm by pressing “OK”.
Displaying the refrigerator and freezer compartment
temperatures.
The temperature inside the refrigerator compartment can be
adjusted between +2°C and + 8°C. In the same way, the freezer
compartment temperature can be adjusted between -16°C and
-24°C.

GB
ELECTRICAL CONNECTION
When the appliance is connected to the power supply, the display
lights up and all the symbols appear on the display for a few
seconds.
The factory setting -18°C appears and flashes, the symbol
lits, while the refrigerator display shows a temperature
of +5°C (factory-set). While the appliance is working to reach
the factory-set temperature, the alarm icon lits, an acoustic
alarm sounds and temperature symbol (- -) on the freezer display
flashes. This indicates that the appliance has not yet reached the
optimal temperature for storage of foodstuffs.
Press and hold the button “OK” until the acoustic alarm disables.
The icon disappears when the freezer compartment reaches
a temperature below -12°C, the display will show the
temperature -18°C, at which point food can be loaded into the
freezer compartment. After being switched on, the refrigerator
needs from 2 to 3 hours to reach the correct temperature to
store a typical volume of food in the refrigerator compartment.
IMPORTANT:
• If food is placed in the refrigerator before the appliance has
cooled completely, it may deteriorate.
• Turning the refrigerator and freezer controls to a cooler than
recommended setting will not cool the compartments any
faster.
• A built-in exterior moisture control continuously guards against
moisture build-up on the front edges. Do not be alarmed if
these edges sometimes feel warm to the touch.
• The inside light switches on when the refrigerator door is
opened. After 10 minutes of door opening the light switches off.
WATER CONNECTION
First use
When the water dispenser is used for the first time, the first
water coming out of the dispenser may have an unpleasant taste
and should therefore be discarded.
Water dispensing
To dispense water press a glass against the water dispenser
paddle, removing the glass to stop dispensing.
It is not necessary to press hard on the paddles to activate the
dispenser Pressing hard will not result in faster dispensing or
greater quantities.
If the dispenser does not dispense water when the
paddle is pressed:
During the first delivery, there will be a delay of 15 to 20 seconds
due to the system needing to fill with water.
GUIDE TO SELECTING FUNCTIONS
Functions are not available until the freezer compartment reaches
the temperature below -12°C.
Functions and settings for the refrigerator compartment.
Functions and settings for the freezer
compartment
Refrigerator compartment door open
Refrigerator compartment temperature setting
Fast cooling
This function should be selected before refrigerating
fresh food. To select the function, keep pressing the
menu button until the display shows the fast cooling
symbol. The symbol flashes, press “OK” to
confirm. The function is automatically disabled after 6
hours, or can be manually disabled by repeating the
same procedure.
Vacation
This function turns the refrigerator compartment to a
warmer state if you are going away for some time. To
select the function, keep pressing the menu button
until the display shows the vacation symbol . Press
“OK” to confirm. To turn the refrigerator back to
setting point repeat this procedure.
Important: after activating this function, remove all
perishable foodstuffs from the refrigerator
compartment and leave the door closed, since the
refrigerator maintains a suitable temperature to
prevent the formation of unpleasant odours.
ON/OFF
This function turns off both the refrigerator and
freezer compartments. To enable the stand-by
function, press the “On-Off” button for 3 seconds,
two hyphens appear on both display to indicate that
the appliance is on stand-by. To switch the appliance on
again, follow the same procedure until the previously
set temperature is shown on the display.
When the appliance is on stand-by the light inside the
refrigerator compartment does not work. Remember
that this operation does not disconnect the appliance
from the power supply.
Stand-by (fridge)
This function turn off the fridge compartment while the
freezer compartment continue to run. To enable the
stand-by function, press the “stand-by (fridge)” button
for 3 seconds. To switch the fridge compartment on
again, follow the same procedure until the previously set
temperature is shown on the display. When the fridge
compartment is on stand-by the light inside the
refrigerator compartment does not work.
Freezer compartment temperature setting
Fast freezing
For more efficient freezing activate this function 24
hours before freezing fresh food. To select the
function, keep pressing the menu button until the
display shows the fast freeze symbol . Press “OK”
to confirm. After 24 hours place the food to be frozen
in the upper basket of the freezer compartment. The
function is automatically disabled after 24 hours, or can
be manually disabled by repeating the same
procedure.
Party mode
To select the function, keep pressing the menu button
until the display shows the party mode symbol .
The symbol flashes, press “OK” to confirm. Use this
function to chill drinks inside the freezer
compartment. When the function is in operation, the
symbol is animated. 30 minutes after selection (the
time required to chill a 0.75 l bottle without the glass
breaking), the symbol flashes, an acoustic alarm sounds
and the display lights up: remove the bottle from the
freezer compartment and press the “OK” button to
disable the function.
Important: do not leave the bottle inside the freezer
compartment longer than the time necessary for
chilling.

GB
Other functions
“6th Sense” function
The 6th Sense function is automatically activated when:
• a large amount of food is loaded into the refrigerator
and/or freezer
• the refrigerator and/or freezer door is left open for a
long time
• a prolonged power failure takes place, causing the
internal temperature of the appliance to increase to
values that cannot guarantee safe storage of food.
The symbol flashes for approximately 3 seconds, after
which it remains permanently lit until optimal storage
conditions have been automatically restored.
Control panel lock function
This function prevents anyone from inadvertently
changing settings or switching off the appliance.
To lock the control panel, press buttons “+” - “OK” - “-”
at the same time for 3 seconds until the display shows
the symbol : an acoustic signal confirms the
function has been selected. To disable the function,
follow the same procedure until the symbol
switches off.
Alarms
In the event of an alarm, the acoustic alarm and
indicator lights are activated.
Freezer temperature alarm
The acoustic alarm sounds: alarm symbol lights up and
the temperature indicator flashes.
The alarm is activated when:
• The appliance is connected to the power supply for
the first time or after prolonged disuse
• The freezer compartment temperature is too high
• The quantity of foods loaded into the freezer exceeds
that indicated on the data plate
• The freezer door has been left open for a long time
Note: in these cases automatically appears on the
display
.
Power failure alarm
The maximum temperature reached during a power
failure flashes on the freezer display. The alarm symbol
lights up and the acoustic alarm sounds at the same
time.
This alarm may activate when:
• There had been a prolonged power failure, and the
freezer internal temperature rose to the level that
does not guarantee appropriate food storage
conditions.
To disable the alarm press “OK”, after which the
pre-set temperature will appear on the display.
Note: evaluate the state of the stored food.
Refrigerator door open alarm
The refrigerator door symbol lights up and the acoustic
alarm sounds.
The alarm is activated when the refrigerator's door is
left open for more than 2 minutes. Press “OK” to mute
the acoustic alarm.
If the door is not closed, the acoustic alarm will sound
again after two minutes.Close the door/s and press the
“OK” button.
Note: in these cases 6th Sense automatically appears
on the display
Operation alarms
In the event of operation alarms, other alarms will also
be displayed in the refrigerator or freezer
compartment, depending on the malfunction site, (e.g.
CF, AL01, AL02, AL03 or AL04 etc...) call After-sales
Service and specify the alarm code.
Malfunction and After-sales Service symbol
(Call After-sales Service).
Listeria indicator - average temperature of the whole
compartment (depending on model).
Right temperature inside the refrigerator
The symbol indicates the coldest zone in the
refrigerator compartment. For optimum temperature
adjustment, the refrigerator is provided with a
temperature indicator to allow you control the average
temperature.
Checking the temperature
After the appliance has been switched on for at least 24
hours, can be checked if the temperature in the
refrigerator is correct and, if necessary, adjust the
setting as indicated in the user instructions (see
“Adjusting the temperature”).
The internal temperature of the refrigerator depends
on various factors such as the ambient temperature of
the room, the amount of food stored and how often
the door is opened. These factors should be taken into
account when setting the appliance.
If the symbol is switched OFF, it means that the
temp. inside the refrigerator is too warm; in this case
adjust the temp., setting and wait for at least 12 hours
before checking again if the temp, is correct.
Important: after opening the door or loading the
refrigerator, it is normal if the symbol is switched OFF
for some time, especially if room temperature is very
warm.
Function indicating the necessity to replace the
Anti-bacterial filter
The replacement of the filter is described on the first
page of this Product Sheet.
After connecting the appliance, the three-segment icon
is displayed.
The segments will sequentially go off:
- after 2 months
- after 4 months
- after 6 months

GB
REPLACING THE LIGHT BULB
Always disconnect the refrigerator from the power supply before
replacing any light bulbs.
If the inside light is not working:
• Remove the light cover using a small screwdriver. Put the tip of
screwdriver into upper rectangular hole, press down the catch
for unblock and pull cover towards outside.
• Check the bulb and if necessary replace it.
• Pull the bulb towards the outside of the lamp holder. Put the
new one pushing connectors to the sockets of lamp holder. It is
used a special bulb, which does not unscrew. This bulb is
available only from our After-sales Service. Replace using
maximum 15W bulb.
• Assembly again the light cover pushing in its place, hearing “click
effect”. Do not leave not covered bulbs.
Warning:
After removing the light cover in order to cleaning, unplug the
appliance at first. Use only slightly wet wash cloth. Do not touch
the bulbs. Keep special precautions.
It is recommended to maintain upper glass shelve in the
highest possible positioning in order to obtain most
favorable food storage conditions.
FRESH CONTROL COMPARTMENT UNBLOCK
Press the both locks (1), pull the drawer out (2).
Cleaning
Press the Stand-by button, which allows you to switch off the
refrigerator compartment alone, keeping the freezer on. The
refrigerator compartment can now be emptied and cleaned.
After 6 months of operation, the alarm icon and
icon will be displayed, indicating that it is necessary
to replace the filter. After replacing the filter, keep the
“OK” button pressed for about 5 seconds, until the
alarm icon goes off and the three-segment icon
reappears. It is possible to switch the icon off
until the filter is replaced (for about 6 hours) by
pressing the “OK” button.
The filter can be replaced at any time and filter icon
status can be refresh by the User Interface pressing
“Menu” button until the icon turns on (symbol
blinks). To confirm keep the “OK” button pressed for
about 5 seconds until three-segment icon
reappears.
Water filter
Water filter symbol indicates the state of the water
filter. When switching on the appliance for first use, or
after replacing the filter and refreshing filter icon status,
the filter icon shows three dashes. In time their number
will decrease, depending on the use of the appliance
and the natural wear of the filter charge itself. When all
the dashes disappear and the icon starts flashing,
alarm icon will be displayed, indicating that it is
necessary to replace the filter. It is possible to switch
the icon off until the filter is replaced (for about 6
hours) by pressing the “OK” button. After replacing the
filter, keep the “OK” button pressed for about 5
seconds, until the alarm icon goes off and the
three-segment icon reappears. The filter can be
replaced at any time and filter icon status can be refresh
by the User Interface pressing “Menu” button until the
icon turns on (symbol blinks). To confirm keep the
“OK” button pressed for about 5 seconds until three-
segment icon reappears
CHANGING A WATER FILTER CARTRIDGE
1. Locate the water filter cartridge cap below the reservoir into the crisper bin inside the fridge cabinet. Rotate the
cap counterclockwise to a vertical position and pull the cap and filter cartridge out through the reservoir shelf
and crisper bin.
Note: Since there is water in the cartridge, some spilling may occur.
2. Remove the cartridge cap by sliding it off the end of the old cartridge. DO NOT DISCARD THE CAP.
3. Take the new cartridge out of its packaging and remove the protective cover from the o-rings.
4. Slide the cartridge cap onto the new cartridge as shown.
5. With cartridge cap in the vertical position, push the new filter cartridge into reservoir shelf until stops. Rotate the
cartridge cap clockwise to horizontal position.
6. RUN WATER THROUGH THE DISPENSER UNTIL THE WATER RUNS CLEAR ( about 9-14 liters or 6-7
minutes). This will clean the system and clear air from the lines.
Note: as air is cleared from the system, water may spurt out of the dispenser.
Ordering replacement filters
To order more water filter cartridges, please contact your after-sales service.
5019 637 01038/A
-
 1
1
-
 2
2
-
 3
3
-
 4
4


Whirlpool ARC7559 IX AQUA Program Chart
- Category
- Fridge-freezers
- Type
- Program Chart
- This manual is also suitable for
Ask a question and I''ll find the answer in the document
Finding information in a document is now easier with AI
Related papers
-
Whirlpool ARC7559 IX AQUA Program Chart
-
Whirlpool ARC 7298/IX Owner's manual
-
Whirlpool ARC 6709 IX Program Chart
-
Whirlpool 20TM-L4 A+ Owner's manual
-
KitchenAid KRSC - 9020 I User guide
-
KitchenAid KRSC 9015 User guide
-
Whirlpool KRSC - 9020 I User guide
-
Whirlpool AS2025GIMS User guide
-
Whirlpool 20TI-L4 DK Program Chart
-
Whirlpool S20D RSS33-A/G User guide
Other documents
-
Bauknecht KGNA336 BIO OPT IN Program Chart
-
-
Bauknecht KGEA 356 BIO OPTIMA IN Program Chart
-
-
-
KitchenAid KRCB 6050 Program Chart
-
Maytag MSS 20 TBB4 Program Chart
-
-
Ignis SBS5400 Program Chart
-
Smeg FA 720 X2 Owner's manual