Page is loading ...

Description
2
Each unit includes the following items:
•1 Electronic Pipettor
•1 Charging Stand
•1 AC Adapter
•1 Test Performance Certificate
•1 Instruction Manual
•1 Quick Reference Card
•Replacement Tip Cone Filters (50/bag)
Make sure that all items are included
and that no damage has occurred during
shipment. Also check that the AC adapter matches your electrical requirements.
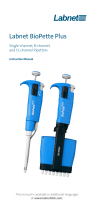
Pipettor Controls
These controls are often referred to in this manual.
Speed Key Changes aspiration and dispense speeds
Mode Key Shifts to next mode
Up Key Increases open volume or speed
Down Key Decreases open volume or speed
Recall Key Flips back to last mode entered
Enter Key Selects mode,speed or volume changes
Start Button Triggers all mechanical operations
Tip Ejector Lever Squeezed to remove pipette tip
ON-OFF SWITCH
The On-Off Switch is located at the
back of the pipettor. Slide to the left
position to switch "ON" and to the
right to switch "OFF".
AC adapter
ON
OFF
keypad
display
start button
tip ejector
lever
tip ejector
collar
tip cone
charging stand pipettor
filter
Electronic Pipettor - 5mL
Pipette Electronique - 5mL
Elektronische Pipette - 5mL
Pipetta Elettronica - 5mL
Pipeteador electrónico - 5mL
6483
5mL
FOD# 1210
Page 1 of 15 - June 2001

Precautions
4
• Always follow Good Laboratory Practices.
• Avoid contamination of the tip cone. Do not rest the pipettor on its side. Always
place the pipettor in the charging stand when not in use.
• Ensure consistent technique to maintain precise results.
• Never strike the pipettor tip cone against the tip tray when mounting tips. This
can damage internal components.
• Avoid excessive shock to pipettor. Do not drop the pipettor, charging stand or AC
adapter.
• Avoid exposing the unit to extreme temperature changes, humidity and dust.
• Avoid rough handling when using the unit. Moderate keystroke pressure is all that
is required for all operating buttons.
Indications
3
The easy-to-use 3M Electronic Pipettor - 5mL is pre-programmed to perform the
most common dilutions used with 3M
™
Petrifilm
™
Plates and 3M
™
Redigel
™
Tests.
The self-calibrating, microprocessor-based system reduces the possibility of human
error and instrument contamination by controlling pipetting speed, calibration and
volume selection. It is a simple yet sophisticated instrument for handling micro-
volumes of liquids with high accuracy and precision. Its light-weight and ergonomic
controls take the effort out of pipetting to help reduce the risk of repetitive strain
injuries that are frequent in manual pipetting.
The 3M Electronic Pipettor 5mL includes:
• Pre-programmed diluting, pipetting, and dispensing modes
• Self-calibrating, microprocessor-controlled system
• Full-grip; low-effort tip ejector
• Soft-touch operating button
• Open programming mode for user-set pipetting and diluting
• Recall button for selecting previous mode
• LCD screen for viewing speed, mode and volume
• 5 speeds for aspiration and dispensing
• Cordless operation
• Magnetic-mount recharging stand
• Replaceable NiMH battery
• Weighs less than 6 ounces
• Standard Methods for the Examination of Dairy Products (SMEDP) accuracy
Page 2 of 15 - June 2001

Instructions For Use
6
1. Connect the AC adapter into the connector jack at the rear of the charging
stand's base.
2. Plug the AC adapter into an AC electrical outlet.
3. The green light at the top of the charging stand indicates that the stand is in
operation. The light will always be on when plugged in and operating properly.
Charging the Pipettor Battery
1. Switch the pipettor “ON” (see page 2).
2. Mount the pipettor into the charging stand. The top of the pipettor will fit snugly
into the head of the charging stand. The magnetic mount will lock the pipettor into
the proper charging position.
3. If the battery is new or has been allowed to fully discharge, keep the pipettor in
the stand for 10 hours to fully charge the battery before continuing use.
• The unit will charge when “ON” or “OFF”. Leave the pipettor “ON” and in the
charging stand when not in use to retain user-selected pipettor settings.
• Switching the unit “OFF”clears user-set programming and resets the pipettor to
default settings.
Instructions For Use
5
Only use and store the pipettor in accordance with the following
operating conditions:
Condition Range or Limit
Performance Testing Temperature +19 to + 25°C
Mechanical Operating Temperature +15 to + 35°C
Storage Temperature -20 to + 40°C
Maximum Humidity 95%
The following recommendations should always be followed for best results:
1. During aspiration, hold the pipettor vertically. For greatest accuracy, the pipettor
should never be tilted at an angle greater than 15° during aspiration.
2. During aspiration, consistently place the tip no deeper than 5mm into the liquid.
3. During dispensing, position the tip at least 5mm above the surface to prevent
bubbles from forming.
Connecting the AC Adapter
• Be sure that the voltage rating of the AC adapter correctly corresponds to the
voltage from the electrical outlet.
• Do not use electrical outlets that are timed or switched.
• Use only the AC adapter provided with the unit or an approved replacement
from 3M.
1.
2.
Page 3 of 15 - June 2001

Power “ON” Display and Startup
The display of a switched “ON” pipettor indicates that programming has been reset
to default settings.
1. Switch the unit “ON”. Display:
2. Press the Start Button twice. The display
shows that the unit is ready for the
default 1:5 dilution (Mode d1, 5mL) or
for program changes.
Switching the pipettor “OFF” and then
“ON” will reset the unit to the default
settings (Mode d1, 1:5, 5mL dilution).
Mode Selection and Mode Recall
Selecting available modes on the pipettors is done with the use of these three keys:
1. Press once to display the default dilution mode of the pipettor.
2. Press repeatedly to view each of the modes available.
3. Press when the desired mode is displayed. This will enter the mode
selection and allow you to use this mode.
Mode recall allows you to flip back and forth between the last two
modes used.
or may not be used in the middle of an aspiration or
dispensing cycle.
Pipettor Programming
8
Pipettor Programming
7
The Program Menu
1. The following five dilutions have been pre-programmed.
Dilution Diluent Sample Total
Mode Ratio Volume Volume Volume
d1 1:5 4.00mL 1.00mL 5.00mL
d2 1:10 4.50mL 0.50mL 5.00mL
d3 1:20 4.75mL 0.25mL 5.00mL
d4 1:5 0.80mL 0.20mL 1.00mL
d5 1:10 0.90mL 0.10mL 1.00mL
2. Repeat Dispense 1mL Mode-
This mode performs repeat 1mL dispensing.
Mode Volume Repetitions
rd 1.00mL 1-5
3. Pipette Modes -
These modes perform standard 1mL and 5mL pipetting with blow-out.
Mode Volume
P1 1.00mL
P5 5.00mL
4. Open Dilution Mode -
This mode allows selection of any dilution ratio within the range of the pipettor
Diluent Sample Max.
Volume Volume Total
Mode Increment Range Range Volume
d0 0.05mL 0.10-5.00mL 0.00-4.90mL. 5.00mL
Page 4 of 15 - June 2001

1:10 Dilution (5mL Total Volume)
1. Press repeatedly until the
display reads:
2. Press to enter selection.
3. Attach a pipette tip to the tip cone.
The pipettor is now ready to begin the
1:10 dilution (5mL total volume). The
display indicates that the pipettor is
ready to aspirate 4.50mL.
4. Place the tip in the diluent and press the
Start Button. The unit will aspirate
4.50mL.
The following display indicates that the
unit is ready to aspirate 0.50mL.
5. Place the tip in the sample solution
and press the Start Button to aspirate
0.50mL.
The next display indicates that the unit
is ready to dispense the total volume
(5mL) with blowout.
6. Position the pipette tip to dispense and
press the Start Button. The unit will
dispense the full amount from the tip.
The display now indicates that the unit
is ready to repeat the dilution sequence,
beginning with the 4.50mL aspiration.
10
Pipettor Programming
1:5 Dilution (5mL Total Volume)
1. Press repeatedly until the
display reads:
2. Press to enter selection.
3. Attach a pipette tip to the tip cone.
The pipettor is now ready to begin the
1:5 dilution (5mL total volume). The
display indicates that the pipettor is
ready to aspirate 4.00mL.
4. Place the tip in the diluent and press the
Start Button. The unit will aspirate
4.00mL.
The following display indicates that the
unit is ready to aspirate 1.00mL.
5. Place the tip in the sample solution
and press the Start Button to aspirate
1.00mL.
The next display indicates that the unit
is ready to dispense the total volume
(5mL) with blowout.
6. Position the pipette tip to dispense
and press the Start Button. The unit will
dispense the full amount from the tip.
The display now indicates that the unit
is ready to repeat the dilution sequence,
beginning with the 4.00mL aspiration.
9
Pipettor Programming
Page 5 of 15 - June 2001

1:5 Dilution (1mL Total Volume)
1. Press repeatedly until the
display reads:
2. Press to enter selection.
3. Attach a pipette tip to the tip cone.
The pipettor is now ready to begin the
1:5 dilution (1mL total volume). The
display indicates that the pipettor is
ready to aspirate 0.80mL.
4. Place the tip in the diluent and press the
Start Button. The unit will aspirate
0.80mL.
The following display indicates that the
unit is ready to aspirate 0.20mL.
5. Place the tip in the sample solution
and press the Start Button to aspirate
0.20mL.
The next display indicates that the unit
is ready to dispense the total volume
(1mL) with blowout.
6. Position the pipette tip to dispense and
press the Start Button. The unit will
dispense the full amount from the tip.
The display now indicates that the unit
is ready to repeat the dilution sequence,
beginning with the 0.80mL aspiration.
12
Pipettor Programming
Pipettor Programming
11
1:20 Dilution (5mL Total Volume)
1. Press repeatedly until the
display reads:
2. Press to enter selection.
3. Attach a pipette tip to the tip cone.
The pipettor is now ready to begin the
1:20 dilution (5mL total volume). The
display indicates that the pipettor is
ready to aspirate 4.75mL.
4. Place the tip in the diluent and press the
Start Button. The unit will aspirate
4.75mL.
The following display indicates that the
unit is ready to aspirate 0.25mL.
5. Place the tip in the sample solution
and press the Start Button to aspirate
0.25mL.
The next display indicates that the unit
is ready to dispense the total volume
(5mL) with blowout.
6. Position the pipette tip to dispense and
press the Start Button. The unit will
dispense the full amount from the tip.
The display now indicates that the unit
is ready to repeat the dilution sequence,
beginning with the 4.75mL aspiration.
Page 6 of 15 - June 2001

1:10 Dilution (1mL Total Volume)
1. Press repeatedly until the
display reads:
2. Press to enter selection.
3. Attach a pipette tip to the tip cone.
The pipettor is now ready to begin the
1:10 dilution (1mL total volume). The
display indicates that the pipettor is
ready to aspirate 0.90mL.
4. Place the tip in the diluent and press the
Start Button. The unit will aspirate
0.90mL.
The following display indicates that the
unit is ready to aspirate 0.10mL.
5. Place the tip in the sample solution
and press the Start Button to aspirate
0.10mL.
The next display indicates that the unit
is ready to dispense the total volume
(1mL) with blowout.
6. Position the pipette tip to dispense and
press the Start Button. The unit will
dispense the full amount from the tip.
The display now indicates that the unit
is ready to repeat the dilution sequence,
beginning with the 0.90mL aspiration.
13
Pipettor Programming
Repeat Dispensing (1-5 repetitions of 1mL)
1. Press repeatedly until the
display reads:
2. Press or to select a
new number of 1ml repetitions (1-5).
In this case 3.
3. Press to enter selection.
4. Attach a pipette tip to the tip cone.
The display indicates that the pipettor is
ready to aspirate 3.00mL.
5. Place the tip in the liquid and press the
Start Button. The unit will aspirate
3.00mL.
The following display indicates that the
unit is ready to dispense the first of the
three 1.00mL aliquots:
6. Position the pipette tip to dispense and
press the Start Button. The unit will
dispense the first 1.00mL aliquot.
The following display indicates that unit
is ready to dispense the second of the
three 1.00mL aliquots:
Pipettor Programming
14
Page 7 of 15 - June 2001

7. Position the pipette tip to dispense and
press the Start Button. The unit will
dispense the second 1.00mL aliquot.
The following display indicates that unit
is ready to dispense the third of the
three 1.00mL aliquots.
8. Position the pipette tip to dispense and
press the Start Button. The unit will
dispense the third 1.00mL aliquot.
The following display indicates that unit
is ready to perform a new repeat
dispensing series.
9. Eject the disposable tip and repeat the
series beginning with Step 4.
Pipettor Programming
15
Pipettor Programming
1mL Pipetting
1. Press repeatedly until the
display reads:
2. Press to enter selection.
3. Attach a pipette tip to the tip cone.
The pipettor is now ready to aspirate
1.00mL.
4. Place the tip in the sample and press
the Start Button. The unit will aspirate
1.00mL.
The next display indicates that the unit
is ready to dispense the total volume
(1mL) with blowout.
5. Position the pipette tip to dispense and
press the Start Button. The unit will
dispense the full amount from the tip.
The display now indicates that the unit
is ready to repeat the 1mL pipetting,
beginning with the 1.00mL aspiration.
16
Page 8 of 15 - June 2001

Pipettor Programming
18
Open Dilution Programming
1. Press repeatedly until the
display reads:
2. Press to enter selection.
The display shows the default setting
for the diluent aspiration volume.
3. Press or to select a
new diluent volume (0.10 - 5.00mL).
(In this case 4.50mL)
4. Press to enter selection.
The display shows a default setting
for the sample aspiration volume.
5. Press or to select a
new sample volume (In this case
0.50mL)
6. Press to enter selection.
Pipettor Programming
17
5mL Pipetting
1. Press repeatedly until the
display reads:
2. Press to enter selection.
3. Attach a pipette tip to the tip cone.
The pipettor is now ready to aspirate
5.00mL.
4. Place the tip in the sample and press
the Start Button. The unit will aspirate
5.00mL.
The next display indicates that the unit
is ready to dispense the total volume
(5mL) with blowout.
5. Position the pipette tip to dispense and
press the Start Button. The unit will
dispense the full amount from the tip.
The display now indicates that the unit
is ready to repeat the 5mL pipetting,
beginning with the 5.00mL aspiration.
Page 9 of 15 - June 2001

Pipettor Programming
20
Speed Selection
Speed changes are made using these four keys:
Speed "1" is slowest and Speed "5" is fastest.
1. Press to display the
aspiration speed.
2. Press or to select a
new aspiration speed.
3. Press when the desired
aspiration speed is displayed.
Dispensing speed is then displayed.
4. Press or to select a
new dispensing speed.
5. Press when the desired
dispensing speed is displayed. The
display then returns to the diluent
aspiration readout.
may not be used in the middle
of any aspiration or dispensing cycle.
Pipettor Programming
19
7. Attach a pipette tip to the tip cone.
The pipettor is now ready to begin the
dilution. The display indicates that the
pipettor is ready to aspirate the selected
diluent volume.
8. Place the tip in the diluent and press the
Start Button. The unit will aspirate the
diluent volume selected.
The following display indicates that the
unit is ready to aspirate the selected
sample volume.
9. Place the tip in the sample solution
and press the Start Button to aspirate
0.50mL.
The next display indicates that the unit
is ready to dispense the total volume
with blowout.
10. Position the pipette tip to dispense and
press the Start Button. The unit will
dispense the full amount from the tip.
The display now indicates that the
unit is ready to repeat the dilution
sequence, beginning with the diluent
volume aspiration.
Page 10 of 15 - June 2001

22
Troubleshooting
Liquid in Tip Cone
If liquid is aspirated beyond the tip cone filter, clean the tip cone as follows.
1. Switch the unit “OFF”.
2. Remove the tip ejector collar: hold down the tip ejector lever and twist off the tip
ejector collar.
3. Unscrew the tip cone from the control handle. Do not rest the pipettor
on the lab bench. Do not touch the stainless steel piston with any foreign objects
to avoid scratching or contamination.
4. Use ethanol and a soft lint-free wipe to gently clean the piston and tip cone.
5. Apply a thin layer of grease to the piston seal.
NOTE: Use only the piston grease specifically recommended by your 3M
representative. Other types of grease can permanently damage the piston.
6. Reassemble the unit and perform a calibration check.
piston
tip cone
tip
ejector
collar
“Er 1” Display
The 3M Electronic Pipettor - 5mL has a
built-in monitoring program to control the
pipettor mechanism. A display showing
“Er1” indicates that the pipettor has been
unable to perform a function properly. Go
through the following procedure to clear
this display and resume pipetting.
1. Allow the pipettor to charge on the stand for a minimum of 15 minutes.
2. Press to clear the error message.
The display should now show the Power “ON” reading. If the error message
remains displayed, consult your 3M representative for additional assistance.
Bubbles
The appearance of many small bubbles on the Petrifilm plate may indicate that the
dispense speed is too fast. Lower the dispense speed (see Speed Selection page 20).
In more viscous samples, a single large bubble may form if the tip is allowed to
contact the sample surface during dispensing. To prevent this, position the tip at least
5mm above the surface during dispensing.
“Frozen” Display
If this display is shown and the pipettor
will not operate, the has been
pressed.
1. Press twice to clear the display
and continue working.
See Speed Selection, page 20.
Troubleshooting
21
Page 11 of 15 - June 2001

Care and Maintenance
The 3M Electronic Pipettor - 5mL requires regular cleaning to ensure trouble-free
operation. Use a soft cloth lightly moistened with a mild detergent to clean the outer
surface of the pipettor. DO NOT AUTOCLAVE.
Cleaning the Tip Cone
Monthly tip cone cleaning is recommended. However, with heavy use, clean more
frequently. If liquid enters the shaft, clean tip cone immediately.
1. Switch the unit “OFF”.
2. Remove the tip ejector collar: Hold down the tip ejector lever and twist off the tip
ejector collar.
3. Use a soft, lint-free wipe lightly moistened with ethanol to gently clean the tip cone.
4. Replace the tip ejector collar allowing the ejector handle connection to snap into
the attachment notch of the ejector collar.
Care and Maintenance
23
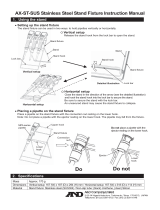
Filter Replacement
If the pipettor is not performing due to a clogged filter or if sample fluid has
contaminated the filter, the filter should be replaced.
1. Remove the contaminated or clogged filter by simply pulling it straight out of the
end of the tip cone (see Figure 1).
2. Clean the outside surface and the inner filter placement surface of the tip cone
using a swab moistened with ethanol (see Figure 2).
3. Place the pipettor in the charging stand for 15 minutes to allow drying of the
tip cone.
4. Place a new filter into the tip cone (see Figure 3).
Care and Maintenance
Figure 3
Figure 1 Figure 2
Removing Contaminated or
Clogged Filter from Tip Cone
Cleaning the Tip Cone Before
Installing New Filter
24
tip cone
ejector
collar
filter
Page 12 of 15 - June 2001

Care and Maintenance
26
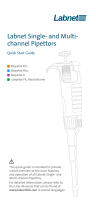
1:5 Dilution
Test Volume> 4.00 mL 1.00 mL 5.00 mL
Volume (mL)
Tolerance
Range > 3.968-4.032 mL 0.979-1.021 mL 4.945- 5.055 mL
Weight (g) Weight (g) Weight (g)
Temperature Tolerance Range* Tolerance Range* Tolerance Range*
19°C 3.9585 - 4.0207g 0.9767 - 1.0181g 4.9332 - 5.0409g
20°C 3.9577 - 4.0199g 0.9765 - 1.0179g 4.9322 - 5.0399g
21°C 3.9569 - 4.0191g 0.9763 - 1.0177g 4.9312 - 5.0389g
22°C 3.9557 - 4.0179g 0.9760 - 1.0174g 4.9297 - 5.0374g
23°C 3.9549 - 4.0171g 0.9758 - 1.0172g 4.9287 - 5.0364g
24°C 3.9542 - 4.0163g 0.9756 - 1.0170g 4.9278 - 5.0354g
25°C 3.9530 - 4.0151g 0.9753 - 1.0167g 4.9263 - 5.0339g
26°C 3.9522 - 4.0139g 0.9751 - 1.0164g 4.9253 - 5.0324g
27°C 3.9510 - 4.0131g 0.9748 - 1.0162g 4.9238 - 5.0314g
28°C 3.9498 - 4.0119g 0.9745 - 1.0159g 4.9224 - 5.0299g
29°C 3.9487 - 4.0107g 0.9742 - 1.0156g 4.9209 - 5.0283g
30°C 3.9475 - 4.0099g 0.9739 - 1.0154g 4.9194 - 5.0273g
Table 1
Calibration Check Chart
* Weights adjusted for temperature and pressure effects using the “z factor”.
Care and Maintenance
25
Battery Replacement
If the battery does not hold a sufficient charge for proper operation of the pipettor,
follow these steps for replacement of the battery.
1. Switch the unit "OFF".
2. Remove the top two screws on the back of the pipettor and remove the battery cover.
3. Carefully remove the battery by lifting it straight out of the holder.
4. Install the new battery by pressing the positive (+) end against the contact spring
at the bottom of the holder. Guide the negative (-) end carefully into position.
5. Replace the cover and the screws. Do not overtighten the screws.
6. Dispose of battery according to local requirements or regulations.
Calibration Check (Mode d1, 1:5, 5mL dilution)
Genuine 3M Pipettor Tips are strongly recommended for verifying pipettor
performance. Perform a single-sample measurement following a change of any
removable parts. Perform a 4-sample test monthly–or more frequently, depending on
use. Perform a 10-sample test quarterly. Record all results and maintain records. Use
the procedure indicated in “Standard Methods for the Examination of Dairy Products.”
1. The pipettor, pipettor tips and test liquid should all be allowed to adjust to room
temperature (19°C-25°C) for one day before beginning the calibration check.
Note the temperature before starting.
2. Double-rinse the pipettor tip by aspirating water to the 5.0 mL level (4.0mL +
1.0mL) and then expelling it.
3. Place a 50mL or smaller vessel containing 20-25g of distilled water onto an
analytical balance. Note its weight. Re-tare balance to 0 (zero).
4. Aspirate 4.0mL of water from the vessel on the analytical balance. Note its
weight. Re-tare balance to 0.
5. Aspirate an additional 1.00 mL from the vessel on the analytical balance. Note its
weight. Re-tare balance to 0.
6. Expel the 5.0mL of water back into the vessel on the analytical balance. Note
its weight.
7. Repeat steps 4 - 6 as desired.
8. Calculate the average weight of the 4.0mL aspirations. Repeat this
calculation for the 1.00 mL and 5.0mL measurements.
9. Refer to Table 1, page 26. Find the temperature closest to the temperature you
recorded during step 1. Confirm that each average weight falls within the
corresponding weight tolerance range for that temperature.
Page 13 of 15 - June 2001

Pipettor Tips
28
Genuine 3M Pipettor Tips are strongly recommended for use with the 3M Electronic
Pipettor - 5mL. Other tips may adversely affect the accuracy of the instrument and
may damage the tip cone and ejector mechanism.
Item No. Description
6489 5mL wide bore tip, 500/pkg, racked, sterile
6488 5mL wide bore tip, 500/pkg, racked, nonsterile
6487 5mL wide bore tip, 250/pkg, bulk, nonsterile
Specifications
27
Accuracy and Precision
Test Mode: d1 1:5 (5mL) dilution
Test Action Precision Accuracy
Aspirate 4.00mL 0.6% 0.8%
Aspirate 1.00mL 1.6% 2.1%
Dispense 5.00mL 0.8% 1.1%
Tolerances
Test Action Range
Aspirate 4.00mL 3.968 - 4.032 mL
Aspirate 1.00mL 0.979 - 1.021 mL
Dispense 5.00mL 4.945 - 5.055 mL
Materials
Part Material
Tip Cone Polypropylene
Ejector Collar Polypropylene
Piston Polypropylene
Control Handle ABS
Tip Ejector Lever POM
+
-
+
-
+
-
+
-
+
-
+
-
Accuracy and Precision
Tolerances
Materials
Page 14 of 15 - June 2001

Limited Warranty
29
3M warrants that - except for depletion of the battery power or where due to product
abuse, product use outside the instructions or intended applications, or reasonable
wear and tear - the 3M Electronic Pipettor meets 3M’s manufacturing specifications
for a period of one year from the date of purchase except where prohibited by law.
3M DISCLAIMS ALL OTHER EXPRESS AND IMPLIED WARRANTIES
INCLUDING BUT NOT LIMITED TO THE WARRANTY OF
MERCHANTABILITY OR FITNESS FOR A PARTICULAR USE.
Limitation of Remedies:
At 3M’s option, 3M will repair, replace or refund the purchase price of a 3M
Electronic Pipettor that does not conform to 3M’s express limited warranty above.
You must notify 3M of any suspected nonconformance in a product within 20 days
after you discover it and return the nonconforming product to 3M. In the United
States, please call 3M Microbiology Products Sales Management (800-328-1671) for
a returned goods authorization. Outside of the United States, please contact the local
3M subsidiary.
These are your exclusive remedies except where prohibited by law.
3M WILL NOT BE LIABLE FOR ANY OTHER DIRECT, INDIRECT,
SPECIAL, CONSEQUENTIAL OR INCIDENTAL DAMAGES, INCLUDING
LOST PROFITS.
Out of Warranty Service
Contact your 3M representative for service.
For spare parts, filters, piston assembly, piston grease, or batteries contact your
3M representative.
3
Made in Finland for
3M Microbiology Products
3M Center, Building 275-5W-05
St. Paul, MN 55144-1000
USA
©3M 2001 - 15 pages
Faxable Doc # 1210
34-7048-6067-4
3M Microbiology Products
D-46325 Borken, Germany
Page 15 of 15 - June 2001
/