Page is loading ...

110 Gas
Users Guide
Installation & Service Instructions
U102180-06

2
Be safe
Warning
Accessible parts will become hot in use. To avoid burns
and scalds children should be kept away.
You need clean fresh air - so does your cooker. Burner fl ames
produce exhaust gases, heat and moisture. Make sure that the
kitchen is well ventilated: keep natural ventilation holes open or
install a powered cooker hood that vents outside. If you have
several burners on or use the cooker for a long time, open a
window or turn on an extractor fan. For more detail see the
Installation Instructions.
We recommend you read the ‘General Safety Instructions’
section if you have not used a gas cooker before. We describe
some basic guidelines on how to use a gas cooker safely.
Gas and Electricity on
Make sure that the gas supply is turned on and that the cooker
pluged in to the electricity supply and switched on. The cooker
needs electricity.
Peculiar smells
When you fi rst use your cooker it may give off a slight odour.
This should stop after a little use.
Before using for the fi rst time, make sure that all
packing materials have been removed and then to dispel
manufacturing odours, turn the ovens to Mark 7 and run for
an hour.
To clear the smell make sure the room is well ventilated
to the outside air, by opening windows or turning on a
cooker hood for example. We recommend that people with
respiratory or allergy problems should vacate the area for
this brief period.
Before using the grill for the fi rst time you should also
turn on the grill and run for 30 minutes with the grill pan in
position, pushed fully back, and the grill door open
Installation
In the UK the cooker must be installed by a CORGI registered
engineer. Failure to install the appliance correctly could
invalidate any warranty or liability claims and lead to prosecution
This appliance shall be installed in accordance with the
regulations in force and only in a well ventilated space. Read the
instructions before installing or using this appliance.
This appliance should not be installed in a boat or caravan.

3
Contents
Hotplate burners Page 4
The Griddle Page 5
Warmer Page 5
The Grill Page 6
The Ovens Page 7
The Clock Page 7
Cooking using the timer Page 9
Oven cooking Page 10
‘S’ (Slow) cooking Page 10
Oven shelves Page 11
The Handyrack Page 12
Oven light Page 12
Storage Page 12
Oven cooking guide Page 13
Cleaning your cooker Page 14
Moving your cooker Page 17
Troubleshooting Page 18
General Safety Instructions Page 20
Installation Page 22
Servicing Notes Page 29
Circuit Diagram Page 34
Technical Data Page 35

4
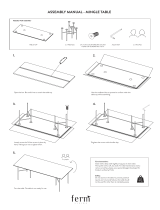
Hotplate burners
1
The drawing by each knob indicates which burner
that knob controls.
Press the igniter button, and push in and turn a knob
to the large fl ame symbol (
). Alternatively light with
a match.
2
Adjust the fl ame height to suit by turning the knob.
On this cooker the low position is beyond high, not
between high and off. The small fl ame marks the ‘low
position’. Turn the knob towards it after the contents
of a pan have boiled.
3
Make sure fl ames are under the pans. Using a lid
will help the contents boil more quickly.
Pans and kettles with concave bases or down turned
base rims should not be used.
4
Simmering aids, such as asbestos or mesh mats,
are NOT recommended. They will reduce burner
performance and could damage the pan supports.
5
Avoid using unstable and misshapen pans that may
tilt easily and pans with a very small base diameter
e.g. milk pans, single egg poachers. The minimum
pan diameter recommended is 120mm.
Pans and kettles with down turned base rims should
not be used.
6
The Wok burner is designed to provide even heat
over a large area. It is ideal for large pans and stir
frying. For heating smaller pans the smaller burners
may be more effi cient.
If a burner fl ame goes out, turn the control knob
off and leave it for one minute before relighting it.
You can remove the burner parts for
cleaning, see the ‘Cleaning your cooker’
section of these instructions.
You should wipe the enamel top surface of the
cooker around the hotplate burners as soon as
possible after spills occur. Try to wipe them off
while the enamel is still warm.

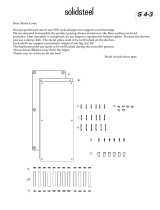
5
The Griddle
1
The griddle fi ts a single pan support, front to back.
It is designed for cooking food on directly. Don’t use
pans of any kind on it. The griddle surface is non-
stick and metal cooking utensils (e.g. spatulas) will
damage the surface. Use heat resistant plastic or
wooden utensils.
2
Don’t put it crossways - it will not fi t properly and will
be unstable.
Don’t put it on the Wok burner - it is not designed to
fi t the Wok burner pan support.
3
Position the griddle over the hotplate burners
resting on the pan support. The griddle can be
lightly brushed with cooking oil before use. Light the
hotplate burners. Adjust the fl ame heights to suit.
4
Preheat the griddle for a maximum of 5 minutes
before adding food. Leaving it longer may cause
damage. You can reduce the heat by turning the
control knobs towards the lower position (marked
with the small fl ame symbol).
5
Always leave space around the griddle for the
gases to escape. Never fi t two griddles side by side.
Large pans should also be spaced well apart. The
maximum pan base diameter is 250mm.
Use the following heat settings as a guide for
griddle cooking.
High/medium:
Drop scones, Bacon, Chops, Steak, Burgers.
Medium/low:
Potato cakes, Eggs, Fish cakes.
Experience will soon familiarise you with the
correct setting to use for cooking.
After cooking allow the griddle to cool before
cleaning.
Warmer

6
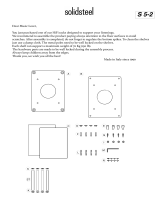
The Grill
CAUTION: Accessible parts may be hot when
the grill is in use. Young children should be
kept away.
1
The burner does not glow red - food cooks from
the heat of the fl ame. The fi rst time you light the
grill there may be a little smoke given off - this is
perfectly normal.
2
Remove the pan from the bottom of the grill
compartment.
3
After placing your food on the grill tray pan, slide
the grill pan onto the side supports just below the
burners. Make sure it is pushed right in and touches
the back stop.
4
Make sure the grill pan is pushed right in and
touches the back stop. Never close the grill door
while the grill is on.
Natural gas
5
Press the igniter
button and press
in and turn the grill
knob to the large
fl ame symbol ( ).
When the fl ame lights
release the igniter
button.
LP Gas
5
The grill has a special safety device with stops the
fl ow of gas to the grill if the fl ame goes out. Turn the
knob to the large fl ame symbol ( ).
Press the igniter button. Press in the grill knob - this
lets gas through to the burner. Keep holding the grill
knob pressed for about 10 seconds.
If when you let go of the control knob the burner
goes out, the safety device has not held in. Turn off
the grill and wait one minute then try again this time
holding in the button for slightly longer.
6
The low position, marked with the small fl ame
symbol, is beyond high, not between high and off.
7
The grill pan grid can be turned over to give two
grilling positions.
For best results, especially on toast, preheat the
grill with the grill pan in the cooking position for
two minutes before use. The grill trivet can be
removed and the food placed on it while you are
waiting for the grill to preheat. After placing your
food on the grill pan grid, slide the grill pan onto
the side supports just below the burners. Adjust
the fl ame height to suit by turning the knob.
Don’t leave the grill on for more than a few
moments, without the grill pan underneath it.
You can brown the top of dishes cooked in the
oven, under the grill. Remove the grill trivet and
place the dish onto the base of the grill pan.
Slide the grill pan along the fl oor of the grill
cavity.

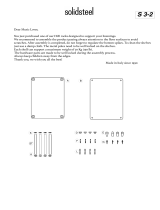
7
The Ovens
The clock must be set to the time of day before
the ovens will work. See ‘The Clock’ section of
these instructions for how to set the clock.
Before using for the fi rst time, to dispel
manufacturing odours turn the ovens to
Mark 7 and run for an hour. To clear the
smell make sure the room is well ventilated
to the outside air, by opening windows or
turning on a cooker hood for example. We
recommend that people with respiratory or
allergy problems should vacate the area for
this brief period.
1
Push in and turn the knob controlling the oven to
Gas Mark 9. The oven will light automatically.
2
Turn the control knob back to the Mark you wish to
cook on and for best results pre-heat for 15 minutes
before placing your dishes in the oven.
3
The ovens use our special ‘Heatfl ow’ system.
Because the oven burner is not hidden under the
oven base you will see the burner fl ames at the back
of the oven - this is perfectly normal.
The oven is protected by a safety cut off, which
reduces the supply of gas to the oven if the fl ames
go out, e.g. an interruption to the mains supply.
Initially the gas will burn with a small fl ame but after
approximately one minute the fl ame will become
larger indicating that the oven is full on.
4
Dishes cooking on the central shelf will cook at the
gas mark indicated on the knob.
5
Dishes placed above the central position will be
cooked at approx. one gas Mark higher, dishes
cooked below approx. one gas Mark lower. You can
therefore cook dishes requiring different gas Marks
at the same time.
6
The ‘S’ setting is a very low temperature for slow
cooking, overnight or while you are out or at work.
The ‘S’ setting can also be used for keeping food
warm.
The Clock
You can use the timer to turn the ovens on and
off. The clock must be set to the time of day
before the ovens will work.
To set the time of day
Press and hold as shown.
At the same time, press
(-) or (+) until the correct
time shows.
Don’t forget it’s a 24 hour
clock.
If you make a mistake or press the wrong button,
turn off the power supply for a minute or two and
start again.
If the key symbol
( ) appears on the left of the
display you have accidentally turned on the
key lock feature. See the section ‘Clock Special
Features’.

8
To time something that’s cooking
(minute minder)
Press and hold the
Minute Minder (
).
At the same time
press (-) or (+) until
the time you want to
cook for is shown.
You can check time remaining by pressing
and cancel the beeper by pressing
To stop automatically
Use when you have started the oven manually.
Press and hold the
Stop Time (
)
button.
At the same time press (-) or (+) until your
required ‘Stop Time’ shows. AUTO will show in
the display. When your cooking is fi nished the
beeper sounds. TURN THE OVEN KNOB TO
0 FIRST, then press
once to stop the beep,
press
again to return to manual cooking.
To start and stop the oven
automatically
Before you set the clock, you must have two
numbers clearly in mind.
The ‘cook period’, which is the period of time
you want the oven to cook.
The ‘stop time’, which is the time of day you
want the oven to stop cooking.
You cannot set a start time directly - this is set
automatically by setting the cooking period and
stop time.
Press and hold the
Cook Time (
)
button. At the same
time press (-) or (+)
until your required
‘cook period’ shows.
Press and hold the
Stop Time ( )
button.
At the same time
press (-) or (+) until
your required ‘stop
time’ shows.
AUTO will show in the
display.

9
Clock Special Features
Key Lock
When the key lock is activated, the clock can be
operated as usual but the oven is locked and will
not come on. This means that your child could
select a cook program but the program will not
be activated and oven will not be switched on.
To activate the key lock
Make sure that the clock is in manual mode and
cancel any active programs.
Hold the
Minute Minder (
)
and Cooktime ( )
buttons for about 8
seconds.
‘On’ will appear on the
display.
Press the ‘+’ button
once.
‘Of’ will appear on the
display.
The clock oven
control functions are
now locked.
After a few seconds
the display will revert
to show the time
of day and the key
symbol (
).
To turn off the key lock
Hold the
Minute Minder (
)
and Cooktime ( )
buttons for about 8
seconds.
‘Of’ will appear on the
display.
Press the ‘+’ button
once. ‘On’ will appear
on the display.
After a few seconds the display will revert to
show the time of day.
The oven and the clock oven control functions
can now be used normally.
Cooking using the timer
The timer can be used to turn just one oven
or both on and off automatically. The start and
stop time must be the same for both ovens but
different cooking temperatures can be set.
If you want to turn one of the ovens on
at the same time as the timer is set for
automatic cooking, you must wait until
the timer has turned on the oven/ ovens
fi rst. Then you can adjust either of them
manually in the normal way.
You can set the oven to turn on any time over
the following 24 hour period
If you want to cook more than one dish,
choose dishes that require approximately
the same time. However, dishes can be
‘slowed down’ slightly by using small
containers and covering them with
aluminium foil, or ‘speeded up’ slightly by
cooking smaller quantities or placing in
larger containers.
Very perishable foods such as pork or fi sh
should be avoided if a long delay period is
planned, especially in hot weather.
Don’t place warm food in the oven.
Don’t use an oven already warm.
Don’t use if an adjoining oven is warm.
Avoid using wine or beer if there is a delay
period, as fermentation may take place.
To avoid curdling, cream should be added to
dishes just before serving.
Fresh vegetables, which may discolour during a
delay period, should be coated in melted fat or
immersed in a water and lemon juice solution.
Many frozen foods are ideal for delayed
cooking and can be placed in the oven while
still frozen.
Fruit pies, custard tarts or similar wet mixtures
on top of uncooked pastry are only satisfactory if
there is a short delay period. Dishes containing
leftover cooked meat or poultry should not be
cooked automatically if there is a delay period.
Whole poultry must be thoroughly defrosted
before placing in the oven.
Check that meat and poultry are fully
cooked before serving.

10
Oven cooking
The wire shelves should always be pushed
fi rmly to the back of the oven.
Baking trays with food cooking on them should
be placed level with the front edge of the oven’s
wire shelves. Other containers should be placed
centrally. Keep all trays and containers away
from the back of the oven, as overbrowning of
the food may occur.
For even browning, the maximum recommended
size of a baking tray is 325mm (12
3
/
4
”) by
305mm (12”).
When the oven is on, don’t leave the door open
for longer than necessary, otherwise the knobs
may get very hot.
• Always leave a ‘fi ngers width’ between dishes
on the same shelf. This allows the heat to
circulate freely around them.
• To reduce fat splashing when you add
vegetables to hot fat around a roast, dry them
thoroughly or brush lightly with cooking oil.
• Where dishes may boil and spill over during
cooking, place them on a baking tray.
The oven is protected by a safety cut off, which
reduces the supply of gas to the oven if the
fl ames go out, e.g. an interruption to the mains
supply.
• Plates can be warmed in the oven on the ‘S’
setting. The ‘S’ setting can be used to keep
foods hot for 3-4 hours after ‘normal’ cooking,
without drying out or overbrowning.
• The Cook & Clean oven liners (see Cleaning
your cooker) work better when fat splashes
are avoided. Cover meat when cooking.
• Suffi cient heat rises out of the oven
while cooking to warm plates in the grill
compartment.
• If you want to brown the base of a pastry dish,
preheat the baking tray for 15 minutes before
placing the dish in the centre of the tray.
‘S’ (Slow) cooking
The ‘S’ setting is a very low temperature for
slow cooking, overnight or while you are out
or at work. The ‘S’ setting can also be used for
keeping food warm.
You can cook on ‘S’ throughout, or use a 30
minute ‘boost’ period at gas Mark 6 and then ‘S’
cook.
When roasting joints, poultry or pot
roasting, always cook at Mark 6 for 30
minutes at the beginning of the cooking
period.
You can ‘S’ cook for periods of 6 to 12 hours.
This technique is particularly useful if you want
to cook a dish overnight or while you are out at
work during the day.
Frozen foods must be thoroughly
thawed out before ‘S’ cooking.
Whole poultry should not be cooked on ‘S’.
Chicken casseroles are fi ne.
Casseroles must be brought to boiling
point on the hotplate immediately before
‘S’ cooking.
Poultry and rolled joints should not be stuffed
before cooking. The stuffi ng should be cooked
separately. Poultry and pork should be cooked
in the top half of the oven, and other meats not
lower than shelf position 4.
A roasting joint should be covered with
cooking foil, or with a roasting bag to
reduce shrinkage and retain juices.
Should further browning be necessary, uncover
the meat and increase the temperature to Mark
4 for a short period.
Cut root vegetables into small pieces
unless cooking whole, e.g. jacket
potatoes.
Cover dishes tightly with a lid or foil to prevent
evaporation and transfer of fl avour.

11
Once the oven has been loaded and
the ‘S’ setting is in operation resist
the temptation to open the oven door.
Heat will be lost and the cooking time
extended.
A meat thermometer is recommended for
checking that a joint or poultry is suffi ciently
cooked. Insert the probe through the thickest
part of the meat. The temperatures to be
expected are as follows.-
Beef rare 60°C / 140°F
medium 71°C / 160°F
well done 77°C / 170°F
Lamb 82°C / 180°F
Pork fresh 88°C / 190°F
cured 77°C / 170°F
Poultry 90°C / 195°F
Veal 77°C / 170°F
Oven shelves
the shelf guard should be at the back pointing upwards
The oven shelves can be easily removed and
refi tted.
Pull the shelf forward
until the back of the
shelf is stopped by the
shelf stop bumps in the
oven sides.

12
The oven control settings and
cooking times given opposite
are intended to be used only as a
guide. Individual tastes may require
the temperature to be altered to
provide a preferred result.
Always leave at least one runner space
between shelves when 2 tier cooking.
Place baking trays, individual cake
tins or baking dishes centrally on the
oven shelf. For best results pre-heat
the oven for 15 minutes.
The Handyrack
The maximum weight that can be held by the
Handyrack is 5.5kg (12lb). It should only be used
with the supplied meat tin, which is designed
to fi t the Handyrack. Any other vessel could be
unstable.
The Handyrack fi ts to the left hand oven door
only. Food cooking on it is easy to attend to,
because it’s accessible when the door is open. It
can be fi tted at two different heights. One of the
oven shelves must be removed and the other
positioned to suit.
When the Handyrack is used in its highest
position, other dishes can be cooked on the
bottom shelf position of the oven or standing on
the base of the oven
When the Handyrack is used in its lowest
position, other dishes can be cooked on the
second shelf position of the oven.
To fi t the Handyrack,
locate one side of it on
the door bracket.
Then spring the other
side out to clip it onto
the other bracket.
Oven light
Press the appropriate button to turn on one of
the oven lights.
If one of the oven lights fail, turn off the
power supply before you change the bulb.
See the ‘Troubleshooting’ section for details
on how to change an oven light bulb.
Storage
The bottom drawer is for storing oven trays and
other cooking utensils. It can get very warm,
don’t store anything in it that may melt or catch
fi re. The drawer can be removed completely by
pulling it right out and up.

13
Oven cooking guide
Gas Shelf Position
Mark from Top Approximate Cooking Time
Meat
Thoroughly thaw frozen joints
before cooking. Meat may be
roasted at Mk. 7 and the cooking
time adjusted accordingly. For
stuffed and rolled meats, add
approx. 10 min. per 500g. or
cook at Mk. 6 or 20min, then
Mk. 3 for the remainder.
Beef (no bone) 3 3-4 30-35mins. per 500g.+30-35 mins.
6 3-4 20-25mins. per 500g.+20-25 mins.
Lamb 3 3-4 30-35mins. per 500g.+30-35 mins.
6 3-4 25-30mins. per 500g.+25-30 mins.
Pork and Veal 3 2-3 35-40mins. per 500g.+35-40 mins.
6 3-4 25-30mins. per 500g.+25-30 mins.
Poultry
Chicken (2.3kg) 3 3-4 20-25mins. per 500g.+20-25 mins.
For stuffed poultry, you could
cook at Mk. 6 for 20mins. and
then Mk.3 for remainder. Don’t
forget to include the weight
of the stuffi ng. For fresh or
frozen prepacked poultry,
follow instructions on the pack.
Thoroughly thaw frozen poultry
before cooking.
6 3-4 15-20mins. per 500g.+15-20 mins.
Turkey (4.5kg) 3 3-4 25-30mins. per 500g.+25-30 mins.
6 3-4 20mins. per 500g.+20 mins.
Turkey (over 4.5kg) 3 4 20mins. per 500g.+20 mins.
6 4 15mins. per 500g.+15 mins.
Duck/ duckling 3 4 25-30mins. per 500g.
6 4 20mins. per 500g.
Casseroles
1-2 3-4 2-4 hours according to recipe.
Yorkshire Pudding
7 2 Large tin 30-35 mins. Individual, 10-20 mins.
Fish
5 2 Fillets 15-20 mins. Whole 15-20mins. per 500g.
5 2 Steaks according to thickness.
Cakes
Very rich fruit - Christmas
/ wedding etc.
1 4 45-50mins. per 500g. of mixture.
When two tier cooking leave at
least one runner space between
shelves. Position the baking tray
with the front edge along the
front of the oven shelf.
Rich fruit cakes made with self-
raising fl our should be cooked
on Mk.4 for the fi rst half hour at
least and then fi nished at the
setting shown.
Fruit 180mm tin 2 4 2 to 2
1
/
2
hours.
Fruit 230mm tin 2 4 Up to 3
1
/
2
hours.
Madeira 180mm 3 4 80-90 mins.
Queen cakes 5 2 & 4 or 3 15-25 mins.
Scones 7 2 & 4 or 3 10-15 mins.
Victoria sandwich
180mm tin 4 2 & 4 or 3 20-30mins.
230mm tin 4 2 & 4 or 3 30-40 mins.
Desserts
If cooking more than one tart at
the same time, swap them over
at approx. 25 mins. For even
browning the maximum size of
baking tray recommended is
325mm x 305mm. This ensures
free heat circulation.
If cooking a two tier load, when
the top tray is removed, the tray
in the lower position should be
raised to the higher shelf, or
the trays interchanged, for the
remaining cooking time.
Shortcrust tarts 6 2 & 4 40-60 mins. on pre-heated tray.
Fruit pies 6 2-3 35-45 mins.
Tartlets 6 2-3 10-20 mins. according to size.
Flaky/rough puff 7 2-3-4 20-40 mins. according to size.
Puff pastry 8 2-3-4 20-40 mins. according to size.
Meringues ‘S’ 3 1
1
/
2
to 2 hrs.
Baked egg custard 3 3 45-60 mins.
Baked sponge pudding 5 3 40-45 mins.
Milk pudding 1-2 3 2-3 hrs.

14
Cleaning your cooker
Essential information
Before thorough cleaning isolate the electricity
supply. Remember to switch on the electricity
supply before use.
Never use paint solvents, washing soda,
caustic cleaners, biological powders,
bleach, chlorine based bleach cleaners,
coarse abrasives or salt. Don’t mix
different cleaning products - they may
react together with hazardous results.
Recommended cleaning materials are
shown in the table at the end of this
section.
If you want to move your cooker for cleaning,
see the section called ‘Moving your cooker’.
All parts of the cooker can be cleaned with hot
soapy water - but take care that no surplus
water seeps into the appliance.
For cleaning materials see the ‘Cleaning Table’
at the end of this section.
Hotplate burners
Some models have a separate trim ring, which
fi ts on the burner head.
The burner heads and caps can be removed
for cleaning. Make sure they are absolutely dry
before replacing.
The LH hotplate
A cap, B head, C notch, D base, E electrode
When refi tting the burner head, make sure that
the notch lines up with the electrode or hole in
the base. Check that the burner head is level
and that the cap is fi tted centrally on the burner
head.
The Wok burner
The Wok burner is a little more complicated but
it also can be taken apart for cleaning.
Wok burner
A inner burner cap, B outer burner cap
C inner burner head D outer burner head
E Wok burner base
When reassembling the Wok burner, turn over
the large base ring and fi nd the ‘D’ shaped area.

15
To fi t the small inner burner, fi nd the larger
electrode notch in the burner rim. Line this up
with the white ignition electrode and place the
inner burner on the large base ring.
A electrode notch B ignition electrode
Now fi t the two trim rings, making sure that they
are sitting down properly.
Griddle
Always clean the griddle after use. Allow to
cool completely before removing. Immerse the
griddle plate in hot soapy water. Use a soft
cloth or, for stubborn stains, a nylon washing up
brush.
NEVER USE CAUSTIC OR ABRASIVE
CLEANERS AS THESE WILL DAMAGE THE
SURFACE.
Control Panel and Doors
The control panel and control knobs should
only be cleaned with a soft cloth wrung out
in clean hot soapy water - but take care that
no surplus water seeps into the appliance.
Wipe with a clean dampened cloth then polish
with a dry cloth. The oven doors should only be
cleaned with a soft cloth wrung out in clean hot
soapy water.
Cookers with window doors
On some models the oven door front panel can
be taken off so that the glass panels can be
cleaned. If the top edge of the oven door of your
cooker has a line of holes and there are screws
in the side edges then it can be taken apart for
cleaning.
Move the cooker forward to gain access to the
sides (see the ‘Moving the cooker’ section of
these instructions).
Open the oven door slightly and remove the
front panel fi xing screws from the door sides
(two each side).
some window doors only
Carefully lift off the outer door panel. The inside
face of the glass panels can now be cleaned
- take care not to disturb or wet the door
insulation. Please note that the door is triple
glazed but the inner two panels are fi xed and
should not be separated. After cleaning carefully
refi t the outer door panel and replace the side
fi xing screws.
Grill
The face of the grill burner will darken with
use - this is perfectly normal. Any fat or grease
will burn off. Do not try to clean it - the small
holes could get blocked and affect burner
performance.
The grill pan and grid should be washed in hot
soapy water. After grilling meats or any foods
that soil, leave to soak for a few minutes in the
sink immediately after use. Stubborn particles
may be removed from the grid by using a nylon
brush.
Oven
Cleaning is easier if carried out while the oven is
still warm. Before cleaning, cover the burner to
prevent the burner holes becoming blocked.
The inside of the oven and inner door panel can
be cleaned using an approved cleaner see the
table at the end of this section.
Take care not to disturb the oven thermostat
temperature sensor at the top of the oven
opening.
The enamelled oven burner trim (supplied with
some models only) can be removed for cleaning.

16
Cleaning Table
Hotplate
Part Finish Recommended Cleaning Method
Hotplate Top Enamel or
Stainless Steel
Hot soapy water, soft cloth. Any stubborn stains
remove gently with a nylon scourer.
Pan Supports, Wok Cradle
(some models only)
Enamel coated
Cast Iron or
Stainless Steel
Cif Cream Cleaner- Faberge Lever and a nylon
scourer.
Dishwasher.
Warming Zone (some models
only)
Toughened
Glass
Hot soapy water, cream cleaner/scourer if necessary.
Burner Caps Enamel Cream cleaner, nylon scourer. Dishwasher
Burner Trim Rings (some
models only) and Burner Head
Aluminium Cif or other cream cleaner with a soft cloth. Be careful
not to be over vigorous.
Griddle Plate (some models
only)
Non-Stick
Surface
Allow to cool. Wash in hot soapy water. Do not use
abrasive cleaners/scourers. Dishwasher.
Outside of cooker
Part Finish Recommended Cleaning Method
Door, Door surround and
Storage Drawer exterior.
Enamel or paint Hot soapy water, soft cloth.
Any stubborn stains, remove gently with a liquid
detergent.
Stainless Steel E Cloth (Comet) or Vileda Microfi bre Plus All
Purpose Cloth Freudenberg Household Products LP
(supermarket)
Sides and Plinth Painted surface Hot soapy water, soft cloth
Splashback/Rear Grille Enamel or
Stainless Steel
Hot soapy water, soft cloth. Cream cleaner, with care, if
necessary.
Control panel Paint, Enamel or
Stainless Steel
Warm soapy water. Do not use abrasive cleaners on
lettering.
Control Knobs/Handles Plastic/ Chrome Warm soapy water, soft cloth.
Oven Door Glass/Glass Lid Toughened glass Hot soapy water, cream cleaner/scourer if necessary.
Oven and Grill
Part Finish Recommended Cleaning Method
Sides, fl oor & roof of oven -
NOT COOK & CLEAN OVEN
PANELS (see below)
Enamel Any proprietary oven cleaner that is suitable for enamel.
CAUTION: CORROSIVE/CAUSTIC OVEN CLEANERS
- FOLLOW MANUFACTURERS INSTRUCTIONS.
Protect the burner in gas ovens with foil whilst cleaning
the oven interior. Make sure you remove the foil
before using the oven.
Cook & Clean Oven Panels
(some models only)
Special enamel
that partly
cleans itself
This surface cleans itself at Mk. 7 and above, or the
panels can be removed and washed with hot soapy
water and a nylon brush. (see ‘The Ovens’ in ‘Cleaning
your cooker’)
Oven Shelves, Handyrack,
Grill Trivet.
Chrome An oven interior cleaner that is suitable for chrome.
Soap fi lled pad. Dishwasher.
Grill Pan, Meat Tin. Enamel Hot soapy water. Soap fi lled pad (Brillo). Dishwasher.
Cleaners listed are available from
Supermarkets or electrical retailers as stated.
Cleaner manufacturer in Italics
For enamelled surfaces use a cleaner that
is approved for use on vitreous enamel. The
vitreous enamel association has a list of
approved cleaners. Contact them via their
website www.ive.org.uk or telephone: 01527
893031.
Regular cleaning is recommended. For easier
cleaning, wipe up any spillages immediately.
To help keep your oven clean, cover meat when
roasting, with foil or use a roasting bag. Brush
vegetables with fat before placing around the
meat.

17
The oven burner trim hooks onto the front of the
oven burner bracket.
When refi tting make sure that the trim is in the
middle of the front of the oven burner bracket.
The Oven side linings
The oven has removable oven side lining panels
that have been coated with special enamel that
partly cleans itself. This does not stop all marks
on the lining, but helps to reduce the amount of
manual cleaning needed.
The Cook & Clean panels work better above
gas Mark 6. If you do most of your cooking
below this temperature, occasionally
remove the panels and wipe with a lint
free cloth and hot soapy water. The panels
should then be dried and replaced and the
oven heated at Gas Mark 7 for about one
hour. This will ensure the Cook & Clean
panels are working effectively.
Don’t use steel wool (Brillo) or any other
materials that will scratch the surface. Don’t use
oven cleaning pads.
Before cleaning the oven, cover the burner at
the rear to stop the holes getting blocked as you
clean. If they are accidentally blocked, clean
them out with thin wire, such as fuse wire.
Removing the Oven Linings
The lining panels can be removed for cleaning
and for cleaning behind. Remove the shelves
fi rst.
Each side of the oven
is fi xed with four fi xing
screws. You don’t have
to remove the screws
to remove the oven
linings. Lift each side
panel upwards and
they will slide off the
screws. Then pull them
forwards.
Once the linings are removed, the oven enamel
interior can be cleaned.
Moving your cooker
Switch off the electricity supply.
The cooker is heavy, two people may be
required to move it. The cooker is fi tted with
one roller at the front and two at the back.
There are also two screw down levelling feet
at the front.
The front roller, designed for moving the cooker
can be wound down. The levelling tool that
controls this roller is in the storage drawer
compartment.
Remove the storage drawer (by pulling it
right out and lifting it up slightly) and you
should see the levelling tool.
Your installer may not have left the levelling tool
in place. If not, locate it as shown. If you cannot
fi nd the levelling tool, contact your installer. See
the Installation section of these instructions
where your installer should have written their
contact details.
Turn the levelling tool clockwise, two full
(180°) turns. It will be stiff. The front of the
oven will rise slightly as the roller drops
down.

18

19
supply. Is the cooker supply on at the isolator
switch? Is the clock fl ashing 0.00? If so set it to
the correct time of day. Has the Timer been set
to AUTO by mistake. If AUTO is showing on the
clock display, press the ‘cook period’ button and
reduce any set cooking time showing to 0.00,
with the (+) and (-) buttons. Press the
button
twice.
Is the key symbol (
) showing in the display?
See the Clock section of the instructions for
more information on the key lock feature of the
clock.
Oven not coming on when
automatic cooking
Timer set correctly but oven knob left OFF by
mistake?
Is the key symbol (
) showing in the display?
See the Clock section of the instructions for
more information on the key lock feature of the
clock.
The oven is not cooking evenly
Do not use a tin or tray larger than 340mm x
305mm.
If you are cooking a large item, be prepared to
turn it round during cooking.
If two shelves are used, check that space has
been left for the heat to circulate. When the
baking tray is put into the oven, make sure it is
placed centrally on the shelf.
Check that the door seal is not damaged and
that the door catch adjusted so that the door is
held fi rmly against the seal.
NB the seal is intended to have a gap at the
bottom of the door
A dish of water when placed on the shelf should
be the same depth all over. (For example, if it is
deeper at the back, then the back of the cooker
should be raised up or the front lowered). If the
cooker is not level arrange for your supplier to
level it for you.
Food is cooking too slowly, too
quickly, or burning
Cooking times may differ from your previous
oven. The oven control settings and cooking
times are intended to be used only as a guide.
Individual tastes may require the gas mark to
be altered one gas Mark either way, to get the
results you want. Try cooking at a higher shelf
position and/or higher Mark. Oven cooking times
and temperatures may need to be increased
when other burners are in use. Are the oven
burner ports blocked with spilt food?
Oven temperature getting hotter as
the cooker gets older
If turning the knob down has not worked or only
worked for a short time then you may need
a new thermostat. This should be fi tted by a
service person.
The oven light is not working
The bulb has probably blown. You can buy a
replacement bulb (which is not covered under
the guarantee) from a good electrical shop. Ask
for an Edison screw fi tting 15w 230v lamp, FOR
OVENS. It must be a special bulb, heat resistant
to 300°C.
Open the oven door and remove the Handyrack
(if fi tted) and oven shelves.
Turn off the power supply.
Unscrew the bulb cover by turning anticlockwise.
Unscrew the old bulb. Screw in the new bulb,
screw back the bulb cover. Turn on the electricity
supply and check that the bulb now lights.
Power supply - You think there
may be a problem with it
First check the socket by trying out another
piece of electrical equipment in it.
If that works, replace the fuse in the cooker plug.
Use a 3 amp fuse.
Power failure
In the event of a failure in the electrical supply
the hotplate may be lit using a match.
If there is an installation problem
and I don’t get my original
installer to come back to fix it who
pays?
You do. Service organisations will charge for
their call outs if they are correcting work carried
out by your original installer. It’s in your interest
to track down your original installer.
What cleaning materials are
recommended for the cooker?
See the ‘Cleaning your cooker’ section for
recommended cleaning materials. We do not
recommend Mr. Muscle, as it contains chemicals
that may damage the surfaces of your cooker.

20
off at the mains and before cleaning or carrying
out any maintenance work, unless specifi ed
otherwise in this guide.
All parts of the cooker become hot with use
and will retain heat even after you have
stopped cooking.
Take care when touching cooker, to minimize
the possibility of burns, always be certain that
the controls are in the OFF position and that it is
cool before attempting to clean the cooker. Avoid
touching heating elements.
Use dry oven gloves when applicable -
using damp gloves might result in steam
burns when you touch a hot surface. Never
operate the cooker with wet hands.
Do not use a towel or other bulky cloth in place
of a glove. They might catch fi re if they touch a
hot surface.
Clean with caution. If a wet sponge or cloth
is used to wipe spills on a hot surface,
be careful to avoid steam burns. Some
cleansers can produce noxious fumes if
applied to a hot surface.
Do not use unstable saucepans and position the
handles away from the edge of the hotplate.
The appliance is not intended for unsupervised
use by young children or infi rm persons.
Babies, toddlers and young children should not
be allowed near the cooker at any time. They
should never be allowed to sit or stand on any
part of the appliance. Teach them not to play
with controls or any other part of the cooker.
Never store anything of interest to children in
cabinets above a cooker - children climbing on
the cooker to reach them could be seriously
injured.
Clean only parts listed in this guide.
In the interests of hygiene and safety the cooker
should be kept clean at all times as a build up in
fats and other food stuff could result in a fi re.
Always keep combustible wall coverings or
curtains etc. a safe distance away from your
cooker. For more detail see the Installation
section of these instructions.
General Safety Instructions
In the UK the cooker must be installed by a
CORGI registered engineer.
The installation must be in accordance with the
in stal la tion instructions and comply with the
relevant regulations and also the local gas and
electricity supply companies’ requirements.
If you smell gas
Don’t turn electric switches on or off.
Don’t smoke
Don’t use naked fl ames
Do turn off the gas at the meter or cylinder
Do open doors and windows to get rid of the gas
Call your gas supplier.
If you are using natural gas in the UK ring British
Gas - Trans Co on
0800 111 999
DO NOT SPRAY AEROSOLS IN THE VICINITY
OF THIS APPLIANCE WHILE IT IS IN
OPERATION.
WHERE THIS APPLIANCE IS INSTALLED IN
MARINE CRAFT OR IN CARAVANS, IT SHALL
NOT BE USED AS A SPACE HEATER.
This appliance is designed for domestic
cooking only. Use for any other purpose
could invalidate any warranty or liability
claim.
The use of a gas cooking appliance results in
the production of heat and moisture in the room
in which it is installed. Ensure that the kitchen
is well ventilated: keep natural ventilation holes
open or install a mechanical ventilation device,
(mechanical extractor hood).
Prolonged intensive use of the appliance
may call for additional ventilation, for example
opening a window, or more effective ventilation,
for example increasing the level of mechanical
ventilation where present.
The cooker should be serviced by an Authorised
Person and only approved spare parts used.
Have the installer show you the location of the
cooker control switch. Mark it for easy reference.
Always allow the cooker to cool and then switch
/